Intro
This document collects videogame quick references, including the basic controls, rules and some strategic tips.
It is mostly meant for the casual gamer, so if you are looking for a detailed guide check the links in the "sources" section.
Sources if check out often:
Most text was edited for quicker and easier reading.
arcade
default MAME layout:
            1 2 3
Joystick    4 5 6
to enter the service menu:
some machines req. to hold down the service button (F2 on MAME) for a few sec after the legal stuff faded out, not just tapping it.
NAOMI/NAOMI2 errors:
CAUTION 51 - Player number incorrect
CAUTION 52 - I/O Board serial doesn't match game settings
CAUTION 53 - I/O Board serial doesn't match game settings
CAUTION 54 - Cabinet orientation incorrect
ERROR 03 - Can't read serial number, bioses with this error won't work at all
ERROR 02 - BIOS region incorrect
ERROR 01 - BIOS version or ROM incorrect
Top Speed | Full Throttle
sources:
Big Run
Cisco Heat
controls:
analog = steer
1 = accelerate
2 = brake -> always brake when approaching hard corners, no need to shift gear
3 = shift gears -> stay on LOW only when starting from still and after crashing
basics:
last stage: 5
Chase Bombers
controls:
analog = steer
1 = accelerate
2 = brake
3 = use item (check the icon in the bottom-right. Best item: bowling ball, machine gun -> can be aimed)
4 = gear shift (if using MANUAL)
basics:
- easier car: TRUCKIN' TYPE (lose less speed with collisions)
- you must finish each lap at the position shown in the top-right to proceed to the next lap (3rd place at the final lap).
You can play only 1 race even if you finish 1st.
sources:
Double Dragon
controls:
joystick = move
2x joystick left|right = headbutt attack
1 = kick (slow+powerful attack) -> push heavy objects to trip the enemy
2 = jump (press 1|3 in midair for a flying kick)
3 = punch (fast+weak attack), pick and use weapons (some are single-use throwable) -> approach the enemy from behind and push the Punch button to armlock
1+2 = back kick
3+2 = back elbow
basics:
- getting hit will deplete the blue gauge on the bottom-left. You lose a life when empty.
In easy diff. you lose a life only when falling off a cliff.
- stay away from grounded enemies as they have a greater chance of grabbing you as soon as they get up.
- you can skip some enemies by platforming and by throwing them off cliffs.
- last MISSION: 4
sources:
Double Dragon II: The Revenge
basics:
sources:
Double Dragon 3: The Rosetta Stone
sources:
Operation Wolf
controls:
gun = aim
1 = shoot (hold for autofire)
2 = missile launcher (check the green icons on the right)
basics:
- getting hit or shooting the civilians will deplete the vertical "DAMAGE" bar on the right. Collect "P" drinks to refill.
- Each magazine holds 30 bullets. The game is over if you run out of ammo.
So keep collecting blue magazines from the ground and animals.
- Enemies flash when they are about to shoot. You lose a life unit when hit.
- last stage: AIRPORT (save at least 1 hostage from the knife-wielders for an happy ending) (2 loops)
sources:
Operation Wolf II: Operation Thunderbolt
controls:
gun = aim
1 = shoot (hold for autofire)
2 = missile launcher (check the counter on the bottom-left)
basics:
- getting hit or shooting the civilians will deplete the green "LIFE" units on the bottom-left. Rescue civilians to refill.
- last MISSION: 8
sources:
Line of Fire | Bakudan Yarou
controls:
gun = aim
1 = machine gun
2 = bombs (check the icons in the top-left)
basics:
- getting hit will deplete the blue "LIFE" gauge on the top-left. Shoot medkits to refill
- last MISSION/stage: 8
sources:
Jurassic Park
controls:
gun = aim
1 = shoot
basics:
- getting hit will deplete the red gauge on the bottom-left. Shot medkits to refill.
- last AREA: 4
sources:
Jurassic Park The Lost World
controls:
gun = aim
trigger = shoot
shoot outside screen = reload
basics:
- getting hit and shooting civilians will deplete the medkits on the bottom-left.
Shot a "POWERBAR" for an extra life.
When 0 you can continue without resetting the score.
- last STAGE: 5
sources:
The Ocean Hunter
controls:
gun = aim
trigger = shot (autoreloads, check the bullets icons in the bottom-left)
basics:
- getting hit or shooting humans will deplete the "LIFE" orange orbs on the bottom-left.
Save attacked humans to get 1 life back.
- shoot chests for extra points.
- last stage: Panthalassa, the Sea of Evil (7th)
sources:
Dragon Gun
controls:
gun = aim
1 = shoot (hold for autofire, stop shooting to charge a powerful blast)
2 = bomb (check the counter on the bottom-left)
basics:
- getting hit will deplete the "LIFE" gauge on the bottom-left. Shoot the white bunny for a refill.
The bunny also provides SHIELD and POWER items.
Getting enough POWER items will temp. powerup your main weapon.
- last STAGE: 6
sources:
Beast Busters
controls:
gun = aim
1 = shot (limited ammos, check the magazine counter in the top-left)
2 = bomb (check the counter in the top-left)
basics:
- getting hit will deplete the yellow gauge at the top-left.
Shoot medkits or "E"=Energy drinks to refill.
- last SECTION/stage: 7
sources:
Beast Busters: Second Nightmare
controls:
gun = aim
1 = shot (check the bullets in the bottom-left)
2 = reload
3 = bomb (check the icons in the bottom-left)
basics:
- getting hit will deplete the "LIFE" gauge at the bottom-left.
Shoot medkits to refill.
- last STAGE: 5
sources:
Space Gun
controls:
gun = aim
1 = shoot (hold for autofire, unlitimed ammos but overheats and reduce firerate, check the red gauge on the bottom-left is empty)
2 = select missiles (press 1 to fire and go back to regular shoots, limited, chcek the counters on the bottom-left, shot colored magazines to restock)
pedal = move backward (1P mode), forward (2P mode)
basics:
- getting hit will deplete the "LIFE" gauge on the bottom-left. Collect red or orange capsuels to refill.
- the game is over if you fail to rescue at least 1 hostage at the end of each stage/mission (check the icons on the top)
- last stage: 7 (to get the good ending avoid destroying the ship control station)
sources:
Gun Buster | Operation Gunbuster
controls:
gun = aim (aim at the sides of the screen to turn)
joystick = move forward, backward, strafe
1 = shot
2 = missile (unlimited, but slow to reload)
basics:
- easier char: ??
- getting hit will deplete the red "LIFE" gauge on the bottom-left.
- last STAGE: 8
sources:
Battle Shark
controls:
gun = aim (slow)
trigger = shoot primary weapon+torpedos (limited ammos, check the icons in the bottom-right. Autorefills when not shooting or via blue orbs)
basics:
- the damage you take shows up on your screen, both in a damage gauge and as cracks in the window/glass that is your cross-hair sight.
Shoot red orbs to refill.
- shoot green orbs to get a secondary weapon, which is lost after each stage.
- last ROUND/stage: 10
sources:
Steel Gunner
controls:
gun = aim
1 = fire machine gun
2 = launch a missile (check the "MISSILE" counter in the bottom-left)
basics:
- getting hit will deplete the "LIFE" gauge on the bottom-left.
- last ACT: 4
sources:
Steel Gunner 2
controls:
gun = aim
1 = fire machine gun
2 = launch a missile (check the "MISSILE" counter in the bottom-left)
basics:
- set dipswitch RANK=A for easy difficulty.
- getting hit will deplete the gauge on the bottom-left.
Let hostages pass safely to refill 1 unit.
- last Act: 6
sources:
Virtua Cop
controls:
gun = aim
1 = shoot
2 = reload
basics:
- getting hit will deplete the medkits in the bottom-left.
- all enemies except bosses die with a single hit in any part of their body.
- do not shoot civilians or you will lose a life.
- last stage: 3
sources:
H2Overdrive
sources:
SenXin Aleste | Senjin Aleste
controls:
joystick = move
1 = shot (hold to focus shoot + slow move)
3 = rapid fire
2 = bomb + burst mode (req. the gauge on the top-left >25% full) -> temp. invicibility
4 = blows away nearby enemy projectiles (req. the circular gauge around the player)
basics:
- assist mode automates smart bomb use when it is available.
- the initial ship you chose will be your team captain, and will affect the gameplay:
- Japanese pilot Yuri Kunugi, the energy gained upon picking up P-chips is increased.
- French pilot Ratna Francis heightens the frequency with which various items appear
- Russian-Japanese character Tanya Yaezakura increases firepower
- Chinese heroine Huang Kexin boosts the regeneration speed of downed characters significantly.
- easier ship: TYPE-D (has options that absorb bullets)
- getting hit will lose your current ship and auto-switch to the next one.
Lost ships will start recharging (check their gauges on the bottom)
If there are no ship left you will game over.
Collecting the pickup with rotating letters "A-B-C-D" let you switch your current ship, or speedup the recharge process.
- the "BOMB" pickup acts as an insta-bomb.
- last MISSION/stage: 5
sources:
Mouse Shooter GoGo
controls:
joystick = walk
1 = fire ball
2 = toogle free aim mode
basics:
- to finish each stage you must clear all the balls onscreen.
- if you get hit by a ball you'll have to restart the stage, however you can use the ball you are holding to guard against other balls.
- last STAGE: 30
sources:
Bomb Jack | Bombjack
controls:
joystick = walk
1 = jump (combine with joystick up to jump higher, tap while descending to stay in float in midair)
basics:
- in order to clear each stage, you must collect all 24 bombs that are scattered around the screen.
Unlit bombs are worth 100 points, and lit bombs, which stay lit indefinitely and never explode, are worth 200 points.
- the "P" Power Coin is obtainable after meter filling the Bonus Multiplier 20 segments: unlit bombs by 1, and lit bombs by 2.
Upon spawning, it bounces around the stage.
Collecting it turns enemies into coins temporarily.
- "B"=Bonus and "E"=Extra coins only provides extra points.
- last stage/ROUND: 63
sources:
Kickle Cubicle | Meikyu Jima
controls:
joystick = walk
1 = shoots his freezing breath -> turn small enemies into blocks, damage big enemies
2 = creates or destroy an ice pillar
basics:
- to finish each ROUND, you only have to collect all the bags onscreen, no need to kill all enemies.
Enemies are needed to create platforms and cross gaps.
- last round: ??
sources:
Nitro Ball | Gun Ball
sources:
Ganryu | Musashi Ganryuki
controls:
joystick left/right = walk
1 = attack (hold to charge)
2 = jump (combine with d-pad down to slide), wall jump
3 = grappling hook -> now very useful, can only be swing laterally
basics:
- getting hit will deplete the yellow gauge on the top-left. Collect food to refill.
- weapon powerups can be obtained from boxes and by rescuing ladies (check the icon and counter on the bottom-left).
- last stage/Episode: 5
sources:
Hangzo
controls:
joystick = walk, crouch
1 = melee attack (combine with joystick up for a wider swing)
2 = jump (press again in midair for a swinging rope attack)
3 = projectile attack (unlimited, hold to charge)
1+2 = bomb (check the "JUTSU" counter in the top-left)
basics:
- getting hit will deplete the orange gauge on the top-left. Collect onigiri items to refill.
- last STAGE: 5
sources:
Mobile Suit Gundam
controls:
joystick left|right = walk
2x joystick left|right = dash
joystick back (hold) = defend
joystick up = jump
1 = weak attack
2 = strong attack
Gundam special moves:
qcf + 1|2 = fire guns
quicktap 1|2 = head fire
Mobile Suit Gundam: EX Revue
controls:
joystick left|right = walk
2x joystick left/right = dash
joystick back (hold) = defend
joystick up = jump
1 = attack
2 = jump
Gundam special moves:
Beam rifle: quarter-circle forward + attack
Gundam hammer: half-circle forward + attack
Beam saber: right, down, down-right + attack
Double beam saber: down, down-right, left + attack
sources:
Blazeon | BlaZeon: The Bio-Cyborg Challenge | Blaze On
controls:
joystick = move
1 = normal shot
2 (when in ship form) = shoot the "Tranquilander" projectile that freezes enemy mechas and allows you to take over their forms and abilities by flying over them (some may req. more shots). Each "bio-cyborg" mecha vary in firepower, speed and special attack.
2 (when in mecha form) = use the Special Attack (mech-specific, some have limited uses, check the "SP" gauge on the bootom-left)
basics:
- enemy shots will kill you instantly when in ship form, while you can take some hits when in mecha form before reverting.
- there are no weapon powerups for any form for the regular ship.
- the bosses weak spot is the "blue lens".
- last STAGE: 5 (2 loops)
sources:
Karnov
controls:
joystick = move, crouch, switch item (check the blinking icon on the bottom)
1 = attack
2 = jump (hold to jump higher, press d-pad down in midair to fall faster)
items:
- shoe = run faster and jump higher for a limited period of time.
- bomb = attack enemies (diff. to use), they can also be used to knock down structures, or create new passageways.
- ladder = use to reach shortcuts and out-of-reach items.
- boomerang = powerful weapon. it can be used again if you jump up and catch it on the return.
- clapper / spiky ball = bomb
- shield = 5-hits protection
- wings, mask, scuba gear (special items that can be used only in certain spots)
basics:
- you lose a life with a single hit, unless you have the shield.
- collect 50 "K" items for an extra life.
- collect small red orbs to increase the attack power.
- last STAGE: 9
sources:
Bubble Bobble
controls:
joystick = walk
1 = shoot bubbles -> trap enemies
2 = jump -> you can jump through the bottom opening and respawn at the top of the level in some levels
basics:
- you can't jump on the heads of the enemies like in other jump run games,
you have to trap them inside the bubbles and then pop them open.
If you touch an enemy or rather an enemy touches you, you lose a life.
If you leave an enemy trapped in a bubble for a long time or if the words "HURRY UP" appear, the enemy will turn red from anger and start moving quickly.
- chain breaking: if one bubble in a chain of bubbles is broken, the whole chain breaks. Increase your score by breaking chains.
- riding bubbles: you can jump on bubbles without breaking them by keeping "A" pressed while landing on top of a bubble. This technique is necessary to clear some rounds.
- if you open your mouth to shoot a bubble when you are immediately next to an enemy, you can bite them, a quicker way to defeat them than trapping them in a bubble.
- in some Rounds you will encounter bubbles which give you special powers: Fire bubble, Thunder bubble, Water bubble.
- last level: 100 (you have to collect the 3 hidden magic balls in level 10, 50 and 90 to proceed past level 100, then collect 5 more in levels 115, 135, 145, 155, and 195)
sources:
Don Doko Don
controls:
joystick = move
1 = hammer attack -> stun enemies, then you can grab and thow them with the same button
2 = jump
basics:
- dispose all enemies to advance to the next stage.
- powerups left by enemies include:
- Water Jars = speed increase
- P-Ball, Gray Hammer, Marmalade Jar = incr. power
- Blue Hammer can be thrown at enemies
- Brown Book = stun every enemy on screen
- Gray Book will = freeze every enemy on screen and kill them
- King = freeze every enemy on screen (but without killing them)
- food items only gives extra points.
- last World: 5 (2 loops)
sources:
Puyo Puyo | Puzlow Kids
controls:
...
basics:
- puyos are popped when 4 or more of the same colour are grouped together with horizontal or vertical connections. The tiles which they occupy are then made empty for any puyo above to fall into.
- In endless mode, where the objective is simply to remove puyo and stay in the game, however in story mode and competitive play a greater emphasis is placed on chaining.
Competitive mode also introduces the concept of ojama puyo (aka garbages/nuisance/grey/ghost puyos), which can only be removed if adjecent puyo are popped.
- the competitive games will end when you filling your opponent's grid up to the top with garbages or other puyos, or when your grid is filled.
sources:
Puyo Puyo Tsu | Puyo Puyo 2
basics:
- after inserting a coin and pressing start,
a timer will run for the 2nd player to join.
sources:
Killer Instinct
sources:
Street Fighter II: The World Warrior
controls:
joystick = move, jump, block (opposite direction of the attack)
1 = light kick
2 = medium kick
3 = hard kick
4 = light punch
5 = medium punch
6 = hard punch
basics:
- easier char: BLANKA
- if you cannot avoid an attack, block it. You can still take damage from special moves.
- projectiles are capable of cancelling each other out.
- always grab your opponent when stunned (usually with medium/hard punch), it deals more damage than other attacks.
- when dizzy, shake the cobwebs off by quickly and repeatedly pressing Left and Right on the d-pad and the attack buttons.
- some stages have backdrops at one or both sides of the stage that can be destroyed by throwing or knocking your opponent into them, and you get a few extra points for doing so.
- last BATTLE: 11 M. BISON
sources:
Street Fighter Alpha | Street Fighter Zero
controls:
joystick = walk, jump, crounch, block
X = light punch
Y = medium punch
Z = hard punch
A = light kick
B = medium kick
C = hard kick
Y|Z (some chars also B|C) = grab+throw
L|R = 3x light punch|kick -> easy combos
A+X (if Auto enabled) = super combo 1 (req. the "Super Combo" LEVEL>=1 on the bottom-left)
B+Y (if Auto enabled) = super combo 2 (req. the "Super Combo" LEVEL>=2 on the bottom-left)
C+Z (if Auto enabled) = super combo 3 (req. the "Super Combo" LEVEL>=3 on the bottom-left)
L+R = taunt
basics:
- select "Auto" for easier super combos
- to execute an ALPHA COUNTER, after a counter execute a quartercircle + a punch or kick button (depending on the char).
- last opponent: M.BISON
sources:
Street Fighter Alpha 2 | Street Fighter Zero 2
sources:
Street Fighter Alpha 3 | Street Fighter Zero 3
sources:
Fighting Vipers
controls (TYPE A):
joystick = step, jump
2x d-pad = run
A = Guard
B = Punch
C = Kick
d-pad back + B|C = charged attacks
X | B + A (near enemy) = grab, wall slam
Y | C + A = reverse kick
Z | C + B + A = ?
R | C + B = ?
d-pad up + B | d-pad down + C (when the enemy is floored) = pursuit attack
jump against a wall, A + right = wall spring
tap the A + B + C buttons rapidly when knocked down = air recovery
basics:
- best female char: Candy/Honey (prefer keeping distance from opponent and perform running attacks)
- hammer the A button for a Quick Recovery to a standing position.
- you can pull off a counter attack if after a successful Block you press b + P or b + K, you can use these to interrupt combo attacks if time correctly.
sources:
Last Bronx
controls:
d-pad = walk, crouch, jump
2x d-pad = quickstep (hold to run)
A = Guard, attack cancelling (aka as G-cancel)
B = Punch
C = Kick
d-pad up + B = ground attack
X | B + A = throw, break throws
2x X | B + A = Crouch Slam
Y | C + A = ?
Z | B + A = ?
L | C + B + A = rolling -> evade upper and mid-body attacks
R = special?
basics:
sources:
Virtual On: CyberTroopers | Cyber Troopers Virtual-On
sources:
Sega Rally Championship
sources:
Manx TT Super Bike
controls:
TODO
basics:
- come in 1st place on all 4 challenge tracks to unlock Super bike mode.
sources:
Cabal
controls:
joystick = move, aim
1 = shoot (hold to fix position)
2 = grenade (check the counter in the bottom-left. Shoot the white grenadiers and enemy medics to restock)
3 + joystick left|right = roll -> temp. invicibility during the animation, use to avoid enemy fire
basics:
- to finish each stage you must kill enough enemies until the "ENEMY" bar on the bottom-left is full.
- you die with a single hit and lose a life (check the hearts on the top-left).
- last LEVEL: 5
sources:
Blood Bros
controls:
joystick = move, aim
1 = shoot (hold to fix position)
2 + joystick left|right = roll -> temp. invicibility during the animation, use to avoid enemy fire
3 = dynamite (check the counter in the bottom-left. Shoot the red pigs to restock)
basics:
- to finish each stage you must kill enough enemies until the "FOE" bar on the bottom-left is full.
- you die with a single hit and lose a life (check the blue spheres on the bottom-left).
- last STAGE: 5
sources:
Heated Barrel
controls:
joystick = move, aim
1 = shoot
2 = bomb (check the counter in the bottom-left, Collect barrel icons to restock) -> temp. invicibility
basics:
sources:
NAM-1975
controls:
joystick = move, aim
A = shoot
B = grenade (check the counter in the top-left)
C (hold) = run (combine with lower diagonals to roll -> temp. invincibility)
basics:
- if you save a female hostage from the enemy, the hostage will help you by shooting at enemies, until you die or the end of the area.
- last stage: 51 HOURS INTO OPERATION (6th)
sources:
Dead Angle | Lead Angle
controls:
joystick = move, aim
1 = shoot
2 = grenade (check the counter in the bottom-left)
basics:
- getting hit will deplete the "LIFE" meter on the bottom. Collect medkits to refill.
- each stage has a certain number of baddies to kill displayed by a gauge below the health bar before players confront the tough "boss".
- last stage: "THE BOSS"
sources:
Dynamite Duke
controls:
joystick = move, aim
1 = shoot
2 = punch (hold to charge a bomb-like "Dynamite Punch", req. a "D" icon in the bottom-left)
3 = kick
joystick down, up + 2|3 = uppercut|flying kick
basics:
- getting hit will deplete the "LIFE" gauge on the bottom-right. Collect medkits to refill.
- shoot down any unusual item such as wall panels, drums, or apparatus and hidden items may pop out: special weapons, armor (=halves enemy damage), medkits, gold bars (extra points).
To collect these items simply shot at them.
- punches and kicks are effective only on enemies near you.
- last stage/MISSION: 9
sources:
Riot | Kamniari Kishi Riot
controls:
joystick = move, aim
1 = roll
2 = shoot forward
3 = shoot backward
basics:
- getting hit will deplete the yellow gauge on the top-left. Collect..
- take cover on the scenery while taking down enemies on the opposite side.
- last stage: 6
sources:
Pac-Land
controls:
left|right buttons = walk
2x left|right buttons = run
1 = jump (higher the faster he is running, and the longer you hold down the jump button)
sources:
Shadowland | Shadow Land | Yokai Dochuki
basics:
- colect wallet, money bags and pots to buy powerups from the stores (accessed by climbig tne slopes near the OPEN signs
sources:
Astyanax | Lord of King
controls:
joystick = walk, crouch
1 = attack (more powerful if the green gauge on the bottom-left is full)
2 = jump
3 = bomb-like Thunder attack (req. the icon in the bottom-left, collect gold winged items to restock and powerup)
basics:
- getting hit will deplete the blue squares on the bottom-left. Collect purple spheres to refill.
- red and blue gems only provide extra points.
- last stage: 6
sources:
Night Slashers
sources:
Mega Man: The Power Battle
controls:
joystick = move
1 = fire current weapon (hold to charge)
2 = jump -> use to avoid smaller projectile shots, can also wall jump
joystick down + 2 = slide -> the best way to avoid damage coming from above.
3 = switch weapon
suggested order:
Mega Man 1-2
    Guts Man (Use Mega Buster)
    Ice Man (Use Guts)
    Heat Man (Use Ice)
    Wood Man (Use Heat)
    Crash Man (Use Wood)
    Cut Man (Use Crash)
Mega Man 3-6
    Napalm Man (Use Mega Buster)
    Gemini Man (Use Napalm)
    Gyro Man (Use Gemini)
    Plant Man (Use Gyro)
    Dust Man (Use Plant)
    Magnet Man (Use Dust)
Mega Man 7
    Freeze Man (Use Mega Buster or Junk)
    Slash Man (Use Freeze)
    Shade Man (Use Slash)
    Turbo Man (Use Shade)
    Cloud Man (Use Turbo)
    Junk Man (Use Cloud)
basics:
- best chars: Duo, Megaman
- at a random part of a fight, or after a continue, Eddie (a little red guy) will teleport in and eject a powerup. It has a different effect for each char.
Megaman gets to summon his dog Rush, who will fly into an enemy whenever you fire a fully charged shot (and you can jump on his back to be launched higher).
Protoman gets to have a shield, making him invulnerable to the front.
Bass summons his wolf Treble, who shoots when Bass does.
Duo gets fully invulnerable.
- the Robot Masters' energy meters get increasingly bigger as the game progresses.
- the screen flashes if you hit a robot with the weapon he is weak against.
- the weapons energy is refilled between stages.
sources:
Mega Man: Power Battle 2 | RockMan 2: The Power Fighters - Megaman Anniversary Collection
sources:
Vigilante
controls:
joystick = walk, crouch, grab the nunchaku
joystick up = jump
1 = kick, jumping kick (in midiar) -> higher range and damage than punches but slower
2 = punch -> use when not surrounded with nearby enemies to stun and easily dispose them
basics:
- getting hit will deplete the red "PLAYER" gauge on the top-left. There are no health and time refills items.
- the nunchaku is the only weapon in the game, and it is lost after a single hit.
- you must reach the stage boss and beat him within the time limit, otherwise you lose a life and must restart the stage from the start.
- last stage: 5
sources:
Rush 'N Attack | Green Beret
controls:
joystick = walk, jump, crouch
1 = knife attack
2 = special weapon attack (very limited ammos, check the "POW" counter in the top-right)
basics:
....
sources:
Cadash
sources:
Dragon Unit | Castle of Dragon
sources:
Aliens
controls:
joystick = move, aim
1 = shot
2 = crouching shot | use a bomb (check the counter in the bottom-left)
basics:
- getting hit will deplete the gauge on the top-left. Collect "ENERGY" items to refill.
- the main weapon can be switched via "P" item boxes: MISSILES, 3BULLETS, 3WAY, FLAME.
- last stage: 6
sources:
Alien Storm
controls (in street mode):
joystick = move (doube tap to run)
1 = attack
2 = roll (combine with 1 for a diff. attack)
3 = bomb (req. the red "ENERGY" gauge on the bottom-left. Collect "E" fuel tanks to refill)
basics:
- easier char: SCOOTER (robot)
- getting hit will deplete the blue "LIFE" gauge on the bottom-left.
- there is no jump move in this game, use roll instead to avoid enemies.
- each "MISSION" is split in multiple STAGES: STREET MODE (plays like a beatmeup), RUNNING MODE (endless runner+shmup), SHOOTING MODE (gallery shmup).
- last MISSION: 6
sources:
Alien vs Predator
sources:
Tiger Road | Tora e no Michi
controls:
joystick = move, crouch, climb ladders
1 = attack
2 = jump (hold to jump higher)
basics:
- getting hit will deplete the "PLAYER" blue gauge on the top-left. Collect blue and red flasks to refill. Avoid the orange flask that will cut half of your energy.
- crack open vases, red boxes and statues to obtain weapons, refills and other powerups:
POW=weapon powerup, red scroll=insta-bomb, black pearl=temp. invincibility.
Letters and monk statues only provides extra points.
- best weapons: mace and spiked ball (have a larger range)
- early areas end with a small training session where you gain extra health or learn a new and powerful Tiger Attack (remain active when at full health).
- last STAGE: 5
sources:
Black Tiger
sources:
Saint Dragon: Tenseiryuu | Tensei Ryuu: Saint Dragon
controls:
joystick = move -> although you can't move the tail directly, you can coil it around your ship to block shots or use it to inflict damage on any enemies that it happens to touch.
1 = shot
basics:
- you die with a single hit on the face, unless you have grabbed the red "N" capsule which provides temp. invincibility.
- secondary weapon can be switched by collecting capsules: pulse torpedoes, a laser, bouncing bombs, ring lasers or a T=Turret (aimed with d-pad).
Other tokens can upgrade the dragon's speed ("S"), weapon power, or initiate a "hyper" mode which endows maximum firepower and invulnerability.
- last level: 6
sources:
Bonze Adventure | Jigoku Meguri
controls:
joystick = walk, crouch
1 = fire bubbles -> will bounce on walls, use at your advantage
2 = jump
joystick down + 1 = release a bomb-like special attack blinking bubble (activate on enemy contact and reduce the bubbles size)
basics:
- you die with a single hit, unless you have the aura/halo thing obtained from the angel (1 hit protection), or the Magic Mirror (temp. invicibility).
- the burning candles in the bottom-right represents the stage time left.
- collect colored spheres to switch your bubble attack: red for fire, purple for lightning, green for earth (multidirectional leaves shot).
Collect the same color multiple times to increase the bubbles size (also provide 1+ special attack).
Green talismans will also powerup your bubbles to the max.
- blue talismans only provide bonus points.
- you must find a shinto statue to go to the next stage, sometimes protected by a boss.
- last ROUND/stage: 10
sources:
Wonder Boy | Adventure Island | Takahashi Meijin no Boukenjima
controls:
joystick = move
1 (tap) = attack
1 (hold) = run -> jump higher while running
2 = jump
basics:
- constantly check the vitality meter at the top, which runs down at a steady pace and can only be refilled by collecting fruits.
- touching enemies will kill you instantly, while bumping into rocks only deplete your health.
- eggs appear throughout each stage. In order to obtain the contents they hold, you must crack them open. You can do that two ways. The first is by crashing into them as you run. This will send the egg flying forward, and the contents will pop out. However, if the egg falls into a pit or the water, you won't be able to collect the item. The other way requires that you have a weapon. If you do, you can simply throw your weapon at the egg. The first hit will crack it, and the second hit will break it open where it lies.
- items found by eggs: stone axe, skateboard, milk (=full health refill), flower (=doubles the point value of all the fruits during the stage), fairy = temp. invincibility, eggplant (=health sucker, avoid).
There are also hidden eggs which may contains: fireball (=best weapon, can destroy rocks), milk, key (=spawns a platform leading to a bonus stage), ring (=extra points), +1UP.
- last AREA: 8
sources:
Wonder Boy in Monster Land
controls:
joystick left|right = walk
joystick up = enter doors, climb ladders
1 = attack with your sword
2 = jump
joystick down = use special weapon (check the icon and the counter on left HUD)
basics:
- taking hits from enemies you will lose hearts in the "LIFE" bar on the top-left.
When they are all depleted it's game over.
Collect hearts, visit the inns and the hospitals to restore your LIFE. Some health is also restored after each boss fight.
- an hourglass is continuously draining in the bottom-left. Every time the hourglass runs out of sand, it flips over to start again, and you lose 1 heart.
Collect small hourglasses to refill the sand.
- defeated enemies often drop coins that can be used in shops to purchase new equipment (check the "GOLD" counter in the top-left).
SWORDS, ARMORS, SHIELD, and SHOES are immediately equipped.
Potions auto-refill the LIFE bar when depleted, but only one can be carried at the same time.
Hidden shops have better deals, and you can obtain some equipment for free in some stages.
- best suff to buy: FIRE BALL (auto-aiming special weapon), POTION, ARMORS, SHIELD, SHOES.
- when the bosses die get the golds before the key, or you will lose them.
- last RND.: 12
sources:
Wonder Boy III: Monster Lair
controls:
joystick = move
1 = attack
2 = jump
basics:
- touching enemies will kill you instantly, while their bullets will only deplete your health (check the gauge on the top-left).
Health also keeps decreasing over time in the walking sections, so collect fruits and veggies to refill.
During the flying sections your health will only decrease when hit by an enemy projectile instead.
- some fruits like lemons can be hit multiple times and will explode releasing more health.
- all collected weapons have a very short time limit and will also refill your health, so keep collecting them all while in stages, as they are dropped frequently by enemies.
- the last weapon you have while meeting the stage boss will last until you die, so pick carefully near the end of each stage (e.g. missiles are the best against bosses).
- fairies can be rescued along the way and will reward you with temporary invulnerability or dump large cakes for extra health. Avoid freeing and touching the reapers found in later stages.
- last ROUND: 14
sources:
Valkire no Densetsu | Legend of Valkyrie | Legend of the Walkyrie
controls:
joystick = move
1 (tap) = shoot
1 (hold) = use magic spell (req. the blue bubbles at the bottom. New spells can be obtained from NPCs)
2 = jump (hold for a longer leap)
basics:
- getting hit will deplete the hearts in the bottom-left.
Health is refilled after each stage, but mid-stage health refills are rare.
- destroy chests to get coins, refills and temp. weapon powerups (rare).
- most enemies will leave coins behind when killed.
Exchange these coins for special items with the shops who appears in preset locations (sometimes hidden).
You can only enter each shop once and buy 1 item only.
All purchased weapons with expire after a while, so always get some when you can.
Shops will also give hints about the game.
- find the elderly sorcerer and villagers in stages to learn a new magic spell.
Collect blue bubbles to refill the magic uses.
- a time limit, indicated by an hourglass at the bottom, is also present. The game will be over if the timer is empty.
- last stage: 8
sources:
E.D.F. | Earth Defense Force
controls:
joystick = move
1 = autofire
2 = satellites formation change
basics:
- best weapons: HOMING, LASER
- killing enemies will fill the red experience bar at the bottom-left and increase firepower from "LEV1" up to 5.
Extra satellite formations are activated once you achieve higher levels.
Satellites are invincible, block enemy bullets and are also able to damage by contact.
- when you get hit you lose one blue shield/life at the top-right and the process of leveling up is delayed a little bit.
Acquiring more lives is possible, but only after you reach a power level of 5. When this happens every subsequent filling of the upgrade bar results in an extra shield/life.
- last stage: 6
sources:
Gratia: Second Earth
controls:
joystick = move
1 = fire main weapon
2 = ground missiles (unlimited and more powerful than the main weapon, but with slow reload)
3 = bomb (check the "H" icons in the top-left. Restock by collecting the same icon)
basics:
- the main weapon can be switched and powered up with a color-cycling item: blue=LASER, yellow=wide, red=3-way (best one).
- crystals only provide extra points.
- last stage: GRANDIS (7th) (2 loops)
sources:
Rabbit Punch | Rabio Lepus
controls:
joystick = move
1 = fire main weapon
1 (near enemy or item) = melee punch -> useful with tougher enemies and obstacles blocking your path, but also for cracking open the carrot cans
2 = fire homing MISSILEs (check the icons in the bottom-left)
basics:
- you take damage from touching the scenery and enemies, but you can walk on the ground.
- you must shoot or punch the carrot cans/barrels to release the items, nothing comes out if you just touch or ram into them.
Besides extra MISSILEs and carrots for health there are also money/grey vases (extra points), a tanuki/red raccoon (a generously long period of invincibility) and a yellow ribbon (increases the power and duration of the homing missile attack).
The items comes out with a different trajectory according to which angle the box is hit.
- every life comes with 3 health cells (the "SHIELD" in the bottom-left), so unless you take a carrot to restore an empty cell you'll die on the 3rd hit and get sent back to a previous checkpoint.
The SHIELD is also refilled at the end of each STAGE, but not the missiles.
- your bullets can't be powered up, but the missiles can, doubling in both strength and number after you collect a ribbon.
A lost power ribbon drifts slowly to the left, so try to take it again if you lose it.
- last STAGE: 6 (2 loops)
sources:
Air Buster: Trouble Specialty Raid Unit | Aero Blasters
controls:
joystick = move
1 | 2 (tap) = fire main+secondary weapons (hold for rapid fire)
1 | 2 (hold) = charge the bomb-like "Buster Flash" (unlimited, but has some cool down time, check the small bar in the top-left) -> use when there are a lot of bullets or popcorn enemies on screen
basics:
- powerups are released in groups of 5 items by destroying a chunky orange carrier:
"P" = main weapon powerup, followed by the icons for secondary weapons: "S" = Side fighters (firing straight), "R" = Rear shot, red "M" = straight semi-homing Missiles, green "M" = homing Missiles, "6" = 6-way shot, "H" = revolving gun turret (also provides some shielding), "B" = side Bumpers (absorb bullets, in tunnels to avoid collisions with the walls) and "$" = bonus points.
- best secondary weapons: "6" = 6-way shot, green "M" (homing missiles)
- in the 0-G sections, stay attached to the left border of the screen and press d-pad left to stop drifting quickly.
- last stage: 6 (2 loops)
sources:
Twin Cobra | Kyukyoku Tiger
controls:
joystick = move
1 = shoot
2 = bomb (check the "B" icons on the bottom-left) -> not instant, takes time to deploy
basics:
- collect powerup items released by destroying a green helicopter that slowly fires 3 bullets.
The blue "S" is responsible for increasing firepower, while the colored circle serves as a weapon type switch that cycles in the following order:
red (forward vulcan shot), green (thin laser), blue (spread shot, best one), yellow (4-way cross shot).
- ground stars only provide extra points.
- the BGM does not change when you reach a boss, but the stage will stop scroling.
- last stage: 10 (2 loops)
sources:
Twin Cobra II | Kyuukyoku Tiger II
controls:
dpad = joystick
1 = shoot
2 = bomb (check the icons on the top-right, collect 6+ for HYPER BOMBs)
basics:
- collect cycling colored "P" orbs to switch and powerup your weapon: red=vulcan (initial one), blue=spread, green=laser+missiles.
- best weapon: green THUNDER-CLAW (has a frontal powerful missile which, once it hits a target, has a lock-on effect on the lateral homing missiles)
- enemies partially offscreen won't fire at you.
- last STAGE: 6
sources:
Heavy Unit
controls:
joystick = move
1 = fire main weapon
2 = fire missiles
basics:
- destroy green+grey carrier ships to obtain powerup capsules: "P" =increase weapons power, "S" = Speedups, "E" = Extra lives, "B" = Barriers/shields, and the "T" = Trasform spaceship<->robot.
- while in spaceship form you're able to shoot a spread pattern and drop missiles up and down.
When in robot form firepower consists of a more destructive narrow pattern and homing missiles (best one).
- if you have no barrier you will die in a sigle hit in either forms and restart at the last checkpoint with no powerups.
- last ROUND: 6 (2 loops)
sources:
Legendary Wings | Aresu no Tsubasa
controls:
joystick = move
1 = fire guns
2 (overhead sections only) = fire missiles at the ground
basics:
- collect 2x circles containing the letter "P" to increase your weapon level (up to 5).
Getting hit lowers your weapon level. You will die only when hit at the lowest level.
- each stage is divided into an 4 kinds of sections: Overhead, Danger, Lucky, and Palace.
- DANGER: about a 3rd of the way through the Overhead area, you will encounter a giant head lying on the ground. This head will open its mouth and shoot little whirlwinds at you. If you get hit by one of these, you will be pulled into the "DANGER!" zone, which is a side-scrolling penalty area containing some difficult enemies, including a mini-boss at the end where you fight a bunch of burrowing worms.
- LUCKY: In the Overhead part, once you get past the giant head, you will find many cannons on the ground that can only be destroyed by your missiles. One of the cannons contains the secret entrance to the stage's "Lucky" area, which is a side-scrolling bonus stage with nothing but powerups and bonus prizes. Among these prizes are hearts that give you an extra continue for every one that you collect. If you want to enter this place (and who wouldn't?), shoot as many cannons as possible and touch the whirlwind that appears when one of them explodes.
- Palace: side-scrolling section, ending with the final stage boss.
Before entering the palace you will have to fight a dragon mid-boss.
- last stage: 5
sources:
Lucky & Wild
sources:
Gradius | Nemesis
controls:
joystick = move
1 = shoot
2 = missile
3 = powerup (check the highlighted item in the bottom bar, collect red capsules to switch)
basics:
- you die with a single hit and restart from the latest checkpoint with all the powerups stripped.
- enemies carrying powerups are colored in red.
- best powerups to get (in order): SPEEDUP (only 1), MISSILE, DOUBLE, OPTION (until max), then only "?" (=frontal shield).
Switching to LASER can provide an advantage in some sections.
- options are invincibile to enemy collisions but they won't absorb bullets.
- for every 15 powerup capsules that appear on the screen, the next enemy will deposit a blue capsule instead, which acts as an insta-bomb.
- last stage: 7 (2 loops)
sources:
Gradius II: Gofer no Yabou | Vulcan Venture
controls:
joystick = move
1 = shoot
2 = missile
3 = powerup (check the highlighted item in the bottom bar, collect red capsules to switch)
basics:
- best POWER METER: SPEEDUP, 2-WAY, TAILGUN, RIPPLE, OPTION (Type 4) + frontal SHIELD.
- best powerups to get (in order): SPEEDUP (only 1), MISSILE, LASER, OPTION (until max), then only "?" (=SHIELD).
Switching to DOUBLE can provide an advantage in some sections.
- options are invincibile to enemy collisions but they won't absorb bullets.
When at full stock (4), look out for the stealing scorpion that appear behind you.
Rank raises according to the number of options you activate.
- last STAGE: 9 (2 loops)
sources:
Gradius III
controls:
joystick = move
1 = manual powerup (check the hightighted item in the bottom-left)
2 = shoot
3 = missile
basics:
- easier WEAPON TYPE: C. best shield: A (FORCE FIELD).
- last stage: 10 (2 loops)
sources:
Gradius IV: Fukkatsu
controls:
joystick = move
1 = manual powerup (check the hightighted item in the bottom-left)
2 = shoot
3 = missile
basics:
- easier setup:...
- last stage: 9 (2 loops)
sources:
Salamander | Lifeforce
controls:
joystick = move
1 = shoot
2 = missile
basics:
- differences with Gradius: the checkpoint system is gone, stage orientation alternates between horizontal and vertical and all powerups are acquired with straight icons instead of the powerup bar.
- avoid getting too many speedups.
- last stage: 6 (2 loops)
sources:
Salamander 2
controls:
joystick = move
1 = shoot + missile
2 = turn one option into a homing laser (hold to unleash more options at the same time) -> the sacrificed options will come back to the ship as "option seeds", worth half an option.
basics:
- this sequel ditches symbols for most of the items and adopts alphabet characters, thus making the learning process a tad easier.
"S" stands for speedup and "M" for missile. The main weapons are "L" (laser), "R" (ripple laser) and "T" (twin blade).
The only 2 items with symbols are fortunately self-explanatory: force field and option.
- taking a weapon item of the same type boosts its power for 10S.
- avoid getting too many speedups.
- you cannot have more than 4 options, so turn 1 into a homing laser before getting the 5th.
- last stage: 6 (2 loops)
sources:
controls:
joystick = move
1 = main weapon fire
2 = laser beam (fully consumes the BEAM LEVEL gauge on the lower-left + power down your main weapon) -> use only when necessary
basics:
- collect "Newalones" molecules to powerup the standard shot and fill up the BEAM LEVEL gauge.
- when the beam is used at max level (6), lightning bolts will wipe the screen of bullets and minor enemies (bomb-like effect),
while mid-level beams will only fire in a straightforward fashion.
- collecting Newalone while the beam is discharging will replenish its energy on the fly and keep the beam alive.
- bosses are also able to collect Newalone and deploy their own beams, giving the player enough time to counter attack and create a powerful clash that quickly generates an energy sphere.
"laser duels" will always be against your odds if your power level isn't at 75% or more.
- it's necessary to tap the button 2 during beam duels with bosses.
- last level: 6
sources:
New Zealand Story, The
controls:
joystick = move
1 = fire (quickly tap in midair to hover/fly)
2 = jump
basics:
- your goal is to reach the end of the round, where you will find a cage with one of your kiwi companions.
- your time isn't unlimited. If you are too late on a level, first a "hurry up!" warning appears, then a flying devil angrily holding a clock (to show you that you're late!) starts to chase you.
- when you kill an enemy, he turns into a fruit, and after a sequence of different fruits, the next item will be a powerup, and then the sequence starts all over again.
- you can steal most enemies vehicles if you shot the enemy over it, not the vehicle itself.
Then jump on it and hold I to fly upward and reach higher places.
To get off a vehicle, just ground it and press d-pad down.
Diff. vehicles have diff. speeds, resistance to shots, etc.
- last stage: Mt.Cook
sources:
Renegade | Nekketsu Kouha Kunio-kun
sources:
Space Invaders | Space Invaders DX
sources:
Space Invaders '95 | Akkanvader
sources:
P-47: The Freedom Fighter
sources:
P-47 Aces
sources:
Outfoxies
sources:
Dead Connection
sources:
Thunder Zone | Desert Assault
sources:
Monster Maulers | Kyukyoku Sentai Dadandarn
controls:
joystick = move, crouch, jump
1 = light+quick attack
2 = medium attack
3 = strong+slow attack
basics:
sources:
Insector X | Insector-X | Konchuu Taisen
controls:
joystick = move
1 = fire main weapon
2 = fire current subweapon
basics:
- you can only take a single hit, there are no shield items, and you are sent to a checkpoint after dying.
- there are 2 types of subweapons: anti-air attacks, which pair well with the regular weapon, and anti-ground attacks, which attack below.
Each of the weapon types can be upgraded multiple times, granting different, more powerful attacks.
However, you can only carry either an anti-air or anti-ground weapon.
- last level: 5
sources:
Golden Axe
controls:
joystick = walk
2x joystick = dash
1 = attack
1 (while dashing) = dash attack -> very effective to stun enemies, also good for bosses
2 = jump
1 (in midair) = jump attack
1 + 2 = back attack -> unreliable
3 = magic attack (uses ALL the pots in the bottom-left, the more you have the more powerful the attack will be)
basics:
- easier char: Gilius (the green elf) (has higher range)
- enemies won't attack or charge until they are aligned with you.
- take advantage of pits to quickly dispose enemies.
- throws: in the middle of your combination hits, if you are particularly close to the enemy and push forward and attack into them, you will throw them. It doesn't seem to do much damage though, and you can't throw enemies into each other. The Throw is, however, useful for dodging attacks; for the few frames that you are throwing an enemy, you are immune to outside attacks. It should be noted that you cannot throw Thieves, Beasts, Knights, or Commanders. You can throw most normal-sized enemies and giants.
- you will encounter rideable beasts, each with special moves of their own.
Most of them will be "already taken" by enemies, but you can kicking them off it.
- refills are only provided by hitting small thieves with a bag: blue for magic pots and green for meat (check the health ).
- last STAGE: 9
sources:
Golden Axe: The Revenge of Death Adder
controls:
joystick = walk
2x joystick = dash
1 = attack
2 = jump
1 + 2 = power attack (drains health)
3 = magic attack (uses the blue pots)
basics:
- easier char: ??
- getting hit will deplete the blue gauge on the top-left. Collect food to refill.
- last SCENE/stage: 5
sources:
The Legend of Kage
controls:
joystick = move
joystick up = jump
1 = throw shurikens
2 = sword attack
sources:
DJ Boy | DJ Kid
controls:
joystick = move, aim backward
1 = punch (lower range, fast timing, less damage)
2 = kick (higher range, slow timing, more damage)
1 + 2 = spinning sweep -> attack opponents on both sides of you (weak attack, good only when surrounded)
3 = jump
2 (in midair) = jump kick -> useful against bosses
basics:
- you can take multiple hits before losing a life. Your health is represented by the face icon in the bottom-left.
- find the cat to get extra lives.
- last ROUND: 6
sources:
Thunder Fox | Thunderfox
controls:
joystick = move
joystick down = grab weapons on the ground
1 = melee attack
1 + 2 = jump kick attack -> very effective
2 = jump
2 + joystick up = higher jump + somersault kick -> use against flying enemies
3 = weapon attack (if you have it, check the icon and ammos in the top-left)
basics:
- getting hit will deplete the red bars in the top-left. Collect medkits found in boxes to refill.
- best weapon: flamethrower (short range but lasts longer)
- last stage: 5
sources:
Marvel Land | Talmit's Adventure
controls:
joystick = run, crouch, crawl, push items
1 = jump
2 = use clone attack (if you have it)
items found in chests and stages:
- food, big red "L" (=Lucky) = extra points
- face icon = clone attack: strike out at the enemies by whipping 5 spirits in a straight line (press button 1). Each time a clone hits an enemy, it will disappear.
- skull = kill 1 spirit clone -> avoid
- green dragon wings = jump higher and hover in midair by tapping button 1
- Rally-X Special "S" Flag = 1 extra life
basics:
- kill most enemies by jumping over them.
- you die everytime an enemy touches you, fall in the water, touch the spikes, or run out of TIME.
- you can interact with some stage items by pushing them with the joystick (e.g. move the dustbins to find hidden items inside), or with the clone attack (e.g. the swing connectors).
- last WORLD-AREA: 4-4
sources:
Heavy Barrel
controls:
joystick = move
dial = aim
1 = fire main weapon
2 = throw grenades (check the counter in the top-left)
basics:
- red enemies will drop keys that can be used to open chests for temp. weapon powerups.
Chests contain anything from grenades to extra lives, including pieces of the most powerful weapon in the game: the Heavy Barrel (timed use when completed, check in the bottom-left).
- last mission: 7th
sources:
Gun.Smoke | Gun Smoke
controls:
joystick = move
1 = fire diagonally to the left
2 = fire straight
3 = fire diagonally to the right
basics:
- enemy bullets have a limited range, so instead of dodging try to keep distance from them.
- you die with a single hit when on foot and go back to a checkpoint.
When on the horse you can take multiple hits.
- destroy barrells to find powerups like the boots (=movement speedup), bullets (=bullet speedup), and the rifle (=bullets range).
- the red Capcom yashichi icon will give you an extra life, the blue one temp. invicibility.
The "POW" icon acts as an insta-bomb.
- other rare icons like the star provide extra points.
- last stage: 10
sources:
Terra Cresta
controls:
joystick = move
1 = fire main weapon
2 = temp. switch formation (check the "F" icons in the bottom, collect ship parts to restock) -> reduce the hitbox and increase the firing screen coverage
basics:
- the ship firepower and hits protection can be increased by collecting ships parts, released after shooting the numbered spheres around.
When hit these parts are gradually lost.
sources:
Super Puzzle Fighter II X | Turbo
sources:
Pang | Buster Bros.
controls:
joystick = move, climb ladders
1 = fires ropes
basics:
- don't explode all the large balls at once. Break the balls gradually so you only have a couple of Level 1 balls on the screen instead of lots which makes it harder to survive.
- the gun is the most powerful weapon to get rid of the balls quickly, try not to accidentally run back over one of the ropes when you get one.
- when you activate the clock, this is the quickest way to get rid of the larger balls as they keep splitting on the spot.
- last level: 40
sources:
Magical Drop | Chain Reaction
controls:
TODO
sources:
Money Idol Exchanger | Money Puzzle Exchanger
controls:
TODO
basics:
- in the single player mode, one of 2 characters can be selected who attempt to beat up to 7 opponents.
There is also another single player mode called "Solo Mode". Any char can be played in this mode. The aim in Solo Mode is to continually clear the screen from coins and try to keep the game going for as long as possible.
- the quicker and more efficiently each player clears out their screen, the quicker the other player's screen will fill up. Since filled screens offer the most opportunity for chaining together large combos, the tide can turn very quickly.
sources:
Metro-Cross
controls:
joystick = move -> move to the right to speed up, to the left to slow down
1 = jump
basics:
- to finish a round you must make it to the finish line before the TIME runs out.
- blue cans can be kicked for extra points, or jumped over and crushed to stop the timer for a few seconds (more difficult).
Green special cans and the Skateboard will provide temp. speed boost if collected.
- last ROUND: 32
sources:
Rainbow Islands: The Story of Bubble Bobble 2
controls:
joystick = walk
1 = create a rainbow in front of you -> attack enemies and use as platforms
2 = jump (the longer you hold the jump button down, the higher you will jump. Note that it is possible to jump on top of rainbows without dropping them by holding the jump button down.)
basics:
- the speed of creation, as well as the number of rainbows created, can be improved by collecting yellow and red potions.
Collecting the shoe allows you to run faster. Food only provide extra points.
- the 1st and easiest way to attack with a rainbow is to create one and crush an enemy in your rainbow's path. Killing an enemy in this manner produces a regular vegetable or special item from every 3rd enemy.
The 2nd method of attacking with rainbows involves crushing the enemies by dropping rainbows on top of them. Once created, a rainbow will hover in the air for a temporary period of time. During that time, it is possible to jump on top of the rainbow, or up through the rainbow and cause it to fall to the bottom of the screen. Any enemy that it strikes along the way will be killed. Enemies that are destroyed in this manner produce small diamonds instead of vegetables.
Diamonds come in seven different colors, corresponding to the colors of the rainbow.
The color diamond that appears is determined by the location of where the defeated enemy lands (not by the location where the enemy was crushed.)
If you manage to collect at least one diamond of every color before you fight the boss of an island, you will immediately receive one extra life. In addition, after you fight and defeat the boss of the island, you will obtain a giant diamond whose color corresponds to the number island you are on.
- last WORLD: 10 (7 if you fail to collect all big diamonds in every island)
sources:
Puzzle Bobble | Bust-A-Move
sources:
Galaga | Galaga Arrangement - Namco Classic Collection
sources:
Galaxian
sources:
Rally-X | Rally-X Arrangement - Namco Classic Collection
sources:
Pac Man | Pac-Man | Pac-Man Arrangement - Namco Classic Collection Vol. 2
sources:
Pac-Mania
sources:
Dig Dug | Dig-Dug Arrangement - Namco Classic Collection Vol. 2
controls:
joystick = move, dig tunnels
1 = shoot air pump to inflate monsters
basics:
- to finish a stage you must destroy all the enemies onscreen by inflating them.
Enemies that are full of air, but didn't pop, begin to deflate. They are safe to pass through.
You can also drop rocks on enemies to crush them for extra points, but don't get crushed by the rock as well.
After dropping 2 rocks, a vegetable appears in the center of the screen. Collect it for bonus points.
- when chased by an enemy or a ghost, run toward a rock and turn around it.
- a safe spot to pump enemies is between 2 unconnected galleries with a small wall gap not allowing enemies to pass.
- when the music speeds up, any remaining enemies will try to escape the stage through the left side above ground (though in higher levels, if there are remaining Fygars they will chase after and try to kill you).
If the last enemy escapes, the game will simply proceed to next stage.
- last ROUND/stage: 12 (loops infinitely)
sources:
Dig Dug 2 | Dig-Dug II: Trouble in Paradise
controls:
joystick = move
1 = shoot air pump to inflate monsters
2 = activate the jackhammer -> create cracks in the ground from the pegs. The enemies cannot pass. A separated section of island will fall in to the water, taking enemies, (and possibly you), with it.
basics:
- you must kill every enemy on the island to advance to the next round by exploding or sinking them.
- bonus vegetables appear after you have sunk 3 sections of the island, regardless of their size.
- try to avoid lumps of enemies, and if you're being chased, run over a fault line to gain time.
- last ROUND/stage: 16 (loops infinitely)
sources:
Mappy | Mappy Arrangement - Namco Classic Collection
controls:
joystick = move
1 = open/close doors -> block enemies. Blinking doors will release a wave attack on the same platform.
basics:
- to complete a stage you must collect all the museum items scatterd on the screen.
- you cannot jump, you must drop intro trampolines instead. Also you can only move in midair while ascending, not while descending.
They start out coloured green, and with each successive bounce, they will wear, going through the following coloured progression: green --> blue --> white --> red --> break.
Trampolines reset to green after stepping onto a platform.
- touching an enemy will kills you instantly, unless in midair.
After the "HURRY UP" warning has come into effect, Gosenzo will be summoned, and he is able to kill you even in midair.
- the only way to dispose enemies is by opening blinking doors, or touching a bell.
- last ROUND: 16 (loops infinitely)
sources:
Commando | Senjou no Ookami
controls:
joystick = move, aim
1 = shoot
2 = throw a grenade (only forward) -> bonus items will appear on the ground if you kill particular soldiers with a grenade
basics:
- ladders leading to small underground shelters are scattered throughout the game and are revealed by throwing grenades in specific location on the battlefield.
Here you can find weapon powerups.
- last stage: 8
sources:
Trojan | Tatakai no Banka
controls:
joystick = walk, crouch
joystick up = jump
1 = sword, punch
2 = raise shield -> can block most enemies attack
basics:
- getting hit will deplete the red squares on the "PLAYER" gauge. Collect a winged heart to refill.
These hearts must be discovered by swinging your sword in the correct location. This will make the heart appear, which holds still for a moment, before popping up in to the air slightly and then dropping back down and off the bottom of the screen.
- you can enter pits, where you will usually find a skippable boss and a powerup: a shoe = temp. high jump -> use to exit the pit and attack enemies from above, "P" = attack powerup (permanent until you die), "S" = speedup
- last stage: 6
sources:
BurgerTime | Burger Time
controls:
(limited, check the counter in the ...)
sources:
Gauntlet
controls:
joystick = move
1 = fire weapon
2 = magic (check counter in the top-left)
basics:
- easier char: Questor (green elf)
- to finish a LEVEL you must reach the EXIT before your health runs out.
Health will constantly decrease, even when not moving (check the hearts counter in the top-left). Eat food items to replenish 100 units.
Some food may be destroyed by shots. Potions have a lesser effect when shot.
- search for special potions to permanently increase your hero's abilities.
- to stop monster from spawning you must destroy the generators. These look like squares (for ghosts) or cubes (for all other enemies).
- to open the doors blocking the way you must collect the keys scattered around the stage (you may have to backtrack to find more).
- last LEVEL: 108
sources:
Gauntlet 2
sources:
Elevator Action
controls:
joystick = walk, crouch, climb ladders, move elevators when inside
2 = shoot
1 = jump, kick enemy agents, exit crouch
basics:
- to finish each stage, you must enter all the red doors (not the blue ones), and then reach the ground floor.
- you will die with a single hit, and you can not take a fall of even one floor.
- the enemy can also be squished beneath an elevator just as easily as you can.
- periodically throughout the building there are light fixtures hanging from the ceiling. If one is shot, it will fall, and if it hits an enemy, they will die from it.
- last level: 30
sources:
Rolling Thunder
controls:
joystick = walk, crouch, enter doors -> use to avoid enemies attacks
1 = shoot (you cannot shoot in midair and aim up)
2 = jump (combine with joystick up to jump higher)
joystick up|down + 2 = jump up|drop down platforms -> use to avoid enemies attacks
basics:
- touching an enemy will deplete 1 "LIFE" unit, while an enemy bullet will kill you instantly. There are no health pickups, but your "LIFE" is refilled after each AREA.
- to avoid enemy bullets, crouch, take cover behind the scenery, switch platform with the high jump, enter doors and hold d-pad up to stay inside.
- doors with a "BULLET" sign will refill your pistol ammos (can fire only 1 bullet onscreen), while "ARMS" will refill your machine gun (check the "BULLET" and "MG BLT" counters in the bottom-left).
- last "STORY"/stage: 5 (2 loops)
sources:
Rolling Thunder 2
controls:
joystick = walk, crouch, enter doors -> use to avoid enemies attacks and collect powerups
1 = shoot (you cannot shoot in midair and aim up)
2 = jump (combine with d-pad up to jump higher)
d-pad up|down + 2 = jump up|drop down platforms -> use to avoid enemies attacks and stun them
basics:
- touching or jumping over an enemy will stun them, while their projectiles will deplete the "LIFE" blue health squares on the bottom-left.
Some sign-less doors will provide a "SPECIAL" = 1 health unit or time refill. Health is also refilled after each ROUND.
- to avoid enemy bullets, crouch, take cover behind the scenery, switch platform with the high jump, enter doors and hold d-pad up to stay inside.
- doors with a "BULLET" sign will refill your pistol ammos (check the "i" counter on the bottom-left, when 0 you can only fire 1 bullet onscreen),
while "ARMS" will refill your machine gun (check the arrow counter in the bottom-left).
- last ROUND: 8 (2 loops)
sources:
Alien Syndrome
controls:
joystick = move, aim
1 = shoot
basics:
- you die with a single hit and respawn immediately. You can obtain extra lives via score extends.
- to finish a stage you must find and rescue all the "COMRADE" hostages before the TIME runs out (check the remaining face icons in the bottom-left).
Their positions can be checked by touching the MAP panels.
After rescuing all the hostages, you must go the EXIT door and face the stage boss.
Each boss has a weak spot that must be shot.
- you can also find panels to switch your weapon: L = Laser (best one), F = Flamethrower, FB = Fire Ball (best against bosses), B = Buster.
The "O" panel will provide an option (always take them).
The "?" panel only provide extra points.
The "W" panel will warp you to another section of the current stage.
- try to take out enemies from a distance to avoid being shot. When not possible, take cover behind walls and obstacles.
- last ROUND/stage: 7 (2 loops)
sources:
Kid Niki: Radical Ninja | Kaiketsu Yanchamaru
controls:
joystick = move, crouch
1 = jump
2 = attack
basics:
- you die with a single hit from any enemy.
- bells provide you temp. powerups, while coins only adds extra points.
- each boss die in 5 hits in its weak spot, but you must fre-grab your sword after each hit.
- last ROUND: 8
sources:
Tank Force
controls:
joystick = move
1 = fire
basics:
- destroying enemies will spawn powerups.
However, the enemies which give powerups vary per level and do not look different.
- last round: 36
sources:
City Connection | Cruisin'
controls:
joystick = steer left|right (you cannot stop from moving) -> best way to avoid obstacles
1 = shot cans (check the "OIL" counter in the top-right, collect orange cans on the ground to restock) -> makes vehicles spinning and inoffensive. No effect on cats and spikes.
2 = jump (combine with d-pad up to jump to an higher platform)
basics:
- to complete each stage you must cover with white all the floors.
- if you spend too much time on any one level, spikes will begin to appear out of the ground.
- last scene: Japan (6th)
sources:
Demon Front
controls:
joystick = walk, crouch, aim
1 = shot (hold to charge pet attack. Special weapons have limited ammos, shown by the counter in the bottom-left)
2 = jump
3 = toggle pet shield -> the pet will die after taking some damage
basics:
- easier char: Sara (pet charged attack is homing bubbles)
- you can power up your gun by shooting baddies and collecting skulls.
Your skull meter will fill-up, and power up your gun 2 levels.
- knifing or pet-attacking gains you hearts, which power up your pet up to 9 levels.
Your pet will charge faster, do more damage, and change size as the leves stack.
If you max out your pet, and gain enough hearts for another level, your pet will berserk for a limited time, doing heavy damage.
- last STAGE/ACTION: 6
sources:
Hammerin' Harry | Daiku no Gen San
controls:
joystick = move
joystick down (hold) = crouch -> defend from enemy attacks while stooping
1 = attack (combine with joystick up to strike against airborne or falling obstacles, down o pound the ground and stun all the enemies)
2 = jump
basics:
sources:
Crude Buster | Two Crude Dudes
controls:
joystick = move, crouch, climb ladders
1 = punch, kick
1 (in midair) = jump kick -> stun most enemies
2 = jump
joystick up|down + 2 = climb|drop platforms
joystick lower diag. + 2 = roll
3 = grab objects and enemies (press again to throw, can be combined with a direction)
basics:
- throws and and jump kicks deal more damage than regular melee attacks.
- health refills are provided by a vendor machine found in stages and after beating each stage boss.
Breaking the machine gives you an extra life, but little score and just a little life refill. Not breaking the machine but instead drinking as much coke as possible gives score and health, but no extra life.
- last STAGE: 6
sources:
Asterix
controls:
joystick = move
2x joystick = dash
1 = attack (hold to charge)
2 = jump
basics:
- easier char: Obelix
- getting hit will deploy the red gauge on the top-left. Collect food or kisses from PANACEA to refill.
- collect the powerup from the dog Dogmatix for temp. invicibility + special attack.
- last Act: 7
sources:
The Simpsons
controls:
joystick = move
1 = attack
2 = jump
1 (in midair) = jump attack -> very effective, you can take care of large groups of enemies.
1+2 = power attack (does the most damage, but consumes health)
basics:
- the chars is chosen based on the quarter slot you choose, and they pretty much have the same abilities.
- getting hit will deplete the purple bar on the top-left. Food items will restore health.
Any other kind of item will be a throwable weapon.
- last stage: 8
sources:
Teenage Mutant Ninja Turtles
controls:
joystick = move
1 = jump
2 = attack
1+2 = power attack (consumes health)
basics:
sources:
Gunlock | Rayforce | Layer Section | Galactic Attack
controls:
joystick = move, aim with the crossair -> auto-lock enemies in the background layers until there are free "LASER" slots on the bottom-left
1 = regular SHOT -> attack enemies in the foreground layer
2 = fire the Lock-On LASER -> attack enemies in the background layers, some will fly in the front layer and shot at you, so try to take 'em out before they do
basics:
- powerups are brought by floating harmless carriers or by destroying red-colored enemies.
- the weapons can be powered up by collecting 3x red or 1x yellow triangle items (up to LEVEL 7).
Dying reduces only 1 level of each weapon.
- the original max amount of laser targets is 5, but this can be increased to 8 by collecting green slabs with an "L" on them.
The higher the amount of locked on enemies, the higher the score bonus.
- last AREA: 7
sources:
Mazinger Z
sources:
Air Duel
controls:
joystick = move, aim (helicopter only)
1 (tap) = fire
2 = bomb (can be guided with the joystick) (check the icons at the bottom-left)
basics:
- best aircraft: helicopter (can fire diagonally)
- last stage: 7 (2 loops)
sources:
Air Assault | Fire Barrel
controls:
joystick = move
1 = shoot main weapon and missiles
2 = bomb (check the icons in the bottom-left, collect "B" items to restock)
basics:
- main weapon can be switched from capsules.
4 are available: Balkan gun (=straight, red), Wing gun (=wide, green), graviton laser (=narrow beam, blue) and grenade (=all direction gun, orange).
- missiles include the strait megaton missile ("M" pickup) and a homing missile ("H" pickup).
- last stage: 8 (2 loops)
sources:
Storm Blade
controls:
joystick = move
1 = fire primary + secondary weapons
2 = bomb (check the icons in the bottom-left, collect "B" items to refill)
basics:
- easier ship: Camel AV-8B HARRIER II (has homing missiles when poweredup)
- collect "P" capsules to powerup your weapons (fixed for each char).
- last MISSION/stage: 6 (2 loops)
sources:
Gekirindan Time Travel Shooting
controls:
joystick = move
1 = autofire primary + secondary weapons
2 = bomb (check the "B" icons in the bottom-left)
basics:
- easier ship: TYPE-A (has autolocking lasers primary weapon)
- pickups are released by orange carriers only, not enemies.
- the primary weapon is powered up via "P" capsules, and can switched via "C" capsules between vulcan and laser.
- the secodary weapon can be switched by an icon that cycles between "H" (homing shots), "N" (napalm) and "M" (straight missiles).
- last stage: 5
sources:
Darius
sources:
Darius 2 | Sagaia
controls:
joystick = move
1 = autofire main weapon
2 = autofire missiles
basics:
- the powerups are colored red, green, and blue, which respectively increase the level of the main shot, bombs, and provide a barrier.
- last zone: Z
sources:
Darius Gaiden: Silver Hawk
controls:
joystick = move
1 = fire both main weapon and missiles
2 = black hole bomb -> temp. invincibility
basics:
- weapons are upgraded by taking colored icons that resemble badges:
main weapon (red), missiles (green) and shield (blue).
Dying won't strip you down to a default ship: you lose only 2 levels for the main weapon, while missiles and shield are reset to the latest base power level, which are shown below the score display.
- extra bombs are obtained by taking purple badges, and other extra badges appear when you shoot a specific part of the scenery, including bonus points (black/grey) and a screen wipeout (orange).
- each mid-boss ("captain") has an orb on his body, and by hitting it without killing him you're able to detach the orb. Once detached, get it and the evil creature will fight by your side for a little while.
- last stage: 7 (customizable path)
sources:
Gun Frontier | Gun & Frontier
controls:
joystick = move
1 = fire
2 = bomb (if you have some "BOMB" bullets in the top-left. Collect gold bars on the ground to refill) (the direction the bomb will travel in the opposite direction the current plane's movement)
basics:
- you can touch enemies without taking damage, but bullets will kill you instantly.
- collect 5 coins to powerup the main weapon, gold bars to powerup the bomb.
If the player collects the spinning coin on the gold side, then the player's guns and bomb supply is maximized to full power.
- last round: 6
sources:
Sol Divide
controls:
joystick = move
1 = shoot
2 = melee attack -> prefer to shooting for most big enemies because it also stun them
2, 2, joystick (left for KASHON), 2 = combo melee attack -> incr. the multiplier
1 + 2 = use magic item (consumes the purple magic meter in the top-left)
3 = switch magic item (check the active icon in the top-left)
basics:
- easier char: KASHON the hawkman (has longer reach melee attack)
- best magic: freeze
- melee and magic attacks can damage multiple enemies at once.
- magic efficiency varies according to the enemies you're facing.
- last stage: 8 Hell Island (2nd loop only accessible if you beat the game with a single credit)
sources:
TwinBee | Twin Bee
joystick = move
1 = fire
2 (if you have 1+ arms) = drop ground bombs
basics:
- colliding into an enemy will cause you to lose a life instantly.
If hit by a bullet instead, you will lose the arms and won't be able drop ground bombs.
Getting another bullet without arms will result in a life loss.
When you lose the arms for the very 1st time (per each life), an ambulance will fly down from the top of the screen. If collected will restore the arms.
- bells can be retrieved by shooting the clouds and then be converted to powerups when shot a number of times:
- yellow = bonus points
- white (5s) = double shot. You can only collect this powerup once.
- blue (10s) = increase moving speed
- green (15s) = mirror image power-up: 3 ghost-like ships will follow your every move. Once this powerup is activated, you will no longer receive the red bell.
- red (15s) = barrier. While the barrier is present, you will no longer receive the green bell.
- most ground enemies will yield fruit when destroyed for extra points, but sometimes a special item will appear, such as the star (insta-bomb), a candy (3-way shot) or a milk bottle (extra life).
- last STAGE: 10 (2 loops)
sources:
Bells & Whistles | Detana!! Twinbee
controls:
joystick = move
1 = fire air weapon (hold to charge)
2 = fire gound bombs (partially auto-aiming) -> set turbo on this. Destroy ground bases ASAP to have less bullets onscreen to dodge
basics:
- shoot clouds to reveal hidden bells that change color when shot:
- yellow = extra points
- white = double shot
- blue = speedups (do not take more than 2)
- black = speed down
- green = options -> very useful: incr. fire power, invincible and damage enemies on contact
- red = barrier
- purple = generates 3 tail shields that trace you.
- last stage: 7 (2 loops)
sources:
TwinBee Yahho! | Magical TwinBee!
controls (default):
joystick = move
1 | 2 = shoot + drop bombs to the ground (hold to charge shot)
charge up modes (select after game mode):
- SUPER SHOT = hold the Shoot button and release to fire a stronger shot. The more you charge, the more powerful the shot is.
- SUPER PUNCH = hold the Shoot button and release to shoot out a giant boxing glove. The more you charge, the more punches are thrown. Note: If you lose an arm, you will always punch once.
- SUPER ALLY (best one) = another way to get options, without picking up a green bell and the best charge up in the game. Hold the Shoot button for a while, until TwinBee or WinBee releases an option. You may keep holding it down, until you get 3 options. Hold the Shoot button and release while you have 3 options will fire off your options all over the place, destroying not only air target, but ground targets and some bullets. Also useful when you have barrier.
- SUPER BOMB = hold the Bomb button and release to fire a cluster of bombs, destroying lots of ground enemies.
bell colors:
- yellow = gives points. Point value increases as long as you don't miss a bell.
- blue = speed up
- white = powers up your normal shot
- green = gives options. Get this while you have barrier will remove your barrier.
- red = gives a barrier. Get this while you have options will remove your options.
- pink = repairs arms
basics:
- PRACTICE mode is for beginners and makes it easier to obtain powerups, though it only lasts until the 3rd stage (unless you collect over 50 bells in a row).
NORMAL mode lets you play the whole game, while SPECIAL is the equivalent to a 2nd loop, with higher difficulty and a different color palette for the stages.
- ground powerups are easier to collect than bells.
- last stage: 3 (PRACTICE), 6 (NORMAL)
sources:
Marble Madness
sources:
Arkanoid
controls:
paddle = move
1 = launch ball, fire the lasers
basics:
- to finish a stage you must destroy all the color blocks on the screen.
- Random colored capsules will appear after some blocks are destroied:
- Yellow = "Sticky" paddle; catch the ball |
- "S" orange = slows the speed of the ball down
- "E" dark blue = enlarges the length of paddle
- "B" light blue = splits the ball into 3
- "L" red = lasers -> very useful to finish stages quickly, try to keep it as long as possible
- Grey (rare) = Gives you an extra life
- Pink (rare) = Opens escape route to end round early
Picking a capsule will replace the effect of the previous one collected.
- last ROUND: 36
sources:
Arkanoid 2 | Arkanoid II: Revenge of Doh
sources:
Toki | JuJu Densetsu
controls:
joystick = walk, crouch, aim upward (only when grounded)
1 = shoot
2 = jump
basics:
- attack enemies by either shooting or jumping over them. Jumping also allows you to reach higher platforms and powerups.
- you die with a single hit and restart at the latest checkpoint.
- powerups include: helmet=temp. invincibility, sneakers=walk faster+jump higher, and alternative weapons like a 3-way shot, fire shot, etc.
- food items only provide extra points.
- all powerups wear off after a period of time and you are warned it is about to disappear by a flashing icon on the status bar.
- last STAGE: 6
sources:
Cloud Master | Chuuka Taisen | Monkey King: Master of the Clouds
controls:
joystick = move
1 = primary fire
2 = fire special weapon (if you have it)
basics:
- you die with a single hit, lose all powerups and restart from the latest checkpoint.
- killing wave of enemies will reveal powerup vases, denoted by kanji chars: powerup, speedup, autofire, double powerup and extra life.
- dodge the lightning bolts from the mini-bosses that appear throughout the level and enter the door they leave behind when defeated.
There you have the chance to choose one of 4 available auxiliary weapons, which include rotating walls, directional shots, ball bombs, crawling bombs, exploding bombs and fire versions of a few of them.
These increase in power if you continue to select the same type.
- best special weapon to get: wave shot
- last ROUND: 5
sources:
Mega Twins | Chiki Chiki Boys
controls:
joystick = walk, climb ladders
1 = sword attack (throw a wave after 7 consecutive slashes)
2 = jump, cling on to vertical walls (tap repeadely) -> climb to areas that would otherwise be out of reach
3 = use a "MAGIC BOMBER" (check the red orbs in the bottom-left)
basics:
- chests are scattered throughout the game (some of which are hidden and must be discovered).
The majority of which contain coins, but some of them contain powerups and bonuses such as a pill that replenishes the energy bars.
- collected coins can be spent at the end of each stage in a shop.
You can buy sword (=incr. attack) and shield (=max health) powerups and refill health and bombs (not refilled automatically otherwise).
- last ROUND: 5
sources:
Splatterhouse
controls:
joystick left|right = walk
joystick down = crouch
joystick up|down = grab weapons above|below you
1 = puch (while standing), kick (while crouching), use weapon (some are single use)
2 = jump (press joystick down + 1 in midair for a slide attack move -> difficult to execute, but deals a lot of damage)
basics:
- getting hit will reduce 1 heart from your "LIFE" gauge on the bottom-left. There are no mid-stage refills, health is only refilled when completing a stage.
- last stage: VII (can be confused for "OII")
sources:
Chase HQ | Taito Chase H.Q.
controls:
steering wheel = steer
1 = accelerate
2 = brake
3 = activate boost (check the propeller icons in the bottom-left)
4 = shifter
basics:
- in each mission you must reach the target before the time runs out (check the big counter on the top).
You get a time bonus when you reach him for the 1st time (check the "DISTANCE" counter on the top-right).
- best strategy: use all the boosts to reach he target ASAP, then switch to the lower gear to dodge the traffic easily while attacking.
- last stage: 6 (complete Stage 5 with over 5 million points to proceed to Stage 6. You might have to play the 2nd loop to achieve this)
sources:
S.C.I. - Special Criminal Investigation
Thunder Blade
controls:
Analog stick = move
trottle = speed up|down
1 = fire cannon
2 = fire missiles (slower than cannon)
basics:
- land on the ground to stop moving and easily avoiding some enemies shots.
- last STAGE: 4
sources:
Bonanza Bros.
controls:
joystick = walk
1 = fire gun, open doors, pull levers -> does not kill guards, just knocks them out
2 = jump
basics:
sources:
Outrun | Out Run
controls:
paddle = steer
pedal 1 = accelerate
pedal 2 = brake
gear shifter = gear down|up
basics:
- the objective of the game is to complete the course within a time limit, while avoiding other cars and any objects off the side of the road.
- constantly check the signs for the upcoming turns.
- near the end of each section, the road will split in 2 directions. The left path is easier, the right path more challenging.
- last STAGE: 5th
sources:
Turbo OutRun | Outrun 2
controls:
paddle = steer
1 = gear shift (only in MANUAL mode)
2 = turbo  (check the "OVERHEAT" gauge on the bottom) -> use on straight lanes
pedal 1 = accelerate
pedal 2 = brake -> use only when losing grip
basics:
sources:
Phelios
controls:
joystick = move
1 (tap) = shoot
1 (hold) = charged shot (check the red sword bar on the bottom) -> use often: even the smallest enemies take multiple hits, so that standard shot is of little use
basics:
- getting hit you will lose 1 heart bottom-right.
Health is only restored via "LIFE" pickups, which are rare.
- all the powerups except the OPTIONs are temporary, even the SPEEDUPs.
- last chapter: 7 (ADVANCED), 4 (NOVICE), 7 (EXPERT, unlocked after completing ADVANCED)
sources:
Hang-On
sources:
Super Hang-On
controls:
paddle = steer
pedal 1 = accelerate
pedal 2 = brake
1 (hold) = use turbo boost (when the SPEED meter in the top-right is red)
basics:
- constantly check the signs for the upcoming turns.
sources:
Cotton: Fantastic Night Dreams
controls:
joystick = move
1 = fire main straight shot
1 (hold) = charge the magic bomb attack (check the blinking icon at the bottom-right) (combine with button 2 held for defensive magic/shield) -> temp. invincibility, use only to save lives and against bosses
2 (tap) = drop ground bombs (unlimited, combine with the joystick to change trajectory)
2 (hold) = charge straight fairy melee attack -> use often against stronger enemies, will lock on them if they collide
basics:
- stay away from the edges of the screen, because enemies fly in quickly.
You can touch the scenery without taking damage, but touching enemies and getting crushed will kill you, reducing your current main weapon level.
- the red crystals give you flame magic, and the blue crystals give you lightning magic.
And all the other colors give you "EXP" points towards your next level of the main weapon (check the bar at the bottom-left and the small blue crystals next to it: the more/bigger the crystals the higher the current level is).
Shot the crystals to change their color and make them move forward. Use ground bombs when possible since they are easier to dose.
Always try to get blue crystals (blue magic has longer invincibility time), and orange crystals for EXP. Avoid red crystals (short invincibility time) and yellow crystals (little EXP).
Bigger crystals give more magic items/EXP.
- it's possible to collect more fairies to help you by hitting a certain flying vase with a fairy statue. Extra fairies which will increase your frontal fire and melee attack power.
- last stage: 6
sources:
Burning Force
controls:
joystick = move
joystick up|down (hold) = increase|lower speed (check the green radial meter at the bottom-left, letting go goes back to normal speed)
1 = shoot (hold for slow auto-fire)
2 = fire MISSILEs (check the icons at the bottom)
3 = activate invincibility (after collecting 5 green orbs released by destroying selected ground obstacles, check the yellow dots at the bottom-left)
basics:
- you can bump into most objects harmlessly, which merely slows you down, but does temporarily render you vulnerable to follow-up attacks.
Getting hit will make you lose a life (check the face icons in the bottom-left).
- ground ramps make it possible to "jump" and take the floating powerups during hoverbike levels.
- weapons are changed by collecting the appropriate icon: "W" = Wide shot (best one), "L" = thin Laser, and "Cl" = wave-like Cross-laser.
- there are 2 types of missiles: "H" = Home in on the enemies, and "M" = create a huge explosion on impact.
Each icon provides a stock of 5 missiles.
- no upgrades are to be collected for any of the attack options, and you can't stock more than 5 missiles or 1 invincibility at a time.
- in bonus areas to win an extra life, just collect all 10 stars that appear within the lines of bonus tokens.
- last day: 5th
sources:
Midnight Resistance
controls:
joystick = walk, duck, climb ladders
paddle = rotate aiming
1 = fire
2 = jump
3 = use grenades (check the 2-digits counter in the top-left)
basics:
- collected keys act as currency in between levels to get various weapons, which are held in cases in a storage room.
These weapons have limited ammo (check the 3-digits counter in the top-left), though the default gun is unlimited.
Plus you get so much of it - 500 rounds when you pick it up, an extra 500 if you spring for the bonus pack -
that it's usually more than enough to last you to the next checkpoint.
- best weapon: 3 WAY
- when you get hit, you drop all of your keys and your weapon, but they can be easily recovered when you get back up.
- last stage: 9
sources:
Mercs | Senjou no Ookami II
controls:
joystick = move, aim
1 = fire your gun
2 = bomb (check the "M" counter on the bottom-left)
basics:
- getting hit will deplete the green gauge on the bottom-left. Grab food and first aid kits to refill.
Health a bombs are also refilled after each mission/stage.
- items are found inside crates when shot open: weapons, food, first aid kit, Life-UP = incr. max LIFE, orange "POW" = weapon powerup, "M" suitcase = bomb restock.
- last MISSION: 7
sources:
Legend of Hero Tonma
controls:
joystick = move, crouch
1 = shoot
2 = jump (hold to jump higher, combine with joystick up in midair to descend slowly and cross longer gaps)
2 + joystick down = drop down platforms
basics:
- you can jump on top of most enemies to stun and bounce off them.
- the main shot can be increased by collecting "P" orbs.
Clear spheres with an icon inside provide secondary fire (best one: red fireball=homing).
"B" orbs gives protective blue spheres rotating around you and absorbing a projectile each.
"K" books are insta-bombs.
Money bags and chests only contain coins for extra points.
- in some areas you need to pick a key to open a wall and proceed.
- some special items appear later in the game, such as scrolls (reveal hidden passageways) and magic books (kill all enemies on screen).
- last stage: CASTLE (7th)
sources:
Ninja Spirit | Saigou no Nindou
controls:
joystick = walk, crouch
1 = switch weapon (check the icon at the bottom)
2 = attack with current weapon
3 = jump (hold for higher jumps, stick to ceilings)
basics:
- you die with a single hit and restart at the latest checkpoint.
- orange ninjas are carrying powerups: flashing red = weapon powerup, purple = bomb, blue = gives you a shadow alter-ego (up to 2), yellow = temp. protective fire shield.
- best weapons: chain sickle (long range and can absorb bullets), bombs (most powerful, use with stronger enemies).
- last stage: 7
sources:
Liquid Kids | Mizubaku Daibouken
controls:
joystick = move
1 = throw water bombs -> they travel in an arc, bounce, and then explode in a water stream
1 (hold) = charge water bomb (the water will flow further)
2 = jump
basics:
- throw water bombs at enemies to freeze and damage them.
Once soaked, the enemies can then be kicked and destroyed completely.
Enemies left unkicked however will dry out and recover after a short period of time.
Small plants also appear on certain levels which can be "watered", causing them to grow and creating new platforms.
- whenever you lose a life or finish a stage, your speed and weapon status are reset.
- take the train icon to speedup your movements. Avoid taking too many, or use piggy icons to slow down.
- every time you beat a boss, 2 doors open and you have to choose a branching path.
The one on the right takes to an harder stage of the next area (except the last round).
- last round: 7-4.
sources:
Forgotten Worlds | Lost Worlds
controls:
joystick = move
padde = aim, rotate satellite position (when not firing)
1 = shot
1 (tap rapidly) = "megacrush" bomb attack (consumes health)
basics:
- use the satellite to absorb bullets and damage enemies by contact (very effective, expecially against bosses' weak spot).
- collect blue "ZENNY" coins left by enemies to buy stuff in a SHOP that usually appear half-way through each level (check the counter in the top-left).
- best items to buy: medkit (=VITALITY refill), potion (= extra life), heart (=VITALITY increase), missile (homing satellite weapon), primary weapon powerup (3 levels).
- moving speed can also be switched in the SHOP by purchasing a pendant-like item (3 levels), although the default one is already pretty fast.
- taking hits will deplete the blue VITALITY bar on the bottom-left, unless you are wearing an armor. It can be replenished by purchasing medkits and via "Pow" pickups. It is NOT refilled at the end of each stage.
When the bar is depleted the game is over, unless you have a potion left.
- some items can also be found hidden in the stage scenery: strawberry (=extra points), barrel (+3000 zenny), star sword (incr. max VITALITY), Pow (+32 VITALITY), armor.
- last stage: 9
sources:
Demon's World | Horror Story
controls:
joystick = move, crouch
1 = shoot
2 = jump (press again in midair to double-jump)
basics:
- you can kill most enemies by jumping and shooting at them.
Jumping is more risky, but provides extra points and allows you to stay in midair longer.
- you can switch your weapon by picking flying boxes with a colored symbol inside. The best weapon is "3" = 3-way shot.
- collect 3 "P" items dropped by enemies to get a SHIELD for 1-hit protection (check the "Ps" in the top-left).
- you die with a single hit, unless you have the SHIELD.
- small hearts only provides extra points.
- last ROUND: 7
sources:
Dynasty Wars | Tenchi wo Kurau
controls:
joystick = move
1 = attack left
2 = attack right
3 = "tactics" bomb attack (consumes health)
basics:
- completing stages and collecting yellow orbs increase the experience points of the player in order to level-up, where he gains more vitality and use stronger weapons.
- for every 3 blue orbs collected, the player's weapon improves, depending on his current level range.
- ingame treasure increases player score, and food packs replenish vitality.
- last round: 8
sources:
Athena
controls:
joystick = move, squat, climb vines
1 = jump
2 = attack with current weapon
basics:
- jumping ability improves with the Shoes of Icarus. After collecting them, her jumps repeat in a three jump pattern. The 1st jump will be a small jump. The 2nd jump will be a higher jump. The 3rd jump will be a high jump that travels much farther.
- you can gain offensive power by collecting weapons from defeated enemies and by breaking blocks.
Athena needs a weapon to break blocks, and not all weapons are capable of breaking blocks.
Weapons that can break blocks are: hammer, morning star, red sword.
- you can gain defensive power by collecting armor, helmets, and shields from broken blocks.
It is possible to lose these pieces of armor if the enemy breaks them. Collect mirrors to improve the durability of her armor.
equipment colors from weakest to strongest: green, blue, yellow, gold.
- last world: World of Labyrinth
sources:
Pu-Li-Ru-La | PuLiRuLa
controls:
joystick = move
1 = attack
2 = jump
joystick down|forward + 2 = wind-up attack (does a bit more damage and has better reach)
3 = use an elemental attacks (if you have it, check the cane icons in "MAGIC" meter at the top)
basics:
- getting hit will deplete the yellow bars at the top-left.
- last round: 6
sources:
X-Multiply
controls:
joystick = move
1 = shoot
basics:
- the 1st powerup collected will only activate the tentacles, but after the 2nd one you'll start to take advantage of their abilities according to a simple color code: red (lasers), blue (homing missiles) and yellow (inverted directional shots).
Since there's no need to stick to the same item to upgrade your firepower just take whatever comes your way and be happy.
- other items available consist of speed-up (S), speed-down (inverted "S"), ground bomb/missile (B) and extra life (1UP).
- the tentacles absorb bullets and greatly damage enemies on contact. These tentacles bounce about gracefully as you move, resting in a vertical alignment if you stop moving.
To easily clean the bullets around your ship, make quick left-right movements.
- last STAGE: 7 (2 loops)
sources:
Strider
controls:
joystick left|right = walk (hold to run)
1 = sword attack
2 = jump (cannot change direction midair)
2 + joystick down = slide attack -> risky, avoid
basics:
- jumping towards a wall or ceiling will cause Strider to take out his scythe and grab ahold of the wall/ceiling with it.
This causes you to hang onto surfaces. Moving left/right/up/down is possible while hanging/climbing, as is attacking.
- collect kanji items to replenish and increase your health (check the rects at the top-left)
- last stage: 5
sources:
Altered Beast | Juuouki
controls:
joystick = walk, crouch
1 = punch
2 = kick (has better range than punch)
3 = jump (hold to jump higher)
joystick down + 2 = upward kick -> not very useful
1 (in beast form) = projectile attack
2 (in beast form) = full-body attack
basics:
- white 2-headed wolfs release Spirit Balls, a powerup which increases your strength.
Collecting 3 Spirit Balls turn you into a different beast each stage. Each beast has its own abilities.
After becoming a beast, you can face the end-level boss, though the boss will also appear regardless of whether or not you are transformed if you take too long to complete the level.
Upon the boss's defeat, Neff appears and removes the transformation orbs.
- there is no way to regain health, or earn additional lives, so, outside the end of game bonus that refills your life after a loop.
- last stage: 5 (loops from Normal->Hard->Hardest then loops on Hardest difficulty indefinitely)
sources:
Shinobi
controls:
joystick left|right = move
joystick down = crouch -> good to avoid projectiles
joystick down + left|right = squat
1 = attack
2 = jump
joystick up|down = jump/drop platform
3 = use ninja magic (only once per mission)
basics:
- you must rescue all hostages to exit a level (check the counter of the hostages left in the bottom-left).
If you are killed, all hostages rescued will still be recorded as rescued.
- rescuing certain hostages will grant you an attack upgrade.
- try to take out enemies 1-by-1. Don't evade them as they will follow you around.
- you can bump into most enemies without harm and you can only be killed when hit by an enemy's attack, a projectile or fall into a pit.
- extra lives are awarded by achieving certain scores, completing the bonus round, or when rescuing a special hostage.
- all bosses take 8 hits to defeat. Of course, you will have to hit them in the right place for that hit to register.
- last mission: 5
sources:
Ghosts 'n Goblins | MakaiMura
controls:
joystick = walk, crouch
1 = jump
2 = attack
basics:
- best weapon: dagger/knife
- once acquired, a weapon cannot be dropped until a new weapon is found. This means that picking up a lousy weapon by accident is a mistake that could haunt you for levels.
- last stage: 6 (2 loops)
sources:
Ghouls 'n Ghosts | Daimakaimura
controls:
joystick = walk, aim
2 = jump
1 = weapon attack (hold when you have the golden armor until the red bar at the bottom-left is fully charged for a magic attack, diff. for each weapon)
basics:
- hidden treasure chests will appear by jumping in certain spots. By firing the weapon at the chest, you may uncover new weapons, gold armor or an evil magician that changes Arthur into an elderly man or a helpless duck.
- once acquired, a weapon cannot be dropped until a new weapon is found. This means that picking up a lousy weapon by accident is a mistake that could haunt you for levels.
- best weapon: dagger/knife (faster firing rate)
- last stage: 6 (2 loops, to beat the final boss you must collect the special weapon in the 3rd chest of level 5-2)
sources:
The King of Dragons
controls:
joystick = walk
1 = attack
2 = jump
1+2 = magic attack (consume health, use only when necessary)
joystick opposite direction to the attack = raise shield
basics:
- best beginner chars: CLERIC (good defense, his level can advance quickly)
- getting hit will deploy the red+yellow gauge on the bottom-left. Collect food to restore your health.
Gold and gems only provide extra points.
- the score in the top-left acts as "EP"=Experience Points, leveling up when reaching certain milestones and increased their life meter.
- hit flying magic crystals/orbs for an instant bomb. They won't disappear if not used immediately, and they can be moved forward in the stage.
- last STAGE: 16
sources:
Magic Sword
controls:
joystick = walk, crouch
1 = attack with your weapon and the ally (more powerful when the colored gauge on the bottom-left is fully charged)
2 = jump (hold up while jumping to get a higher jump, hold down to drop down platforms)
1+2 = "Zenidyne" bomb attack (unlimited uses but cost some health, check the red slots and the blue lives counter on the bottom-left) -> temp. invincibility, use when about to get hit to reduce damage
basics:
- you lose health/VITALITY automatically, though the rate depends on the difficulty setting (check the red bars on the bottom-left).
As a result, you need to keep driving forward and grab restorative food items. Health is also refilled after each boss depending of the SCORE (unused keys provides extra points).
- destroy treasure chests to find various powerups for you and your ally.
Avoid mushrooms as they poison you for a short while, making it impossible to attack, and the scissors that will make you lose your ally.
- enemies will only drop coins for extra SCORE.
- you need to collect different keys to open the locked doors (check the counters in the bottom-right).
While opening regular doors, enemies can still move and attack you. But they won't damage you while opening doors leading to an upper floor.
- there are 8 allies in the game locked inside doors. Each ally is good or bad for a situation.
Also, your allies level up when you get a red heart, or collect the same ally another time.
Non-magical allies will attack when you attack regardless of the status of the magic meter.
- when you find a fairy egg, a fairy comes and drops food for you.
- after beating a boss, you'll be rewarded with a new, more powerful weapon.
When you take a hit, you'll drop it and need to pick it back up again. If you leave the floor without retrieving it, it's lost, and you'll be in a weakened state until you beat the next boss.
- last FLOOR: 51 (select "NO" after beating the final boss for the good ending)
sources:
Knights of the Round
controls:
joystick = move
1 = attack
1 + joystick forward = slow+strong attack
1 + joystick back (hold) (max 2s) = guard (only from the direction he is facing)
joystick back (before being hit) = guard (only from the direction he is facing)
2 = jump, mount horse
joystick back + 2 = backstep ("Emergency Retreat")
1 + 2 = desperation attack (consumes health)
controls (on horse):
2x joystick forward = dash (can stomp enemies)
1, joystick forward, 1 = slow+strong attack
2 = change direction
1+2 = Horse Stampede
basics:
- best char: Percival (can run, and do a super strong attack while running)
- kill enemies and destroy barrels to get pickups, which all gives you points.
When you reach certain scores you will level up and become stronger (check the "L 1 NEXT/" label in the top-left).
- to gain levels faster, hit a pickup multiple times. This will break it up into pieces which you can then collect with a greater overall point average.
- getting hit will deplete the red bar on the top-left. Collect food to refill. Health is also refilled when you level up.
- colored crystal orbs on small pedestals act as a insta-bomb.
- the knight chess piece will call the horse, with you can mount right away. Unfortunately it is not very useful.
- last STAGE: 7
sources:
Mortal Kombat
sources:
Mortal Kombat 2
sources:
Darkstalkers: The Night Warriors | Vampire: The Night Warriors
controls:
joystick left/right = move
2x joystick left/right = dash, backstep
joystick up = jump
joystick down = crouch
joystick opposite to opponent = block
1 = light punch
2 = medium punch
3 = strong punch
2|3 + joystick toward|away to the opponent (near opponent) = throw
4 = light kick
5 = medium kick
6 = strong kick
up + any kick (after knocking down your opponent) = pursuit attack
Special Moves (more powerful if the Special meter is full):
- Morrigan:
- quarter circle from down to forward = Soul Fist
- jump, quarter circle from up to forward = Air Soul Fist
...
basics:
sources:
Night Warriors | Vampire Hunter - Darkstalkers' Revenge | Darkstalkers 2
controls:
joystick left|right = move, jump, crouch (tap to quick recover, escape grabs)
2x joystick left|right = dash, backdash
1 = light kick
2 = medium kick
3 = hard kick
4 = light punch
5 = medium punch
6 = hard punch
joystick away from opponent | B (tap when attacked) = block (even in midair)
joystick toward the opponent + medium|hard attack (punch or kick depending on char) = grab+throw
joystick up + kick (when opponent is knocked down) = pursuit attack
basics:
- best beginner chars: FELICIA, MORRIGAN
- select AUTO GUARD for a limited number of autoguards.
- when the "Special" meter below the HP bar is filled special attacks will be enhanced (ES and EX moves, more powerful according to the counter that appear).
Special attacks are usually triggered with quarter joystick movements + an attack button (diff. for each char).
- while blocking, if you quickly perform a special move you will GUARD REVERSAL.
Even when knocked down, you can quickly surprise your opponent with a swift REVERSAL move by inputting your special attack right as your character gets up to counterattack the vulnerable opponent!
- last opponent: Pyron
sources:
Vampire Savior: The Lord of Vampire | Darkstalkers 3
controls:
TODO
sources:
Super Street Fighter 2 Turbo | Super Street Fighter II X: Grand Master Challenge
controls:
joystick left|right = move
joystick up = jump -> you can never block while in the air, jumping is a risky move in general and should be avoided.
joystick down = crouch
joystick opposite to opponent = block
1 = light punch
2 = medium punch
3 = strong punch
3 + joystick toward to the opponent (near opponent) = throw
3 + joystick opposite to the opponent (while being thrown) = soften throw
4 = light kick
5 = medium kick
6 = strong kick
special moves (cause damage even if they get blocked):
- Ryu: quarter-circle from down to towards + any punch button = Hadouken
- Chun-Li: back (charge 2 sec.), forward + any punch = Kikouken
- Honda: ...
super moves (usually activated by inputting 2 times the special moves):
- Ryu: ...
- Chun-Li: back (charge 2 sec.), forward, back, forward + any kick = Kikouken
- Honda: ...
basics:
- best beginner chars: Honda, Chun Li
- in addition to the health bar shown at the top of the screen, each player has a super meter at the bottom.
As the player attacks and damages the opponent, and as the player takes damage from the opponent, the super meter fills up incrementally.
When the super meter fills to capacity, the player is given access to a Super Move.
- if you cannot avoid an attack, block it. You can still take damage from special moves.
- projectiles are capable of cancelling each other out.
- always grab your opponent when stunned (usually with medium/hard punch), it deals more damage than other attacks.
- when dizzy, shake the cobwebs off by quickly and repeatedly pressing Left and Right on the joystick and the attack buttons.
- some stages have backdrops at one or both sides of the stage that can be destroyed by throwing or knocking your opponent into them, and you get a few extra points for doing so.
- last BATTLE: 11 M. BISON
sources:
Fighter's History
controls:
joystick = move, jump, block (opposite direction of the attack)
1 = light kick
2 = medium kick
3 = hard kick
4 = light punch
5 = medium punch
6 = hard punch
basics:
- easier chars: RAY, FEILIN, RYOKO
- every character has their own weak point (usually a piece of clothing).
This weak point will begin to flash once it has been struck a few times.
Once it flashes, the next successful strike to that area will cause that item to pop off,
and in the process, causing the char to become dizzied.
A char can only be dizzied once per round.
- last opponent in CPU BATTLE: KARNOV
sources:
Karnov's Revenge | Fighter's History Dynamite
controls:
TODO
sources:
Final Fight
controls:
joystick = walk, grab enemy
1 = attack, pick up, throw
2 = jump
2, 1 = jump attack (stun enemies)
2, 1 + joystick down = alt. jump attack (stun enemies)
1 + 2 = spinning/desperation attack -> if it hits someone consumes health, use only when surrounded
basics:
- easier char: HAGGAR (more powerful, can do the Pile Driver grab by pressing 1 + 2 while grabbing an enemy)
- getting hit will deplete the yellow gauge on the top-left. Pick up food to restore your health,
- weapons are dropped when hit or the scene ends.
- other items like jewels only provide extra points.
- last ROUND: UP TOWN (5th)
sources:
Sunset Riders
controls:
joystick = move, crouch, aim
1 = shoot
2 = jump
joystick up = enter doors -> obtain powerups and refills
joystick down + left|right + jump = slide -> avoid enemy bullets
joystick up|down + 2 = jump and climb|drop to upper|lower platforms -> avoid enemy bullets
basics:
- easier chars: BOB and CORMANO (have a shotgun that fires 3 bullets at a time which spread)
- collect silver and gold stars to increase your fire power.
- you lose a life with a single hit and lose all your powerups.
- the Golden Heart will give you an extra life.
The golds and the chicken only provides extra points.
- last stage: 8
sources:
Undercover Cops
controls:
joystick = move
2x joystick = dash
2x joystick, 1 = dash charge
2x joystick, 2 = dash grab
1 = attack
2 = jump
2, 1 = air attack
1+2 = desperation attack (consumes some health)
basics:
- easier char: Matt / MATT
- getting hit will deplete the green health gauge on the top-left.
Collect food and animals to refill. Some health is also refilled after each stage depending on your score.
- last stage: 5
sources:
Alex Kidd: The Lost Stars
controls:
joystick = move
1 = jump
2 = fire (if you have the "SHOT" powerup)
basics:
- never touch enemies, or you will lose a life.
- last level: 14
sources:
Dragon Blaze
controls:
joystick = move
A (tap) = shoot
A (hold) = charge magic attack (auto-refills over time, check the magic meter at the bottom-left)
B = bomb (check the counter in the bottom-left, next to the magic meter)
C = "d-shot" (=Dragon Shot) melee attack (more powerful that regular shots, different if on the dragon or not) + release dragon (press again to call dragon back)
basics:
- easier char: Rob (has wide shot)
- when touched by enemies you only level down your weapon, while enemy shots kills you instantly.
- the hitbox location corresponds to the character's head when mounted, centered when dismounted.
- last stage: 7 (2 loops)
sources:
Dragon Spirit
controls:
joystick = move
1 = air shot
2 = ground shot
basics:
- each life has 3 health cells (check the LIFE bar at the bottom-left), but there are no health refills, even at the end of each stage.
- destroying colored eggs on the ground or airborne blinking enemies will release orbs that float towards you:
- blue = extra head + makes your dragon bigger
- red = collect 3 to increase FIRE power (check the "FIRE" bar at the bottom-right)
- purple heart = collect 3 for an extra life (check the egg status beside the life count on the bottom-left corner)
- black skull = lose 1 head/level (avoid)
- yellow = speedup
Other items in clear/silver orbs are active until you take a hit:
- torch = increase firing rate
- W = wide fire
- homing missiles
...
- last AREA: 8
sources:
Dragon Saber: After Story of Dragon Spirit
controls:
jotstick = move
1 = air shot (stop shooting to charge shot)
2 = ground shot
basics:
- destroying colored eggs on the ground or blinking enemies will release orbs that float towards you:
- red = increase the air shot power
- blue = get extra head for a wider shot (up to 3). You lose any alt. weapon you have when collected.
- orange, green, black, silver = alt. weapons (also alter the charged shot)
- more collectable orbs:
- small dragon = size shink (until hit)
- heart = collect 3 for an extra life (check the egg hatching icon on the bottom-left)
- Power Wing (purple) = temp. invincibility
- jewel = extra points
- skull = damage, avoid
- yellow = speedup
- last STAGE: 9
sources:
Aero Fighters | Sonic Wings
controls:
joystick = move
1 = fire
2 = bomb (check the "B" icons in the bottom-left) -> temp. invincibility
basics:
- all the planes have different weapons, bombs and speeds.
There is no way to switch weapon ingame via powerups.
- easier plane: Japanese FSX (has homing missiles)
- last stage: 7 (the first 3 stages are shuffled and the last 4 are fixed) (2 loops)
sources:
Image Fight | ImageFight
controls:
joystick = move
1 = shoot (set SHOT MODE=AUTO SHOT for autofire)
2 = switch speed (check the 4 numbers at the bottom) -> the thrusters on the back exhaust a large blue flame that can damage enemies
1+2 = frontal pods melee attack -> powerful, use often
basics:
- a single hit will send you back to an early checkpoint. Touching the scenery will also count as a hit.
- from powerup containers, you can grab pods, colored red or blue, which are positioned around your craft.
Blue orbs only fire upwards, while red pods are aimed in the opposite direction you're moving in (more useful).
These pods cycle colors when revealed, so you can pick and choose how to equip yourself.
You can equip 3 at a time, and mix and match the colors, prioritizing whether you want a powerful forward firing attack or a more versatile offense.
Catch: if you have 3 pods and grab 1 more, it will change all of them to the selected color, rather than just one.
- the 2nd type of powerup is a frontal attachment that gives you extra firepower such as spread patterns, lasers, side shots, missiles, etc..
These attachments are destroyed when hit and can only be replaced for a new one if you get rid of the attachment you're carrying.
- last LEVEL/MISSION: 5+3 (the first 5 missions are called "Combat Simulation Stages" and the last 3 missions are "Real Combat Stages")
sources:
Parodius Da! | Parodius Da! Shinwa kara Owarai he | Parodius: Non-Sense Fantasy
controls (MANUAL):
joystick = move
1 = pick current powerup (check the red square on the bottom-left)
2 = fire main weapon
3 = fire missiles, use bell power (check the icon in the bottom-right)
bells colors:
- blue = destroys all enemies on screen within the radius of the ensuing explosion.
- green = enlarges your ship and makes you temporarily invulnerable to enemy attacks. You can also go through walls during this period, but cannot shoot at anything.
- white = gives you an air horn that yells phrases at enemies. Anything that is within the path of the phrase is destroyed.
- red = creates a mini vertical barrier in front of your ship that destroys anything colliding with it.
basics:
- easier char: TWIN BEE
- last stage: 11 (2 loops)
sources:
Gokujou Parodius | Fantastic Journey
controls:
joystick = move
1 = manual power up
2 = shoot + missile (hold for auto fire)
3 = use bell power (if you have an icon in the box on the bottom-left)
bells powers:
- blue = powerful single bomb
- green = instant inflate + invincibility
- white = concentrated shot of random messages in kanji
- brown = 3x vertical energy bars
- purple = turn all popcorn enemies into powerups/bells
basics:
- easier char: KOITSU (blue little stick man flying on paper airplanes)
- last stage: 7
sources:
Sexy Parodius
controls:
joystick = move
1 = shoot
2 = missile
3 = powerup (in MANUAL and SEMI-AUTO modes only)
basics:
- best char: MAMBO (blue fish) (has search laser)
- choose AUTO powerup for auto-respawn/disable checkpoints.
- sometimes the next stage variation ("A" or "B") is determined whenever you meet the requirements of the extra challenge.
- last mission: 8 (finish before the timer runs out to see the good ending)
sources:
After Burner II
controls:
Analog stick = move, aim
1 = fire machinegun (unlimited)
2 = fire lock-on missiles (check the stock on the bottom-right, refilled every few stages, not after dying)
throttle = speed up|down (check the "SPEED" meter on the bottom-left)
basics:
- a safe place to be is on the sides, but they make it hard for you to shoot at the enemy. Also, don't stay still at all costs.
- whenever the enemy planes make a line or circle formation, you should be able to take them all down with the lock on target.
If you shoot the middle planes of a horizontal line formation, there is a chance that the other planes will simply fly off to the sides and not take a shot at you.
- the "Enemy" plane uses its vulcan cannon to try to shoot you down from behind. You can either keep your plane far away from him, speed up your thrusters to outrun him, or slow down so he outruns you. The only way to destroy them is to slow down.
- "Be Careful!" = a missile is locked on to your plane from behind and the only way to shake it off is to either speed up or slow down.
- last STAGE: 23
sources:
Space Harrier
controls:
Analog stick = move
1 = shoot
basics:
- try to take out enemies quickly to avoid them firing at you, and reduce the incoming fire to dodge.
- move constantly in circles to avoid the enemies aiming.
- last STAGE: 18
sources:
Planet Harriers
controls:
joystick = move, aim (double tap to dash and avoid attacks)
1 = fire main weapon (hold for autofire)
2 (hold) = missiles lock on (release to fire, unlimited but needs reloading, check the "LOCK ON FUEL" gauge on the top)
3 = bomb (check the counter in the bottom-left)
d-pad = view-change
basics:
- easier char: ?
- getting hit will deplete the "LIFE" hearts on the top-left. Shot medkits to refill.
When you continue your score resets, but you keep all the acquired powerups and the gold.
- collect GOLD coins and bags to buy powerups and refills in the STAR SHOP.
- last STAGE: 5 GALAX
sources:
Fantasy Zone
controls:
joystick = move
1 = fire main weapon
2 = fire ground bombs
basics:
- check the radar in the bottom for the remaining enemy bases to destroy.
When they are all destroyed you will proceed to the stage boss.
- collect coins from enemies for "GOLD" to buy items in the SHOP (accessed via a red balloon).
All primary weapon powerups are temporary (check the "WEAPON" blue gauge in the top-right).
While ENGINE and TWIN BOMBS are permanent until you lose a life.
- in order to activate any weapons or bombs that you have in reserve, you must find a SHOP or the yellow "SEL" (=select) balloon.
- best items to buy: JET ENGINE, TWIN BOMBS, HEAVY BOMB (try to drop above bosses with button I), WIDE BEAM (cheapest weapon powerup, can help if activated before some boss fights).
- last stage: 8 SALFAR (2 loops)
sources:
Ordyne
controls:
joystick = move
1 = air attack
2 = ground bomb attack
basics:
- killing enemies leaves baloons behind that can be collected for CRYSTALs and exchanged for weapons and powerups in shops (flying discs with a "COME IN" sign).
All purchased weapons are immediately active and have a time limit (check the WEAPON bar in the bottom-left).
- touch the "Dream Co. Ltd." red carrier to play a roulette minigame and obtain a random prize (incl. limited ground bomb powerups).
- one hit will kill you unless you have purchased the "SHOOT BOMBER" (provides a barrier for some hits).
- last ROUND: 7
sources:
Battle Chopper | Mr. Heli no Daibouken
controls:
joystick = move
1 = fire the front gun
2 = fire missiles straight up (when in the air), drop bombs (when on the ground)
basics:
- your heli is influenced by gravity. If you let go of the joystick for longer than a second, he will slowly sink down to the ground.
- you can touch the scenery without taking any damage. But you can still be crushed in the auto-scrolling areas.
- unconver blue crystals behind destructible blocks and collect them for MONEY. When crystals fall to the ground will break into pieces with a lower combined value.
If you collect enough crystals, the displays showing certain items light up and you can buy them by touching.
In addition to the 3 weapon upgrades (front gun, missiles and bombs), there are also ENERGY refills (look like squared fuel cans) and shields (look like a round flame).
If you lose a life, you lose all upgrades and all the MONEY you have collected.
- last stage: 6 (2 loops)
sources:
The Ninja Warriors
controls:
joystick left|right = walk
joystick up = jump
joystick down = crouch -> avoid most enemy shots
1 (hold) + joystick up = somersault jump -> pass over enemies
joystick diagonals = crawl, climb ladders
1 = attack with a short-range kunai slash
2 = fire long-range shurikens (check the counter in the bottom-left)
basics:
- any kind of contact with the enemies will be injurious to you, draining your LIFE in the bottom-left and exposing your metallic endoskeleton.
- life an shurikens are only refilled at the end of each stage.
- last stage: 6
sources:
Twin Hawk | Daisenpu
controls:
joystick = move
1 = shoot
2 = deploy support squadron (the planes will fall down when hit or if you press the button again, double tap for an instant bomb) (check the plane icons on the bottom-right, restock with "H" pickups)
basics:
- enemies always aim at your plane, so you can keep you support squadron alive for a long time if you stay in the center of the screen while enemies are aiming at you.
- little trucks and boats need to be destroyed in order to release items that descend bouncing on the sides of the screen. Items disappear forever if you let them reach the bottom, so don't wait too much to take them.
There are: "P" = weapon powerups (orange carrier), "H" = extra support squadron (white carrier), a glowing little plane = extra lives (blue carrier), extra points (green carrier).
It takes 4 powerups to max out the plane's firepower to a thick stream of 8 parallel shots.
- last AREA: 4 (there are no interruptions, only the BGM changes) (2 loops/ROUNDs)
sources:
Fire Shark | Same! Same! Same!
controls:
joystick = move
1 = shoot
2 = bomb (check the "B" icons on the bottom-right)
basics:
- items are released by zeppelins that approach slowly from the top and by selected medium-sized enemies.
3 "P" powerups are needed to increase the plane's firepower (check the the red squares on the top-right), with a total of 3 upgrade levels.
Surplus powerups will serve as future upgrades when you die.
- selecting the type of weapon is independent from the upgrading process and is possible with the colored squares that bounce around for a while before leaving the screen.
Blue (default) is the regular vulcan pattern, red generates a menacing fire beam (best one, use turbo to focus shot forward), and green activates a wave shot (narrow).
- speed is increased by taking "S" items. They stop coming once 3 of them are collected, so don't worry about getting too fast.
- thunderbolt pickups on the ground only provide bonus points.
- besides granting a first extend with 70K points and a new one for every extra 200K, the game will kindly throw 1UPs and 2UPs every once in a while.
- a good performance is always followed by the inevitable rank progression: enemies shoot more often and their bullets get increasingly faster. This is particularly noticeable after you die and have to restart with reduced power levels.
- last STAGE: 10
sources:
Vapor Trail | Kuhga: Operation Code Vapor Trail
controls:
joystick = move
1 = fire
2 = activate the roll move (req "ROLL OK" the bottom-left meter) -> temp. invincibility, but does not damage enemies
basics:
- best beginner plane: XFV-03
- items you collect during the game are "Spd" (speedups) and "Pw" (weapon powerups).
Powerups are applied to the weapon you're currently carrying: V (wide vulcan), M (guided missiles), B (straight cluster bombs, absorb bullets) or D (spiralling shots).
Shoot the weapon icon to change the letter and pick up the desired one.
- there's a second layer to the weapon system described above, provided by the S-unit. This item creates an attachment on the jet, fitting it with a new weapon that overrides all others and is unique to each craft.
- powerups does not appear with Easy difficulty dipswitch.
- last MISSION/stage: 6
sources:
Rod-Land | Yousei Monogatari Rod Land
joystick = move, climb ladders
1 = rod attack -> grab enemies with the rod and then tap the button to slam them into the floor over and over until they turn into high explosives. I can then use these bombs and missiles to kill their friends
2 = create ladders -> you cannot jump, but you can use ladders to avoid enemies
basics:
- to proceed to the next stage you must kill all enemies onscreen.
- collecting all the flowers onscreen will enter the "EXTRA GAME" mode, where enemies will drop the letters to form the "EXTRA" word and get an extra life.
- last SCENE: 31
sources:
Daioh
controls (jap. ver):
joystick = move
1 = shot
2 = bomb (check the icons in the bottom-left, collect "B" icons to restock)
basics:
- take "P" icons to powerup your current weapon and "S" for speedups.
The main weapon can be switched via colored orbs: red=wide vulcan, blue=homing lasers, yellow=missiles.
- last STAGE: 7 (2 loops)
sources:
ZuPaPa!
controls:
joystick = walk
A = punch, throw Zukkos -> will stick to enemies
B = jump (combine with joystick down to drop down platforms)
basics:
- to finish each stage you must dispose all the enemies onscreen.
You can either: punch and then run over them, or use some of the colored Zukkos hanging around the stage.
You have to run into them to pick them up, then you throw them at the enemies and run into them.
The more mini-zupapa attached to them, the larger the star appears around it and kills the other surrounding enemies. The more you kill, the more prizes they give out
sources:
Tumble Pop | Tumblepop
controls:
joystick = walk
1 = vacuum (hold to suck, release to spit) -> capture more enemies for a bigger tumbling ball
2 = jump
basics:
- to finish each stage you must clear all the enemies on screen.
- powerups include: plasma gun, barrier (=temp. invincibility), "?" box (bomb-like "Hyper Cleaner"), POW battery.
- coins and crystals only provide extra points.
- collecting all the "TUMBLEPOP" lettes will teleport you to a bonus stage where you can earn 1UP.
- last stage: 10
sources:
Diet Go Go | Tumble Pop 2
controls:
joystick = walk
1 = inflate -> flatten the enemies and push them to send the bouncing.
2 = jump
basics:
- dispose all enemies to complete a stage.
- picking any food will make you fatter and slow you down.
Drink "D" bottles to become slim again.
- picking up a coin will activate the slot machine at the top.
Getting 3 symbols in a row makes a large number of bonus items appear, and three 7s takes you to the bonus stage.
- gems only provides extra points.
- last stage: space
sources:
Snow Brothers | Snow Bros.: Nick & Tom
controls:
joystick = walk
1 = throws your Freeze Shot -> used to trap your enemies in snowballs.  It is also used to start a completed snowball rolling.
2 = jump -> cannot jump down platforms, sometimes it is better to wait for enemies to get down
basics:
- to finish each stage you must take out all the enemis on screen.
- last FLOOR: 50
sources:
Snow Bros. 2: With New Elves
controls:
joystick = walk, kick snowballs
1 = jump (combine with js down to drop down platforms)
2 = throw snow -> turn enemies into snowballs
basics:
- easier char: NICK THE SNOW KID (the old clown-looking Snowman)
- food only provide extra points, while drinks are powerups:
- red = faster movement
- yellow = longer weapon range
- blue = higher power power
- last stage: 6
sources:
Joe & Mac Returns
controls:
joystick = walk
1 = attack -> stomp enemies, then grab and throw em away
2 = jump (combine with JS down to drop down)
basics:
- you must dispose all enemies onscreen to proceed to the next stage.
- touch the girl in each stage (without hurting her with the club) to set her free and get some items.
- last world: 7
sources:
Nebulas Ray | Nebulasray
controls:
joystick = move
1 = shoot
2 = bomb (check the "B" icons in the bottom-left, collect yellow "B" capsules to restock)
basics:
- you can switch the main weapon via a capsule cycling between: yellow "G" (=narrow) and green "W" (=wide).
You can also get a time-based weapon from a capsule cycling between red "H" (=homing), turquoise "F" (=Four-way shot), orange "L" (=Large flamethrower), blue "D" (=Defense shield).
- blue "S" capsules will increase the ship speed permanently. Do not collect more than 2 of them.
- orange capsules without any letter only provide extra points.
- last STAGE: 6
sources:
Trio the Punch
sources:
Ninja Baseball Bat Man | Yakyuu Kakutou League Man
controls:
joystick = walk
2x joystick = run
1 = attack, pick item
2 = jump
2x joystick, 1 = baseball slide
1+2 = desperation attack (consumes health)
jumping and pressing back, forward, attack = elemental bomb attack (consume half the energy bar)
basics:
- easier char: JOSE
- getting hit will deplete the yellow energy bar on the top-left. Grab food to refill.
- each char has six, seven, maybe even more unique special moves, including throws, rushing moves, and even a crude form of desperation moves.
- when your life is in the red, you gain access to a few more moves that you can pull off in rapid succession.
- last STAGE: 7
sources:
The Ninja Kids
controls:
joystick = walk
2x joystick = dash attack -> risky, use only to evade
1 = attack
2 = jump
1+2 = "NINJA POWER" special attack (req. 1+ scrolls in the top-left. More powerful with more scrolls)
basics:
- easier ninja: AKANE (red, has shurikens for safe distant attacks)
- getting hit will deplete the colored bars in the top-left.
- destroy the scenery to get temp. powerups like TIME STOP, invincibility, etc.
- last CHAPTER: 5
sources:
Charlie Ninja
controls:
joystick = move, crouch
2x joystick = dash attack -> risky, use only to evade
1 = attack
2 = jump (press again to midair to double jump and reach higher platforms)
1+2 (hold) = "Ninja Cloaking" -> hide in the background and remain invincible for several seconds
special attack moves:
joystick down, forward+jump = Ryu-esque hurricane kick
joystick up, forward+attack = tumbling spin
joystick forward, down, forward+hold attack = rushing blade attack
basics:
- getting hit will deplete the hearts top-left.
- destroy containers to get "P" spheres=powerups, new weapons, hearts, money bags.
- last STAGE: 5
sources:
Thunder Dragon
controls:
joystick = move
1 = shoot
2 = bomb (check the "B" icons in the bottom-left)
basics:
- the main weapon can be switched via alternating powerups: red 1=wide vulcan, blue 2=laser, green 3=bouncing lasers, red 4=missiles.
- last stage: 8 (2 loops)
Thunder Dragon 2 | Big Bang: Power Shooting
controls:
joystick = move
1 = shoot
2 = bomb (check the icons in the top-left, collect "B" icons to restock)
basics:
- collect "P" icons to powerup the main weapon and "M" for the missiles.
There are no switchable weapons in this game.
- purple and blue medals only provide extra points.
- last STAGE: 8
sources:
Rapid Hero
controls:
joystick = move
1 = shoot
2 = bomb (check the "B" icons in the top-left)
basics:
- there is no weapon switching in this game, all powerups increase the firepower and are to be collected.
- last STAGE: 8
sources:
Hacha Mecha Fighter
controls:
joystick = move
1 = shoot
2 = activate the bomb-like "Big" powerup (check the "B" icons in the bottom-left, collect "Big" items to refill. continously picking up flower items will also grant you bombs) -> temp. invincibility + boost attack power. Some bosses can easily be quickkilled with one bomb (e.g. stage 2 and 3 boss).
basics:
- you will lose 1 life with a single hit and respawn immediately with a powered down weapon.
- flower and fruits are only worth bonus points.
- last STAGE: 7 (2 loops)
sources:
Lightning Swords | Ken-Go
controls:
joystick left|right = walk
joystick up = jump (press down in midair for a landing attack)
joystick down = jump
1 = attack (hold to charge and block most incoming attacks) -> keep charging while moving in stages most of the time
basics:
- getting hit will deplete the yellow/orange squares on the bottom-left. When empty you will lose a life and respawn immediately.
Collect red hearts to refill. Yellow hearts will increase your max health instead. Health is not refilled after each stage.
- the hourglass item provides some extra TIME (represented by the yellow spheres in the bottom).
Coins only provide extra points.
There are sword powerups that increase your attack power.
- last stage: 5 (2 loops)
sources:
Magical Crystals
controls:
joystick = move
1 = jump -> use often to avoid enemy projectiles
2 (tap) = attack -> by default throw a ball that bounces through walls
2 (hold) = charged attack -> travel longer distances
basics:
- to complete each level you must reach the "EXIT" panel before the TIME runs out. You often need to collect some yellow crystals to reach the exit:
- blue crystals = provides some options rotating around you
- yellow crystals = open nearby doors or make some platforms appear (req. to finish a level)
- green crystals = add extra time
- orange crystals = temp. big bombs weapon
- light blue crystals = temp. 3-way weapon
- red crystal = temp invincibility + get faster and bigger
- each world has 3 levels each, 2 regular levels and a boss level.
- getting hit will deplete the "L" counter on the top-left.
You can win an extra life in the BONUS GAME after each boss by reaching the QUALIFY score.
- last World: 6
sources:
Black Heart
controls:
joystick = move
1 = main shot
2 = short-range dragon breath special attack (limited use, check the "F" gauge on the bottom-left. Collect blue fairies to refill) -> use against bosses and stronger enemies
basics:
- while your sprite is huge, you only die if the knight is hit. The dragon is able to absorb enemy fire without taking damage.
- you can upgrade your firepower by collecting red fairies, that will also join in as options, providing extra protection.
You only lose one fairy when you die.
- you can only shoot in front of the knight and the only way to hit enemies above, below, or behind, is by ramming them with your fairies.
- collect 10 coins dropped by enemies for an extra heart/life (check the icons in the top-left).
- last STAGE: 8 (2 loops)
sources:
Dyna Gear
controls:
joystick = walk (hold to run), aim, crouch, climb platforms when hanging below
1 = jump (press again in midair to double jump and somersault attack -> risky, use only to avoid enemies. Press while crouching to roll.)
2 = attack (tap rapidly in succession for a special attack)
basics:
- ROGER is slightly faster while WOLF jumps higher, though they still play similarly.
- getting hit will deplete the hearts on the bottom-left. Collect food to refill.
- destroy chests to get diff. weapons: SWORD, HAMMER (ball-and-chain), ARROW (homing, good to attack bosses from a safe distance), and AXE. Grab the same weapon 2 times to power up.
- most enemies explode in coins, large and small, which are collected with loud, satisfying chimes; get enough and you'll get an extra life (check the counters on the bottom-left).
- the big red flags works as a CHECK POINT and refill your TIME.
- try to grab the ceiling when you can to skip enemies on the ground.
- not every dinosaur is out to get you, though, and occasionally one will join your side, running next to you while you dash through the level.
- after certain levels, you'll also visit villages of the wolf folk, who offer powerups and assorted questionable translated dialogue in an attempt to provide aid.
- last AREA/stage: 8
sources:
Espgaluda
controls (Arcade Mode):
joystick = move
A (tap) = regular shot
A (hold) = "rapier" concentrated shot/laser (unlimited, but slows down movement)
B (when the gem meter is NOT empty) = activate/deactivate Kakusei mode -> use when there are a lot of bullets on screen and deactivate when clear: all enemy bullets will become pink and travel at a slower speed. Getting hit will activate the bomb automatically at the cost of half the barrier energy bar.
B (when the gem meter IS empty) = activate/deactivate Overmode mode -> turn enemy bullets red and make them travel faster
C (tap) = bomb+barrier (hold to charge, check the blue bar at the bottom of the screen)
D (hold) = auto-fire regular shot
basics:
- easier char: TATEHA (the girl, has spread shot)
- main shot is powered up with the "P" icon (get 5 for maximum), and barrier energy with the "E" icon.
- green gems refills the gem meter (in the top-left as a counter and around the player in red)
- last stage: 5
sources:
Espgaluda II | ESP Galuda 2
controls:
joystick = move
1 (tap) = regular shot
1 (hold) = concentrated shot/laser (unlimited, but slows down movement)
2 (when the gem counter at the top-left is > 0) = toggle "Kakusei" mode = bullets go slower, and are turned to gold if you destroy the enemy firing them. Hitting a bullet or enemy in this mode will trigger the auto-barrier that takes 50% of the guard barrier bar at the bottom-left (better if activated manually).
2 (when the gem meter at the top-left IS 0) = toggle "Overmode mode" = turn enemy bullets red and make them travel faster
3 (tap) = bomb+barrier (check the green meter at the bottom-left of the screen, takes 25% if tapped, hold for a more powerful attack) -> temp. invincibility + clear shots onscreen, use when you can't avoid them
basics:
- easier char: Asagi (in the middle/top of the char select) (focused shot is auto aiming when powered up)
- the hit box is a very small area on the char's back. When holding the fire button down, the hit box will shine.
- green gems refills the gem meter (in the top-left as a counter and around the player in red)
- regular shot is powered up with the "P" icon (get 5 for max), and the green barrier energy with the "E" icon.
- last stage: 6
sources:
Ibara
controls:
joystick = move
1 = shoot (hold for rapid-fire shot + lock options aiming)
1 (tap) = bomb (check the bullets at the bottom-left) -> NO INVINCIBILITY
2 (hold when having 1+ big bomb) = charge up the "Hado-cannon" -> stay in the red trail to get temp. protection from bullets
basics:
- each option can be changed individually depending on what extremity the ship touches it.
Collecting an option that isn't already equipped or powering up your shot will cause an aura flash, a very powerful miniature bomb around your ship.
- collecting 40 bomb fragments will create one large bomb that can be used as a Hado-cannon.
- blue and red roses only give you points.
- the rank increases as you acquire more items and cause more damage, increasing the difficulty of the game along with it.
The number of enemies doesn't increase but the number of bullets fired towards the user does, often reaching a ridiculous level of bullet density.
The only known way of decreasing your Rank in Ibara is to die. The more lives you have, the less the rank decreases when you die.
- last stage: 6
sources:
PinkSweets | Pink Sweets: Ibara Sorekara
controls:
joystick = move
1 = fire regular + options shot (hold for autofire, release the button for 3s to charge the "Rose Cracker" shots-absorbing bomb and press again to fire it)
2 (hold) = options fire only -> use while charging the next bomb
2 (tap) = cycle options formation+shot: Front, Wide, Back, Reverse, and Turn (if collected the corresponding powerups)
1 + 2 (tap together) = switch speed level (check the 3 arrows in thd bottom-left
basics:
- easier char: HANA KASUMI (has options with homing fire)
- the Rose Cracker automatically charges whenever the 1 button is not being pressed, and is fully charged after 3s. When fully charged, the aura shield in front of the ship will damage enemies and absorbs Type-1 bullets (mostly blue and purple).
Pressing the button 1 when the aura is fully charged will fire a bomb-like attack (diff. for each char), destroying any and all types of bullets inside of it, as well as causing heavy damage to enemies.
Use often when attacked by big enemies and bosses, release when their attack stops.
- physical bullets can only be destroyed with regular shots or with a Rose Cracker.
- last STAGE: 7
sources:
Muchi Muchi Pork!
controls:
joystick = move
1 = fire regular shot (hold for autofire + )
2 (hold) = fire focus "Lard" shot + slow movement (req. the red gauge in the bottom-left, collect piggies to refill)
3 = bomb (check the "B" icons in the bottom-left, collect bomb "hams" to refill the small gold "B" gauge and restock. They appear only from ground enemies destroyed with the lard shot) -> temp. invincibility
basics:
- easier char: Ikuo (blue, has laser trailing options that lock on enemies by holding button 1)
- collect "P" items to powerup the main shot.
- if there are no bombs left and the meter is half full, triggering a bomb will fire a localized blast in front of the character, which is useful for cancelling nearby bullets.
- last stage: 5
sources:
Final Star Force
controls:
joystick = move
1 = fire primary + secondary weapons
2 = bomb (check the icons in the bottom-left, auto-refills over time)
basics:
- the main weapon power charges up automatically over time (check the meter and counter in the bottom-left).
When you reach level 4 secondary weapons become active.
- at regular intervals, a red ship will appear which will release a capsule to switch the current weapons set (primary+secondary+bomb):
A = straight laser, B = wide vulcan + missile, C = wide spraygun + auto-locking "Synch-Fire".
- last STAGE: 10
sources:
G-Stream G2020 | DeltaZeal
controls:
joystick = move
1 (tap) = shoot
1 (hold when there is a green "OK" sign in the bottom-left) = black hole (aka void-bomb or cancel-bomb) (collect pink crystals dropped by enemies to refill) -> creates an energy sphere that melts everything that's caught inside its radius except for your own ship (collect the small green particles left behind by destroyed enemies to refill)
2 = bomb (check the small icons on the bottom-left, collect the same icon to restock)
basics:
- powering up the ship is achieved by collecting the colored rotating cubes released at a regular interval from defeated enemies, which then fill up a 10-slot power bar from the inside out; when the bar is full each new powerup pushes the oldest one out in the queue, with the current item combination determining firepower behavior.
Red contributes with vulcan, blue with laser and green with homing missiles.
- last STAGE: 7
sources:
Truxton | Tatsujin
controls:
joystick = move
1 = fire
2 = skull bomb (check the skull icons in the bottom-right)
basics:
- after dying you respawn at the last checkpoint with the initial weapon, so use bombs to save your life when possible (bomb restocks are frequent).
- your firepower is augmented with each 5 "P" powerup collected, to a maximum of 2 upgrades (check the "Ps" on the top-left).
After that the powerups are stocked for an eventual respawn.
- 3 types of weapons can be changed with the appropriate powerup: the red one is the standard wide vulcan, the green one is a straightforward shot and the blue one is a laser beam that latches on more powerful enemies and covers almost the whole screen when maxed out (best one).
- do not take more than 1 or 2 "S"=Speedups.
- last stage: 5 (loopable) (there are no interruptions between stages, only the BGM changes)
sources:
Truxton 2 | Tatsujin Ou
controls:
joystick = move
A = autofire main+sub weapon
B = bomb (check the skull icons in the bottom-left. Collect "B" orbs to refill)
basics:
- the main and sub weapons are powered up by collecting colored orbs released by green carriers with a skull symbol.
These orbs periodically alternate between 3 colors: red=Napalm Bomb, blue=Search Laser, and green=Normal Shot.
Grabbing a power up of the same type already equipped will increase the power of both the main shot and the subweapon (up to 5 levels).
- "S" items will increase the ship speed, up to 5 levels (avoid taking too many).
- last stage: 6 (infinite loops, no stage interruptions, only the BGM changes)
sources:
Brave Blade
controls:
joystick = move
A (tap) = switch to fighter mode, shoot
B (tap) = switch to mecha mode, melee attack -> risky
B (hold) = activate guard (req. the gauge on the bottom-left, slowly refills over time) -> absorb bullets
C (tap when the guard gauge at the bottom-left is at MAX) = activate "Core Awakening" -> temp. invincibility, but completely drains the guard guage, so use sparingly
basics:
- easier plane: Rosita em Flamberge (green plane, 3rd from the left) ()
- collect "P" medals to LEVEL UP you weapons (current level is shown in the bottom-left).
Dying or depleting the guard gauge completely ("GUARD BROKEN") will level you down.
- other medals only provide extra points, and can be hit with the melee attack to increase their value.
- last Stage: Seventh
sources:
Lethal Thunder | Thunder Blaster
controls:
joystick = move
1 (tap) = shoot
2 = bomb (unlimited, but need to charge the "POWER" gauge on the left up to the red zone to fire it again)
basics:
- there are no powerups for your main weapon. Instead keep tapping the fire button to charge the big "POWER" gauge on the left to increase your weapon power. Btw it is lost when you fire a bomb.
- collect colored orbs to switch the main weapon: red = straight flamethrower, blue = auto-aiming angled lasers (best one), yellow = plasma spread (adjustable wide or narrow with movement), green = default.
- last STAGE: 7
sources:
Grid Seeker: Project Storm Hammer | Gridseeker
controls:
joystick = move
1 (tap) = fire primary + secondary weapons + lock pods
1 (hold) = autofire + rotate pods -> use as a shield from incoming bullets
2 = bomb (check the "BOM" colored squares on the bottom-left. Absorb small red bullets to fill the "POW" gauge and restock)
basics:
- best plane: AH-64H (most balanced)
- collect orange "P" items to powerup your main weapon.
- the secondary weapon (and bomb) can be switched and powered up by picking color-cycling "G" orbs:
red = straight vulcan (default), blue = straight bolts (+ laser bomb), green = homing shot (+ dragon bomb), yellow = exploding bullets (+ multidirectional bomb).
- the "H" = Helper item will call a support helicopter/plane providing additional firepower and shielding for a while.
- last MISSION: 7
sources:
Change Air Blade
controls:
joystick = move
A (tap) = fire main weapon
A (hold) = slowdown + fire a stronger main weapon
B = bomb (check the "B" icons in the bottom-left, collect the small canisters with orange "B"s on them to fill the meter at the bottom-left and restock) -> clear onscreen bullets, but slow activation and no temp. invincibility
C = activate single-use support weapons (check the icon in the bottom-left)
basics:
- best plane: ??? (brown one, 3rd on the top) (has wide shot, but it is slower) | XH-10IX "SYLPH" (has wide shot when powered up)
- to finish each stage you must deplete your opponent 3 lives (represented by the 3 ARMOR bars at the top-right of the screen) within the time limit.
- some enemy bullets won't kill you instantly, but will deplete your ARMOR gauge on the top-left.
- collect green "P" metallic canisters to powerup your main weapon.
- boxes with an icon inside provide single-use support weapons: Linear (a blue triangle), Homing (green crosshairs) and Exchange (two orange arrows pointing up and down, rare).
Linear is a temporary supplement to your own ship's weaponry that relies own your aiming skills to connect, whereas Homing causes your ship to emit a radar pulse, targeting the enemy craft with auto-aiming or homing attacks should the pulse hit.
The third is much more rare, due to the powerful effect it has: It switches the positions of you and your opponent, thereby opening up a new set of offensive options.
- last STAGE/opponent: 8th
sources:
Explosive Breaker | Bakuretsu Breaker
controls:
joystick = move
1 (tap) = fire main + secondary weapons
2 = bomb (check the counter in the bottom-left, collect "B" items to restock)
basics:
- best ship: HANSE (has wide+bending shots)
- collect "P" items to powerup your main weapon.
- you can also switch between 4 kind of secondary weapons: "M" = straight foward missile, and "H" = homing missiles (best one), "C" = crackling/exploding missiles, "S" = 4-sided waves.
- last STAGE: 6
sources:
Nostradamus
controls:
joystick = move
1 (tap) = shoot main weapon
1 (hold) = create an energy column that can be dragged behind you, release for a charged shot -> absorbs most bullets, use against stronger enemies
basics:
- a missile-like carrier provides purple crystals to powerup your main weapon (8 levels) and "E.B.A." pods attachments with a secondary weapon.
The pod pickup is alternating between red (=straight regular shot+wide and short charged shot) and blue (=homing regular shot+straight and long charged shot) (usually best one).
Collect the same color multiple times to powerup the secondary weapon.
- "?" panels and "B" squares only provide extra points.
- last STAGE: 9
sources:
Hotdog Storm | Hot Dog Storm
controls:
joystick = move
1 (tap) = shoot main+pod weapons
1 (hold) = charge pods shot (diff. for each weapon)
2 = bomb (check the counter on the top-left, collect "B" capsules to restock)
basics:
- collect blue "P" capsules to POWER UP your main weapon.
- collect colored capsules to switch and powerup the pods secondary weapon:
red (=2x narrow lasers, multidirectional spheres+barrier when charged, very useful), green (=multidirectional bubbles, auto-aiming when charged), orange (=fire missile in a 'Y' pattern, frontal burst when charged, not very useful).
- last STAGE: 5
sources:
Varth: Operation Thunderstorm
controls:
joystick = move
1 (tap) = shoot main weapon
2 = bomb (auto-restock over time, check the "B" icons at the bottom-left) -> temp. invincibility, use everytime when about to get hit
basics:
- best POD: SMART (default one)
- collect blinking "POW" items to powerup your main weapon (check the current level in the bottom-left "L.V-1").
- the main weapon can be switched by 3 big icons (not cycling): multi-directional shot (best one), a narrow laser, and the machine gun (still narrow).
- the secondary/pod weapons ca be switched via 3 orbs with letters inside: "M" = normal Missiles, "H" = Homing missiles, and "N" = Napalm missiles.
Collect multiple orbs of the same kind to raise the level.
- sometimes if you are dead, appears a windmill take and restore the full power.
- there are other hidden items hidden in the scenery that can be found for extra points: flags, helmets, etc.
- last STAGE: 30
sources:
Cyvern: The Dragon Weapons
controls:
joystick = move
1 (tap) = fire
1 (hold) = slowdown + Banish Attack (req. the "BANISH" gauge in the top-left, refills when destroying enemies and collecting bullets) -> use against stronger enemies
2 = bomb (check the icons in the bottom-left, collect "B" icons to restock)
basics:
- easier dragon: 2 SCHWARZ (has wide shot+auto-locking lasers)
- collect "P" bullets to POWER UP your main weapon and refill the "BANISH" gauge.
- last STAGE: 5 (2 loops)
sources:
Thunder Cross
controls:
joystick = move
1 = fire
2 (hold) = enlarge/shrink options vertical formation, use special weapons
basics:
- after killing waves of red enemies, they will leave orbs to collect.
Most of these orbs default to "S" for "Speed Up", but if you wait a few seconds, it'll cycle to different letters, including a Vulcan cannon (V), bouncing Boomerangs (B), and a Twin Laser (L), which fires both forward and behind.
Some will also drop "O" orbs for "Options". Once you get 4 Options, there are also three "special" weapons that appear, which includes: F=Flamethrower (best one), L=Laser, and N=Napalm bombs.
Once equipped, these are only available for a limited amount of uses and disable the options firing (check the gauge on the bottom-left).
Special weapons are very effective against bosses, where you can attack the core directly.
- last STAGE: 7
sources:
Thunder Cross II
sources:
Turbo Force | Hyper Force
controls:
joystick = move
1 = fire
basics:
- the shoot slowly loses the collected powerups even if not damaged.
- flashing "?" powerups randomly provide main weapon powerups, a barrier or an instant-detonating bomb.
- last stage: 7 (space)
sources:
Raiden
controls:
joystick = move
1 = shoot main weapon and missiles
2 = bomb (check the "B" icons in the bottom-left) -> not instant, you are not invincible until it hits the ground
basics:
- getting hit you will respawn at the last checkpoint with the initial pea shooter.
- 1UP icons are very scarce, and extends only come with 150K and 400K points.
- destroyed specific carriers release powerup icons, which cycle in color so that the player has the chance to change the weapon if needed.
- there are only 2 main weapons: the vulcan (red) and the laser (blue).
The vulcan has great spread range but is weaker, whereas the laser is concentrated but far more powerful.
- orange ground buildings release icons for missiles, where "M" represents the more powerful straightforward ones and "H" stands for the homing green missiles.
- it takes 8 powerups to maximize the main weapon and 4 powerups to maximize the missiles.
- best weapon combination: blue laser + homing missiles
- last stage: 8 (3 loops)
sources:
Raiden 2
controls:
joystick = move
1 = shoot main weapon and missiles
2 = bomb (check the "B" icons in the bottom-left) -> you are not invincible until it hits the ground
basics:
- besides the vulcan (red) and the laser (blue), a 3rd new option to use as main weapon is the latching laser (purple), also known as the infamous "toothpaste" laser.
Upon initial firing it works like the blue laser, but then the streams merge and the magic happens: whenever this weapon connects to one or more enemy it bends, ricochets and rebounds all around, creating a spectacle that can be directed but not really controlled by the player's movement. Some people believe it has homing abilities, but the truth is that it will only fulfill its purpose when the player directs it to a proper target.
- in addition to the regular nuclear bomb (red B) we now have the cluster bomb (yellow B), which is less powerful but is deployed with almost no delay, covers a wider area and lasts a tiny bit longer.
- there's a "rhythm" according to which enemies will fire, dictated by a characteristic reload window, and moving back from a sweeping maneuver must take place during that time when enemies are not allowed to shoot.
- every enemy needs to be seen to fire anything against the player, so leaving them out of your sight is a good - and sometimes necessary - move.
Beware though, those floaters are fond of sniping you from the sides blindly if they have already crossed the play field in one piece.
- last stage: 8 (3 loops)
sources:
Raiden Fighters
controls:
joystick = move
1 (tap) = fire primary + secondary weapons
1 (hold) = charged attack (has some refilling time)
2 = bomb (hold for delayed detonation) (check the "B" icons in the bottom-left)
basics:
- easier plane: CHASER (fast plane with a rapid firing rate, has homing laser and best charged attacks)
- there are only 2 types of weapon powerups to collect: "M" (missile) and "L" (laser).
They both change the current secondary weapon and increase the fire power.
- the "S" pickup gives you a Slave/option, a small assist fighter that shoots out quick straight shots and protects you from enemy gunfire for several hits.
You can have 2 Slaves at a time, and by default, they remain at the side of your fighter.
However, picking up another "S" with 2 Slaves changes their formation and causes them to be positioned differently as well as fire in a new pattern.
- last stage: 7 (divided in 3 missions) (2 loops)
sources:
Raiden Fighters 2: Operation Hell Dive
controls:
joystick = move
1 (tap) = fire primary + secondary weapons
1 (hold) = charged attack (has some refilling time)
2 = bomb (hold for delayed detonation) (check the "B" icons in the bottom-left)
1 (hold) (only in 2P mode with both players near to each other) = Hybrid Attack
basics:
- easier plane: Flying Ray (fast and powerful, has tracking missiles)
Beast Wing (has wider main shot and homing missiles, but it's the slowest)
- last stage: 7 (divided in 3 missions) (2 loops)
sources:
Raiden Fighters Jet
controls:
joystick = move
1 (tap) = fire primary + secondary weapons
1 (hold) = charged attack (has some refilling time)
2 = bomb (hold for delayed detonation) (check the "B" icons in the bottom-left)
1 (hold) (only in 2P mode with both players near to each other) = Hybrid Attack
basics:
- easier plane: Ixion (has wide main shot and it's fast)
- the slave formation depends on the number of lives + bombs you have. Slaves only assume these formations if you collect a "S" icon when you already have 2 slaves.
The best formation sum is 3 or 7: Enemy Seeking.
- beginning on LEVEL 05, the stage you enter next depends on how often you die and your play technique, which is graded at the end of each simulation level.
Collect medals and fairies to increase your score quickly.
If you have at least 1 Slave ship, a point medal might come floating through the sky and follow you around, just out of the range of your Slave. The medal can be collected, but if you don't move too fast, it flies around you and absorbs incoming medals while it becomes larger.
- last level: 45|50 (depending on your score)
sources:
Air Gallet
controls:
joystick = move
1 = fire main weapon
2 = bomb (check current color type and counter in the bottom-left angle)
basics:
- there are 4 weapon types:
- red "F" = FIRE, a spread vulcan shot (initial weapon)
- blue "L" = LASER, a narrow but powerful shot.
- green "S" = HUNTER, manual-aiming option that shoots in 3 directions.
- yellow "M" = MISSILE, periodic batches of homing missiles with rapid bursts of forward shooting.
Each weapon has 5 power levels, starting from "LV-0". A power level is increased when the player collects 4 "P" powerups (check the "P" icons and current level in the bottom-left).
Losing a life causes the weapon power to reset to 0.
- there are 2 bomb types:
- green bombs = hit everything on screen.
- blue bombs = shoot a concentrated energy ball straight ahead.
- last stage: 6
sources:
Master of Weapon
controls:
joystick = move
1 = fire main weapon
2 = fire ground weapon (combine with button 1 to fire the collected special weapon. More powerful when the green bars on the bottom-right are fully charged)
basics:
- in order to upgrade and get autofire for the main gun you must collect the "F" icon (the default gun has no autofire).
Four Fs are needed to achieve maximum power and a 5-way spread gun.
The ground weapon can't be upgraded, only changed into a different one.
There's "P" (PIERCING, default), "L" (LASER), "W" (wide), "G" (GUIDE) and H (H-BOMB).
In order to use them you have to be firing the main gun at the same time, because pressing only the button for ground attack unleashes a series of fast ground shots.
When a ground weapon is used it takes a while to recharge to its maximum power, according to the 4 green blocks at the right lower edge of the screen.
It can still be fired when it's recharging, but at a lower power level.
The only exception to this is the H-BOMB, which can be used only once, and then reverts to the prev. collected weapon.
"G" is the best ground weapon by far because it will chase and destroy most ground enemies.
When it's not available, the next best weapon is "W".
- last stage: 6
sources:
Ryu Jin | Ryujin
controls:
joystick = move
1 (tap) = primary fire
1 (hold) = charged wide attack (check the gauge on the bottom-left)
2 = bomb (check the small skull icons at the bottom-left. Collect "BOMB" items to restock), rotate options (when you have no bomb) -> options can absorb most bullets
basics:
- best ship: PHALCYON (purple, has wide charged attack)
- getting hit will drop 1 blue slot on the bottom-left. Collect "LIFE" items to restock.
- the main weapon can be switched by rotating colored orbs: blue = wide shot, purple = concentrated shot.
Collect the same colored orb multiple times to powerup.
- the "OP" item will provide 2 different options depending on its color: red/orange=homing missiles, green=straight lasers.
- the "BIG" item will make your ship bigger and invincibile for a while. It will bounce on the screen for a while, so try to grab it strategically.
- last level: 6
sources:
Vasara
controls:
joystick = move
1 (tap) = primary fire
1 (hold for 2s) = charge melee attack -> reflect bullets+temp. invincibility, more powerful when the red "VASARA" meter on the top-left is full (collect red crystals to refill)
2 = bomb (check the kanjis in the bottom-left, collect "B icons to refill)
basics:
- easier char: Saiga Magoichi (3rd one, has homing fans when powered up)
- collision with an enemy will not kill you, but will cause to bounce off.
- collect "P" items to powerup your main weapon.
- last stage: 6
sources:
Vasara 2
controls:
joystick = move
1 (tap) = fire main+secondary weapon
1 (hold for 2s) = charge melee attack -> reflect non-pink bullets
2 = Vasara melee attack (check the blue bars with "V" at the top-left, collect the blue jewels to refill) -> speedup + temp. invincibility
basics:
- easier char: SEIRYUBO (green, has homing secondary shots)
- collision with an enemy will not kill you, but will cause to bounce off the enemy.
- last stage: 6 (x2 loops on DIFFICULT RANK)
sources:
Gang Busters | Crazy Cop
controls:
joystick = move, aim
1 = shoot (if you have some bullets left, check the blue bullet meter in the top-left) or throw cans
2 = super shot (if you have it, check the big bullet icons at the bottom)
basics:
- capture red enemies or pick up bullet belts to refill the bullet meter.
- bring red enemies into the prison van to obtain Super shots.
- shot and capture red enemies to power up:
- 1st enemy = speed up
- 2nd enemy = longer shooting range
- 3rd enemy = more powerful shot
- 4th enemy = longer shooting range and speed
- 5th enemy = longer shooting range and speed
- push the yellow big rocks in front of doors that enemies spawn from.
- last stage: 5 (Wasteland)
sources:
Pilot Kids
controls:
joystick = move, aim
1 = main shot (can destroy orange bullets), fire locked-on missiles
2 = fires a marker for lock-on missiles (can mark up to 3-6 enemies at once depending on how many powerups you have, check the stars at the top-left)
basics:
sources:
Motor Raid
controls:
handle = steer
pedal 1 = accelerate
pedal 2 = brake
punch (tap) = weapon attack
punch (hold) = throw weapon attack, grab other player weapon -> risky, avoid that
kick -> effective to hold off opponents coming from the behind, but less powerful than punch
2x accelerate = use turbo (if the gauge is at least 100%. If it is at 300% you will critically knock out opponents)
basics:
- if the player finishes 1st in all 3 races in Championship mode,
he/she will go to the planet Segal for an extra race.
If the player finishes 1st in every race will get a chara-specific bonus ending.
sources:
Daytona USA
controls:
...
basics:
- to power slide, brake then accelerate at a high speed whilst holding left or right depending on which way you want to go.
- on every track there is a pit lane. If you pull into the pit lane, the car will automatically pull into your team's garage and the pit crew will start work on your car.
Pit stops, just like in Virtua Racing, was a waste of time. You lose far too many places in the race when you come out from your pit stop, and the actual benefits are little. When your car is dented, your top speed will be slightly lower than usual, but not that much.
sources:
Daytona USA 2
Daytona 3 Championship USA
Sega Race TV
sources:
Scud Race | Sega Super GT
controls:
wheel = steer
pedal 1 = accelerate
pedal 2 = brake
basics:
- drifting technique: stop accelerating and tap the brake, when the car is aligned correctly start accelerating again slowly.
sources:
Zero Gunner
controls:
joystick = move
1 = auto-lock shoot -> the main gun automatically locks onto enemies for a limited time, which allows you to fly around or behind enemies while still firing at them, check the "Lock on Time" gauge on the top-left.
2 = bomb (check the icons on the bottom-left, collect red "B" items to restock)
basics:
- select the "EXPERT" course to play all the stages in a single run and get an hiscore.
- easier plane: APACHE AH-64AX (has auto-aiming side shots)
- collect blue "P" items to POWER UP your weapons.
Touching an enemy will "POWER DOWN", while getting hit by a shot will kill you instantly and strip all powerups.
- last Mission: 10 (EXPERT), 5 (continental courses)
sources:
Planet Harriers
controls:
joystick = move, aim
2x joystick = dash -> avoid attacks
1 = bullet trigger (hold for autofire)
2 (hold) = lock on enemies (release to fire missile)
3 = bomb
d-pad = view-change
basics:
- collect gold to buy powerups in the shops.
- last stage: 5 Galax
sources:
J.J. Squawkers
controls:
joystick = move, aim, crouch
1 = shoot
2 = jump
basics:
- since you cannot move while firing, the best strategy is to advance by jumping while shooting.
- weapons and powerups are released by the chicken enemy. Powerups looks like golden items.
- getting hit will deplete the green "LIFE" bars in the top-left. Colleft the golden mouse to restore 1 bar.
- last STAGE: 5 (2 loops)
sources:
Aqua Jack | Aquattack
controls:
joystick = steer, aim
1 = shoot
2 = jump
3 = missile (check the icons in the bottom-left)
4 = boost
basics:
sources:
Galactic Storm
controls:
ADS = move, aim
1 = shoot
2 = "D WEAPON" bomb (check the big red counter in the top-right)
basics:
- getting hit whill deplete the "SHIELD" gauge on the top-left.
The SHIELD is partially refilled at the end of each stage.
- last AREA: 20 (STAGE 5)
sources:
Solar Assault: Gradius
controls:
ADS = move, aim
1 = shot main weapon
2 = shot missiles
1+2 = charge the mega laser (if acquired, check the "CHARGE" gauge on the bottom-right)
3 (in MANUAL mode only) = powerup (check the highlited label on the bottom, pick yellow capsules to switch)
Start = switch camera
basics:
- easier ship: WC-672H ALPINA (has auto-homing missiles)
- you die with a single hit and respawn immediately with all the powerups stripped.
When you lose all your lives you can continue from the current stage.
- last STAGE: 6
sources:
Raiga: Strato Fighter
controls:
joystick = move
1 = fire current weapon
2 = switch direction
basics:
- powerups can be obtained by destroying container ships carrying 2 square boxes.
The craft's weapons include the Shotgun, Ion launcher, Vertical, Homing Missiles and Bomb attacks along with items such as Speed Ups, Shields and Extends.
The spacecraft can also obtain an Option weapon called the Auto Guard; 3 types of Auto Guards were available such as the target locking Beam Rifle, the powerful Solid Shooter and the standard Blaster item.
- last stage: 6 (2 loops)
sources:
Shadow Dancer
controls:
joystick left|right = move
joystick down = crouch -> good to avoid projectiles
joystick down + left|right = squat
1 = attack
2 = jump
joystick down + 1 (when the dog barks towards an enemy) = sic the dog on the enemy (if the player takes too long to attack the bitten enemy or the enemy has a strong defense, then the dog will be hurt and turn into a harmless pup)
joystick up|down = jump/drop platform
3 = use ninja magic (only once per mission)
basics:
- you must collect all the time bombs and proceed to the exit to finish a stage.
When the player collects half of the time bombs in each stage, stronger weapons are granted until the player finishes the stage or loses a life.
- gain extra lives by beating the minigame after each stage.
- last mission: 4
sources:
Xexex | Orius
controls:
joystick = move
1 (tap) = fire current weapon (jap ver only: hold while pod is attached to charge the power shot)
2 = detach the pod (press again to recall) -> will extend its tenctacles which absorb bullets and damage enemies
weapons:
- PHOTON BEAM = standard laser
- GROUND LASER = shoots downward and moves across the surface (similar to a weapon from R-Type)
- SPIRAL LASER = has tremendous width
- HOMING LASER = fires in a single laser forward, as well as 2 other beams that bend upward and downward; and the Shadow Laser, one of the coolest, which is a standard laser that creates a damaging shadow as your move your ship up and down.
basics:
- there are no powerups for the main weapon.
There's a good array of weapons, but they don't evolve and are changed with icons released by killing blinking enemies or by hitting some secret spots (they also release speed-ups).
The pod is the only thing that can be powered up: it grows an extra arm with each new power level (up to 3).
- last STAGE: 7
sources:
Dogyuun
controls:
joystick = move
1 = fire main weapon
2 = use sub-module
3 = drop sub-module (if you have it), picks up things with a rear forcefield (not very useful)
basics:
- picking up rotating-coloured pods gives you a different weapon - choose from a straight blue laser, a green dual shot, a purple wavy homing laser and a red right angle homing laser.
Picking up more of the same colour doesn't improve your weaponry at all, but it does give you a bonus.
So you don't upgrade your weapons, you only change your weapon by using these pods.
- you can get 2 different types of sub-module pickup, which are assigned to the 2nd button.
Like the main weapon you can't powerup these, but only switch to a different one.
the best one is the speedy/multiple module, which allows you to dash over the screen and avoid bullets (temp. invincibility).
- best weapons: red, warp submodule
- last level: 10
sources:
Grind Stormer | V-Five
controls:
joystick = move
1 = fire main weapon + options (if collected) (hold for autofire)
2 = use a bomb (check the bars at the botton) -> temp. invincibility
powerups:
- SHOT is the default form, with two to four Options that constantly follow you in a sort of V formation. By moving backward while not shooting, these options come close together and shoot a powerful laser. By moving forward, your options spread out and shoot weaker attacks that can cover more of the screen.
- SEARCH mode has your Options homing in on enemies and zipping through the screen from enemy to enemy.
- MISSILE has your Options following you, like in Gradius, and shooting destructive and powerful missiles.
- POWER gives you more options and makes your attacks do more damage.
- SHIELD gives you a force field that is surprisingly resilient.
basics:
- upon dying you always get back with +1 speed and 3 bombs instead of the initial 2.
- last stage: 6 (2 loops)
sources:
Gunbird | Mobile Light Force
controls:
joystick = move
1 = shoot
2 = bomb
basics:
- easier char: MARION (Main and Sub shot that have great coverage, has homing bomb)
- when hit you lose a shot power level, and a powerup flies around the screen and disappears as soon as it reaches the edge.
If a player is at the lowest level of shot, the player loses a bomb instead.
- "Arcade Mode" is "Tate mode"
- final stage: 7 (2 loops)
sources:
Battle Garegga
controls:
joystick = move
1 = shoot (hold for autofire)
2 = bomb (check the ammos in the lower-left, collect bullets to restock) -> temp. invincibility. Can interact with the environment and trigger specific events
3 = cycle the option's formations: spread, tail, front, rotate, trace (+ hidden ones)
basics:
- easier plane: WILD SNAIL (has penetrating bullets at all shot levels)
- when selecting the plane, use A for the normal variant, B for the faster variant, C for the smaller hitbox variant, A+B+C combined faster and smaller hitbox variant.
- collect "!" for shot powerup, ammos to charge the bomb and medals for points.
- you start the game at the lowest possible rank and have to be careful not to let it get too high.
The computer will count how many times you fire your weapon, how many times you grab powerups, how long you go without dying, how many bombs you hoard, even your score count - and then adjusts the difficulty accordingly on the fly. Once the rank goes up, the difficulty increases dramatically. There is one way to make the rank go down: by dying.
- last stage: 7
sources:
Armed Police Batrider
controls:
joystick = move
1 = fire main weapon + options (if collected) (hold for autofire)
(no fire) = charges the Aura at the front of the ship -> can be used for melee attacks, but does not absorb shots.
1 (when the aura is fully charged + you have the options) = release the options inplace autofiring for a while
2 = use bomb (if you have some bullets in the lower-left) -> temp. invincibility, use with bosses or when about to get hit
3 = change options formation (Battle Garegga ships only)
basics:
- easier player: Shorty from POLICE TEAM (has Search Missiles)
- at the player select screen, your ship capability is determined by which button(s) you press:
- 1 = strong shot, weak option
- 2 = strong option, weak shot
- 3 (or 1+2 on a 2-button cab) = strong option & shot, slower speed
- Start = weak option & shot, faster speed
- you start the game at the highest rank (not shown in the HUD).
The rank increases when the player destroys enemies, collects powerups or medals, or uses a bomb.
You can lower your rank by keeping the lives count low or by grazing bullets.
- last level: 7 (ADVANCE), 5 (NORMAL)
sources:
In The Hunt | Kaitei Daisensou
controls:
joystick = move
1 = fire torpedoes (horizontal attack)
2 = fire missiles (upwards attack)
powerups:
- Missile: cycle from "A" to "M" (=from floating mine to missile):
- "M" at water surface = a tracking missile (best one)
- "M" in the water = a normal missile
- "A" at the water surface = a machine gun
- "A" in the water = a floating mine
- Torpedo: cycles between:
- green = Hyper Torpedo (best one)
- blue = Supersonic Torpedo (shockwave)
- red = Cracker (cluster explosions)
basics:
- touching walls and obstacles does not damage you.
- you must emerge to the surface to attack airboune enemies.
- you can shoot down most enemy missiles.
- once maxed out in power (3 powerups), every extra powerup adds 1 star to the counter.
You earn an extra life when 100 stars are collected.
- best strategy: try to stay on the surface and keep moving forward unless there is an obstacle in front of you.
- last STAGE: 6
sources:
1941: Counter Attack
controls:
joystick = move
1 = fire current weapon (hold to charge a multidirectional shot -> use when surrounded)
2 = bomb (consume 1 VITAL)
basics:
- getting hit will deplete the red "VITAL" guage on the bottom-left. Collect "Pow" items to refill or you will game over when empty. The "VITAL" gauge is also refilled at the end of each mission.
- destroy a wave red enemies to get either a cycling weapon powerup (M-GUN=machinegun, S-SHELL=laser, MISSILE=wide) or a support powerup (side-planes, shadow-planes).
Weapon powerups are timed (check the counter on the bottom-left), starting from 99s. Collect the same powerup to reset the timer.
Side planes can absorb shots, but they will disappear after some hits.
- touching a wall will make your plane spin. You can fire while spinning, attacking enemies in all directions.
- last MISSION: 6
sources:
19XX: The War Against Destiny
controls:
joystick = move
1 = fire with current weapon (hold to charge the lock-on shot -> use only against stronger enemies)
2 = use bomb (hold to charge, up to level 3) (check the icons on the bottom-left, collect "B" icons to restock)
basics:
- easier plane: LIGHTNING (has best HOMING shots)
- red-colored enemy waves release ciclying weapons: the vulcan (blue), the 3-way missiles (red), and the laser (green)(travel through enemies).
- last TARGET: OUTERLIMITS (6th)
sources:
1942
sources:
1944: The Loop Master
controls:
joystick = move
1 (tap) = fire with current weapon
1 (hold) = fill the CHARGE bar (when full the plane will fly up and become temp. invincible)
2 = bomb (check the "B" icons in the top-left)
basics:
- a small golden plane icon flies down the screen at certain times which releases a wingmen icon.
Wingmen add some extra firepower, but are vulnerable to enemy fire.
- during any boss battle, there is an invisible time limit for each battle. The mission is failed when there is at least one core among all boss units are not destroyed within the time limit. Mission failure does not change game progress, but it prevents the player from getting the stage clear bonus.
- last stage: 15
sources:
R-Type
controls:
joystick = move
1 = shoot
1 (hold) = charge plasma cannon (check the "BEAM" gauge on the bottom-left)
2 = send and recall the Force Pod
basics:
- the Force Pod can be used both as a shield and as a weapon (press A to send it).
Most enemies die faster if you ram your pod into them.
When the pod is mobile, moving around freely, it will continuously shoot out pellets.
Touch the pod with your ship to dock it.
The pod can be docked on the front and the back of your ship.
- don't touch the scenery, it will kill you.
- last level: 8
sources:
R-Type 2
controls:
joystick = move
1 = shoot
1 (hold) = charge plasma cannon (check the "BEAM" gauge on the bottom-left)
2 = send and recall the Force Pod
basics:
- the 1st colored weapon powerup provides you a pod that can absorb most enemy shots and also deals a lot of damage with direct contact.
It can be detached and reattached on the front or the back of your ship, changing its lasers firing direction.
- slow-moving walkers release most upgrades: "S"=Speedups (don't take too many), colored weapon capsules, the "M"=Missile capsules (red is for homing, blue is for ground scatter) and the "bit"=option providing extra protection on the top and the bottom of your ship.
The type of lasers the pod fires depends on the weapon colour: red/purple (narrow wave cross-laser), blue (3-way ricocheting lasers, good in tight spaces), yellow (crawling energy streams), gray (short-range exploding clusters, 2nd best one) and green (forward spread bubble shot, best one).
Every time you grab a powerup your pod is upgraded, regardless of the previous one you get.
- the hitbox matches the ship clockpit.
When you die you start back at the beginning of the current stage with no powerup (no midstage checkpoints).
- last stage: 6
sources:
R-Type Leo
controls (international version):
joystick = move, pods aim while docked
1 (tap) = regular shoot
2 (hold) = send off the pods to melee attack enemies (press again to recall them. Check the charge bar on the bottom)
basics:
- do not touch the scenery or you will die.
The pods can fly over most scenery obstacles and absorb bullets.
- the weapons are changed and powered up by 1 of 3 colored crystal items:
- red = Air-to-Air Laser = a powerful horizontal laser beam and horizontal traverse wave
- blue = Reflective Laser = fires multiple ricocheting lasers, similar to the standard R-Type series blue weapon.
- green = Homing Laser = fires semi-homing lasers that can bend at 90° angles -> best one
- other pickups include S=speedups (do not take too many) and M=missiles.
- last AREA: 6
sources:
Juudan Arashi Gundhara
controls:
joystick = move
1 = shoot (hold for fixed aiming direction)
2 = kick -> destroy enemy shots, req. precise timing, risky
3 = bomb (check the "B" icons in the top-left, colleck "CHARGE" packs to refill)
basics:
- destroy suitcases to get and powerup: new weapons, ARMS=missiles, CHARGE=bomb refills.
- last MISSION: 6
sources:
Prehistoric Isle in 1930 | Genshi-Tou
controls:
joystick = move
1 = fire
2 = rotate pod clockwise (if you have it) -> changes pod firing mode
basics:
- collect "P" powerups to acquire the pod and increase its power (up to 5).
- the pod is NOT invulnerable like in R-Type. After taking some hits it will lose its color and the next damage taken will make it disappear.
Once the pod disintegrates, powerups start showing up again.
- besides pod powerups (P) and speedups (S), destroyed eggs also bring money ($, worth from 100 to 1.000 points), a 5s time-bomb, a rapid-fire powerful cannon or an all-encompassing pod shield that makes you virtually invincible.
Now here's the catch: only these last 2 items (the cannon and the shield) restore the pod to its full health once their temporary effect has passed.
- touching walls will only make you bounce slightly.
- it's impossible to get too fast by taking successive speedups.
- last stage: 5
sources:
Recalhorn
controls:
joystick = move
1 = attack
2 = jump -> attack some enemies
3 = open menu to switch form
forms:
- monkey: can jump higher and it can hang from certain vines and ropes and carry itself along hand-over-hand. Attack with a spinning vertical jump that's excellent for taking out the game's many airborne enemies.
- seal: can swim, has a low-to-the-ground horizontal spinning attack, useful for ploughing through groups of land-based enemies and traversing narrow passageways alike.
- lion: it's faster and it's got a lunging bite attack that makes you almost invincible while you're using it, and it's got the foot speed to outrun any hazard that might be chasing you.
basics:
- getting hit will deplete the hearts on the "LIFE" bar on the bottom...
- last area: 4
sources:
Dungeon Magic | Light Bringer
controls:
joystick = move
1 (tap) = attack, pick up, drop
1 (hold until you start glowing) = power/super attack (char-specific, most powerful attack)
2 = jump
2x joystick forward + 1 = charge attack -> deals little damage, but it fells the enemies on the ground
1 + 2 = use magic attack (check the spheres in the upper-left)
basics:
- best beginner chars: Gren the Fighter, Cisty the Archer
- almost all of your experience points will come from collecting treasures.
You gain few experience from defeating monsters.
- consuming food and drink items restores health.
- picking up mice increases the chance to unleash a critical hit.
- there are 3 different elemental weapons (fire, ice and lightning) that deal increased damage against certain enemy types.
The starting weapon and the secret "power" weapon do not deal elemental damage but instead can inflict critical hits randomly.
The "power weapon" increases damage and has a higher critical rate.
- last scenario: 4
sources:
ESPrade | ESP Ra.De.
controls:
joystick = move
1 = primary fire (hold for rapid fire, but it will slow you down)
2 (hold) = piercing attack (autorefill when not in use, check the small blue angled bars in the bottom-left)
3 (tap)= bomb+barrier (check the cyan meter in the bottom-left, refill by collecing "E=ENERGY" cubes. Also refilled when you die.) -> temp. protection, but hard to refill, use only when necessary
3 (hold) = charge bomb+barrier (transform colliding bullets into bonus tokens)
basics:
- easier char: J-B 5th (has spread shot)
- each character has their own unique stages. You can "choose" their stages 2 and 3 depending on the button you use to select your character.
- getting hit will drop 1 hearth from the top-left. Collect "L" items to restock. (score-based extends)
- the hitbox is in the head or part of the torso.
- collect "P" cubes=Power Items to powerup your main weapon.
Once at max shot power, non-zako enemies will start dropping orange Score items instead of Power items.
By collecting 300 orange Score items, the counter in the top-left will start decreasing and enemies will drop bomb energy refills until it reaches 0.
- upon destroying an enemy that will drop Score items, any enemy bullets that are very close to the destroyed enemy will be canceled into more Score items and will inherit the current chain multiplier. Therefore destroying enemies immediately after they attack will result in significantly more items.
- last stage: 5
sources:
Fever SOS | Dangun Feveron
controls:
joystick = move
1 = shot (hold to activate the Power Shot weapon chosen at the start of the game)
2 = bomb (check the "B" icons in the bottom-left) -> temp. invicibility
3 = autofire (if enabled in service mode)
basics:
- best ship: TYPE-C WIDE SHOT, LOCK-ON HOMING SHOT, SPEED 1 (has the smallest hitbox)
- collect "P" items to powerup the main and side shots, up to 3 levels.
- Cyborg Discomen dropped by enemies increases the chain counter by 1 point, up to 999, then awards points equal to the chain.
- last stage: 5
sources:
Guwange
controls:
joystick = move
1 (tap) = normal shot
1 (hold) = activate and control the shikigami (move with joystick, block vertical movements of the main char while active) -> use to shield/slowdown incoming bullets and easily dodge them, attack enemies behind walls or not in front, collect items, clear bullets (bullet cancels only with shikigami kills)
2 = bomb (check the orange/red spheres in the top-left) -> temp. invincibility
3 = autofire (if enabled in service mode)
basics:
- easier char: Hiiragi Kosame/Light Rain (2nd, has wolf shikigami with )
- regular shot works better on cannon fodder, but the shikigami is definitely recommended for all enemies that fire more than a couple of bullets.
Knowing when enemies are about to fire their weapons is excellent because then you can just park you shikigami over them and reap all those shiny coins. Besides, all coins generated with a shikigami attack are automatically sucked into the character.
- last stage: 6
sources:
Batsugun
controls:
joystick = move
1 = shoot (home for autofire with some ships)
2 = bomb (check the counter in the bottom-left)
basics:
- best beginner ship: TYPE-B BELTIANA (homing shot when powered)
- besides collecting powerups, the ship "evolves" every time the experience bar at the bottom gets filled up by consistently destroying enemies.
This evolution is signalled by an explosion, a big "LEVEL UP" message and a considerable change in the weapon's graphics.
The ship can evolve 3 times and powerup 5 times within each experience level.
When you die, you lose these upgrades but keep your experience level.
- last stage: 5
sources:
DonPachi
controls:
joystick = move
A = spread shot (hold for focus/laser weapon + slow down)
B = bomb (diff. if firing spread or focus/laser, get "B" icons to restock, also refilled at the end of each stage)
C = autofire
basics:
- easier ship: Type C (wider shot, but slowest)
- powering up is done by taking "P" items, but you need to get 2 Ps in order to see a step up in firepower.
"B" icons stand for extra bombs, which are also granted at the end of every stage (stage number equals the number of bombs refilled, so at the end of the 4th stage you can get 3 bombs back in stock).
- bees and stars only provide extra points.
- last area: 5 (2 loops)
sources:
DoDonPachi
controls:
joystick = move
A = spread shot (hold for focus/laser weapon + slow down + Aura that deals extra damage))
B = spread bomb (press while holding A for a laser/focused Bomb, get "B" icons to restock, also refilled at the end of each stage)
C = autofire
basics:
- easier ship: Type-C (wider shot, but slowest)
- each ship can be played with a Shot or Laser boost, making the chosen mode of firing more powerful.
- collect "P" items to powerup your ship weapons.
- gold bees, star and pentagons only provide extra points.
- MAXIMUM bonus mode is triggered whenever a bomb is collected when all bomb slots are full.
- last stage: 6 (2 loops)
sources:
Dodonpachi II BeeStorm
controls:
joystick = move
1 (tap) = basic shot
1 (hold) = laser (override basic shot and slows you down, surround you with an aura)
2 = use bomb/energy
3 = auto-fire shot (has lower priority than laser with button 1)
Start = switch ship type (takes a while, cycle through are Type-A, Type-B, Type-C)
basics:
- best ship for beginners: Type-C (blue) with bombs
- after selecting their ship, players then must choose what type of bomb they will use: Bomb or Energy.
Bomb Type acts just like the regular bombs from Dodonpachi.
The Energy Type uses an energy meter instead of bomb items.
The Laser Bomb can only be fired once the meter is at 100%, and is replenished by "scraping" enemy bullets. A "scrape" occurs when enemy bullets come into contact with the ship's graphic, but not the ship's cockpit, which would cause the player to lose a life.
- collecting "P" items will powerup the main weapon up to 4 levels.
If a player gets hit and loses a life, their weapon's power level is only reduced by 1 level.
- last level: 6 (+1 hidden if score > 400,000,000 points) (2 loops)
sources:
Dodonpachi Daioujou | Do Don Pachi: Dai-Ou-Jou | Dodonpachi III
controls:
joystick = move
A (tap) = shoot
A (hold) = laser
B = use a bomb or enter Hyper mode (check the "B" icons or "HYPER STANDBY" in the bottom-left) -> temp. invincibility
C = rapid shot
basics:
- best ship: TYPE-B (wider normal shot, slower ship) + DFSD-014 LEINYAN
- the larger "GP" gauge in the top-left is the chaining meter.
- getting high chains and point-blanking enemies will raise the pink Hyper Gauge in the upper-left corner.
When the meter is filled, a hyper items falls from the top of the screen, unless the player is currently in a boss battle. A player can hold up to 5 hyper items at any one time.
When hyper is activated, all hyper items are used at once with an effect proportional to the amount of hypers consumed (duration and power are both affected).
A hyper causes the player to be invincible for a short while, and amplifies the powers of both normal fire and the laser. Once the timer runs out the player returns to normal.
As a side effect, all enemy bullets move faster when the hyper is activated, increasing the "RANK" difficulty level of the game, until a bomb is used or when the player's ship is destroyed. This effect does not disappear when the hyper wears off.
- last stage: 5 (2nd loop unlocked with all the bees collected)
sources:
Progear: Storm of Progear
controls:
joystick = move
1 (tap) = fire straight "Pilot" shot
1 (hold) = fire "Gunner" frontal focus shot + options auto-locking shot -> weaker + slows you down
2 = bomb (check the "B" icons in the top-left)
3 = autofire straight "Pilot" shot (if enabled in service mode)
pilots:
- RING = TYPE-A Fighter Gambler: Wide shot type, slower speed.
- BOLT = TYPE-B Fighter Militant: Focused shot type, faster speed.
gunners:
- CHAIN = Type Alpha: Focused missile strikes, medium damage.
- NAIL = Type Beta: Spread cannonballs, high damage.
- RIVET = Type Gamma: Homing missile strikes, low damage.
basics:
- easier pilots: GAMBLER PILOT: RING (wide shot type, slower speed) + TYPE-GAMMA GUNNER: RIVET (Heat-seeking missiles)
- collect "P" boxes to power up your weapon (up to 4 levels).
- for extra points, enemy bullets that are caught in enemies explosion disappear and become scoring items (rings or gems).
Your pilot's shot makes rings, while the gunner's shot makes jewels.
You can only get high value jewels by having a high ring count, and as you collect those bigger jewels, the ring counter will drop down (check the counter in the bottom-left).
The rings on the screen are automatically collected when the player shifts to Gunner mode. With the same idea, the jewels on the screen are automatically collected when the player shifts to Fighter mode.
By having a high ring rank, you obtain jewels of high value and vice versa, however said rank is lowered by losing a live or using a bomb.
- last STAGE: 5 (2 loops, accessed only if 1 life is lost or at most 2 bombs have been used)
sources:
Cosmic Cop | Armed Police Unit Gallop
controls:
joystick = move
1 = shot main+missile weapons
2 = fire auto lock-on "LASER" (req. the gauge on the bottom-center, will turn red when almost empty. Auto-refill when not used, or when grabbing an "L" orb) -> use against stronger enemies or when surrounded
basics:
- move towards the left of the screen to slow down, and to the right to speed up.
- collect "P" orbs to powerup the main weapon, colored "M" orbs will provide 3 diff. types of missiles: anti-air (blue), anti-ground walking (orange), anti-ground napalm (red).
Contact with any terrain will cause the missile unit to be lost instantly, so terrain must be avoided at all costs.
- last ZONE: E (2 loops)
sources:
Section Z | Section-Z
controls:
joystick = move
1 = shoot both forward firing gun and lob a grenade, which travels at a downward parabola
2 = turn
basics:
- the "P" powerup will enhance the rate of fire of your laser.
"S" will increase the speed.
All other powerups provide extra points only.
- last stage: SECTION Z
sources:
Wild West C.O.W.-Boys of Moo Mesa
controls:
joystick = move, aim
joystick down = duck, set off dynamite (near a detonator)
1 = shoot
2 = jump (you can't control your jump height and will always jump at the same height)
joystick up + 2 = jump and climb to upper platform
joystick down + 2 = drop platform
joystick up + 1 + 2 = melee spinning jump attack -> not very useful
1 + 2 (while carrying an item) = use item
1 + 2 (while standing on ground, not in midair) = dash attack -> destroy certain stationary barrels. Will momentarily stun a boss.
1 + 2, opposite direction of the dash = dash cancel -> gives temp. invincibility, useful move
basics:
- all the characters in the game play the same. The only differences are their appearances.
- you can safely touch enemies without taking damage. You'll only take damage if the enemy actually shoots or attacks you, except in cases where touching the enemy is the hazard itself (like the barrels that are rolled at you in some levels).
- last stage: 7 (2 loops)
sources:
Mystic Warriors: Wrath of the Ninjas
controls:
joystick = move, aim
1 = shoot, melee attack (near enemy)
2 = jump (combine with joystick up|down to jump to upper|lower platform)
joystick down + left|right + 2 = slide (no temp. invincibility)
basics:
- melee attack are more powerful than any shot.
- the player must defeat box-carrying enemies in order to obtain powerup items. These include:
- shuriken = increase the shooting power up to 2 levels (which differ between characters)
- food (sushi, tempura, udon, sukiyaki) = replenish the life gauge
- blue orb with the kanji shinobi (忍) = surround you with a barrier for a limited period
- yellow orb with the kanji chikara (力) = destroy all on-screen enemies (immediate bomb-like)
- various kinds of jewelry for extra points and temp. invincibility.
- last stage: 9 (2 loops)
sources:
Strikers 1945
controls:
joystick = move
1 = shoot main gun + helpers
1 (hold when having some helpers) = charge helpers shot (release when they flash)
2 = bomb
basics:
- best plane: Bf-109 (has options with auto-locking fire)
- collect "P" capsules to LEVEL UP your weapons. Touching enemies will only LEVEL DOWN your weapon.
- gold bars only provide extra points.
- last stage: 8 (2 loops)
sources:
Strikers 1945 II
controls:
joystick = move
1 = shoot main gun + helpers
1 (hold when having some helpers) = charge helpers shot (release when they flash)
2 = bomb
basics:
- easier plane: Hayate (has wide shot + auto locking options)
- collect "P" capsules to LEVEL UP your weapons. Touching enemies will only LEVEL DOWN your weapon.
- gold bars only give you points.
- last MISSION: 8 (2 loops)
sources:
Strikers 1945 III | Strikers 1999
controls:
joystick = move
1 (tap) = normal shot
1 (hold) = charge shot (Super shot) (check the charge meter at the bottom)
2 = bomb
3 (hold) = auto-fire normal shot
basics:
- easier plane: F/A-18 Super Hornet (has homing subweapon)
- up to 3 power ups can be collected, any after that are worth 4000 points. It is possible to 'power down' at any time by colliding with an enemy craft.
- all bosses have an extra powerful super attack. Whenever a boss uses a super attack, a blue orb is shown, which is its weak spot.
- last level: 8 (2 loops)
sources:
Eco Fighters | Ultimate Ecology
controls:
joystick = move
1 (hit) = shoot
1 (hold) = rapid shoot + charge ball attack
dial = rotate arm with ball
basics:
- the rotatable weapon is also immune to all enemy contact and can be used as a shield.
- collect blue crystals or the same ball you have to level up.
- last stage: 7
sources:
Sorcer Striker | Mahou Daisakusen
controls:
joystick = move
1 = fire main shot and subweapon
2 = use bomb (if you have it, check the counter in the upper-left)
basics:
- best char: BORNNAM
- your fighter has 2 weapons, a main forward-firing shot and a more versatile subweapon.
- the main shot is enhanced by grabbing coins from by "P" bags,
while the subweapon can be changed+upgraded by picking up one of 3 kinds of magic books:
- red gives you extra homing shots that are usually slow, but are good at clearing enemies
- blue gives you a sort of spread shot that hits enemies on the sides and diagonally
- green simply shoots straight and does the most damage.
- last stage: 6 (2 loops)
sources:
Kingdom Grand Prix | Shippu Mahou Daisakusen
controls:
joystick = move
1 (tap) = fire + secondary weapons
1 (hold) = accelerate (check the meter in the lower-left)
2 = bomb (check the counter next the "B" icon in the upper-left) -> stun the opponents on screen
powerups:
- "P" = increase main shot power
- "B" = restock bombs
- "H" = switch secondary weapon to Homing, collect multiple times to incr. its power
- "F/E" switch secondary weapon to Forward, collect multiple times to incr. its power
basics:
- best char: NIRVANA (has the best homing shot)
- the goal is to place as highly as you can at the end of the race (check your position on the top-left).
- best winning strategy: keep holding the acceleration button, avoid enemy fire and stay near the top of the screen or accelerate by holding A.
- you can bump into walls and even enemies without dying, though bullets will still kill you and slow you down.
- after completing the 1st race, you have the option to choose between 2 and sometimes 3 courses.
Depending on what rank you come in at the end of the level, you'll receive an appropriate number of points, much like any traditional racing game.
If you manage to place 1st by the end of the 1st loop (6 races), a 2nd loop is unlocked using the levels that were not used on the 1st run.
sources:
Dimahoo | Great Mahou Daisakusen
controls:
joystick = move
1 = shoot main and magic orbs weapon
1 (hold) = charge shoot and switch color blue<->red (keep holding to switch multiple times and charge the blue meter at the bottom. The more you charge it and the more powerful will be)
2 = bomb (if you have some yellow crystals following your ship. Collect gold crystals from ground enemies to restock) -> temp. invincibility
basics:
- easier char: Karte The Sorceress (homing type)
- collect coins to powerup your main weapon and spell books enhancing your magic.
- collect gold crystals from ground enemies in order to fill up the angled gauge at the bottom.
Once the meter fills up completely, the sound of a chime will go off, and treasure chest with an extra bomb will appear.
- some enemies and all bosses have an element associated with them, as well as their own elemental attacks.
If an attack that is the same element as you hits you, you don't die, but instead you'll level down in shots and magic.
If you use an attack of the opposite element on an enemy, you also do extra damage.
- the ranking system is tied to how many of the 108 individual items you have collected. The more sets you complete (or are close to completing), the more difficult it gets.
So to keep it low just avoid collecting non-powerup items.
Btw once you complete an item set you get a +1 to your multiplier. So, to score high, you need to complete as many sets as possible.
- last stage: 6
sources:
Brave Blade
sources:
Ketsui: Kizuna Jigoku Tachi
controls:
joystick = move
1 (tap) = wide shot
1 (hold) = laser/focus shot + auto-aim options fire -> lower range, reduce ship speed, your satellites will automatically lock onto the nearest enemy and hit it until it dies or leaves the screen
2 = bomb (diff. if firing regular shots or laser) (check the "B" icons in the bottom-left)
basics:
- easier chars: Alice Blackbarn+Lloyd Evansmann (default one, has wide shot, locks onto enemies faster, but slower movement)
- killed enemies release green chips with values that range from 1 to 5. The 3 counters on the upper-left keep track of your chip performance: the 1st row is the sum of all chips collected and also the multiplier to be applied at the end of the stage, the 2nd row is the stage multiplier (depletes when you collect chips using the lock shot) and the 3rd row is the current chip value.
The closer you are when an enemy is killed, the higher the chip value. The extra counter/timer that appears to the side of the 3rd row shows for how long you can extract chips of the current value, and depletes even faster if you kill enemies using the lock shot. The lock shot killings, however, release more chips than the regular shot.
- last stage: 5
sources:
Dark Seal | Gate of Doom
controls:
joystick = move
1 = primary fire
2 = cast current spell (if the magic meter on the left is fully charged, kill enemies to refill. The current spell is indicated by the book above the magic meter, which flips through the spell pages automatically, so you need to wait until it brings up the magic you want to use.) -> no temp. invicibility, cannot use during boss fights
basics:
- best beginner char: Wizard
- best magic spells: thunder, sun
- getting hit will deplete the hearts on the top-left. Collect potions from chests to refill.
- powerups can be obtained from chests only, that temporarily improve your speed, strength, or defense.
- last stage: 5
sources:
Wizard Fire | Dark Seal 2
controls:
joystick = move
1 = primary fire
2 = cast current spell (if the magic meter on the bottom-left is fully charged, kill enemies to refill. The current spell is indicated by the book above the magic meter, which flips through the spell pages automatically, so you need to wait until it brings up the magic you want to use.)
basics:
- easier char: KNIGHT (largest attack)
- getting hit will deplete the hearts on the top-left. Touch the statues to refill mid-stage.
- break chests and collect equipment and items for better chances of survival.
- last stage: 5
sources:
Psycho-Nics Oscar
controls:
joystick = move
1 = fire
2 = jump
3 = get powerup
powerups:
- JUMP = enhances the height
- GRENADE = subweapon: toss small grenades on a short arc
- MISSILE = subweapon: ...
- P.C.U. = bomb
- GUN = improves the firepower of your main weapon -> most useful
- ARMOR (hidden, appear after 1 full rotation) = let you take some extra damage
- QUICK (hidden, appear after 2 full rotation) = activates a rapid fire mode
basics:
- every time you pick up an "N" capsule, it highlights the next powerup in the line. When it's highlighted the power you want, you hit a button to get equipped with it, and the power bar resets.
- collecting 20 "K" icons will also grant you an extra life.
- you can take 3 hits by default (check the red squares in the top-right corner).
You lose all of your weapons when you die.
- last stage: 8
sources:
Avenging Spirit | Phantasm
controls:
joystick = move, crouch, fly (as ghost)
1 = attack, possess (as ghost)
2 = jump (hold for higher jump)
basics:
- best char: ninja (very high jump, can skip platforming sections)
- you must find 3 hidden keys in stage 2, 5, and 6 to see the good ending.
- last stage: 6
sources:
Out Zone | OutZone
controls:
joystick = move
1 = shoot
2 = bomb (if you have it, check the icons in the bottom-left)
powerups:
- "P" = weapon powerup, get 2 for max power
- "B" = bomb, can have up to 10
- "E" = Energy refill
- "C" = Change = weapon change
- "SP" red = 1up
- "SP" white = shield (1 hit)
- "SP" geen = 30% energy extension
- "SP" blue = 50% speed up
- "SP" yellow = flame thrower weapon
- "SP" pink = Super ball weapon
basics:
- the game imposes a time limit in the form of an energy bar that slowly drains as time goes on (check the hearts in the upper-left cornet).
If the bar empties completely, you lose a life.
It is refilled when you pick up "E" icons or complete a level.
The energy bar does not represent health, as touching one enemy or bullet will immediately cost you one life.
- you can use one of two main weapons, and switch between them by picking up "C" icons.
The two main weapon can be upgraded by picking up to two "P" icons.
- last stage: 7 (2 loops)
sources:
FixEight
controls:
joystick = move
1 = shoot
2 = bomb (if you have it, check the icons in the bottom-left)
basics:
- best char: R-LANGELO
- last stage: 7 (2 loops)
sources:
Desert Breaker
controls:
joystick = move
1 = basic attack
2 = dash (invincible while performing)
1+2 = melee attack
3 = bomb
basics:
sources:
Gaiapolis
controls:
joystick = move
1 = basic attack
1 (hold) = block (if you have a shield)
2x joystick = dash attack
joystick 360° rotation = spinning attack
2 = send the companion to attack nearby enemies or pick up items (press again to call the beast back and regenerate your health)
3 = use special attack (if you have it, check the rectangle icon in the top-left)
companions:
- Goblin = a small armored warrior in a blue egg
- Rollin = an armadillo-like creature in a brown egg
- Garuda = a flying baby dragon in a purple egg
basics:
- best char: ?
- when the player picks an egg of the same color while his or her companion is still around, his companion's maximum health will increase.
- last stage: ?
sources:
Sengoku Ace | Samurai Aces
controls:
joystick = move
1 = shoot
1 (hold) = charged shot
2 = bomb (if you have it)
basics:
- best female char: Koyori (bottom left)
- last stage: 7
sources:
Tengai | Sengoku Blade: Sengoku Ace Episode II
controls:
joystick = move
1 = shoot (hold when you have a familiar to charge)
2 = bomb (check the "B" icons in the upper-left corner, collect "B" scrolls to restock)
basics:
- best char: MIKO/Koyori (1st from the left) (her familiar fires very effective homing bubbles)
- collect "P" scrolls released by red and big enemies to LEVEL UP your firepower.
- there are 2 types of hits: bullet and physical.
Bullet hits will kill you instantly and bring you back to your initial power level.
Physical hits (i.e. physical contact with an enemy) will merely stun you for a second and bring your POWER DOWN 1 level.
- to dodge the bullets easily stay on the bottom of the screen and let the options kill the enemies from below.
- last stage: 7 (choose to enter the front gate)
sources:
U.N. Squadron | Area 88
controls:
joystick = move
1 = fire
2 = fire special weapon (if you have it, check the counter in the bottom-left)
basics:
- best beginner char: SHIN KAZAMA (most balanced)
- getting hit will deplete the gauge on the bottom-left.
- rare blinking icons provides midstage refills: the Yashichi pinwheel and blue fuel tanks refills your energy, the ammos restock the special weapons.
- there are also other rare icons: Mobi-chan=insta-bomb, Unicorn=3 hits protection, white star=extra $50,000.
- try to dispose enemies as soon they appear onscreen in order to have less shots to dodge.
- collect "POW" colored capsules from orange enemies to levelup your front vulcan. They come in 3 varieties: green (+1 POW), blue (+2 POWs), gold (+4 POWs).
Check the current vulcan LEVEL and the number of "POW" left before the next levelup in the top-left. The "TOTAL" counter is not relevant.
- get "$" from destroyed enemies (more SCORE=more $) to spend in the shop before each mission. You can stock new planes and special weapons.
Each plane has a different speed, can carry a different set of special weapons and some also have a different front cannon.
- best planes to buy: F20 (cheapest one that provide access to better special weapon in early missions), A10A (has a very useful angled vulcan), F200 (priciest, best one).
- best special weapons to buy: BOMB (=ground bombs, cheap and have a lot of ammos), PHOENIX (=homing missiles), NAPALM (easy to hit ground targets).
- last mission: 10
sources:
Carrier Air Wing | U.S. Navy
controls:
joystick = move
1 = fire
2 = fire special weapon (if you have it, check the counter in the lower left next to "WEAPON")
basics:
- your energy bar is the "FUEL" at the bottom-left.
Even if you aren't moving or firing, your fuel will decrease at the same rate and make you more vulnerable.
Certain enemies in the game carry fuel tanks to replenish your supply.
You can't die simply by running out of fuel.
- whenever you destroy a set of red enemies you'll most likely see a capsule that starts cycling colors:
- red shots fire slow but have the widest path
- green shots which are a more concentrated autofire
- blue shots are simply straight missiles that can do the heaviest damage but are very narrow.
- last mission: 10
sources:
Sailor Moon, Bishoujo Senshi
controls:
joystick = move
2x joystick = dash
1 = attack, throw (near enemy)
1 (while dashing) = dash attack
2 = jump
1 (in midair) = jump kick
joystick down + 1 (in midair) = downward strike
1 + 2 = 360° attack
3 = special attack (must have at least 1 blue crystal in the top-left next to the score. More powerful if there is more than 1)
basics:
- some enemies go halfway off-screen and don't take damage no matter what attacks you use. Only enemies fully on-screen can take damage from any attacks used.
- during the most difficult moments in battle, Tuxedo Mask will appear and throw a rose, which is a bonus drop that restores a large portion of health and damages the enemy.
- last round: 8
sources:
Gun Force | Gunforce: Battle Fire Engulfed Terror Island
controls:
joystick = move, crouch, aim, climb ladders
1 = fire (special weapons have limited ammos, check the counter in the top-left)
2 = jump, get on/off vehicles
basics:
- touching enemies won't kill you, only their shots.
- last MISSION: 5 (2 loops)
sources:
Gun Force 2 | GunForce 2 | Geo Storm
controls:
joystick = move, crouch, aim, climb ladders
1 = fire
2 = jump, get on/off vehicles
basics:
- touching enemies won't kill you, only their shots.
- last mission: 5
sources:
AB Cop | A.B. Cop
controls:
wheel = steer
pedal (hold) = brake
pedal (release) = boost (unlimited)
1 = jump (if you have a "J" icon in the upper-right) -> better saved for bosses, smashing into them while jumping blows off a large chunk of their life
basics:
- you are required to destroy every enemy's vehicle before you can apprehend their leader.
A meter of thug heads appears in the top-left corner ranging from 5 to 7 punks, and you've got to keep ramming into their vehicles until they fall off.
- last mission: 6
sources:
Mystic Riders | Mahou Keibitai Gun Houki
controls:
joystick = move
1 = shoot (hold to charge, check the gauge on the top-left)
2 = throw the broom forward (combine with a direction to aim inverted) -> use often: it can hits multiple times and nullify enemy fire
joystick up, down = spin maneuver -> 1s temp. invincibility
basics:
- you can touch the ground and the ceilings without harm, but not enemies.
- collect red gems to LEVEL UP your main weapon. You only lose 1 LEVEL when hit.
- collect colored orbs to switch your main weapon and charge shot: red = fire+exploding and gold = thunder+spread.
- last stage: 6
sources:
Chariot: Adventure through the Sky - Wonder 3 | Three Wonders
controls:
joystick = move
1 = shoot main weapon + ground bombs -> enable autofire on this
2 = options charged shot (req. 3+ orbs in the tail, unlimited but req. recharging)
basics:
- collect small orange orbs to get more TAIL OPTIONS. The tail provides protection on your back and damage enemies on contact. The orbs are temp. eliminated when you use the charge shot.
- collect colored orbs to switch and powerup your main weapon: red=WIDE SHOT, green=incr. fire rate.
Purple orbs provide a barrier/shield.
- collect heart orbs to increase the "EXTEND" counter on the bottom-left and gain extra lives.
- last STAGE: 7
sources:
Midnight Wanderers - Wonder 3 | Three Wonders
controls:
joystick = move, crouch, aim, climb ladders
1 = shoot
2 = jump (phold d-pad up to grab on platforms above)
2 + d-pad down = dash (not an attack), drop down some platforms
basics:
- you can take multiple hits before losing a life.
You get more naked after each hit.
Collect the lamp to restore your vest (also restored after each stage), or you will lose a life on the next hit.
You will also lose a life if the TIME in the top reaches 0.
- destroy chests and get the colored orbs inside to switch the main weapon:
red=TAIL (=boomerang), green=HYPER, blue=BOUND (bouncing lasers, best one).
These cannot be powered up by collecting more of the same color.
- you can also find various OPTIONs, acting as secondary weapons.
- collect 100 heart cards for an extra life (check the hearts counter in the bottom-left).
- last STAGE: 5
sources:
Bonk's Adventure: Arcade Version | Kyukyoku! PC Genjin
controls:
joystick = run left and right, crouch, crawl
1 = jump
2 = headbutt attack
basics:
- you're given a level select with 21 different stages.
Each stage is extremely short, and the goal is to get the end as quickly as possible, all while trying to rack up a high score.
There are various sports items you'll find lying around the stages, like basketballs.
- after completing 3 stages, you get to select from one of 7 boss battles.
- you can grab smiley faces, which attach themselves to Bonk's head and can be used to either absorb enemy projectiles or extend the length of your own attack.
you no longer bounce off foes when you dive bomb them. Instead, you just keep falling until you hit the ground.
sources:
Marchen Maze
controls:
joystick = move
1 (tap) = fire bubbles
1 (hold) = fire bigger bubbles (if it is held down for too long, it will burst and she will start blowing a new one)
2 = jump
powerups:
- Red Crystal = give Alice a random amount of extra points, from 1000 to 7650
- Blue Crystal = blow enormous bubbles for a short period of time
- Green Crystal = blow bubbles in three directions for a while
- Balloon = save Alice from falls (not if caused by the Jikangire Monster)
- Usagi No Nuigurumi = miniature rabbit will cause a rotating barrier of orbs which protects Alice against the enemies' attacks to appear around her for a short period of time
- Mini Watch = give Alice forty-five extra seconds to finish that current world in
- Boots = allow Alice to jump much higher than she normally can, for a short period of time
- Yellow Crystal = cause the enemies to stop moving for a short period of time
- Purple Crystal = walk much faster for a while
basics:
- always keep a fully charged bubble around you as a shield for incoming enemies.
- last round: 9
sources:
Cybattler
controls:
joystick = move
1 (tap) = fire main + turn direction
1 (hold) = auto-fire cannons + locked direction (check the CHARGE meter at the bottom)
2 (tap) = melee sword attack
basics:
- in each mission/stage different weapons are given and cannot be powered up.
- all guns are automatic, and charge up when not being fired, making the 1st handful of shots more powerful.
- whenever you're holding down either of the attack buttons, you will continue to face in the same direction and strafe instead of turning.
- contact with enemies alone will not hurt you.
- last mission: 6
sources:
Dragon Breed
controls:
joystick = move
1 = fire
1 (hold) = charged fire
joystick down + button 2 (on platforms) = jump down dragon (press button 2 again to jump over)
basics:
- the dragon is immune to enemy attacks, capable of blocking most projectiles and damaging enemies on contact. Kayus, however, is not.
The dragon body is flexible and responds to the boy movement, enabling Kayus to use Bahamoot as a mobile shield or as a whip-like weapon. The player can also circle the tail around a group of enemies to kill them. The tail of the yellow or blue dragon can be coiled around the player to offer almost complete invulnerability for a limited time.
- there are 4 different types of orbs, each of will change the dragon to a different color and grant him a new attack power:
- red = breathe a flame.
- gold = enables the dragon body to fire crescents in all directions.
- silver = produce up to four miniature dragons, which home in on enemies.
- blue = fire downward bolts of electricity from its underside.
- the player can further enhance the dragon powers by picking up the same type of orb up to three times.
- last stage: 6 (2 loops)
sources:
Great Ragtime Show, The | Boogie Wings
controls:
joystick = move, aim (when human)
1 = fire
2 = release hook grab (dragged objects cause damage to anything they collide with), jump (as human)
joystick down + 2 (while inside vehicle as human) = exit vehicle
basics:
- the biplane can sustain two hits before exploding, but even then you don't lose a life, instead you take control of the pilot and the game becomes sort of a run-'n-gun!
As human, just run over vehicles to enter them.
The pilot is super-humanly fast and strong, even capable of outrunning everything and picking up things much bigger than him, and damaging enemies by jumping on them, but one hit will still defeat him.
- to view the best ending answer "No" to the final boss.
sources:
Super Spacefortress Macross
controls:
joystick = move
1 = fire
2 = bomb
basics:
- pick powerups to change form.
- each form has a different weapon scheme, each powerable up to level 3:
- Fighter has a spread shot
- Gerwalk has a Beam
- Battroid fires homing missles.
- last stage: 7
sources:
Super Spacefortress Macross II | Chou-Jikuu Yousai Macross II
controls:
joystick = move
1 = fire
2 = bomb
basics:
- you must aquire a predefined number of points before the time ends in order to advance to the next level (check the "CLEAR SCORE" at the top of the screen).
- items give you additional bombs, as well as convert your Valkarie between Fighter and Gerwalk modes.
- repeatedly getting weapon items will increase the firepower of the Gerwalk and Fighter modes.
sources:
Macross Plus
controls:
joystick = move
1 (tap) = fire
1 (hold) = lockon missile (release to fire)
2 = bomb
basics:
- easier jet: VF-11
- the standard attack can be upgraded and more bombs collected by collecting powerups dropped by special enemies.
You can gain side missiles that join your standard attack this way too.
Other, rather hard to find, powerups transform your fighter into Gerwalk and Battroid mode.
- last area: 8 (2 loops)
sources:
Viper Phase 1: USA (new ver.)
controls:
joystick = move
1 = fire vulcan + subweapon
2 = bomb (collect "B" icons to restock. Also refilled after each stage, so always use them all against bosses) -> delayed temp. invincibility
basics:
- subweapon can be switched via a rotating icon:
- L = Laser -> very narrow but the most damaging
- M = Burst Missile
- N = Napalm Missile -> easy chains
- W = Wide Vulcan -> the weakest, avoid it
- picking up another subweapon icon of the one you already have only gives you more points.
The only way to power up is by collecting "P" icons (up to 4 levels).
- medals only provide extra points.
- last stage: 8 (2 loops)
sources:
Battle Bakraid
controls:
joystick = move
1 = main shot (stop shooting for a while to charge a special shot)
2 = bomb (the distance varies depending on how long you hold the button)
3 = change options formation
basics:
- easier plane: F-101 SIBER TIGER (has homing missiles)
- pressing different buttons when choosing a fighter can alter its ability:
Main shot power type: Press 1 button
Bomber power type: Press 2 button
Side shot power type: Press 3 button
Speed up type: Press Start button
- rapid fire rate can be increased by holding C then press A when inside a stage, or decreased by holding C then press B when inside a stage.
- the rank increases when the player collects items, fires its weapons, or uses its bombs.
The rank will only decrease when the player grazes bullets or loses lives.
As rank increases, more bullets spawn, some bullets move faster, attack patterns are generally trickier to negotiate, and enemies gain health.
- last stage: 8 ("Advance"), 6 ("Normal")
sources:
Cannon Dancer | Osman
controls:
joystick = move, climb walls, ceilings
1 = attack
2 = jump
3 = bomb (if you have it)
joystick up + 2 = grab upper platform
joystick down + 2 = slide
joystick down + 2, 1 = slide kick
joystick down + 2, 2 = grab certain enemies and flip them over
joystick down + 2, left|right = dash
basics:
- there are 4 types of powerup capsules that the player can retrieve by destroying certain floating containers:
- the red capsules will increase the player character's attack power by allowing him to create body images of himself that will mimic his movement. The main character's attack power can be determined by the color of his pants. In his starting level, the character's pants will be blue, which changed to purple with the first powerup (allowing him to create one body image), followed by red (two body images) and white (four body images). The strongest attack level is black, which increases the player character's attack range. If the player takes damage from an enemy Osman's attack power will be reduced by one level.
- green powerup that restores one health point
- yellow powerup that increases the maximum health by one point
- blue powerup that restores the player's complete health.
- last stage: 6
sources:
Dynamite Dux
controls:
joystick = walk
1 = punch, use current weapon (check ammos in the bottom-left)
1 (hold) = charged punch (cannot move while charging)
2 = jump -> use to avoid enemies and projectiles
2, 1 = mid-air kick attack
basics:
- best weapon: Flamethrower
- when hit you lose your current weapon, but you can grab it again if not out of reach.
- do not stay in the same screen for too long or a demon will appear.
- last stage: 6
sources:
Armored Warriors | Powered Gear: Strategic Variant Armor Equipment
controls:
joystick = move
2x joystick left|right = dash
1 = arm attack (diff. if combined with a direction, in midair, or while dashing), grab body parts
2 = jump
joystick down + 1 (in mid-air) = downwards attack -> can inflict a few more hits depending on leg type
3 = subweapon attack (limited ammos, check the counter in the bottom-left)
1+2 = desperatation attack (consumes health)
2+3 = desperatation attack #2 (consumes more health)
basics:
- best mech: GRAY | AEX-10H GULDIN (more powerful, but slower)
- getting hit will deplete the blue gauge on the top-left. Collect repair items to refill (screwdriver, pliers, oil tank, etc.).
- killed enemies will drop weapon arms, subweapons and legs.
- best body parts: electric stun arm (orange arm weapon)
- pick up radios
- last MISSION: 7
cheats:
- Select Starting Weapon: On the mission start screen (where the game says "Terminate them!"), hold Jump + Sub-Weapon and a direction on the joystick to start with a certain weapon.
sources:
sources:
Dolphin Blue
controls:
joystick = move, aim
A = fire
B = jump
C (when the meter at the bottom-left is full) = special attack
basics:
- last log: 5 (different ending depending on how many medals you collected during the last stage)
sources:
Tobe! Polystars
controls:
TODO
sources:
NGAES
NEOGEO arcade controller:
Stick A B C D
NEOGEO controller pad:
D
Stick Select C B
Start A
NEOGEO AES unibios keys:
at boot logo press A+B+C for extra options (change region and machine type)
when playing press Start+Select | Start+B+C+D for extra options incl cheats
(A)+(B)+(C)+(D) Memory Card Manager
... http://unibios.free.fr/howitworks.html
Magical Drop 2
sources:
Ironclad | Super Iron Brikinger | Choutetsu Brikin'ger
sources:
Galaxy Fight: Universal Warriors
joystick = walk, jump, crouch, block (not in midair)
A = light attack
B = normal attack
C = strong attack -> avoid using when approaching
C (some chars also B) = grab+throw -> difficult to pull, use when the opponent is blocking or stunned
2x joystick left|right = dash, backstep, throw opponent in midair -> 50% more powerful attack and damage while dashing. Risky, avoid.
D = taunt and tease your opponent -> you are open to attack while doing so, and has no effect in the battle.
basics:
- some stages scrolls indefinitively.
- last opponent: FELDEN (10th)
sources:
Waku Waku 7
sources:
Last Blade | Bakumatsu Rouman: Gekka no Kenshi
controls:
TODO
sources:
Last Blade 2
sources:
Prehistoric Isle 2 | Genshitou 2
sources:
controls:
joystick = move, crouch, climb stairs
A = shoot (can be combined with a direction)
B = jump
C = throw a grenade (check the "BOMB" counter) (no recovery time)
joystick down + C (inside a vehicle) = throw a grenade (check the "BOMB" counter)
joystick down + B (inside a vehicle) = get out
A + B (inside a vehicle, while still have some energy) = frontal attack (will self-destruct on impact)
weapons list:
-
H = Heavy Machine Gun = excellent all-around weapon. Use on any and everything
-
F = Flame Shot = very strong blast of fire. Quite powerful. Use on groups of soldiers/tanks, or save for bosses.
-
R = Rocket Launcher = extremly powerful rockets, with limited homing ability. Best if used against tanks and other machinery.
-
S = shootgun = hands down the strongest weapon. With only limited range.
basics:
-
there's no difference between the chars except for looks.
-
don't waste special weapons on shields. Shielded soldiers will toss aside their shields when they need to fire, so shoot at them only at this instant. Or use your knife if you manage to get close enough.
-
use your knife against lone enemies. No need to waste 10 rounds of your Heavy Machine Gun on a single bastard!
-
many hostages will leave powerups after being rescued.
-
last mission: 6
sources:
controls:
joystick = move, crouch, climb stairs
A = shoot (can be combined with a direction)
B = jump
C = throw a grenade (check the "BOMB" counter) (no recovery time)
C (inside some vehicles) = fire heavy ordinance
joystick down + C (inside a vehicle) = throw a grenade (check the "BOMB" counter)
joystick down + B (inside a vehicle) = get out
A + B (inside a vehicle, while still have some energy) = frontal attack (will self-destruct on impact)
weapons list:
-
H = Heavy Machine Gun = each bullet having roughly 2x the power of pistol rounds.
-
R = Rocket Launcher = fires 2 slightly homing rockets from its barrel. Like the bombs, you can only have 2 onscreen at a time. Its range is limited to a flared cone extending up to 45 degrees from the direction it was fired. Slightly less powerful than grenades.
-
F = Flame Shot = fires a burst of flame roughly 2/3 screen. Damage to vehicles depends on its exposure to the burst.
-
L = Laser Rifle = fires a steady stream of coherent light. More powerful than the "H". Cannot be fired in diagonals.
-
S = shootgun = still the kickass weapon it was in MS1. Although its range is limited to 1/3 screen from the barrel tip, it packs enough heat to knock soldiers back about 100 feet, and makes short work of tanks. A single blast has the strength of 2-3 grenades. Use it sparingly.
basics:
-
there's no difference between the chars except for looks.
-
don't waste special weapons on shields. Shielded soldiers will toss aside their shields when they need to fire, so shoot at them only at this instant. Or use your knife if you manage to get close enough.
-
use your knife against lone enemies. No need to waste 10 rounds of your Heavy Machine Gun on a single bastard!
-
many hostages will leave powerups after being rescued.
-
last mission: 6
sources:
Viewpoint
controls:
joystick = move
A = normal shot
A (hold) = charged shot (can pass thru multiple enemies, no need to fully charge)
B = use bomb (check the colored icons in the bottom-left. you can stock up to 3 bombs, and if the stock is full the next bomb will replace the oldest one)
items:
- pod = add 2 options (always the 1st item to appear)
- blue barrier/shield (changes its color after getting hit)
- H = Homing = homing missiles bomb (green)
- W = Wave = shock wave bomb (blue)
- F = Nova = fire wall bomb (red)
- star = extra points
basics:
- it's always better to escape enemies by doing lateral moves instead of forward/backward evasions.
- each boss has a weak spot that should be exploited with charge shots.
- last level: 6
sources:
Power Instinct | Gouketsuji Ichizoku
controls:
joystick left|right = walk
2x joystick left|right = dash
joystick back (hold) = defend
joystick up = jump
A = Weak Punch
B = Weak Kick
C = Strong Punch
D = Strong Kick
joystick forward + C = Throw/Hold
basics:
TODO
sources:
Fatal Fury: King of Fighters | Garou Densetsu: Shukumei no Tatakai
controls:
joystick = move, crouch, jump, block, change plane without attacking (when the opponent is not on the same)
A = punch (diff. depending on the opponent distance and plane)
B = kick (diff. depending on the opponent distance and plane)
joystick forward + C (close to opponent) = throw -> very powerful, always use when the opponent is stunned
basics:
- best beginnner char: ANDY BOGARD (has the Zaneiken rushing elbow, the beste special)
- when you and your opponent are on different planes, it is not possible to perform special attacks.
You can still move around on your plane, but each normal attack causes a so called 'plane attack', which means that your fighter will jump onto the other plane to attack the opponent.
In FF1, only opponents can initialize plane switches, but in FF2 and FFS fighters can switch planes by pressing A+B.
- last opponent
sources:
Fatal Fury 2 | Garou Densetsu 2
controls:
joystick = move, crouch, jump, block, crawl, change plane without attacking (when the opponent is not on the same)
A = weal punch
B = weak kick
C = strong punch
D = strong kick
A+B = switch plane
C+D = strong sttack (knocks opponent to the opposite plane)
joystick forward + C (close to opponent) = throw -> very powerful, always use when the opponent is stunned
2x joystick back = backstep
basics:
- beginnner char: ANDY BOGARD
- last opponent: Wolfgang Krauser
sources:
Fatal Fury 3 - Road to the Final Victory | Garou Densetsu 3
sources:
Real Bout Fatal Fury
sources:
King of Fighters '94
sources:
Art of Fighting | Ryuuko no Ken
controls:
TODO
sources:
Ryuuko no Ken 2
Samurai Shodown | Samurai Spirits
controls:
joystick left/right = move
2x joystick left/right = move
A = Weak Slash
B = Medium Slash
A + B = Strong Slash
C = Weak Kick
D = Medium Kick
C + D = Strong Kick
joystick left/right + B|D|C+D (close range) = Throw
A | B | A+B while unarmed (must clash hit with a weapon) = Weapon grab
basics:
- When the Rage gauge is full, your damage is increased.
- Rage gauge is increased when you take damage.
Rage gauge goes back to 0% after certain time period has passed.
- Weapon clash is initiated when weapon hitboxes collide.
Characters enter a state where they push each other, and the one who presses more buttons will cause opponent's weapon to drop. There is also randomness factor.
When neither character wins the weapon clash, both characters drop their weapons.
Weapon clash can also occur when both characters run at each other.
Weapons take damage when they exchange hits, and they can be broken.
sources:
Samurai Shodown 2 | Shin Samurai Spirits
sources:
Samurai Shodown 3: Blades of Blood
sources:
Zed Blade | Operation Ragnarok
controls:
joystick = move
A = fire all weapons
B = deploy the bomb, a powerful energy outburst that makes the ship invincible as long as it lasts (check the icons in the bottom-left. Collect orange capsules to restock. Blue capsules will upgrade all bombs to "HYPER" status for the current life)
basics:
- movement speed is fixed according to the pilot you choose at the start of the game. Uncle Beard is slow, Ms. Charlotte flies at middle speed and Swift Arnold is fast, and while their ships have different sprites they all seem to posses the same hitbox areas.
Once the pilot is chosen you must configure the ship's weaponry in 3 steps: SHOT, MISSILE and REAR. There are 3 options for each weapon and cannot be switched after the game is started.
- upgrade items and extra bombs appear inside certain enemies, which must be destroyed for you to take them.
Powerups cycle continuously through P (=frontal SHOT), M (=MISSILES) AND R (=REAR).
It takes 3 powerups to max out each respective weapon, and the good news is that you're downgraded only 1 level for all of them when you die. Upon every death two random items will appear from the right, so if you're fast enough it's possible to regain maximum frontal power almost at once.
All items, including extra bombs, will bounce on the left border of the screen and disappear to the right.
- last STAGE: 8
sources:
Ninja Commando
controls:
joystick = move
A = attack
joystick down (hold until your character glows), up + A = charged attack
B + direction = evade (no temp. invicility)
B + direction, A = Attack Evade (throwing stars go in the opposite direction of your movement)
C = ninja trick (drains life meter)
basics:
- easier char: JOE (has spread shot)
- if you get 3 blue glowing scrolls (which appear beneath your score) for your character, your character will change into a beast.
While morphed, you are invincible, and if you hit the A button, your beast does a particular attack.
After a few seconds, you will change back into your character.
- last stage: Europe
sources:
Captain Tomaday
controls:
joystick = move
A = left punch shoot
B = right punch shoot
C (when you have clones) = formation change
basics:
- attacking with one fist for a while makes the other grow in size and power, eventually turning Tomaday's other first into a 1-ton weight which does more damage than the usual fist.
- throughout the level, tomato cans will fall from the top of the screen. If Tomaday hits one of these, it turns into either a gem or token for points, or a powerup in the form of a capsule pill.
- last level: 5
sources:
Andro Dunos
controls:
joystick = move
A (tap) = fire main weapon
B = switch weapon TYPE: forward-focused, backward-focused, diagonal green lasers, forward spread (check the HUD in the top-left)
A (hold when having 1+ blue weapon level) = charge shot (consumes 1 blue weapon level) -> use sparingly
basics:
- powerups are handled by taking the items that cycle according to 4 colors, each one of them upgrading a specific portion of the ship's firepower:
blue "S" corresponds to the main weapon, red "B" powers up the little lasers, yellow "M" upgrades your guided missiles and green "U" adds auxiliary pods that block bullets, whose behavior depends on the type of weapon you're using.
When you die you lose 1 level of the main weapon only (check the current levels in the top-left HUD).
- black "B" orbs only provides Bonus points.
- last STAGE: 8 (2 loops)
sources:
Aero Fighters 2 | Sonic Wings 2
controls:
joystick = move
A = shoot
B = bomb
basics:
- best planes: FS-X, F-14 (have seeking missiles)
- last stage: 10 (2 loops)
sources:
Aero Fighters 3 | Sonic Wings 3
controls:
joystick = move
A = shoot
B = bomb
basics:
- best planes: F-22 RAPTOR Mao Mao
- last stage: 8 (2 loops)
sources:
Last Resort
controls:
joystick = move, inverted aim the orb
A (tap) = shoot
A (hold until the "POW" gauge on the bottom-left is full) = charge the orb shot (if you have it)
B = lock the orb in its current position
powerups:
- "H" = set of straight missiles with very slight homing ability
- "L" = straight lasers
- "G" = 2 napalm bombs with trailing capabilities dropped above and below the ship -> best one
- "S" = boost your speed and maneuverability
- "Z" = slow you down
basics:
- powerups are defined by their inner characters (G, H or L) and their cycling colors (red or blue).
Take any of them to activate an invincible satellite that remains permanently attached to the ship and can be used both for offense and defense, since it blocks all regular enemy bullets.
The color of the last powerup collected is also important for the charge attack because it defines how the satellite behaves upon hitting a wall. Red will make it trail along the surface, blue will make it bounce around.
Upon collection of the 2nd powerup the letter inside it activates its corresponding weapon
It then takes just 2 successive powerups to max out the ship's attack power.
You can cruise through the game with any of these weapons, but at certain spots the ground bombs (G) are certainly more helpful.
- last level: 5
sources:
Pulstar
controls:
joystick = move, inverted options aim
A (tap) = shoot
A (hold) = charged shoot (check the right part of the bottom bar)
B = lock options aiming directions
A + B = bomb-like panic attack (diff. for each weapon) -> sacrifices the force pod
powerups:
- N = wave shot weapon
- P = bouncing lasers weapon
- T = trailing homing lasers weapon
- R = straight laser weapon
- F = electrical purple field weapon, damages by contact but doesn't stop bullets (need tapping the shoot button to keep the max radius)
- S = speed-up -> useful, always collect them
- C = charge speeder
- I = add an option that hover above or below the ship and grant a little extra directional firepower. They are also capable of blocking regular bullets.
basics:
- taking any of the 5 available weapon types creates the pod at the nose of the ship.
The 1st pod is small and offers little protection, but as soon as the 2nd powerup is taken it grows to its normal size.
- last stage: 8
sources:
Blazing Star
controls:
joystick = move
A (tap) = shoot
A (hold) = charge shoot (release to fire, check the "SHOT" bar at the bottom-left, has some cool down time)
B = tap while firing the charge shot to spread
basics:
- easier ship: HELL-HOUND (has homing missiles)
- "P" powerups will increase firepower up to 4 levels, further ones are worth 300 points each.
- blue "BONUS" jewels and "LUCKY" panels only provide extra points.
- the "EVENT ITEM" / Rate Up Angel gives you a score multiplier depending on the color it has when its picked. To increase its value you have to avoid it until it leaves, it'll return with a different color, increasing its value.
- despite the "BOSS TIMER", most bosses don't actually timeout until long after the timer reaches zero.
- last STAGE: 7
sources:
Cyber-Lip | Cyber Lip
controls:
joystick = move, aim, crouch
A = fire current weapon (check the ammo counter in the bottom-left)
B = jump
joystick up + B = higher jump
joystick down + B = slide -> not an attack, use to avoid bullets
C = switch weapon (check the label in the bottom-left)
basics:
- collect squares with a letter inside to get and refill weapons (kept also if you die).
- on most stages the 1st door with the word "IN" will lead you to the ammo room (refill the ammos of all the weapons).
Upon entering the room all of the weapons you currently possess will be reloaded to full.
- last stage: 7
sources:
Spinmaster | Spin Master | Miracle Adventure
controls:
joystick = walk, aim, crouch
A = attack (hold to charge)
B = jump (combine with joystick down to drop platforms) -> you can also attack enemies by jumping on them (more risky)
C = bomb attack (check the "B" icons in the top-left) -> temp. invincibility. Always use when about to get hit, "B" bomb refills are more common than health. Use all the remaining bombs against bosses as they are refilled after each stage, unlike health.
joystick down + A + B = sliding attack
basics:
- getting hit will deplete the red bars on the top-left. Collect fruits to refill (very rare).
- destroy chests to get diff. weapons. Best ones are "DOUBLE"=green shurikens and BOMB. Weapons cannot be powered up.
- coins only provides extra points.
- last STAGE: 5
sources:
Top Hunter: Roddy & Cathy
controls:
joystick = move, crouch, aim up
A = attack (tap rapidly for a combo attack), grab enemies and objects (press again to throw)
A (hold for 2s) = arm stretch -> reach distant objects
B = jump -> also works as an attack for most enemies
C = switch background/foreground plane -> can stun enemies by landing over them
special moves:
joystick qcf + B = slide
joystick qcf + A = Plasma Buster
joystick down + A (during jump) = Atomic Bomb
joystick df (charge), f + A = Turn Attack
joystick d (charge), u + B = Rolling Attack
basics:
- getting hit will deplete the gauge on the top-left. Collect food and heart orbs to refill (rare).
- you will lose a life if the TIME counter on the top reaches 0, so collect all the "TIME" items you can.
- you can damage enemies by throwing stuff, grabbing and jumping over them.
- to increse your attack power, you can find a gold star "POWER" item, guns and pilotable mechas.
- a BONUS GAME can also be found through secret areas in each level, where you will ride a skateboard.
- each planet consists of 2 levels, each one ending with a boss fight.
- last stage: FIRE PLANET
sources:
Shock Troopers
controls:
joystick = move
A = shoot (hold for autofire + keep aiming direction)
A (near emeny) = melee attack -> enemies killed with this will give you a random item
B = evasive maneuver (roll, crouch, or jump)
C = throw bomb (unique for each char, check the counter in the lower-left) -> temp. invincibility, use often to avoid enemy shots
D = switch char (if playing on Team Battle Mode)
basics:
- after beginning a game, you can choose to go it alone in "Lonly Wolf Mode", or you can choose 3 chars in the "Team Mode" and switch between them on the fly.
The latter of the 2 modes will cost you a very slight reduction in health, but this reduction is very little, so do not hesitate to select it.
Each character will have less bombs in Team Mode, but they each have their own stock, so you actually have more bombs in total.
- last mission: 6
sources:
Shock Troopers: 2nd Squad
controls:
joystick = move
A = shoot (hold for autofire + keep aiming direction)
A (hold in vehicle) = charged attack
A (near emeny) = melee attack -> enemies killed with this will give you a random item
B = throw bomb (check the counter in the lower-left)
A + B (in vehicle) = "Shock Attack" bomb
C = jump -> temp. invincibility, use often to avoid enemy shots, enter and exit vehicles
basics:
- easier char: LIGHTNING EYES LULU (has WIDE SHOT as main gun)
- finding 3 "P" powerup items will raise your weapon's level up to a max "Lv.3" (check the HUD in the bottom-left).
- last mission: 5
sources:
Blue's Journey | Raguy
controls:
joystick = move, duck, climb, enter a store or hut
A = attack with current weapon, throw
B = jump, swim
C = switch size (anytime) -> you can't attack while small, but you move faster and jump higher
basics:
- you can attack most enemies with you weapon, or by jumping on them and throwing away.
- collect red flowers used as currency in SHOPs to buy powerups (check the counter in the bottom-left).
To make a SHOP appear in the area you must find a clover/trefoil.
- destroy purple flowers to release powerups and weapons.
- getting hit will deplete the hearts on the top-left, buy the "FLOWER HONEY" pot at the SHOP to refill.
- last stage: SARGE SPACE
sources:
Windjammers | Flying Power Disc
controls:
joystick = move
A + direction = slide, throw disc
A + half-circle forward (back, down, forward or back, up, forward) = curve throw -> useful for areans with barriers
A (hold as the disc comes towards you) = block -> if you block too early, the disc will deflect farther from you.
A (tap repeadetly while standing under a disc in the air) = charge special throw
B = lob/toss disc -> use only when the opponent is near the net
basics:
- best beginner chars: H.MITA (Japan), S.MILLER (U.K.)
- to catch a thrown disc, simply walk/slide into it's trajectory as it flies towards you.
You MUST be facing towards the disc's trajectory to catch or block it!
If the disc flies at you and you're facing the opposite direction, your character gets knocked down and stunned for a few seconds.
- watch your sliding! Sliding isn't always necessary and you may end up sliding right past a throw disc.
- as soon as you receive the disc, hit A quickly to throw the fastest possible throw you can.
If you hold onto a disc longer, your throw speed will be slower! -> can be useful to wind down the clock.
- whoever has the most points at the end of the round (30s by default),
or gets to the winning score first (12 points by default) wins that round.
Whoever wins 2 rounds first takes the match.
- scoring:
- red goal area = 5 points
- yellow goal area = 3 points
- disc dropped = 2 points to the opponent
sources:
Slap Shot | Slapshot
controls:
joystick = move
1 = shoot
2 = slice
1+2 = use "SPECIAL TECHNIC" shoot (when the "POWER" gauge on the bottom-left is full)
basics:
- you must score 2 points to win each round, and win 2 rounds to end the match (check the counter and the stars in the top-left).
sources:
Battle Flip Shot
controls:
joystick = move
A (when the ball gets to you) = super shot (you can direct your super shot up or down by holding the joystick)
B + direction = slide
C = taunts your opponent
B + C = alternative taunt
basics:
- best chars: Mr. Justice, Bloody Wolf
- both you and your opponent have 6 targets, and once all 6 have been destroyed by the bouncing ball, you'll win the round (or lose the round).
- Taunts are mainly for comedic purposes, but they do add 10 points to your score for every taunt you complete - you have to be careful though not to taunt too much while the ball whizzes right by you.
sources:
Bang Bead
controls:
joystick = move
A = hit the ball
B (no direction) = provoke + charge power shot
B + direction = slide
C (when the meter at the bottom is full) = Power Shot
basics:
sources:
NGP
controls:
stick = move
A = shoot current weapon (check the icon and counter in the bottom-left)
B = jump
O = switches to your second weapon and back again (incl. "B"=grenades)
basics:
sources:
NES
USA/EUR controller ASCII art:
| |
________________|_|__________________________________
| _________________________________________________ |
| | |_____________| | |
| | ___ ,-------------. | |
| | | | |_____________| Nintendo | |
| | ___| |___ ,-------------. | |
| | | ,-. | |SELECT START| ___B ___A | |
| | |___ `-' ___| ;=============` |,-.| |,-.| | |
| | | | | === === | |._,| |._,| | |
| | |___| ;=============. '---' '---' | |
| |_________________|_____________|_________________| |
|_____________________________________________________|
Teenage Mutant Ninja Turtles III: The Manhattan Project
controls:
d-pad = move, grab
A = jump
B = attack
A+B = special move (consume health)
basics:
- easier char: ?
- last stage: 8
cheats:
- Stage Select and more: Up, Up, Down, Down, Left, Right, Left, Right, A, B, Start (on title screen)
sources:
Joy Mech Fight | Joy Mechs Fight
controls:
TODO
sources:
Power Blade | Power Blazer
controls:
d-pad = walk, crouch, aim up, climb ladders, enter doors
A = jump (hold to jump higher)
B = throw your boomerang (travel farther if the "POWER" meter on the top is filled, collect stars to increase the max range)
Select = use your special weapon (limited uses, check the counter in the top-left)
Start = pause and change special weapon (check the icons on the top-left)
basics:
- getting hit will deplete the "PLAYER" red gauge on the top-left. Collect heart items to refill.
- finding the helmet will turn you into to a robot, which has a more powerful weapon.
When the 3 dots in the top-right are depleted you turn back into the human form.
- last SECTOR/stage: 6
sources:
Kaiketsu Yancha Maru 2: Karakuri Land | Kaiketsu Yanchamaru 2 | Kid Niki 2
controls:
d-pad = walk, crawl, aim up
A = jump
B = attack
Start = pause and select a magic spell to use (limited uses, check the flask counter on the bottom-right, collect small red flasks to restock) -> animal transformations aren't very useful
basics:
- getting hit will deplete the 3 red spheres on the bottom. Collect the geisha faces to refill.
- destroy bells to get items: red flask=magic restock, geisha face=health, coins=extra points.
- last stage: ... (8th)
sources:
Banana Prince | Bananan Ouji no Daibouken
controls:
d-pad = walk, enter doors
A = jump
B = attack
d-pad down + B (hold on any surface where you have both feet planted on) = grow a vine a climb over it -> use to reach higher places, perform a longer somersault if jumping from the top of the vine
d-pad down + A = slide under narrow passages -> get stun if hitting a wall
basics:
- getting hit will deplete the bananas on the bottom-left. Collect bananas from enemies and shops to refill.
In some doors you will also find a girl that heals you completely.
- more powerups include: Flower (Increase vine length), Mini-Dragon (temp. invulnerability), old man/Dragon Master (=ally that attack enemies and pick up items that he touches. Press d-pad up+A to make him circle you).
- collect rings dropped from enemies as a currency to spend in shops.
After each stage you have to enter one door to proceed (from left to right):
- Bonus Island (board game-like, also accessed for free by touching a pink bird in stages)
- Weapon shop (just press B to quit without buying)
- Casino
- last stage: 7-3
cheats:
- debug menu with stage select: At the title screen, press and hold Left, A, Select & Start and then press Reset. If done right, the game should start on the debug menu.
sources:
Gremlins 2: The New Batch
controls:
d-pad = move
A = jump
B = attack (attacking in mid-air causes you to stop moving and fall, which is bad if your over a pit)
Start = pause and show the ITEMs you have: GIZMO=lives, BALLOON=(pitfalls life saver), hearts=HPs, CRYSTALs=shop currency
basics:
- getting hit will deplete the hearts in the top-left. Each heart is 2 HP, so if one if the Heart throbs, it means you got one HP left for it.
You can only get health refills from shops (Heart Bottle).
Getting hit will also knock you back, so always try to kill enemies first to avoid extra damage from stage hazards.
- killed enemies will drop:
- CRYSTAL = shop currency
- Light Bulb = insta-bomb
- Pogo Stick = 7s temp. invicibility while bouncing
- Stopwatch = 10s temp. enemies freeze
- you can enter a shop by finding the small door in stages. You can only buy one item each time:
- BALLOON = pitfalls life saver
- Gizmo Doll = extra life
- Heart = incr. max hearts (only lasts to the end of the stage)
- Heart Bottle = Restores 1 Heart
- Power Canister = Allows you to fire more projectiles
- in the 3rd stage of each world you will face a boss and obtain a new weapon (non-switchable).
- last STAGE: 5-1
level passwords:
Level 1-1 GBQK
Level 1-2 BVKF
Level 2-1 DXNH
Level 2-2 CGMW
Level 3-1 NJTD
Level 3-2 ZFPJ
Level 4-1 SHMC
Level 4-2 VLBB
Level 5-1 (Final Stage) NXRD
sources:
Excitebike
sources:
Dr. Mario
controls:
d-pad = move vitamin capsules
A | B = Rotates vitamin capsule right (clockwise) | left (anti-clockwise)
sources:
Kabuki Quantum Fighter | Jigoku Gokuraku Maru
controls:
d-pad = move, crouch
A = jump (hold to jump higher. While in midair, press d-pad down to quickly fall to the ground)
B = attack (special weapons req. the blue "CHIP" gauge on the bottom-left. Collect blinking crystals to refill)
Select = switch weapon (check the icon in the bottom-right) -> try to save the special weapons for boss battles
basics:
- getting hit will deplete the red "LIFE" gauge on the bottom-left. Collect hearts to refill.
LIFE is also refilled before and after boss fights.
- last ROUND: 6
cheats:
- Alter Chips: After activating the Level Select code (press A 8 times, B 4 times, and right 16 times on the second controller on the title screen), Up and Down can be pressed on the second controller in game to increase or reduce the amount of chips the player has. Unlike the cheat to swap health for chips, this does not affect health, can be done on any stage, and the game does not have to be paused (in fact, it does NOT work while the game is paused).
- Increase/decrease life bar or chips in boss battles: While in a boss battle, press start and press up or down on the D-Pad to increase or decrease your life bar or chips.
- Level Select: At the title screen, press A 8 times, B 4 times and Right 16 times on the 2nd controller. Start your game and when the "Round 1 Start" message appears, press up or down on the 1st controller to select stages.
- Level Skip: After activating the Level Select code (press A 8 times, B 4 times, and right 16 times on the second controller on the title screen), the A button can be pressed on the second controller in game to automatically clear the stage.
sources:
Batman
controls:
d-pad = move, crouch
A = jump (hold to jump higher, also used to walljump)
B = attack (all the weapons shares the same ammos, but they req. diff. quantities, check the counter in the top-left. Collect the blue box with a missile icon dropped by enemies to refill.)
Start (when you have some ammos) = switch weapon (check the icon in the top-left, goes back to "BATMAN"=punches when out of ammos.) -> try to save some ammos for the endstage bosses
Select = pause
basics:
- getting hit will deplete the blue "P" gauge on the top-left. Collect hearts dropped by enemies to refill.
- "B" boxes only gives you bonus points.
- last AREA: 5-1
sources:
Uchuu Keibitai SDF | Space Defending Force SDF
controls:
d-pad = move
A = shoot
B = options melee attack + switch options formation and firing mode: forward+spread | backward+missiles
Start = attract powerup capsules
Select = pause
basics:
- destroy static blue capsules to get options and weapon powerups:
H = spread shot, V = side shot, L = laser shot, "S" = speedup, backward "S" = speed down, "E" = extra life.
Taking the same weapon 3 times will maximixe its firepower, also giving the missiles an homing ability (very useful).
- options will provide protection from enemy fire, but they are lost after taking some damage (avoid using the melee attack to preserve them).
If at least one of them is destroyed you won't be able to fire neither the current weapon nor the missiles when in shot mode, meaning you'll be temporarily stuck with the default shot until you get the next powerup.
- the screen scrolls horizontally in most stages. Enemies outside the screen won't shot at you.
- last stage: 7 (no transitions)
cheats:
- Option Menu: at the title screen, press and hold A & B and press Select. If done right, you'll enter a secret options menu.
sources:
Over Horizon
controls:
d-pad = move
A = shoot to the left
B = shoot to the right
A + B (hold) = move options position -> use to have a focus vs spread fire
Select = switch speed (4 levels, default to 2) -> a brief burst animation is shown: if it appears at the ship's rear it means the speed is going up, if it appears at the front it means the speed is going down.
Start = pause and check remaining lives and current score
basics:
- enter "EDIT MODE" menu at the title screen to customize the options formation and weapons before starting the game.
Give the LASER some homing ability to have the best weapon in the game.
- destroy small yellow ships to get up to 2 options and to switch and powerup weapon: L=Laser, M=exploding Missiles, H=Homing.
- last STAGE: 6
cheats:
- Level Skip: Press and hold Right, A & B on the 2nd controller and press Reset. Now, while playing the game, hold Select on the 1st controller and press the A button on the 2nd controller to skip levels.
- Extra Mode: Hold down A + B and Reset the game.
sources:
Battle City | Tank Battalion
controls:
d-pad = move
A | B = shoot
basics:
- to finish a stage you must destroy all the tanks that spawn (check the remaining icons in the top-right), while protecting your base (represented by a bird icon).
- destroying a red flashing enemy will make an icon appear:
star=bonus points, ...
- take cover behind walls, and you can destroy tne red brick walls by shooting at them.
- you will lose a life with a single shot unless you have the barrier (after respawing or from an helmet icon).
- last STAGE: 35 (infinite loops)
cheats:
- Stage Select: When you start the game and the screen with 'Stage 1' shows up, please do the following. Note that this is the only moment you can perform the cheat, you can't do it afterwards. Press A and B to choose any stage you want.
sources:
Isolated Warrior | Max Warrior
controls:
d-pad = move
B = shoot
A = jump (hold to stay longer in midair, press again to drop a bomb) -> use often to avoid enemy fire and ground obstacles
Select = switch current weapon between "Laser" and "Wide"
basics:
- getting hit will deplete the "LIFE" bar on the bottom-left.
Besides enemies and bullets you also need to beware of a few harmful walls and surfaces.
Collect a refill item (a big purple orb) to recover 2 energy cells mid-stage.
There is also a barrier item that protects you from 5 hits (a big white orb).
- other powerups left by enemies are: upgrades for both weapons ("L" for laser and "W" for wide), S=speedups, B=bomb powerups and bomb stock (small purple orbs, check the HUD in the bottom-right).
- last SCENE: 07 (use no continues to access it)
passwords:
Level 2 5963
Level 3 8920
Level 4 0705
Level 5 5826
Level 6 2687
level 7 3279
sources:
Bomberman | Bomber Man
controls:
d-pad = move
A = drop a bomb
B (with the detonator powerup) = detonate a bomb
basics:
- to finish a stage you must kill all the enemies and find the exit hiddden in a block.
If the timer reaches 0, all enemies on the stage will be removed and replaced with 10 Pontans. Completing a stage will award you with an extra life (check the "LEFT" counter in the top-right).
- you can also find 1 powerup hidden in each stage (no more than 1), which is kept in the following stages:
- bomb = drop more than 1 bomb at a time
- fire = range increase
- heart = manual bombs denotator
- skates = move faster
- Wall Pass/bomb-walker
- Bomb Pass/wall-walker
- Fire Pass/flame-proof = permanent invicibility to bombs
- question mark = temp. invicibility
- do not bomb the exit or a powerup once it appear, because it will make more enemies appear.
- every 5 stages you will play a BONUS STAGE where you are invincible and can kill enemies for extra points.
- last STAGE: 50
passwords:
00 BABABABABABABABABABA
10 DJEFPGGKGLPCGKMFEFEG
20 BADJODAHICDJNMEHIMNF
30 FEABECHCPAFEKGDNMIHJ
40 FEHIMCHPCGJNJDEFECPA
50 JDNMKLGJDJGGCPOLOMNF
Secret Level BACDIHCLOAFHABDNMOLG
sources:
Mappy Kids
controls:
d-pad = move
A = jump (press repeatedly in midair for slow falling)
B = kick out at the enemies, open the boxes
basics:
- collect coins, money bags and jewels in stages to buy house fornitures in shops, accessed after winning a minigame.
- last stage: 15 (1P), 9 (2P) (completing the game with an inconplete house results in a bad ending)
cheats:
- 20 Lives: At the title screen, hold B and as soon as the first "P" letter of "MAPPYKIDS" (the 3rd letter ) blinks, press A. If done right, you'll start with 20 lives.
- Level Select: Hold A on Controller 2 for 4~5 seconds, then B for 5~7 seconds, then press Start on Controller 1.
sources:
Wagyan Land | Wagan Land
controls:
TODO
basics:
- end stage boss battles are all based on minigames.
- last stage: 22th (waterfall)
sources:
Yo! Noid | Kamen no Ninja Hanamaru
controls:
TODO
basics:
- Hanamaru/Noid has no life meter, and loses a life by either making contact with an enemy or running out of time before completing a level.
- gather magic points by collecting scrolls and use them for screen-clearing special attacks
sources:
Ganbare Goemon! Karakuri Douchuu
controls:
d-pad = move
A = jump (the distance is dependent on the number of sandals you currently possess, check the icon in the top-left) -> this move is necessary to collect money and items as well as uncovering hidden passages (just jump next or over them).
B = attack (collect a slingshot or a Lucky Cat for an upgrade)
basics:
- in each stage you must find 3 passes in order to advance to the next one.
These can be found in: underground hidden passages (appearing when you jump over them, or while having the candle) (up to 2), 3D mazes/caves (1x), and some shops.
To easily navigate 3d mazes, after you find the map you can press A to check your position.
- jump near boxes and flask in stages to obtain powerups and coins. You can spend the coins to buy stuff and play minigames in shops.
- when hit you will lose your powerups and some of your "LIFE" gauge in the top-right. Collect or buy food, sleep at the inns, or visit the spas to refill. When your lose a life, your money will be cut in half.
- the lunchbox/Onigiri will automatically refill your LIFE when you're about to die.
To increase the LIFE meter you must find the scrolls. These valuable stat up items are found exclusively in hidden passages of Stages 1, 5, 7, and 11.
- last stage: 13
cheats:
- Special Continue: at the game over screen, hold button A and B and then press Start. If done right, you'll continue on the same stage you were in and you'll keep your energy bar, but half the money.
sources:
Ganbare Goemon 2
sources:
Bomberman II | Dynablaster
sources:
Mappy-Land | Mappy Land
controls:
d-pad = move, climb ladders
B = jump
A = use a weapon/cat distractions (check the icons on the top HUD below "MP-", they can be found in the stage)
basics:
- to complete most stages you must collect all the cheese pieces scattered around (replaced by rings, Christmas trees, and baseballs in the following loops).
- touching an enemy will kills you instantly when you are on a platform but not in midair, so run toward a trampoline when you are being chased.
You can also try to jump over kitties or use a item to "distract" them: tails on a stick, fish, vine jar, gold coin (the coin is effective only against Nyamco the police cat).
There are also stage-specific items that you can use against enemies like pulleys, punching bags, etc.
- the bonus round is rather difficult to access. It appears in certain stages, and is unlocked by jumping on a specific trampoline three times without any distraction items. Normally this would kill Mappy, but here it will send him into the clouds, with various extra items to collect (including a 1UP, which appears nowhere else in the game).
- last ROUND: 8 (4 loops/worlds)
cheats:
- Stage Select (Japanese version): At the title screen press Up, A, Down, B, Left, A, Right, A and Select & Start at the same time. If done right, the stage select should appear.
sources:
Bump'n'Jump | Buggy Popper
controls:
d-pad = steer, accelerate, break
A = jump
basics:
- your car has a fuel gauge (check the "P" counter in the top-right).
If you take too long to complete a stage and run out of fuel, you will lose one life.
Along the way, you will find red barrels with a "P" printed on them that will replenish a small supply of your fuel.
- driving over a 1up icon in the road will grant you an extra life while driving over a pit icon will send you near the finish with full fuel.
- there are 4 kinds of trucks: the green/yellow ones drop rocks in the road, the red ones create oil slicks, the blue ones drop cement, and bulldozers that do not drop anything.
Sometimes the trucks will drop 1up icons instead of rocks/oil.
- last course: 16
sources:
Devil World
controls:
d-pad = move
A | B (while hoding a cross or a book) = breath fire -> stun enemies, making them edible
basics:
- in the first stage of every round you must clear all the little dots.
You can only eat dots when holding on to a cross.
In the next stage, you must retrieve 4 holy books and return it to the Devil's cage (a blinking skull) in the center of the maze.
Finally, there is a BONUS STAGE, where you can step over the arrows and control over the direction in which the maze scrolls. The goal here is to gather up as many of the six bonus boxes before time runs out.
- last round: 10 (loops infinitely)
sources:
Wrecking Crew
controls:
d-pad = walk, climb ladders
A | B = hammer
basics:
- to clear a stage you must destroy all the grey objects inside the screen, including the ladders.
- you cannot jump, so you cannot reach an higher platform unless there is a ladder.
If you get stuck and cannot complete a stage, just wait for a fireball to spawn and kill you.
- you cannot attack enemies directly, you can kill them with bombs, but they will respawn after a while.
Bombs won't kill you, but you will tumble to the bottom of the stage.
- a bonus stage appears every couple of stages where you must be the first to find the wall that a coin is hidden behind.
- last PHASE/stage: 100
sources:
Lode Runner | Championship Lode Runner
controls:
d-pad = walk, climb ladders
A = dig a hole on the left
B = break botom-right block
basics:
- to clear a stage you must collect all the gold pieces on the stage.
- last LEVEL: 50
sources:
Rygar | Argus no Senshi
sources:
Fuzzical Fighter
controls:
d-pad = move
B = shoot
A = use active magic (req. "MP")
Start = pause and open the STATUS screen to switch equipment
Select = quit corrent stage
basics:
- getting hit will deplete the "HP" gauge on the bottom. To refill midstage you can only use the "heal" magic (3 versions: "リケン").
- destroy enemies to get a bit of "GOLD" to spend in shops to buy upgrades. You get a lot more by completing a STAGE.
- after each stage talk to the king to obtain a password. Then visit the INN in each village to refill HPs, play the next STAGE or warp to a previous one.
- last STAGE: 8
passwords:
Level 2 8009
Level 3 0720
Level 4 9025
Level 5 0127
Level 6 7013
Level 7 0926
Level 8 3280
cheats:
- Debug Menu: at the title screen, press and hold A & B on the 2nd controller and then press and hold A & Select on the 1st controller.
- Free Magic: During gameplay, select any magic and use it with the A Button on Player 1's controller while, at the same time, holding any button (except Up) on Player 2's controller. The magic will still be used, but no MP will be consumed.
sources:
Ninja Jajamaru: Ginga Daisakusen | Squashed
controls:
d-pad = walk
d-pad down = crouch, roll down on a hill
A = jump -> attack most enemies by jumping over them. You can also bounce over them.
B (hold) = run inplace -> jump higher while running, even if inplace
B (tap) = use current item in the bottom-center HUD (the dots represents the usages left)
basics:
- jump over or below blinking atom blocks to get a powerup: a space suit/JetPack (=1 hit protection), a star or a moon boomerang (limited uses projectile attack, very useful), roll sphere = roll midair attack when jumping, a letter (getting 3 of a letter will cause effects in the boss battles, check in the bottom-right).
- to enter a portal at the end of most stages, you must jump into it and press d-pad up.
- some walls let you climb. Hold the control pad towards the wall and press jump.
- last WORLD: 7
cheats:
- Stage Select (Jap. release): at the title screen -- Up, Down, Left, B, A, A, Up, Right on Controller 2
sources:
Robocco Wars
controls:
d-pad = move
A = jump, drop bombs (in spaceship), shoot upward (in submarine)
B = shoot forward (hold for autofire)
basics:
- getting hit will deplete the hearts on the top-left. Collect red hearts bubbles dropped by enemies to refill. Empty/white hearts will increase you max hearts instead.
Other collectable items include: "P" = weapon powerup (tied to current transformation), "S" = movement speedup, a star = temp. invincibility, a spaceship = 1UP.
- last STAGE: 9
sources:
Don Doko Don 2
controls:
d-pad = move, enter doors
A = jump
B = hammer attack -> stun most enemies, then grab and throw them to other enemies (even upward)
basics:
- open blue chests to get an item: a scroll (=game tips), an heart (LIFE refill), an hammer powerup, temp. invincibility bag, a key (needed to unlock the door in the current area).
- when an enemy dies it will release a gem. This gem is red or blue. Usually the blue gems are when an enemy is killed outright and the red are for when one enemy is thrown into another.
Blue gems only provide extra points. Collect 10 red gem for a LIFE refill (check the counter in the top-right)
- getting hit will deplete the "LIFE" blue spheres on the top-left. Collect hearts or 10 red gems to refill.
- collect 20 blue flyer squares in stages for an extra life dot (check the counter in the top-right).
- last world: 6
sources:
Jackal | Final Commando: Akai Yousai
controls:
d-pad = move, aim
A = fire a grenade or missile (unlimited, but slow to fire)
B = fire machine gun (always up)
basics:
- weapon upgrades can be obtained by rescuing POW/hostages inside some destructible buildings and bringing them to an helicopter (1 for each stage).
- other rare pickups include: a brown star=insta-bombs, green star=1UP, flashing star=weapon powerup.
- last mission: 6
sources:
Star Soldier
controls:
d-pad = move
B | A = shot (you cannot shot while covered by some scenery, but the enemies cannot damage you as well)
basics:
- when you hit a "P" on the ground you release a small floating "S" icon that serves as the basic powerup:
the 1st one works as a speedup and a firing rate enhancer, the 2nd one adds an additional stream to the main shot an a single rear shot (2-way) and the 3rd one grants the ship with the famous 5-way spread shot the game became known for, as well as providing a shield that protects the ship against bullets (collisions are fatal).
Further powerups will work as insta-bombs and kill all enemies onscreen.
- last STAGE: 16
cheats:
- invincibility: at the title screen, press Select 10 times. Now, press and hold Up & Left on the 2nd controller and Right, Down, A & B on the 1st controller, then press Start on 1st controller to enable the cheat. Release buttons and press Start to begin the game. You will now be invincible and you'll be able to switch weapons by pressing Select.
sources:
Zombie Nation | Abarenbou Tengu
controls:
d-pad = move
B = shoot
A (if you have the star icon active in the bottom-left) = bomb (cannot be used during boss fights)
basics:
- press Select on the map screen to switch the difficulty between EASY and HARD. You can also choose a different starting stage/ROUND with the d-pad.
- taking hits will deplete the face icons on the bottom-left, representing your HP.
There are no refill items, but they will come back slowly if you do not take hits for a while.
- Every once in a while a human will be expelled from the debris of the destroyed scenery and will start falling and screaming "HELP!".
Take him and check the running stick figure in the HUD shifts right.
Once 5 falling men have been collected the firepower is upgraded, which is indicated by the numbers 2, 3 and the star.
3 corresponds to max power, and the star is a single smart bomb.
Some men also refill 1 unit of your health.
- you can touch most of the scenery without taking damage. But avoid the bolts and big enemies which will drain a lot of your health.
Try to stay lower to avoid them and easily grab the falling men.
- last ROUND: 5
cheats:
- Refill energy bar: Up, Up, Down, Down, Left, Right, Left, Right, B, A (when paused)
- Round Select: Turn on the game and Reset the game 25 times. Then at the title screen press Up, Up, Down, Down, Left, Right, Left, Right and Start. If done right, a stage select menu should appear.
sources:
TwinBee 3: Poko Poko Dai Maou
controls:
d-pad = move
B = fire
A (if you have the arms) = drop ground bombs
main menu translation:
1 PLAYER
2 PLAYERS
OPTIONS
basics:
TODO
sources:
Super Mario Bros.
controls:
d-pad = move, duck (when big)
A = jump (hold to jump higher)
B (hold) = run -> perform longer jumps to cross longer gaps, but has momentum to stop
B (tap when Fire Mario) = throw fireballs
basics:
- small Mario and Luigi will die in a single hit. You will also die if the "TIME" counter in the top-right runs out (there are no mid-level time refills).
- most enemies are defeated by stomping them. Those with spikes can only be defeated by hitting the platform they are walking from below or via a fireball.
- hit "?" blocks and some bricks to get powerups: coins, red Super Mushroom (1-hit protection + smash bricks hit from below), Fire Flower (throw fireballs), Starman (=temp. invincibility), green 1-Up Mushroom and climbable magic vines leading to a hidden area.
- the 1st 3 levels in each world ends with a flag pole. A staircase usually precedes the flagpole.
- rapidly tap the "A" button to make sure you do a high jump on the trapolines/springs.
- last WORLD: 8 (2nd loop is the "hard mode", where all goombas are replaced by buzzy beetles)
cheats:
- continue: in order to continue in the world you were playing after dying, simply press Start button while holding down A button at the title screen.
- World Select: after beating the game, if you do not turn off the console, you will return to the title screen. There, you can press the B Button to start as desired in World 1, 2, 3, 4, 5, 6, 7, or 8.
sources:
Super Mario Bros. 3
controls:
d-pad = move, duck (when big)
A = jump (hold to jump higher)
B (hold) = run -> perform longer jumps to cross longer gaps, but has momentum to stop
B (tap when Fire Mario) = throw fireballs
basics:
...
sources:
The Guardian Legend | Guardic Gaiden
controls:
d-pad = move
B = fire main weapon
A = fire special weapon (req. CHIPs to use, check the "SHOT" counter in the bottom-right)
Select = pause and show the special weapon select screen
basics:
- enter the special password "TGL" to play through the entire game skipping the walking portions. At the and of the round you are awarded powerups to automatically advance to the next stage.
- the main currency is CHIPs. These can be used to purchase items from the Randars that inhabit Naju, but they also act as ammos for your special weapons. The number of chips you have also determines the strength of your main weapon.
- shot red orbs on the ground to obtain items: heart (refills your health by 5 bars), blue/red chips (refills your health and CHIPS), special weapons, Gun/Shield (raises your max attack by 1), Blue Lander (raises max health), Red Lander (raises your chip max).
- there are 3 levels to every special weapon that you unlock. Finding/buying/winning the same weapon will simply upgrade the same version of the weapon that you already have. An upgraded weapon in all cases consumes more chips upon use.
- last corridor: 21
passwords:
Area 1 BcvH a8EH 7QRE Z2RF ARwF SARS bIEA AiMB
Area 3 flLQ AVgP 3J6N 5UvO pNGL wADU xtEN 2hjJ
Area 6 AyxW eeh? ANG8 eCGi xMf? CgYA G4R! jm2e
Area 8 AE8s gBot 1f8R Kd2I Nm9T 8ETe aR4! KoZI
Area 9 073z !lN4 dLaZ g1qK jfb0 Xpur Y5e7 bD?B
Second Quest T G L (Arcade Mode: play through the entire game skipping the walking portions)
sources:
Splatterhouse: Wanpaku Graffiti
controls:
d-pad left|right = walk
d-pad up = enter doors
A = jump
B = attack with current weapon
Start = pause
basics:
- collect food like candies and hamburgers to restore HP (the bars on the left)
- the big counter in the upper-left corner is your experience system.
You have to reach the amount on the right side to gain an extra HP (up to 16).
- last stage: 7
passwords:
Stage 2 1055
Stage 3 3739
Stage 4 8245
Stage 4 (with Crystal Orb) 0705
Stage 5 4722
Stage 5 (with Crystal Orb) 2509
Stage 6 7397
Stage 6 (with Crystal Orb) 4090
Stage 7 8671
Stage 7 (with Crystal Orb) 1099
cheats:
- Health Refill: Pause the game whilst playing, then press A and B on the second controller. Once you unpause, you will have full health again! (Note: only usable three times.)
sources:
Micro Machines
controls:
d-pad = steer
A = accelerate
B = brake, reverse (when stopped)
A + B (when playing as the tank) = shoot
basics:
- your goal is to complete the Challenge mode and be crowned the champion, which is a surprisingly lengthy and difficult task, as there are 24 tracks and 10 opponents standing in your way.
- victory is simply a matter of arriving at the finish line first.
Which characters are eliminated in the Challenge follows a fairly simple rule:
At the end of every third race, a character is eliminated:
The character who has been in the challenge longest is eliminated.
- most of the tracks are pretty open and you can deviate from the specified path a little bit, but the game will catch you if you try to take a big shortcut and put you back where you came.
- Whom you choose for your driver does not affect your car's performance, but it does make for one racer you won't have to face in the Challenge, so you should probably choose one of the stronger characters unless you're very adept at the game.
- fastest chars: SPIDER, BONNIE, EMILIO.
- easiest vehicle: jeep
sources:
controls:
d-pad = move, aim, enter doors
A = jump (hold to hover once the upgrade is obtained)
B = fire current weapon
B + d-pad down (when inside vehicle) = fire special weapon (check ...)
Start = pause and bring up the weapon select screen
Select = exit|reenter vehicle
basics:
sources:
Bionic Commando | Hitler no Fukkatsu: Top Secret
controls:
d-pad = move, squat, enter doors, aim the grappling hook forward or upward
d-pad up (when hanging from a platform) = climb up
A = fire the grappling hook (can be combined with a direction, defaults to 45° angle)
B = fire with current weapon (chosen before entering a stage)
Select = pause and use an item
Select = pause and view status
A + B + Start (in horizontally-scrolling stages) = exit current area and go back to the map
basics:
cheats:
- Infinite POW ball (Japanese Version): Area 7 has a single building on the upper right. Stand in the middle of the building and press "up", you can enter a hidden communication room. Communication will tell you to knock on the right wall 5 times. After do it, you will hear the sound like get 1UP, then you can use the POW ball indefinitely(press "A" "B" at the same time).
- Obtain All Weapons (Japanese Version): In Level 17's interrogation room, beat the prisoner 255 times and you'll receive all the weapons.
sources:
Double Dragon
controls:
d-pad = walk
A = punch, pick up, throw weapons
B = kick (slower but more powerful)
A+B = jump (<3 hearts), jumpkick (with 3+ hearts) -> will make any enemy fall
2x d-pad left|right = headbutt -> risky move, avoid it
basics:
- the hearts at the bottom-left indicates your current level. Punches gives more exp points.
- keep an eye on the timer on the bottom. If it reaches 0 you lose a life.
- jump kick to block aerial attacks like knifes.
- falling on water or at the bottom of the screen will kill you instantly.
- always enter caverns from where bosses came from. If you walk past them the stage will loop from the start.
- to quickly dispose enemies: make them fall in pits, or stun them with a flying kick, then mount with d-pad down (req. 5 hearts), and punch a few times.
- last MISSION: 4
game genie cheat codes:
Level Select
EXVGYAA
AVNLGAA
sources:
Double Dragon II: The Revenge
controls:
d-pad = walk
A = left punch, kick, pick up weapons
B = right punch, kick, pick up weapons
A+B = jump
A+B, A+B (as you fall) = jump kick
A+B, A+B (at peak of jump) = cyclone spin kick -> use often when surrounded
A (when crouching after a jump or a fall) = uppercut
A+B (when crouching after a jump or a fall) = knee attack
basics:
- jump often to trigger the the uppercut and knee attacks as they are the most powerful attacks and difficult to counter.
- health is refilled between stages.
- last mission: 9 (finish at "SUPREME MASTER" level to see the true ending)
game genie cheat codes:
enable debug features (while ingame select+A=warp to the next level, Select+B=clear all enemies)
EKNYVYAA
sources:
Double Dragon III: The Sacred Stones | The Rosetta Stone
controls:
d-pad = walk
2x d-pad left|right = run
A = punch, pick up weapons
B = kick, pick up weapons
A+B = jump
A+B, B = jump kick
A+B, A+B (at peak of jump) = cyclone spin kick -> use often when surrounded
Select = pause and switch weapons/fighters (press d-pad left|right to select fighter, up|down to switch weapon and A to confirm)
Start = pause
basics:
- best fighter: CHIN SEIMEI (unlocked after 2nd mission in China) (has strong punches and best jump kick, but it is slow)
- the aerieal attacks are the most powerful, enable turbo on both buttons A and B to trigger them more easily.
- last mission: 5
sources:
controls:
d-pad left|right = move
d-pad up|down = go faster|slower -> going faster leaves you more vulnerable to what's ahead and less vulnerable to what's behind: slower, vice versa.
B = fire
A = turn the turrets (when in manual aiming mode), activate single-use powerups (if you have it, check the letter in the bottom-left, you can have at most 1)
items:
- P = shoot powerup (up to level 5, you lose 1 when you die)
- R = rapid shooting (up to 3 times normal speed in car stages and up to 4 times normal speed for plane stages)
- L = refill+gets you 4 blocks of life gauge
- 1UP = gets you an extra life
- C = cannon control toggle -> collect 1 to switch from manual to auto-aiming and viceversa
- B = bomb (single-use)
- G = option who will swing around and lash out to kill your enemies (single-use)
- O = oil dumping behind you, making enemies swerve (single-use)
- T = tire slasher = destroys enemies colliding on both sides of you (single-use)
basics:
- obey the traffic signs: they say go left, go right, stop or slow down.
"Jump" means you'll want to go fast.
"!" means there's something really to watch.
- it's okay to crash into enemies. Just don't hit a wall or you'll lose life points.
- powerups are carried by trucks that have to be shot 3 times to release them.
blue items are single-use, red are permanent.
- last stage: 6
cheats:
- Max. power for your car: pause the game and press up, up, B, right, right, B, down, B, down, B, left, left, A, start.
- Pong Mini-Game: at the Continue screen after Game Over, Press A eight times, then press start.
- Random Extra Lives: when the title appears, hold A + B + Select, then press start.
sources:
Abadox
controls:
d-pad = move
A = shoot
B = expand the radius of the options (if you have them) -> not very useful
basics:
- powerups are released from blue scorpions:
- weapons: 3-way shot, 5-way shot, bubble shot and laser (the last 2 are the best)
- speedup (S), missiles (M), rotating options (B) and P (power barrier)
- take a second "M" to get missiles with homing ability, stock up to 4 options for extra protection against incoming bullets.
- last stage: 7
cheats:
-
stage Select, Invincibility, and All Power-ups: at the "Push Start" screen, press A, A, Up, B, B, Down, A, B, followed by one of the following combinations: (Simply pause and unpause the game to gain all powerups.)
Stage 2 Up, Start
Stage 2, Second Half Up, A, Start
Stage 3 Left, Start
Stage 3, Second Half Left, A, Start
Stage 4 Down, Start
Stage 4, Second Half Down, A, Start
Stage 5 Right, Start
Stage 5, Second Half Right, A, Start
Stage 6 Select, Start
Stage 6, Second Half Select, A, Start
Stage 7 B, Start
sources:
Final Mission | S.C.A.T.: Special Cybernetic Attack Team | Action in New York
controls:
d-pad = move
A = fire
B = lock your orbital cannons (otherwise they rotate when moving left and right) -> the usual position to do this is in is directly above and below you. Doing so will make it easier to kill turrets on the bottom and top sides of the screen. Otherwise it's usually not worth it.
basics:
- powerups are obtained by destroying a small gray crate. Don't wait too long to collect the desired ones, for they will soon catch up with the scrolling speed and go away.
- best weapon: "W" (wide spread)
- none of the weapons can be upgraded nor have any influence on the firepower of the satellites.
- the remaining powerups are "S" (speedup) and "R" (health recovery). Speedups can be collected at will because the characters will never move too fast.
- health recovery is also obtained at predefined scoring intervals (a chime will play).
- avoid lurking around the screen's edges. Lots of monsters appear there, so it's generally not a good idea to linger.
- last stage: 5
cheats:
-
stage select (Jap ver.): at title screen press and hold on the 2nd controller the A & B buttons, and then on the 1st controller press:
Level 2 A + Start
Level 3 B + Start
Level 4 Right + Start
Level 5 Left + Start
Ending Up + Start
sources:
Summer Carnival '92: Recca
controls:
d-pad = move
A = primary weapon
B = secondary weapon
A (when the ENERGY meter is full, autocharge when not firing) = bomb -> act as a shield while charging
Select = cycle speed
basics:
- NORMAL GAME has a time limit of 60 minutes. Once this runs out, it's game over.
- by reseting after beating the normal game, you will get an opportunity to play a whole new arrangement of Recca.
- once a certain amount of enemies is killed a powerup will appear.
The blue one with a letter upgrades the main weapon, cycling in the following order: V (vulcan), L (laser), B (forward beam), F (forwards/backwards, Star Soldier-type), H (homing).
The red powerup with a letter activates/upgrades a side pod, cycling in the following order: F (forward, slightly angled out), B (back), C (counter), R (rotate), S (search).
With the main weapon it takes 3 of the same items to reach max power.
Once you have fully upgraded a weapon, any new weapon you switch to will also be full.
- best weapons: "H" (primary), "S" (secondary)
- last stage: 4 (NORMAL GAME), 7 (Arrange/Second Quest)
cheats:
- level select: To access the Sound Test menu, hold Select and press a confiramtion button at the title screen (after the Naxatsoft logo). If you get to a small menu that says "Change Limit", just press B and you'll go to the title screen where you'll be able to use the code. Press A+B+Select, and a number should appear in the lower right, indicating the starting stage. Pressing A+B+Select again will increment that number. 01-04 correspond to Normal Game stages, 05-11 are Hard Game stages, and 12 is the Score/Time Attack stage. If Hard Mode is active, 05 will show to begin with. Press Start when done, and choose Normal Game.
sources:
Crisis Force
controls:
d-pad = move
B = shoot
A = change form: Front, Rear, Side Offense Type
B (hold) + A (tap) = bomb (every ship form has a specific bomb animation) (check the counter in the )
basics:
- all 3 forms also have 2 variations of each weapon dictated by the color of the powerups you come across:
blue endows the ship with even faster firing rates,
red results in more powerful and intelligent shots (with wider reach, rotating shields or homing abilities).
Each weapon can be upgraded 3 times by sticking to the same powerup.
Powerup levels are carried over to the ship's different forms.
Upon getting hit the ship reverts back to its initial level, and any shot taken at this condition means you'll lose a life.
- best form+weapon combination: Side/3rd form + red weapon (auto-aiming)
- collect 5 badge-shaped items with a blue centre (check the counter in the bottom-left) to transform your ship into the large ship (gives temp. invicibility).
Collecting more of them will increase the time limit of the transformation.
When the timer runs out or the combined ship takes enough damage, it will revert to its regular form.
- other items players will come across are: speed-ups (blue "S"), speed-downs (red "S", avoid these) and extra bombs ("B").
- last stage: 7
cheats:
- 15 Ships: Up, Up, Down, Down, Left, Right, Left, Right, B, A, Start (on title screen)
sources:
Super Dodge Ball | Nekketsu Koukou Dodgeball Bu
sources:
Nintendo World Cup | Nekketsu Koukou Dodgeball-bu Soccer-hen
controls:
d-pad = move, direction of a pass
A = pass (offense), tackle (defense)
B = shoot (offense), slide (defense)
B (after some steps with the ball) = special kick
A+B (with ball in midair) = bicycle kick (req. precise timing + 1 special kick)
d-pad + A+B = head-butt move (req. precise timing + 1 special kick)
main menu translation (Jap ver.):
TOURNAMENT (1P)
TOURNAMENT (2P)
VS MATCH (2P)
strategies menu translation with best settings (Jap ver.):
+-----------------+ +------------------+
|Your Offensive | |Should The G.K |
| Strategy ? | | join in ?|
| | | |
||>Pass the ball | | Yes |
| (and shoot) | | |
| Use dribble | | |>No |
+-----------------+ +------------------+
+-----------------+ +------------------+
|Should your team-| |Your Defensive |
| mates shoot? | | strategy ? |
| | | |
||>Yes,frequently | | |> Try to Tackle |
| Sometimes | | (won't wait for your command to do so)|
| No, not at all | | Mark the |
| | | Opponent |
+-----------------+ +------------------+
basics:
- best team: BRAZIL, ARGENTINA (but req. 10 steps to do a special kick)
- defeat 12 teams in the Tournament mode to win the cup.
- you control only a single kicker (marked with "I" on the map on the bottom-right), but you can send commands to the teammate near the ball (check the HUD in the bottom-left).
- fouls go unpunished, so always attack enemies with the ball.
- avoid anticipating the opponent passes, it is better to wait for them to receive the ball and slide on them soon after.
Avoid passes from/to your teammates as well, just follow the ball and take action when necessary.
- avoid shooting far away from the net, the easier way to score goals is coming closer to the goalkeeper and trying to dribble him.
- easy scoring trick: stay in the exect middle of the enemy net, and ask your teamates to long-pass the ball from a distance.
When the ball arrives from midair do a bicycle kick in the same position of the goalkeeper, passing thru him.
- special kicks are unlimited in JAP ver, and limited to 5 times per half in the USA version.
- passwords can only be acquired by refusing to continue after losing a game.
- last match: 12th
passwords for all teams (replace "##" with your chosen team):
2nd Match 103##
3rd Match 307##
4th Match 015##
5th Match 220##
6th Match 721##
7th Match 115##
8th Match 424##
9th Match 626##
10th Match 602##
Semifinal Match 223##
Final Match 128##
00: USA
01: Holland
02: Japan
03: France
04: Cameroon
05: Russia
06: Mexico
07: England
08: Spain
09: Brazil
10: West Germany
11: Argentina
12: Italy
sources:
Kunio-kun no Nekketsu Soccer League
controls:
d-pad = move, direction of a pass
2x d-pad = run
A = pass (offense), tackle (defense)
B = shoot (offense), slide (defense)
A+B = jump -> when it gets to the highest peak, press B to makes your own special shot (can be combined with a direction)
main menu translation:
...
sources:
Mike Tyson's Punch-Out!!
controls:
d-pad left|right = dodge
d-pad down = block a single punch
2x d-pad down = duck
d-pad up = aim the head of the opponent
A = right-handed body blow = to the abdomen
A + up = right jab = face punch
B = left-handed body blow = to the abdomen
B + up = left jab = face punch
rapidly tap A|B (when knocked down) = get up
START (when Little Mac has a Star) = throw an uppercut = hit the bottom of the chin
Special Techniques:
- Proper Punch: Sometimes an opponent will receive more damage depending on which hand you punch them with. The general rule is if a right-handed punch is thrown at you, answer with a left-handed punch.
- Late Punch: lands a punch very late on an opponent after they punch (or after they are stunned for a bit), they opponent will take a little extra damage, and/or may even yield a star.
- Quick Dodge: press LEFT or RIGHT to dodge out of the way of a punch, but by pressing the opposite direction of the direction dodged will cause Little Mac to come back to a ready punching position.
- Counter Punch: throw a punch that will hit the opponent as they try to hit him. This will often yield a star, or at the very least cause some extra damage.
- Gutters: hold UP, and when your opponent raises their guard you stop holding UP and you throw a body blow before they can shift their guard.
basics:
- each fight consists of 3x 3-minute rounds.
- A boxer is knocked out (KO) and lose the match if he does not get up within 10s.
- 3 knockdowns in one round equals a T.KO.
- if the fight does not end in a form of KO within the 3 rounds, a decision victory is called by the referee.
The judges will consider your score and either award or deny you the victory based on whether your score is high enough. Note that some opponents can not be beaten by a score decision.
- not all opponent attacks can be blocked, but all can be dodged. You don't need to correctly choose which direction to dodge an attack; a dodge in either direction will work equally well regardless of the direction of an incoming attack.
- check the hearts counter, they indicates your level of fatigue.
Hearts are lost every time you block an opponent's punch, when you get hit by your opponent, and every time your attacks are blocked.
If your hearts are reduced to 0, you will turn purple and be unable to throw any punches, guard against attacks, or quick dodge. You must successfully dodge a couple of attacks before you regain hearts, permitting you to fight again.
- you earn stars by attacking opponents at pivotal moments like just before or after an opponent's own attack.
Use the stars ASAP as you will lose them when hit.
passwords (shown when Little Mac becomes the campion of a circuit):
Major Circuit 005 737 5423
World Circuit 777 807 3454
Super Macho Man 940 861 8538
Mike Tyson 007 373 5963
cheats:
- Heal Between Matches: Hold SELECT in-between fights, when Doc is talking to Little Mac to cheer him on and psyche him up for the next round, and while the opponent is talking. This may only be performed once per match. NOTE: If this is used when Little Mac has yet to be hit at all, he will lose energy!
sources:
River City Ransom | Downtown Nekketsu Monogatari
controls:
d-pad = move
2x d-pad = run (attack while running for +50% damage)
A = punch, block (press before being hit), grab/use weapon/enemy
B = kick, block (press before being hit), grab/throw weapon/enemy
A+B = jump (you can punch, kick, and throw in midair)
Start = pause and show submenu
Select = switch between stamina/health guage and money in the top-left
stats:
- Punch: Determines how much damage is made with punch attacks.
- Kick: Determines the power of kick attacks.
- Weapon: How much damage the characters make when they swing their weapons.
- Throwing: Damage made with thrown weapons and enemies (along with damage to enemies that are thrown).
- Agility: Determines the character's movement speed and jump height. The higher this stat, the faster the character moves, runs and jumps.
- Defense: The character's ability to guard attacks. Blocking is performed by pressing any button when being attacked.
- Strength: This stat determines how long you can hold an enemy when you grab them from the ground and how easily you can break their guard.
- Will Power: Will Power is used to determine the likelihood of enemies knocking you down as well as how best the character gets up upon being knocked down. It is also used as an extra life of sort, if the character's stamina is fully decreased, Will Power is used up to get them up from the ground (regaining 20 Stamina). This requires that the Will Power be 35 or higher.
- Stamina: The character's current health. If the character is knocked out when this is empty, they will regain consciousness in the nearest shopping district (Hanazono High School if they have yet to reach one) with half of their money.
- Max Power: The maximum amount of a character's health.
basics:
- all stats start at 15 by default and max out at 63 with the exception of Stamina and Max Power, which start at 63 and max out at 127.
- each time you defeat an enemy they will drop their lunch money, which you can use to buy items that increase your character stats.
- the gang you face on each screen is random, so if you don't like fighting a certain gang, leave the screen. When you return, a new gang may take their place.
- weapons slow you down and are a detriment when fighting in close quarters. If the enemy is close to you, stick to hand-to-hand combat.
- if an enemy has a weapon, move offline a bit and hit him with a running kick--he'll lose his lunch.
- never stay in between two gang members; they'll beat you silly.
- the quickest way to defeat gang members in the presence of bottomless pits is to simply push or throw them in. They can do the same to you.
Whilst throwing enemies into pits is fun, it also means they don't drop any money, so don't bother. Also, falling into a pit is an instant-KO for yourself.
Water equal deaths, just like pits.
- USE WALLS TO YOUR ADVANTAGE: enemies freeze when you climb above them. So get them close, jump on a wall, move over, and attack while falling.
Even better sometimes you can attack enemies directly from an upper platform while they are still frozen!
- if you're knocked out, you'll awaken at the last mall you passed through with half of your money missing.
If your Willpower is 35 or above, you will regain consciousness shortly after being knocked down with 20 life points.
- you MUST defeat every boss to enter River City High School. If a single one goes undefeated, the gates will be closed.
All bosses can be fought repeatedly, which means they're a really useful source of cash, especially the second Benny & Clyde fight, and the Ivan fight.
Throwing bosses off into pits still counts as a kill.
- best weapons to get: Trash Can, Tire, Lead Pipe, Chain
- best books to buy (read them to acquire special techniques): Stone Hands (quick punches), Dragon Feet (quick kicks), Grand Slam (quick weapon strikes).
- best shoes: Texas Boots
- visit Vitamin Shops as often as you can and buy the most expensive vitamins as often as you can. This will boost your statistics up fast!
- save your money as best you can; unless you need healing, don't worry about gaining stats until you have enough to get the essential items, such as the Dragon Feet and Grand Slam technique, and the Texas Boots.
After that, Merlin's Mystery Store sells items offering massive stat boosts.
To find Merlin's Mystery Shop go to the Armstrong Thru-Way 1. Once inside press up at the top wall and the wall will open. Inside you can buy the best items in the game.
suggested stage order:
- Cross Town High
- Sticksville 1
- Grotto Mall
- Sticksville 2
-
- Sherman Park (north) -> Boss: Blade
- Sticksville Construction Site -> Boss: Moose
- Waterfront Mall
- Capital Ave Bridge 1
-
- Capital Ave Bridge 2 (north) -> Boss: Benny and Clyde #1
- Downtown 1
- WSL Co. Warehouse (outside 1)
- WSL Co. Warehouse (inside) -> Boss: Rocko
- WSL Co. Warehouse (outside 2)
- Armstrong Thru-Way 1
- Armstrong Thru-Way 2
- Armstrong Thru-Way 3 -> Boss: Turk
- Downtown 2 -> Boss: Mojo
- Flatirons Mall 1
- Flatirons Mall 2
- Downtown 3
- Vacant Third Wheel Factory (outside)
- Vacant Third Wheel Factory (inside 1)
- Vacant Third Wheel Factory (inside 2) -> Boss: Thor
- Downtown 4
25, Oak Hill Mall 1
- Oak Hill Mall 2
- Burb Village 1 (Pop's Health Club) -> Boss: Benny and Clyde #2
- Burb Village 2
- River City High (outside) -> Boss: Ivan
- River City High Gym -> Boss: Otis
- River City High 1st Floor
- River City High 2nd Floor -> Boss: Tex
- River City High 3rd Floor -> Boss: Randy and Andy
- River City High School Rooftop -> Boss: Simon
passwords:
Everything Maxed & All Items
W e L c Y S G T O Q 2
a r 1 5 o A Q V X X i
c X s U 3 m V U n 1 c
sources:
Downtown Special: Kunio-kun no Jidaigeki Dayo Zenin Shuugou! | Downtown Special Kunio-kun's Historical Period Drama!
controls:
d-pad = move
2x d-pad = run (attack while running for +50% damage)
A = punch, block (press before being hit), grab/use weapon/enemy
B = kick, block (press before being hit), grab/throw weapon/enemy
A+B = jump (you can punch, kick, and throw in midair), stomp an enemy
Start = pause and show submenu (press B to see the map and the other gangs locations)
Select = switch between Stamina Guage and Money Guage
basics:
- gangs wander from region to region and may encounter Kunio when they come to the same region.
Beat all the enemies in a region to make the boss appear and the story proceed (the music will change during boss fights).
- recommended gangs order: GINPA > ICHI & ROKU > HEIRU, TAME, KINSU, HEISI > JINRO > HAN > NIZAE > TSUI & TATSU > TSUI or TATSU > ASAJI > HEISI > TORA > ASAJI
- at random times after Kunio defeats a gang member, he can learn a Tech.
Some defeated bosses will ask to join him as ally.
Best allies: TATSU, TSUI (dark blue gangs).
- the bigger the weapon, the more it hurts. The smaller the weapon, the faster you use it.
Besides swinging and throwing them, weapons can be used by hitting them while they are on the ground. A weapon struck by any attack gets pushed away, and if it hits someone, the damage done is equal to the damage that would have occured if the attack had hit directly.
- attacking from ledges like in RCR is almost useless because enemies will actually follow you.
- best items to buy: DOUBLEUP, MASTER belt (=learn Tech from bosses), MAP CRSR (=freely warp on the map), MAGIC kimonos (they can be found at the Kouzuke Secret Shop 1 and costs 2-3K)
SILK items are the best in their class.
sources:
Shadow of the Ninja | Blue Shadow | Yami no Shigotonin Kage
controls:
d-pad left|right = move
d-pad down = crouch (avoid some bullets)
d-pad up (while hanging on a platform) = climb
A = jump (hold for higher jumps) (auto grab some platforms)
d-pad down + A (on a overhang) = drop down
B = attack (some weapons have limited amount of usage, see the counter next to the energy bar)
B (hold until the energy-meter will start to shine) = special Ninpo attack (not very useful, costs half your energy, use only against bosses)
weapons:
- katana (the sword) (unlimited)
- shuriken (throwing stars) (limited use)
- kusarigama (sickle and chain) = can be swung upwards diagonally and horizontally, but can only damage enemies from a specific distance and does not work as well at close range like the katana
- bombs (limited use) = rare and powerful
basics:
- the heroes Hayate and Kaede each have identical abilities, so selecting one over the other won't make any difference.
- if the player picks up a weapon they already have, its attack power will be strengthen by an increment of 1 level (with up to 3 attack levels).
However, if the player takes too much damage, their weapon's strength will be reduced back to its previous level.
If you pick up the shurikens when you have a level 2/3 sword, then they will be power powered up as well.
- collect scrolls to increase the range of the weapon you are using.
- once a boss has been defeated it will explode, this explosion will heal players the closer they are from it, since actually the same amount of health from one level will be carried to the next one until either recovered with potions or by dying.
- last stage: 5
sources:
Duck Tales | DuckTales
controls:
d-pad = move, climb ladders
A = jump
B = cane attack
B + direction (next to an object) = golf swing
B + d-pad down (hold in midair) = pogo cane attack
Start = pause
recommended stage order:
- African Mines
- Himalaya
- Amazon
- Transylvania
- Moon
treasures list:
Sceptre of the Incan King Defeat Amazon boss
Coin of the Lost Realm Defeat Transylvania boss
Diamond of the Inner Earth Defeat African Mines boss
Crown of Genghis Khan Defeat Himalayas boss
Green Cheese of Longetivity Defeat Moon boss
Golden Ring Hidden in African Mines
Gold Plate Hidden on the Moon
basics:
- dont pogo jump when you dont have to. It some spots it is faster if you walk and most times pogo jumping could cause you to get hit easier, so stay off the pogo unless needed.
- if you have 3,000,000 in your total, you can refill your energy anytime by pressing Select. Each time you press Select, you will consume that amount.
sources:
The Little Mermaid
controls:
d-pad = swim
B (hold) = swim faster
A (combine with d-pad to aim) = splash fins -> capture enemies in bubbles, throw, push items, kick up sand, find hidden items, enter tunnels
d-pad up + A = jump from water onto ledge (then tap A + direction to move)
Start = pause and show status screen
basics:
- just swim up to a bubble or shell to pick it up. Then press A to throw it.
- magic shells are heavier than bubbles, but can be used against multiple enemies
and can open treasure chests containing powerups.
- you can find in the nooks, crannies, and sand hearts that recovers the health.
- last stage: 5
cheats:
- Invincible: at title screen, press and hold Right, A & B on the 2nd controller and press Start on the 1st controller. If done right, you'll be able to select "No damage".
sources:
Bucky O'Hare
controls:
d-pad = move, crouch, aim up
A = jump
d-pad down + A = drop down platforms
B = fire
B (hold) = charge special ability
Select = switch char
recommended stage order:
- Blue Planet
- Green Planet
- Red Planet
- Yellow Planet
- Cell
- Salvage Chute
- Center of Magma Tanker
- Escape!
characters:
- BUCKY special ability: Hi-Jump that will allow you to reach higher ledges and bonus items
- BLINKY special ability: Rocket Pack. Weapon flies in a downward arc, and destroys walls made of Ice and Stone.
- DEADEYE (duck) special ability: climbing of walls. Weapon is a 3 Way Blaster.
- JENNY special ability: quasi-homing missile (charge it up and use the arrows to direct it anywhere on screen)
- WILLY special ability: Thumber (like Megaman's Mega Buster)
passwords:
Blinky 5NJZJ
Blinky and Deadeye M7K2J
Blinky, Deadeye and Jenny 68L!3
Cell, with Blinky MRX24
Magna Tanker M!L2X
Last Level - Escape M!M6X
sources:
Tiny Toon Adventures
controls:
d-pad = move, crouch
A = jump
B (hold) = run
B (hold), down = slide (invicible, can pass over enemies)
d-pad down (on a hill) = roll attack
secondary chars:
- Plucky Duck: he can fly for short periods of time. When in midair, repeatedly press A to have him hover
- Dizzy Devil: By pressing B, Dizzy can spin around, destroying any enemy in his way. Dizzy will stop spinning if he is either hit by a foe or if the power bar runs out (which is at the bottom-left corner of the screen).
- Furball: is the best jumper in the game as he can jump the highest and the farthest. On top of that, Furball's special technique lets him claw onto walls or other objects. Simply jump towards a wall or the side of any large object and he'll stick to the side.
basics:
- best char: Plucky Duck (can hover in midair)
- kill most enemies by jumping over them.
- if you touch a Star Ball, you'll switch to your secondary character (if you grab a Star Ball as the secondary character, you will go back to Buster).
- enter doors to meet Hamton, who will give Buster an extra lives for 30 carrots each.
- the second level in each world concludes with an enclosed area where the player must avoid Elmyra and exit through the door. If the player is grabbed by Elmyra, they must start the world over!
cheats:
- Stage Select: at the title screen, press A, A, A, B, B, B, Select, Select, Select, A & Start.
- Stage Select & Invincibility (Jap ver): At the title screen, press Up, Right, Down, Left, Up, Right, Down, Left, B, A, Select, Select, Select & Start. If done right, the stage select menu will appear. Press Select to turn on invincibility.
sources:
Saiyuuki World 2: Tenjoukai no Majin | Whomp'Em
controls:
d-pad = move, crouch, climb ladders (stand still to raise the spear as a shield against small projectiles coming from the direction you are facing. Press d-pad up for projectiles coming from above)
A = jump (combine with d-pad up for an upward spear attack; press d-pad down in midair for a pogo attack. Both are risky, since they require very precise aiming.)
B = frontal attack with spear or a "Totem" special weapon (both are unlimited use)
Start = switch weapon in use (check the icon in the top-left)
Select = pauses and shows how many more flask/gourds before you get an extra heart
weapons/totems and recommended stages order list:
- SPEAR WHIRLWIND from SACRED WOODS/REALM OF WOOD = repels enemy attacks and breaks rocks.
- FIRE WAND from FIRE TEST/REALM OF FIRE = shoots a flame
- CLOUD from ICE RITUAL/REALM OF DARKNESS = allows you to fly
- DART from SECRET CLIFF/REALM OF METAL = allows you to shoot spear -> very useful to attack enemies from a safe distance, one of the best weapons in the game
- WEB from MAGIC FOREST/REALM OF DECAY = allows you to catch an enemy in a web
- ICE CRYSTAL from WATER TEST/REALM OF WATER = freezes enemies
- DEATH BRANCH from FINAL TEST = destroys every enemy in its path, but it takes away one whole heart everytime you use it
basics:
- getting hit will deplete the hearts in the top left. When empty you will game over and have the choice to continue from the map, unless you have a lantern to revive you.
- killed enemies may drop:
- hearts
- lanterns = extra lives
- pieces of armor = reduce damage (check the icons in the bottom-left)
- a flask/gourd = collect enough to get a life upgrade/extra heart (press Select to pause and check how many are still needed)
- spear/pole extension powerup (lasts for curr. stage only)
- the goal of the game is to collect all 7 "totems" to defeat the final boss.
Totems are special weapons you get for defeating the bosses for each stage/test of courage.
The setup is similar to the Mega Man games, but when you receive the weapon, you have unlimited use of it with no loss in your health or special energy bar.
sources:
Doki Doki Yuuenchi | The Trolls in Crazyland | Crazy Land
controls:
d-pad = walk
A = jump (hold for higher jump)
B = attack
basics:
- you don't get a health meter but you can tell by the color of your suit and what your attacks do (the more damage you get the more powerful your attack become).
The 4th time you get hit you die.
You do however get you're life refilled at the beginning of every level.
- last level: 12
passwords:
Last Stage MZSX
Level 10 QPGL
Level 11 MZS
Level 2 BLNK
Level 3 MMC!
Level 4 PHXY
Level 5 GTRS
Level 6 BCHK
Level 7 HSVX
Level 8 VZLJ
Level 9 FMWS
sources:
Gimmick | Mr. Gimmick
controls:
d-pad = walk, push
A = jump
B (hold) = charge star attack (release to fire, has an odd trajectory)
d-pad up + B = use the item in the left-most slot in the bottom-right
d-pad down = switch the item in the middle slot to the left-most slot
Start = pause
items:
- pink coulored bottle: restores all the energy.
- orange coulored bottle: gives 1 energy (immediately)
- bomb: more powerful than the star, but can only be used once. I suggest you aim your shooting.
- fireball: more powerful than the star, but can only be used once (as the bomb) Strikes over the whole screen in a horizontal direction.
basics:
- you cannot have more than 1 star moving on the screen.
- the star moves according to the your moving speed when released.
- you can jump on a moving star to reach higher platforms.
- you can jump on top of most enemies without being hurt and use them as platforms.
Throwing a star on top of enemies also usually hits them.
Touching them on the sides will damage you instead.
- you can hold 3 items at once, however, you won't be able to pick up any more until you use one of the items you have in storage.
The active slot on the left is the item you can use immediately and you can switch them around by pressing down.
- shoot the animals so they help you. Example: the bird at level 2. If you shoot it, it will help you cross gaps.
- you get an extra life at 10,000 points and every 20,000 points.
- you keep your items and health between levels.
- in each level there is a special hidden item. If you don't find all of them the game will end at level 6.
When you are near an hidden item a different BGM will play.
The color of the flags on the map will show if you have found the item or not (red=yes, white=no).
- last level: 7
game genie cheat codes:
Enable Debug Features (press Select to refill HP, P2 A+B increase lives, P2 d-pad to warp checkpoints and P2 A (hold) + B to finish current level)
PAVVTZAA
sources:
Mitsume ga Tooru | The Three-Eyed One
controls:
d-pad = move
A = jump
B (tap) = shoot
B (hold) = get the spear and release to throw it -> powerful attack, can also be used as a platform
Start = pause and switch shot (check the icons on the bottom-right)
basics:
- getting hit will deplete the heart gauge on the bottom-left.
- enemies will only drop coins, which can be exchanged for health, lives and weapons in a shop, accessed via a girl NPC found in stages.
- best items to buy: Psycho Wave (can be aimed with d-pad up|down), Super-Sonic (high firing rate), Super Cakes (in normal mode will protect you if you fall into a pit, unlimited in easy mode).
- purchased weapons have unlimited uses, but are lost if you die.
- last stage: 5
cheats:
- level select: at the title screen hold A + B buttons on the second controller, press on the first controller A, A, A, A, B, B, B, B, A, B, A, B, A, B, A, B.
sources:
Mega Man | Rockman
controls:
d-pad = move, climb or descend ladders
A = jump (hold for higher jumps)
B = shoot with current weapon
Start = pause and switch weapon
Select = pause
recommended stage order:
- Bomb Man (Use Arm Cannon [P], or later, Fire Storm [F])
- Guts Man (Use Hyper Bombs [B])
- Cut Man (Use Super Arm [G])
- Elec Man (Use Rolling Cutter [C])
- Ice Man (Use Thunder Beam [E])
- Fire Man (Use Ice Slasher [I])
basics:
- most enemies hits will knock you back (easy falling from platforms).
- most weapons can shoot through walls (same can do most enemies).
- enemies will respawn every time you cross the screen borders (same with energy capsules!).
- picking up Power Pellets or Weapons Capsules will slow you down slightly even if you don't actually get any benefit by touching them.
- if you pause on a ladder press up immediately after quitting or you will be falling
sources:
Mega Man II | Rockman 2
controls:
d-pad = move, climb or descend ladders
A = jump (hold for higher jumps)
B = shoot with current weapon
Start = pause and switch weapon or use items
recommended stage order:
- Metal Man (Use arm cannon or Quick Boomerang)
- Air Man (Use arm cannon or Leaf Shield; try standing behind him)
- Crash Man (Use Air Shooter)
- Bubble Man (Use Metal Blade)
- Heat Man (Use Bubble Lead)
- Wood Man (Use Atomic Fire (fully charged) or Crash Bombs)
- Flash Man (Use Metal Blade)
- Quick Man (Use Crash Bombs and/or the Time Stopper.
basics:
- you can get infinite ammo for any weapon that doesn't use a full unit of energy per shot (like the Metal Blade). This is due to the fact that you don't actually see your energy meter decrease until after you have fired a set number of shots. So shoot a few times, then open and close your subscreen (press START), and the game will "forget" about the fractional part of energy that you consumed, and you can basically keep drawing from the same unit of energy infinitely.
- use weapons 1, 2, 3 to fly over difficult sections
passwords:
Start with Max Energy Tanks A5, B1, B3, C4, D2, D3, E1, E4, E5
Dr. Wily's Castle (with all weapons/energy tanks) A5, B2, B4, C1, C3, C5, D4, D5, E2
sources:
Mega Man III | Rockman 3
controls:
d-pad = move, climb or descend ladders
A = jump (hold for higher jumps)
A + down = slide (pass under narrow passages, does not work as an attack)
B = shoot with current weapon
Start = pause and switch weapon or use items
recommended stage order:
- Top Man (Use arm cannon or Hard Knuckle)
- Shadow Man (Use Top Spin)
- Spark Man (Use Shadow Blade)
- Magnet Man (Use Spark Shock)
- Hard Man (Use Magnet Missiles)
- Snake Man (Use arm cannon or Needle Cannon)
- Gemini Man (Use Search Snake)
- Needle Man (Use Gemini Laser)
basics:
- use Rush Coil (RC) or Rush Jet (RJ) to fly over difficult sections.
passwords:
Start with 9 Energy Tanks Red: A6
All weapons, All Items, 9 ETs, no Doc Robots Blue: A3 B5 D3 F4; Red: A6
All weapons, All Items, 9ETs, Dr. Wily Stage 1 Blue: A1 A3 B2 B5 D3 F4 Red: A6 E1
sources:
Mega Man IV | Rockman 4
controls:
d-pad = move, climb or descend ladders
A = jump (hold for higher jumps)
A + down = slide (pass under narrow passages, does not work as an attack)
B = shoot with current weapon
B (hold) = charged shoot (only with Mega Buster and Pharaoh Shot)
Start = pause and switch weapon or use items
recommended stage order:
- Toad Man (Use arm cannon; fire constantly and he won't hit you with the Rain Flush)
- Bright Man (Use Rain Flush)
- Pharaoh Man (use Flash Stopper)
- Ring Man (Use Pharaoh Shot. The timing of your leaps is the key.)
- Dust Man (Use arm cannon. Jump straight up when he fires the Dust Crusher at you, and when the shot splits all the pieces will miss you.)
- Skull Man (Use Dust Crusher; the Ring Boomerang will cut through his shield (as noted by DocLight).)
- Dive Man (Use Dust Crusher and Skull Barrier)
- Drill Man (Use Dive Missiles)
basics:
- you should always hold down the B button to have a charged shot ready when using the Mega Buster to be ready for whatever is ahead of you.
A fully-powered Mega Buster shot is equivalent to three normal shots, but if you only power up to the first level, the shot isn't any more powerful at all—just bigger!
- use R. Coil, R. Jet or Wire to skip difficult sections.
- the Pharaoh Shot is the most versatile and useful weapon in the game agains most bosses.
- the Wire weapon can be used for vertical attacks
- Mega Man 4 marks the first game where the passwords don't save your Energy Tanks. You'll have to go back and get them each time. Try Skull Man's world for this.
passwords:
Start with all weapons and items A1 A4 B5 E2 F1 F3
All bosses defeated with no adaptors A1, A4, B5, E2, E3, E4
sources:
Mega Man V | Rockman 5
controls:
d-pad = move, climb or descend ladders
A = jump (hold for higher jumps)
A + down = slide (pass under narrow passages, does not work as an attack)
B = shoot with current weapon
B (hold) = charged shoot (only with Mega Buster)
Start = pause and switch weapon or use items
recommended stage order:
- Star Man (Use Mega Buster)
- Gravity Man (Use Star Crash)
- Gyro Man (Use Gravity Hold)
- Crystal Man (Use Gyro Attack)
- Napalm Man (Use Crystal Eye)
- Stone Man (Use Napalm Bomb or Mega Buster, because he's immune most of the time)
- Charge Man (Use Power Stone)
- Wave Man (Use Charge Kick)
basics:
- use R. Coil, R. Jet or S.Arrow to skip difficult sections.
- the Super Arrow can be used to make steps up a wall, but it can also act as an Item-2. Fire an Arrow then quickly hop on before it starts moving, and you can ride it.
- the Bubble Bomb weapon can be used for vertical attacks.
- The best places to find Energy Tanks and a Mega Tank are the Stone Man and Crystal Man levels.
passwords:
Start with all weapons and items BLUE: B4 D6 F1; RED: C1 D4 F6
All weapons, before Proto Man Red:C1,D4,F6; Blue:B4,D6,F1
Dr. Wily's Lair Red: C1, D4, F6; Blue: B4, D6, F1
sources:
Mega Man VI | Rockman 6
controls:
d-pad = move, climb or descend ladders
A = jump (hold for higher jumps)
A + down = slide (pass under narrow passages, does not work as an attack)
B = shoot with current weapon
B (hold) = charged shoot (only with Mega Buster)
Start = pause and switch weapon or use items
recommended stage order:
- Plant Man (Use Mega Buster and stay in a corner)
- Wind Man (Use Centaur Flash if you have it)
- Flame Man (Use Wind Storm)
- Tomahawk Man (Use Plant Barrier and stay close to him)
- Yamato Man (Use Silver Tomahawk)
- Knight Man (Use Yamato Spear. If you don't have it, shoot only when he's jumping or tossing his mace at you)
- Centaur Man (Use Knight Crush. Stand close to the center and his shots will miss you)
- Blizzard Man (Use Flame Blast and don't stay in a corner!)
basics:
- use Jet Megaman to skip difficult sections.
- Knight Crush shots can be oriented with a direction.
passwords:
All Weapons/Items B6, D4, F2, F4, F6
Dr. Wily's Castle (have Energy Balancer and Beat) B4, D2, D6, E5, F4
sources:
Vice: Project Doom | Gun-Dec | Gun Dec
controls (side-scrolling stages):
d-pad = move, crouch
A = jump
B = fire current weapon (check the ammos left on the bottom-left, collect pickups to restock)
Select = switch weapon (check the icons on the bottom)
Start = pause
basics:
- getting hit will deplete the "P" bar on the bottom-right. Collect meat and heal-aid to refill.
- collect 100 coins to get an extra life (check the counters on the bottom-right).
- last STAGE: 11
cheats:
- Stage Select/Sound Test: turn the game on, hold the A Button down and press the Reset Button. Press A or B on Controller 2 to bring up the Sound Test. Pressing Up or Down on Controller 1 will allow you to go through the Sound Test. Pressing B on Controller 2 will bring up the Stage Select Option.
sources:
Gun-Nac | Gun Nac
controls:
d-pad = move
B = fire current weapon
A = use a bomb (check current type and counter in the top-left next to "F/W/B/T")
Select = switch speed (check the number near the ship)
basics:
- circle numbered powerups allows you to switch or upgrade the main weapon.
Square lettered powerups allows you to switch or upgrade the bomb.
Collect the same powerup multiple times to increase its level.
Small "P" powerups also upgrade the weapons.
- best weapon: 3 (Homing Crescent)
- bombs are nice, but be careful they leave you open to an attack as they disable your weapon upgrades temporarily.
- last level: 8 USSEINASILLUM
cheats:
- Unlock Non-Death Mode: Hold down the A and B button during the opening animation until the animation ends, then you will see a hidden screen says"Death & Non-Death Free Select Mode OK!". After that, you can select Non-Death mode in the "CONFIG.SYS".
- Level select cheat: When the title screen appears, select the "CONFIG.SYS" option. Place the Sound Test on #5 and go up to "Area" then use the Left and Right buttons to choose your level.
sources:
The Krion Conquest | Magical Doropie
controls:
d-pad = move
d-pad down = crouch
A = jump (hold for higher jumps)
B = fire shots (hold to charge shots) (can be aimed up)
Start = pause and switch powers
powers:
- FIRE = wipe all enemies on screen, but takes four segments away from your health meter -> not very useful
- FREEZE = charged shots will freeze enemies (frozen enemies won't hurn you, but you cannot use them as platforms)
- BALL = shoot balls that fly diagonally and bounce off anything
- SHIELD = charged shots will form a barrier
- BROOM = shoot once to call your broom, then jump on it and shoot again to make it travel forward.
You can also hold up when you shoot to make the broom fly up.
However if your head hits a ceiling or the broom hits an object it disappears, and sends you falling down to the ground.
basics:
- use the BROOM to fly over gaps, skip enemies and difficult sections.
- normal shots won't pass throu walls, but you can use ball shots.
- last round: 5
cheats:
- level select (Jap ver only): at title screen, press Up, Down, Up, Down, Left and Right on the 2nd controller and then hold Select and press A on the 1st controller. If done right, the level select menu should appear.
- invincibility cheat (Jap ver only): at title screen, press Up, Down, Up, Down, Left and Right on the 2nd controller and then hold Select and press Start on the 1st controller. If done right, you should be invincible.
sources:
Little Samson | Seirei Densetsu Lickle
controls:
d-pad = move
down = duck
A = jump
B = attack
Start = pause and switch char, use potions
chars abilities:
- Lickle can climb up walls (press A+direction to grab) and hang on to the ceiling (press A+up to stick).
He can jump high, and has a decent amount of HP.
Attack: unidirectional shoots that travels very far
- Dragon can jump and hover (press and hold the jump button).
He does not slip on ice.
Attack: split fire in an upward arc. You can charge Dragon's fire by holding down the attack button, until he changes color (3 colors in total).
- Golem is slow, and he can't jump high, but he has a large amount of HP, and he has strong attacks.
He can also walk across spikes without taking any damage. He can not duck.
Attack: short range fists (multidirectional, good for bosses, but must touch the tip to cause damage)
- Mouse is extremely fast, and he can jump high.
He can run up walls, and across the ceiling.
Due to his size, he can fit into several small alcoves.
His starting HP is low.
Attack: autofiring bombs (not easy to use)
items:
- Hearts = restore health
- Large Orb with heart inside = increase health of the current char (but does not restore it)
- Potion = restore your health completely, but you must manually select it from the pause menu, press down and A.
basics:
- never fall in pits.
- enemies does not respawn.
- when you finish a stage all the chars health is restored.
passwords (normal mode):
Ruins --------------------> 1 S E K
Mountain Sky -------------> H H 1 A
Mountain Forest ----------> S O N N
Cave ---------------------> X J P P
Mountainside -------------> S A M M
Volcano ------------------> E R I F
Skull Mountain -----------> B 3 W H
Castle -------------------> E L I F
Floating Castle 1---------> G N 0 L
sources:
Cocoron
controls:
d-pad = move
A = jump
B = attack (hold to run)
Start = pause and check your char status
suggested bosses order:
- TRUMP CASTLE
- MILK SEA
- FAIRY FOREST
- STAR HILL
- ICE-FIRE MOUNTAIN
- FAIRY FOREST
- MILK SEA
- BAKU'S REALM
basics:
- best char parts: ファイター (Fighter)| ロボット (Robot) face (has more HPs), ウイング (Wing)|サイボーグ (Cyborg) body (can hover in midair), シュリケン (Shuriken) weapon (most powerful, distant attack).
Keep in mind that the same face and body parts cannot be reused in different chars, while the weapons can (check the counters next to them in the menu for the usages left).
- killed enemies will drop eggs, which you may break to get powerups and refills.
- getting hit will deplete the bars in the top-right (the big ones are like energy tanks in Metroid). Collect hearts to refill.
- you can powerup your weapon by getting weapon symbols (which look like the weapon you are using).
Your weapon will become more powerful for every 5 symbols you obtain (check the current level in the pause menu, can raise up to 20).
- the main objective of the game is to defeat all the bosses. These are marked as pink stars on the map.
There are approximately 8 stages, but their layouts change drastically depending on how you approach them from the map.
The reason for this is because you essentially have to pass through other stages while on the way to the stage you selected, and depending on which angle you're approaching from, the stage layout will be different.
You may even have to traverse a stage in reverse.
- to save you must get a Game Over by losing all your lives.
- last stage: BAKU'S REALM (to enter it, you must beat all the bosses, then go to Fairy Forest, and then to the Milk Sea. Once entered you cannot visit the other stages anymore until you start a new game)
sources:
Kyatto Ninden Teyandee | Cat Ninden Teyandee | Samurai Pizza Cats
controls:
d-pad = move, climb ladders, enter doors
2x d-pad = run (longer jumps while running)
A = jump, swim
B = attack
d-pad up + B = special attack (char-specific, req. the pink "NINPO"/"POWER" bar in the bottom-right, collect "N" scrolls to refill) -> save it for bosses
Start = pause and open the menu to switch to an helper cat (using their special abilities req. "HELP" energy in the bottom-right. Slowly autorefills by itself, or instantly via bell items.)
Select = skip cutscenes
helper cats and their abilities (in clockwise order):
- RIKINOSHIN / General Catton (blue+pink color). Ability: Demolishing (press the attack button to destroy hard blocks)
- MIETOL / BAT CAT (blue+white color). Ability: Flight (fly by holding the jump button)
- NEKKE / SPRITZ (green color). Ability: Swimming (although all the cats can swim, he can swim the fastest and using only the D-Pad)
- MEOWZMA / GOTTON (orange color). Ability: Tunneling (This cat can dig in soft soil. Just press the d-pad near the soil and he will automatically dig.)
basics:
- at the start of each round you can choose a cat to use until you die.
Best choice is PURURUM / POLLY (Pink Pizza Cat): she has the best attacks and the game most devastating ninpo attacks.
You can also switch to an helper cat anytime midstage by pressing Start.
- getting hit will deplete the hearts in the bottom-left. Collect hearts or the Cat's Paw to refill.
- other pickups include: a box with a kanji symbol=special attack powerup (3 levels, check the icon in the bottom-left), a flying egg=random item.
If you exit a screen and come back, the items reappear.
- last round: 11
passwords:
Start at Round 2 427123
Start at Round 3 140901
Start at Round 4 260388
Start at Round 5 600445
Start at Round 6 912210
Start at Round 7 192397
Start at Round 8 128256
Start at Round 9 924748
Start at Round 10 641114
Start at Round 11 (final) 390227
cheats:
- Changed Characters Mid-Round: Normally, before beginning a round, you will choose one character to play as for the duration of the round, and normally cannot switch. However, you can with this cheat. Pause the game, then hold A+B on Controller 2. Now press Select on Controller 1 to cycle through the three main characters. Deselect and select the main character whilst paused to apply these changes.
- Hard Mode: At the title screen, on controller 2 hold A & B and on controller 1 hold Select & B, then press Start twice.
sources:
Hebereke | U-four-ia | Ufouria
controls:
d-pad = move, duck, climb ropes, enter doors
A = jump
A, down = stomp attack
B = pickup, throw balls
B (hold until a heart appears) = charge Secret Weapon (if you have found it)
Select = pause and view the sub-screen, switch char and use items
Start = pause
chars:
- BOP-LOUIE / Hebereke = fast walker on land, cannot swim and cannot walk on icy surfaces (keeps falling). Secret Weapon: Head springs out and attacks enemy.
- FREEON-LEON / Oh-Chan (cat-like) = can walk on icy surfaces. Swims on surface of the water (cannot swim under water). Secret Weapon: Blows icy wind that can freeze enemies in place and turn them into platforms for a while.
- SHADES / Sukezaemon (ghost-like) = can jump very high and floats down slowly. Cannot swim. Secret Weapon: Eyes pop out, attacking multiple enemies.
- GIL / Jennifer (frog-like) = Can walk under water and swim (tap the A button repeately). Secret Weapon: Belches bombs that destroy walls obstructing your path,
basics:
- to attack enemies use the stomp attack, if the enemy turns into a ball you can grab it and throw it to other enemies.
These balls are the only way to defeat mid bosses/regular bosses
- the password you receive on the sub-screen (via the mirror-like item) will allow you to continue with all the items you collected in the game you just played, but
it does not keep track of location, so you will start at the beginning of the game.
- finding the Power of Insight (a doughnut shaped item) will let you see the location of special hidden items on the map (red dots).
- after finding the 4 friends, there are 3 keys which must be collected to open the Temple Gate, which leads to the final boss.
passwords:
Start Strong F2 Blue
Final Stage Red dots: A1, B3, C0, D1, F0, F1, F2, F5. Blue dots: B0, B4, D0, D4, E3, F4. Green dots: A4, A5, B2, C1, C2, C3, C4, C5, E0, E1, E2, E5, F3.
sources:
Totally Rad | Magic John
controls:
d-pad = walk, crouch, climb ladders
A = jump
B = shoot
d-pad up + B = use current magic power (req. the blue "M" gauge on the top-left)
Start = pause and switch current magic power (check the icons in the top-left HUD)
list of magic power icons:
- hearth, half hearth = refill health
- clock = temp. time stop -> enemies are frozen, allowing you to pass through them.
- stick figure = temp. invincibility
- sneakers (USA ver) | hat (jap ver) = turn back to normal/boy. Can charge shoot by holding "B". This is the only form that can use all non-transformation magic powers.
- paw = lion transformation -> has the strongest attack but limited in range
- wing = bird transformation -> can fly in midair by tapping A, has more powerful regular projectiles than normal boy -> very useful to skip enemies and difficult platforming sections.
- fish = fish transformation -> jump higher and swim underwater, higher attack projectiles than the bird and normal boy
- fire = fire bomb
- bubbles = water bomb
- tornado = wind bomb
- rock = rocks bomb
suggested transformations by act/boss:
1 = normal boy
2 = bird, fish
3 = fish
4 = fish, bird
5 = bird
basics:
- getting hit will deplete the orange "L" gauge on the top-left. You can only refill your health midstage with the heart magic.
Magic is only refilled when you die and after bosses.
- last ACT/stage: 5
cheats:
- Level Select/Sound Test: at the title screen, press Up, Down, Down, Left, Left, Right, Right, Start.
sources:
Journey to Silius | Raf World
controls:
d-pad = move
A = jump
B = fire current weapon (all weapons except the HAND GUN req. the blue "G" gauge in the top-left. Collect blue capsules dropped by enemies to refill)
Start = pause and access subscreen where you can switch weapons with Select)
Select = pause
special weapons:
- M = MACHINE GUN (obtained in stage 1)
- H = HOMING MISSILE (obtained in stage 2)
- L = LASER RIFLE (obtained in stage 3)
- G = GRENADE LAUNCHER (obtained in stage 4)
basics:
- getting hit will deplete the red "P" gauge on the top-left. Collect red capsules dropped by enemies to refill.
- special weapons are obtained from endstage bosses and their use is limited by a single gauge (check the blue "G" gauge in the top-left).
- last STAGE: 5
cheats:
- Hidden Options Menu : On the title screen, press the B button exactly 33 times then press Start. If you did it correctly, instead of hearing an explosion and starting the game like normal, you'll go to a hidden options menu. The hidden options menu holds a Sound Test with all the music tracks in the game, as well as a "Continues" option which lets you change the number of continue you have from down to 0 or up to 9.
sources:
Holy Diver
controls:
d-pad = move, duck
A = jump
B = fire, trigger selected magic spell (can be aimed up)
Select = toggle use of selected magic spell, switch back to human from dragon form
Start = pause and open the sub screen to select a magic spell
magic spells:
- TWIN FIRE = doubles the attack power of your fireball and lengthens reach to the entire screen.
- BLIZZARD = freezes lava as well as lesser enemies in their tracks.
- BREAKER = concentrates a large blast of mana into a devastating attack. Can break some blocks.
- OVERDRIVE = sends 2 large blades of mana out to encircle Ranay for several seconds, destroying enemies and some blocks.
- THUNDER = sends a bolt of lightning out, which explodes, killing all enemies on screen.
basics:
- every enemy hit will knock you back (easy falling in pits).
- last stage: 6
sources:
New Ghostbusters II
controls:
d-pad = walk
A = Proton Beam
B = Ghost Trap
Start = pause and show the status screen
basics:
- to change the options, at the title screen, push A+B, then Start.
- the 5 Ghostbusters char have no differences in skill.
- you must capture the ghosts in your Proton Beam first and then use the Ghost Trap (press multiple times if not working).
- you can capture and trap a ghost through walls (usually safer).
- to kill most bosses, you must continually hit it with your Proton Beam until
the boss turns pink, then trap it. You can hold down the button.
- your Proton Beam can be stretched for distance, just make sure how long it can go.
- last level: 6 - Altar
sources:
Hudson's Adventure Island II | Takahashi Meijin no Boukenjima II
controls:
d-pad = move
A = jump
A (hold) (in water) = swim up
B (tap) = attack
B (hold) = run
d-pad up + A = super jump
dinosaurs:
- Blue Dinosaur = shoots electricity from it's tail
- Maroon Dinosaur = shoots fire balls from it's mouth
- Swimming Dinosaur = swims quickly underwater
- Pterodactyl = flys and drops bombs while you ride on its back
basics:
- replenish the energy bar at the top of your screen by getting food (best ones: milk, meat). Avoid the eggplant.
- while riding a dinosaur your energy runs out more quickly.
- best dinosaurs: blue (has tail attack) (hearts symbol), and maroon (can fly over difficult sections) (clubs symbol)
- last island = 8
cheats:
- Infinite Lives: locate the fifth skull in the very first cave in the game. Once you've pass it, jump around to find a new hidden room. You'll find a bee. At any Game Over screen from now on, hold LEFT. Then press START. You will continue regularly with all the items you had before.
- World select: when you're at the title screen, press the following buttons in this order: Right, Left, Right, Left, A, B, A, B. You will then be able to choose which Island you want to play on in this new "World Select" menu. Use A to confirm.
sources:
Hudson's Adventure Island III | Takahashi Meijin no Boukenjima III
controls:
d-pad = move, duck
A = jump
B (tap) = attack
B (hold) = run
allies:
- Magma = red dino (from spade powerup) = can walk in lava, fires projectiles straight forward -> use on stages with lava
- Taylor = blue dino (from heart powerup) = run fast, attacks directly in front (short range)
- Classy = purple elasmosaurus (from diamond powerup) = the only animal that can be ridden in water, but has poor handling above water. -> use in water stages
- Don-Don = light-purple pterandon (from clover powerup, rare) = the only flying animal. Drops rocks from above like a bomber. -> use to skip difficult platforming sections.
- Poley = green tripertaurus (from star powerup) = attacks by rolling into a ball, will NOT get trapped in quicksand -> use on desert stages
basics:
- you can find hidden eggs, which contain keys. Pick'em up for bonus stages, shortcuts and goodies.
- last world: 8
cheats:
- level select: get to the Title screen. Press Down, Up, Left, Right, B, A, B, A.
sources:
Takahashi Meijin no Bouken Shima 4 | Adventure Island IV
controls:
d-pad left|right = move
d-pad down = crouch (press d-pad left|right to crawl)
d-pad up = enter doors, put teleport egg on pedistal
A = jump, swim (hold), fly (hold)
B (tap) = attack with current weapon
B (hold) = run
Start = pause and open weapon select screen (press A to confirm selection, Start to cancel)
Select = pause and open map
items and weapons:
- bone = best all around weapon until the boomerang
- yellow hammer = can smash rocks
- torch = Use it to light lanterns in caverns
- water gun = use to extinguish fires and to water sagging plants
- snowboard = use to glide quickly over snow and ice. Can damage enemies when jumping over them.
- spear = use to grab a floating log from below
- umbrella = use this to slowly float down when you jump. It will increase air-time and distance and is required to make certain jumps. If Higgins floats down onto water he will use the umbrella to float on top of the water.
- blue hammer = can smash crystals
- surfboard = allows you to glide across the surface of the water.
- boomerang = can be aimed up and activate wall switches.
- skateboard = work on dry land the same way the other work on snow and water
- stone axe = most powerfull weapon in the game.
basics:
- collect fruits to fill the fruit guage at the bottom-left (1 red dot for each fruit).
When you get 8 they will reset and a heart will be refilled.
When you begin a mini-game the number of red dots on your guage will determine your handicap.
- to ride a dino you must free them and visit their village on the left down the 1st ladder.
Best dino to get: club (allows you to fly over and skip difficult platforming sections)
- last area: left to the starting house, accessible only after
sources:
Gargoyle's Quest II - The Demon Darkness
controls (action stages):
d-pad = move
A = jump (press again to hover in midair, req. the "WING" gauge on the bottom-left)
B = shoot current MAGIC weapon
Start = pause, check stats and switch MAGIC weapon
MAGIC weapons:
- FIRE (fireball) = the basic weapon you start with it.
- BUSTER (Blockbuster, boomerang-like) = can destroy certain blocks
- TORNADO = create midair platforms allowing you to climb higher
- CLAW (bubbles-like) = sticks to spikes, allowing you to cling to them.
- DARKFIRE = the most powerful attack.
basics:
- getting hit in action stages will deplete the "LIFE" hearts on the bottom-left. Collect hearts to refill.
- collect "VIALS" to purchase items in villages (looks like red pots).
"MAELSTROMS" are extra lives. In action levels, these looks like a little miniature Firebrand.
- unlike in the last game, you can fight enemies seen on the map as much as you want.
Also unlike the last game, there are no random battles on the world map.
- talk to the kings in every village to obtain JUMP, WING and LIFE upgrades, and some special items req. to proceed in the game.
- passwords are obtained by talking to people in villages, usually near the king.
- last boss: BREAGER
passwords:
00400041-6021002 - Gibea
40404061-7152017 - Sittem Desert
40504061-7202117 - Save King Barr
51615153-8303428 - Cursed King's Palace
51645273-8334428 - Saved King's Palace
55645604-8344438 - Search for Soulstream
69796955-9465549 - Lethe's Castle
69797945-9505559 - Approaching the King of Destruction
sources:
Darkwing Duck
controls:
d-pad left|right = move
d-pad down = duck, let go from hanging
d-pad up = cape shield (usable in air as well)
A = jump
A + down = hop through a platform (press down to fall)
B = fire gun
Select = switches between normal and special gas guns
Start = pause and show sub menu screen
special guns:
- Arrow Gas (most rare and useful) = if the projectile hits a wall or other object, it will stick to it and allow DD to climb and stand upon it.
- Heavy Gas = a large ball of gas arcs towards the ground. Upon impact, the ball splits into 2 smaller projectiles that blast away horizontally, one in each direction.
- Thunder Gas = fires two lightning bolts at 45° angles up and down.
basics:
- use your cape to your advantage. Projectiles such as daggers and basketballs can be reflected by it.
Duck under cannonballs and other projectiles that you can't block with your cape.
- DD will auto grab on platforms, switches, etc.
- special guns consumes gas units (the counter behind their icon in the upper-left corner of the screen).
- you can have only one special gun at a time. When picking a new one the old one will be lost.
Try to keep the Arrow Gas for as long as possible. It helps you reach secrets such as 1-ups and bonus areas, and it takes out bosses in six hits.
- enemies respawn when you kill them and move offscreen.
sources:
Ninja Gaiden | Ninja Ryoukenden | Shadow Warriors
controls:
d-pad = move, climb
A = jump
B = basic sword attack
d-pad down + B = crouch attack
d-pad up + B = Ninjitsu attack (consumes ninja points, check the icon and the counter next to the kanji in the top-left)
B, A = jump rotating attack
Ninjitsu attacks:
- Throwing Star (-3 points)
- Windmill Throwing Star (-5 points)
- Art of the Fire Wheel (-5 points) -> best one
- Jump and Slash (-5 points) (aka the Spin Slash, purple vortex) (auto-activates when attacking in midair, press d-pad down+B to avoid it) -> can kill most bosses in a few hits
basics:
- Ryu can only directly climb up or down a wall that has any type of rungs or fence.
Also, Ryu can not attack when clung to a wall.
- every enemy hit will knock you back (easy falling in pits).
- you don't take damage when falling from any height.
- quick wall jumping: just hold A (no need for tapping).
- you can walk over small gaps on the floor.
- HP is automatically refilled after every cutscene.
- last act: 6
game genie cheat codes:
show Level Select and Debug Sound Test (hold the A button and press Left or Right to choose the room)
AZUTYSXT
OTUVASXV
EGUVPSXT
Infinite lives
SZETPGVG
Infinite Energy
SXXVYPSA
sources:
Ninja Gaiden II: The Dark Sword of Chaos
controls:
d-pad = move, climb
A = jump
B = basic sword attack
d-pad down + B = crouch attack
d-pad up + B = Ninjitsu attack (consumes ninja points, check the icon and the counter next to the kanji in the top-left)
basics:
- if you press B while hanging you'll use the Ninjitsu Attack.
- use the Phantom Doubles against bosses and enemies attacking from behind.
- last act: 7
game genie cheat codes:
show Level Select
AZUGVSGZ
YLUGNSNY
KIUKESNN
Infinite Energy
SZNGKGSA
Infinite lives
SXXGXAVG
Stop timer
SXVKLTVG
sources:
Ninja Gaiden III: The Ancient Ship of Doom
controls:
d-pad = move, climb
A = jump, climb platforms
B = basic sword attack
d-pad up + B = Ninjitsu attack (consumes ninja points, check the icon and the counter next to the kanji in the top-left)
d-pad down + A (on a platform) = drop down
Ninjitsu attacks:
- WINDMILL SHURIKEN (10 Ninpo)
- ART OF FIRE WHEEL (8 Ninpo) -> good for bosses
- ART OF FIRE DRAGON BALL (8 Ninpo) -> not good
- INVINCIBLE FIRE WHEEL (20 Ninpo) -> good as a barrier
- VACUUM WAVE ART (10 Ninpo) -> not good
basics:
level passwords (Jap version only) (legend: M=Medicine potion, P=Power-up, R=Ryu, S=Shuriken):
Act I SRMP
Act II SMRS
Act III PSMR
Act IV MPSR
Act V RSMP
Act VI RRPM
Act VII MPRS
sources:
Burai Fighter | Burai Senshi
controls:
d-pad = move and aim in 8 directions
B (tap) = fires the current weapon
B (hold) = autofire + lock aiming direction
A = bomb (req. the red "EXTRA" gauge on the bottom-left, collect 4 red bomb fragments to restock 1 unit) -> removes all enemies and enemy fire from the screen. However, it does not work on bosses.
basics:
- the difficulty levels are:
- EAGLE = easy
- ALBATROSS = medium
- ACE = hard
- ULTIMATE (unlocked by completing the ACE level)
- weapons:
- L = LASER = penetrates multiple enemies, but not walls. Moderate power.
- R = RING = penetrates walls, but not multiple enemies. Low power. (good for bosses: can pass through invulnerable parts of bosses to hit a weak point, making it possible to hit them from any direction.)
- M = MISSILE = does not penetrate multiple enemies or walls. Very powerful.
- all weapons are capable of 3 levels of power, depending on the number of sequential weapon pods of the same letter collected:
1-4 for level 1, 6-9 for level 2, and 10+ for level 3 (check the number of collected pods in the bottom-right).
When you die your current weapon level resets to 0.
- you receive an extra life for every 100K points (check the counter on the bottom-right).
- to enter hidden areas, usually containing weapon pods or the occasional extra life, you must be at the edge of the screen at the proper time (usually the entrance is in the midpoint of the screen). If you are properly positioned, the scrolling of the screen will change directions, allowing you access.
- last stage: 7
sources:
Chip 'n Dale Rescue Rangers | Chip to Dale no Daisakusen
controls:
d-pad left/right = move
d-pad down (holding crate) = hide inside of crate (any enemy which touches you at that point will be destroyed)
A = jump
B = pick, throw (can be combined with direction) -> press B + d-pad up to throw stuff at enemies from a platform below to safely dispose them
Select = status menu
basics:
- getting hit will deplete the hearts on the top-left. Collect acorns to refill.
- collect 50 flowers or 10 stars to make a 1-up appear.
- do not touch any enemy, throw stuff at them instead.
- constantly keep a crate, an apple, or some sort of item that you can throw in your hands.
- last ZONE/stage: J
sources:
Chip 'n Dale Rescue Rangers 2
controls:
d-pad left|right = move
d-pad down (holding a crate) = hide inside of crate (any enemy which touches you at that point will be destroyed)
A = jump
B = pick, throw
Select = status menu
basics:
- super throw: run for a few seconds while carrying an object, and once it begins flashing, you throw it.
- last stage: Control Room
sources:
Contra | Probotector
controls:
d-pad = walk, crouch, aim
A = jump (you can fire below you while jumping)
B = fire current weapon
basics:
- easier weapon: "S"=Spread shot
- the "B" item is a Barrier that will protect you for 20s.
- the flashing falcon item is an instant-use bomb that destroys every basic enemy on the screen when collected. It does little to no damage to vehicles, artillery, and other machines though.
- last stage: 8
cheats:
- 30 Lives: At the Title Screen press Up, Up, Down, Down, Left, Right, Left, Right, B, A, Start.
- Stage Select (Jap ver only): At the title screen, press and hold Up, Left and the A button. While holding these buttons, press Start and immediately hold Select. If done correctly, the stage select screen should appear.
sources:
Super C | Super Contra
controls:
d-pad = walk, crouch, aim
A = jump
B = fire current weapon
basics:
- easier weapon: "S"=Spread shot
- you can fire below you while jumping.
- the "B" item is a Barrier that will protect you for 20s.
- the flashing falcon item is an instant-use bomb that destroys every basic enemy on the screen when collected. It does little to no damage to vehicles, artillery, and other machines though.
- last stage: 8
cheats:
- 30/10 Lives (Player 1): On the title screen, press Right, Left, Down, Up, A, B, then Start
- Stage Select (Jap version only): At the title screen, press and hold Down on the crosspad, while holding it press Start and immediately hold Select. If done correctly you should see the stage select screen.
sources:
Daiku no Gen San | Hammerin' Harry
controls:
d-pad left|right = walk
A = jump
B = attack
d-pad down + B = ground pound -> stun enemies onscreen
d-pad up (hold) = protect from attacks from above
d-pad up + B = jumping poke attack
Select = use the special item you have in the bottom-left box (medicine bottle=restore 1 health, clock=slows down enemies, lightning bolt=bomb)
Start = pause
basics:
- projectiles can be hit with the hammer and deflected. It's easier than dodging all of them.
- each level has checkpoints. If you die you go back to the nearest checkpoint.
- the Megahammer does more damage, but the Cyclone Hammer has the unrivaled benefit of being able to hit enemies both in front and behind.
- powerups are not kept between stages.
- in the bonus stages you're supposed to hammer as many enemies as possible, and you cannot die.
If you hammer 36-40 enemies you'll be rewarded with a hard hat; if you hammer 41 or more you'll be rewarded with a vial of medicine.
- last stage: 5
cheats:
- invincibility: While playing, jump and at the height of the jump, pause the game. Now, at the same time, press Up + A on controller 2 and Down + B on controller 1. If done right, the game will unpause automatically and you'll be invincible.
sources:
Daiku no Gen-San 2: Akage no Dan no Gyakushuu
controls:
d-pad left|right = walk
A = jump
B = attack
d-pad down + B = ground pound -> stun enemies onscreen
d-pad up (hold) = protect from attacks from above
d-pad up + B = jumping poke attack
Select = use the special item you have in the bottom-left box (small heart=restore 1 health, wrist watch=slows down enemies, bomb)
Start = pause
basics:
cheats:
- level select: When the IREM logo appears, press Up, Right, Down, Left, Up, Right, Down and Left. Start the game and when "Stage 1" appears, press B to change levels.
sources:
Kirby's Adventure | Hoshi no Kirby: Yume no Izumi no Monogatari
controls:
d-pad left|right = walk
2x d-pad left|right = run
d-pad up = fly, climb ladders
d-pad down = duck, swallow enemies
A = jump
B = inhale, use current power, Flying Puff attack (while in the air)
d-pad down + A|B = slide attack
Select = drops the current power
Start = pause the game (see current power special attacks)
basics:
- Diving Attack: when Kirby enters into a free fall with nothing in his mouth and he passes a distance that is higher than the maximum his jump can reach, he will lower his face downward. If he collides with an enemy, this will kill the enemy instead of damaging him (provided touching said enemy is not harmful to Kirby).
- last world: 8
sources:
Conquest of the Crystal Palace | Maten Douji
controls:
d-pad = move, crouch
A = jump
B = attack, j-cancel in midair (land faster)
d-pad down (hold) + A = switch between your sword, the dog, and a fireball weapon (check the darkened icons in the bottom-left with kanjis over them = in use)
d-pad up = use the whistle (if you have it)
items:
- coins = enemies drop these. They can be worth either 100 (silver) or 500 (gold).
- coin purse = 1000 coins
- sword = gives you a powerful sword capable of shooting a short range wave. It runs out after it is used 21 times.
- armor = makes you invincible for a few seconds.
- fire ball = gives you a random fireball weapon.
- cherry = recovers 5 health bars. If the dog gets it, it will fill up his life
basics:
- best crystal to select at the beginning: orange SPIRIT CRYSTAL (gives permenent fireballs subweapon)
- collect coins to buy health refills and temporary fireball weapons in shops.
- most powerups are temporary and disappear after a while of use.
- health is refilled after each stage, but not dog's health + you keep unused items.
- last stage: 5 (to finish the last stage go down the ladders 4 times until you found the bats, then go up and meet a blue midboss, then go to the right door)
cheats:
- Increase Credits (Jap. Version): At the title screen, press Select + B and then press at the same time A + B multiple times.
-
free powerups: when at the title screen, press A+Select, B+Select, A+Select then press Start (you should hear a sound letting you know it was done correctly) and during gameplay, hold down Select and press the corresponding direction on the D-Pad below:
Effect Code
Coins Left
Energy Down
Extra Lives Up-Right
Invincibility Right
Jumping Shoes Up
Moon Mirror Up-Left
Weapon Strength Down-Left
Zap's Energy Down-Right
sources:
controls:
d-pad = moves M-308, aim firing
d-pad down = crouch
A = jumps (hold to jump higher)
d-pad up|down + A = switches gravity, tosses you and the enemies to ceiling|floor
B = fires weapon
powerups:
- red "A" (Armor) = allows you to take an additional hit
- red "P" (Power beam) = upgrades your basic weapon into a wider and slightly stronger laser.
- red "G" (Gravity Fireball) = you become indestructible whenever you flip gravity
- red "S" (Shield) = blocks enemy bullets. You can move the shield by looking in that direction where the bullet is coming from.
- blue "B" (Bonus points)
- blue "C" (Crusher) = destroys all the enemies on the screen. It is used immediately upon pickup.
- blue "T" (extra Time)
basics:
- attacking regular enemies from above is usually safer.
- for higher jump switch gravity mid-air 2 times.
- last stage: 7-1
passwords (USA version, normal difficulty with 500k+ Score/All Power-Up Items/127 Lives):
Start game on Stage 1-1 NORMAL with 500k+ Score/All Power-Up Items/127 Lives MZ3 - HMC8 - 872
Start game on Stage 2-1 NORMAL with 500k+ Score/All Power-Up Items/127 Lives MZ3 - S(Heart)C8 - 872
Start game on Stage 3-1 NORMAL with 500k+ Score/All Power-Up Items/127 Lives MZ3 - 2HC8 - 872
Start game on Stage 4-1 NORMAL with 500k+ Score/All Power-Up Items/127 Lives MZ3 - R5C8 - 872
Start game on Stage 5-1 NORMAL with 500k+ Score/All Power-Up Items/127 Lives MZ3 - J2C8 - 872
Start game on Stage 6-1 NORMAL with 500k+ Score/All Power-Up Items/127 Lives MZ3 - 6RC8 - 872
Start game on Stage 7-1 NORMAL with 500k+ Score/All Power-Up Items/127 Lives MZ3 - SJC8
sources:
Akumajou Special: Boku Dracula-kun
controls:
d-pad = move, crouch
A = jump
B = shoots a fireball (can be combined with a direction)
B (hold) = charge special attack or ability (unlimited uses)
Select = change special attack (check the icon in the bottom-left)
main menu translation:
NEW GAME
PASSWORD
special attacks:
- Big Fireball (you start the game with this) = it does more damage than the small fireballs.
- Spread Fireball (you get this on the 2nd stage) = it sends out 5 fireballs in a fan shape that also track enemies.
- Explosion Fireball (you get this on the 3rd stage) = it's like the Big Fireball except that when it hits an enemy it will cause a explosion that others can get caught in.
- Bat Transformation (you get this on the 4th stage) = it turns you into a bat for a limited amount of time, allowing you to fly over spikes and high walls.
- Upside down (you get this on the 5th stage) = it lets you walk on the ceiling for a limited amount of time, allowing you to reach inaccessible areas.
basics:
- getting hit will deplete the hearts on the bottom-right. You can find heart containers to increase your total hearts.
- enemies will drop coins only when killed with the charged attack. Coins are used to play minigames at the end of each stage. There isn't any skill involved, so just pick something and hope for the best.
- last stage: 9
passwords (enter in hiragana):
Level 2 (Amusement Park) Ya-mi-yo
Level 3 (Bottom of the Sea) Ku-mo-ri
Level 4 (Glacier) Ko-sa-me
Level 5 (New York City) Ma-na-tsu
Level 6 (Desert Pyramid) A-shi-ta
Level 7 (Space Elevator) Yo-a-ke
sources:
Castlevania III: Dracula's Curse | Akumajou Densetsu
controls:
d-pad = walk
d-pad down = duck
A = jump
B = basic attack
d-pad up + B = special attack (req. hearts, check the counter in the top-right)
select = switch ally
ally abilities:
- Grant = more precise and higher jump, grab wall or ceilings
- Sypha = has powerful spells attacks (useful with powerful enemies)
- Alucard = can turn into a bat with Down+A (consumes hearts)
basics:
- best ally: Alucard
- last stage: 10
cheats (player name codes):
- Play the Second Quest: AKAMA
- Start game w/ Alucard: OKUDA
- Start game w/ Grant: FUJIMOTO
- Start game w/ Syfa: URATA
- Start with 10 Lives: HELP ME
Alucard Passwords (name "OKUDA") (legend: B = blank / W = whip / C = cross / H = heart):
2-1 W-H-B-H / B-C-B-H / H-B-B-B / B-B-W-B
2-4 B-B-H-B / B-B-H-B / B-H-B-C / C-B-C-B
3-0 B-W-C-B / B-B-H-H / B-H-B-W / C-B-C-B
3-1 C-B-B-H / B-C-B-H / C-B-C-B / B-B-B-B
4-1 B-W-H-B / B-B-W-B / B-H-B-W / C-B-H-B
4-A C-H-B-H / B-C-B-H / H-B-C-B / B-B-B-B
5-1 B-B-H-B / B-B-W-H / B-H-B-H / C-B-C-B
5-6 H-B-B-H / B-C-B-C / H-B-H-B / B-B-B-B
5-A B-H-B-H / C-B-B-B / B-B-H-B / B-W-B-C
6-1a B-C-B-H / H-B-B-B / B-B-H-B / B-H-B-C
6-1b H-H-B-H / B-C-B-H / C-B-H-B / B-B-B-B
6-A B-C-B-H / W-B-B-B / B-W-H-B / H-W-B-C
7-1 B-H-B-H / H-B-B-B / B-B-H-B / H-H-B-C
7-A B-W-C-B / B-B-C-W / B-H-B-B / C-B-H-B
8-1 B-B-C-B / B-B-C-C / B-H-B-C / H-B-C-B
9-1 B-C-B-H / C-B-B-B / B-B-C-B / W-C-B-C
A-1 B-H-B-H / C-B-B-B / B-B-C-B / C-C-B-H
sources:
Shatterhand | Tokkyuu Shirei: Solbrain
controls:
d-pad = walk
d-pad down = crouch -> avoid some bullets
A = jump
B = punch + satellite bot attack -> you can also punch small bullets and some walls
d-pad down (over the white stations) = purchase powerup
d-pad up (tap) = grab onto fences (press jump to disengage from the fence)
d-pad down (hold) + A = fly with the bot (press A in midair for bot melee attacks)
recommended areas order:
- AREA B (top left)
- AREA C (top right)
- AREA D (bottom left)
- AREA E (bottom right)
- AREA F (middle)
basics:
- collect "P" items to buy from white stations:
- "[+]" = health refills
- "[P]" = punch powerup
- "[EX]" = extra life
- once you collect a combination of 3 "alpha" or "beta" items a bot is created that fight with you until it takes too much damage.
Punch the alpha to change it into a beta and vice-versa.
Collect the same combination twice and you will get an extremely powerful gun instead of a bot and become invincible for 14s.
Your bot will return to you with full health after the invincibility mode has ended.
- best bots: B-A-B (yoyo balls), A-B-B (bouncing balls)
- at the end of each stage your bot is lost, but health is refilled and you keep your current alpha/beta items
- last area: G
sources:
Panic Restaurant | Wanpaku Kokkun no Gourmet World
controls:
d-pad = move, crouch, climb
A = jump
B = attack (with weapon if you have it)
items:
- candies = restore one heart
- chef hat = extra Life
- lollipop = adds an extra heart to your energy up to a maximum of 4
- cooking pot | frying pan (JP) = makes you invincible for as long as you're wearing it
- coins = used to play the slot machine at the end of each stage
weapons:
- spoon = slightly longer range than your basic frying pan weapon.
- fork = weapon that's similar to a pogo-stick.
- plates = long-range weapon that you throw. (best one)
basics:
- you lose you current weapon when hit.
- collect coins to use at the slot machine at the end of each stage (press Select to skip playing).
- last stage: 6
sources:
Yume Penguin Monogatari
controls:
d-pad = move
A = jump
B = attack
depending on how fat Penta is he will control quite differently:
- Chubby Penta moves very slowly and can only do a belly flop to take out enemies.
- Normal Penta moves at average speed and does a kick attack to hit enemies.
- Thin Penta moves at a good speed and does a very helpful long-range attack.
items:
- food (AVOID THEM, makes Penta fatter)
- Fat-B-Gone bottle (pink ones are more effective than yellow)
- clocks = increase time left
- (H) Beanie (looks like a circle with an "H") = propeller (Hold A to fly upwards, if you get hit you lose it)
- (A) Auto-Kill (looks like a circle with an "A" = automatically kill every enemy on the screen
- (M) Invulnerability (looks like a circle with an "M" = become invulnerable for a few seconds
basics:
- touching smaller enemies will stun you but won't make you fatter.
- avoid any food, collect yellow and pink bottles.
- if you manage to completely empty Penta's weight meter. If you do the same thing in any of the flying stages you will upgrade your basic shots into missiles.
- last stage: 6
sources:
FDS
cheat codes:
Gyruss
sources:
Falsion
controls:
d-pad = move
B = fire main weapon
A = fire homing missiles (limited, check the "M" counter in the top-right, collect red "P" capsules to refill 5)
basics:
- collect blue "P" capsules to speedup.
If you lose a life, you will lose all of your power ups (your speed returns to its initial value and you lose all of your missiles).
sources:
Zanac A.I.
controls:
d-pad = move
B = fire main weapon (unlimited, straight)
A = fire special weapon (switchable and temporary, check the usage timer in the bottom-right, does not decrease when not in use)
basics:
- collect chips hidden inside some blue boxes to powerup the main weapon.
- collect numbered squares to switch and powerup the special weapon. All weapons except "0" are timed (check the counter in the bottom-right).
Timing out or collecting a different weapon will reset the power level.
- best special weapons: 7 (=bendable big ball, high timeout and absorb enemy bullets), 0 (default one, no timeout, aimable), 2 (very effective shield).
- last AREA: 12
sources:
Hikari Shinwa: Palutena no Kagami | Kid Icarus
controls:
d-pad = move (d-pad down on some platforms will make you fall down, not ducking)
A = jump
B = attack
Start = pause and check your subscreen (HEART=game currency, ENDURANCE=max health, STRENGTH=arrows) and the fortress map if you have it
Select = switch the arrows with hammers (limited uses, check the counter in the subscreen)
basics:
- getting hit will deplete the red bar on the top-left. Collect glasses/chalices or buy bottles to refill.
- hearts earned for killing enemies works as a currency to buy upgrades in shops.
items to buy:
- Chalice = recover 7 hit points, which is nearly one full bar of life
- Bottle = when your health reaches zero, this item will take effect and recover your first bar of health, or 7 hit points.
- Mallet / hammer = additional weapon. Select it with the select button, then press the B button to smash statues or enemies (deals 5 hit points of damage).
Can be used in the fortresses to destroy a statue and relase a Centurian. When you fight the boss of the fortress, the Centurians you've rescued will join the fight in groups of three.
- Feather = if you have this in your inventory when you fall down the bottom of the screen in the normal stages, you'll start flying. Press the A button to fly higher. Each time you fall down, a feather will be spent.
- Pencil (only in Fortress stores) = with this, all the rooms you have visited will turn green on your map.
- Torch (only in Fortress stores) = with it, you can see your position on the map.
- Barrel (only in Black Market stores) = with this, you can store 8 bottles, pushing your maximum hit points to an incredible 95. You can only own 1 barrel, though
- hearts are also worth SCORE points and are converted to health upgrades at the end of each stage, working as a sort of "XP".
204,200 points - 5 Endurance Bars
122,300 points - 4 Endurance Bars
56,600 points - 3 Endurance Bars
28,200 points - 2 Endurance Bars
- doors found in the normal stages will lead you to a "holy chamber".
Once you enter one of them and leave, you can never go back.
There are various type of chambers:
- regular Stores
- Black market stores = the only store that sells the barrel. Also, if one of your Weapons has been stolen by a Pluton or Pluton fly, it'll be sold here.
- Enemies' nest = kill enemies to obtain extra hearts
- Strength upgrade chamber = a friendly god will give you a Strength upgrade, depending on the number of enemies killed.
- Training chamber = a god will let you pass a test to see if you're worthy of a Weapon.
There are 3 "WEAPONS" that can be obtained:
- Protective crystal = 2 protective crystals will revolve around Pit, doing damage to enemies equal to your Strength. Weak enemies can still slip past it.
- Sacred bow = makes your arrows travel further and faster, attacking enemies from a whole screen away.
- Fire arrows = a fireball will rotate around every arrow fired, dealing damage equal to your Strength.
If you pass the test you can pick any weapon you like,
However, the first Weapon picked requires two full bars of health to be activated. The other two require one more bar respectively. After they've been activated, they will remain so for the rest of the game.
The Weapons can't be used in the fortresses. They'll be re-activated once you beat the fortress.
- Hot spring chamber = contain a pool of yellow recovery water
- Treasure chamber = a room with 8 pitchers containing either big hearts or mallets.
You need 5 hearts to break a pitcher and reveal the treasure.
After collecting your first treasure, all remaining pitchers disappear.
But there's a catch. If you shoot the pitcher containing the god of poverty, all the treasures you've uncovered will be lost.
However, if you manage to break 7 pitchers without uncovering the god of poverty, he will be replaced by either a feather, a bottle, a barrel or the credit card.
- the game is organized into 4 stages; the Underworld, the Overworld, the Skyworld, and the Palace in the Sky.
Each of these first 3 stages are divided into 4 areas.
After each area there is a checkpoint, but health is not refilled automatically.
The areas in the Underworld and Skyworld scroll vertically, while the stages in the Overworld and the Palace in the Sky scroll horizontally.
The Fortress level at the end of the first 3 areas instead do not scroll at all, but are instead made up of single screens with platforms and enemiess, most of whom follow prescribed patrol routes. Each room has doors leading out to the left or right, and/or ladders leading out of the top or bottom. In these areas, it is your goal to find the end-level boss and kill it to receive its Sacred Treasure.
The Fortress levels are set up more like mazes, with one entrance, one goal, a few dead-ends, and even some "trick" rooms which will force you to fall back to an earlier part of the maze.
- last STAGE: 4-1
sources:
Super Mario Bros. 2 | The Lost Levels
controls:
d-pad = move, duck (when bigger)
A = jump (hold to jump higher)
B (hold) = run -> cross longer gaps
B (tap with the Fire powerup) = throw fireballs
basics:
- LUIGI can jump higher and longer while running, but he is more slippery.
- a single powerups was added from SMB: the (brown) Poisonous Mushrooms (damages like 1 enemy hit).
- after the Game Over music has played, the text changes into 2 choices: "CONTINUE" and "RETRY." If you choose "CONTINUE," the game will resume from the beginning of the world, but if the player chooses "RETRY," the game will return to the Title Screen.
- last WORLD: 9 (you must not use any Warp Zones to access it)
sources:
The Legend of Zelda | The Hyrule Fantasy: Zeruda no Densetsu
controls:
d-pad = move
A = sword attack (if at full health also send out a magic sword-blade)
B = use subweapon (check the icon in the top-right. Some have limited uses, like bomb and arrows)
Start = pause and open the subscreen menu (change subweapon with the d-pad left|right, manually save with d-pad up+A on controller 2)
Select = pause
basics:
- getting hit will deplete the hearts in the top-left. Collect hearts and fairies to refill.
- collect rupees to buy items in shops found insides caves, and play money-making games. Rupees are also req. to fire arrows.
- you can use the flute to warp to defeated dungeons entrances in the overworld. You can select a different one by facing a different direction before using the flute.
- last dungeon/LEVEL: 9 (x2 quests)
sources:
Zelda II: The Adventure of Link | Link no Bouken: Zeruda no Densetsu 2
controls (side scrolling sections):
d-pad = walk, crouch
A = jump (combine with d-pad up|down for up|downward thrust if obtained from the knights)
B = sword attack (if at full health also send out a magic sword-blade which travels a short distance)
Select = cast a spell (req. the "MAGIC" meter on the top-left, collect potions to refill)
Start = pause and open the subscreen menu to check your stats and switch curr. spell in use
spells:
- SHIELD = reduce damage for a while
- JUMP = higher jumps
- LIFE = restore 3 blocks of health
- FAIRY = turn into a fairy and reach higher places (you cannot attack while in use, enter a new room to turn back to normal)
- FIRE = send out a magic sword-blade with B regardless of current health
- REFLECT = enable the shield to reflect magic attacks
- SPELL = make tougher enemies easier to defeat
- THUNDER = attack all enemies onscreen
basics:
- getting hit will deplete the red "L" gauge on the top. Collect hearts to refill.
- killing enemies and finding "P" bags will give you "EXP"=experience points (check the "NEXT" counter on the top-right).
These points will level up your stats: LIFE, ATTACK and MAGIC.
Note that when you save and quit, all 3 levels are reduced to the lowest one you had of any of the 3 upgrades (for example, if you had Lv. 8 Attack, Lv. 5 Magic, and Lv. 3 Life, they would all be reset to Level 3).
- collect hidden Link dolls for extra lives (check the counter next to "LIFE-" on the top).
- find wizards hidden in towns to learn new Spells.
- last palace: Grand Palace
sources:
Castlevania | Akumajou Dracula
controls:
d-pad = walk, crouch, climb ladders
A = jump
B = whip attack
d-pad up + B = special weapon attack (req. hearts, check the counter in the top-right)
FDS menu translation:
ENTER NAME (NAME TOUROKU)
ERASE NAME (NAME KESU)
basics:
- getting hit will deplete the red "PLAYER" gauge on the top-left. Collect the Pork Chop found by destroying certain blocks throughout the castle (rare). Health is also refilled at the end of each stage.
- destroy candles to get items like whip upgrades, special weapons, money bags=extra points, hearts=used for the special weapons (exchanged after each stage for bonus points), rosary/cross=ista-bomb, Invisibility Potion (in a yellow vase), Double or Triple Shots for the secondary weapons (with "II" and "III" icons, lost when switching weapon and after each stage).
- best special weapons: cross/boomerang, stopwatch (good to to avoid damage from enemies, but not effective against bosses)
- in the FDS version, when you lose all your lives you can save and continue from the main menu later.
- last stage: 9 (x2 quests)
sources:
Castlevania II: Simon's Quest | Akumajou Dracula II: Noroi no Fuuin
sources:
Yume Koujou Doki Doki Panic | Super Mario USA | Super Mario Bros. 2
controls:
d-pad = walk, crouch, climb, enter doors
A = jump
B = pick up item below you, throw, dig sand
d-pad down (hold until your char start blinking) = charge power jump -> jump higher while blinking
basics:
- easier char: Lina (3rd pink char) (can float in midair by holding the jump button)
- getting hit will deplete the red HP on the top-left.
Kill 8 enemies to make a small heart fly up from below and refill 1 HP.
- grab vegetables from the ground and throw them at enemies as an attack.
You can also jump on top of most enemies and grab them.
- instead of veggies you may also find from the grass: a black head (glide on the ground when thrown), bombs (used to detroy cracked walls), 1UP, and potions.
- drop potions near the place where you found them and enter the door that appear to go into a timed "sub-space" mirror/dark word.
While in the "sub-space" you will find coins by grabbing the grass, and you may also find an heart than will give you and HP refill + an extra HP (very useful, but lost when the stage ends).
Collected coins will be used to play the "BONUS CHANCE" minigame at the end of each stage (get cherries or 3 of the same icon to win extra lives).
- grab 5 cherries to make a star appear. Collect the star for temp. invincibility.
- last WORLD: 7-1
sources:
Moero TwinBee | Stinger
controls:
d-pad = move
B = shoot main weapon
A = shoot hearts above you (in horizontal stages), throw bombs to attack land enemies (in vertical stages)
basics:
- shot clouds to make bells appears, then shot the bells multiple times to change their color in this order:
blue = speedup (do not take too many), white = double shot, pink = laser, pink flashing = shadow ships, blue flashing shield.
- there are other powerups you can acquire by destroying land enemies with your bombs:
L = left|up side shot, R = right|down side shot, L+R (combined) = behind shot, moon = 3x spread shot, star = 5x spread shot.
- the "?" item can have many effects when collected: temp. invincibility, ista-bomb, special bomb that turns enemies into bells, and skull=no effect.
The professor's head serves as access to a bonus area after you beat the boss.
- besides the 1UP cross item, the game also grants score-based extends at 100K, 200K and then for every 200K until 1 million points.
- after being hit, there are 2 items that can help you out: angel (in hori stages) = powerups recovery, and the ambulance (in vert. stages) = recover the lost arms
- last STAGE: 7 (2 loops)
sources:
Nazo no Murasame Jou | The Mysterious Murasame Castle
controls:
d-pad = move
A = attack (melee or projectiles depending on enemy distance)
B = use special technique (check the icon in the top-left square, can be used 3 times)
Start = pause
basics:
- find invisible Gift Boxes by swinging your sword to get health refills and other powerups like sandals=speedup, crossbow=faster or multi projectile throws,Shogi piece=multi projectile throws, helmet=temp. invincibility.
- you can find more powerful projectile weapons throughout the game like the fireball and the windmill sword from the tanookis.
Each time you use one of these weapons, you decrease the scroll counter by 1 (above the health bar).
When it reaches 0, you lose your weapon and go back to the shuriken.
You can refill the scroll counter by picking up big scrolls dropped by enemies.
You can fill the meter in 2 ways.
- you start the game with the invisibility technique (check the icon in the top-left square), but during the game you can also find the lightning technique, which is marked by a lightning bolt.
These techniques are found from invisible tanookis that appear when your swing your sword near them.
Once you get a special technique you can use it 3 times before it runs out, and you also keep it even if you lose a life.
- each stage is comprised of 2 sections: an overworld area where you must find the castle entrance, and the castle itself where you must find the boss to proceed.
- you can find captive princesses in castles which will grant you an extra life.
However you may also find an hanya spirit dressed as a princess, which will follow and attack you.
- last stage: 5 (check the icons in the top-right)
cheats:
- invincibility: once you obtain over 99 lives, you become invincible.
sources:
Metroid
controls:
d-pad left|right = move
d-pad down = enter ball form, move elevators
d-pad up = aim up, exit ball form, move elevators
A = jump (hold to jump higher, hold with a direction to somersault)
B = fire beam or missile (check the missiles counter in the top-left, collect the same icon dropped by enemies to restock 2)
B (in ball form) = drop bombs -> drop multiple bombs in midair to "jump" in ball form
Select = switch beam or missile (you will change color)
Start = pause (while paused, press up + A on controller 2 for ista-death, get a password and restart from current area)
regular walkthough:
- Brinstar (rocky zone) -> obtain: "Maru Mari" (morph ball form), Missiles, morph ball Bombs, Ice Beam (freeze most basic enemies), Long-range Beam, Varia Suit (reduce damage)
- Kraid's Hideout -> beat the boss, then go back to Brinstar
- Norfair (fire zone) -> obtain: High Jump Boots, Ice Beam (another), Wave Beam (replace the Ice Beam, pass right through solid material and is more powerful), Screw Attack (activated while somersaulting)
- Ridley's Hideout -> beat the boss, then go back to Brinstar and enter the elevator to Tourian
- Tourian (central base) -> beat the final boss
basics:
- taking hits will knock you back and reduce your energy (check the "EN" counter in the top-left).
Collect purple orbs dropped by enemies to refill.
When this counter reaches 0 and you have no energy tank left is game over (energy tanks are shown as squares on top of the energy counter).
- there are 3 kinds of doors that will block your way:
- blue -> only 1 blast from your beam to open;
- red -> req 5 missile to open
- purple and orange -> req 10 missile to open
- bomb everywhere. This game is full of secret passages, and the only way to find most of them is by bombing.
All items besides Missile Packs and Energy Tanks are closely guarded by Chozo statues. They are contained in energy orbs that only Samus' beam weapon can disrupt in order to claim their contents. These statues are typically hidden behind red doors that need to be opened with missiles, so make sure you have a good supply of them before you seek out powerups.
- the ending you get is based on how long it takes you to finish the game. Because of this, there are lots of things in Metroid that are designed to suck up your time. Try to avoid these things. If you do get stuck, pause the game and press up and A on controller 2. This ‘instant death code' works in a lot of NES games. You'll get your password and go back to the beginning of the area you're in.
special passwords:
- Start the game suitless: 000000 000020 000000 000020
- Invincibility (for 3 sessions) and Infinite Missiles: NARPAS SWORD0 000000 000000
- Everything except the Ice Beam at last boss: JUSTIN BAILEY ------ ------
sources:
Kiki Kaikai: Dotou Hen
controls:
d-pad = walk
A = wand attack -> deflects projectiles and small enemies
B = projectile attack (check the counter in the upper-right)
A + B = bomb attack (check the counter next to the red ball in the upper-right)
Select = switch HUD type
main menu translation:
SELECT
1P
1P & 2P
basics:
- in order to enter a shop, you must find any of the huts scattered throughout the land, and shoot the head of the girl with the unusually long neck until she is defeated. At that time the doors will open and you may enter inside.
- you can save in shops and when you lose all your lives.
- last stage: 8
sources:
Tobidase Daisakusen | 3D Battles of World Runner | 3-D WorldRunner
controls:
d-pad left|right = move to the left|right
d-pad up = run faster
d-pad down = run slower
A = jump
B = fire (only if you have the Rocket)
Start = pause
Select = enables 3d mode (req. 3d glasses)
items (can be found by smashing into green or white pillars):
- potion = this makes you invulnerable for one hit. It turns you orange to let you know it's on. When you are hit, you change back to your normal color.
- rocket = this allows you to fire without reaching a boss. It is very useful, but like the potion, fades when you get hit, so it is better to use this sparingly.
- mushroom = this kills you instantly. Avoid it or your game will end.
- atom = It will make you invincible for approximately 3 seconds.
- heart = this can only be found in the Alternate World. It gives you an extra life.
- balloon (you do not receive this by crashing into a pillar. This are scattered throughout the level) = if touched, it will lift you to the alternate world.
- star (this is not received by crashing into a pillar. It is lying around in many places) = If you see one or a series in the air, it means you must time your jump to get all of them. All it really does is increase you score, or possibly give you an extra life if you get enough.
basics:
- make sure you time your jumps well. Many of the endless pits are very long, and have enemies floating above them. If you do not time your jumps carefully, you could fall into a pit and lose your life.
- last world: 8
sources:
Bio Miracle Bokutte Upa
controls:
d-pad = move
A = jump
B = shake rattle (inflate enemies, open containers)
Start = pause
items:
- milk = comes in a variety of different bottles but each one restores some of your health.
- heart = adds an extra heart to your health gauge and refills it, VERY helpful.
- bell = lets you walk instead of crawl for a few moments while you are invincible, you can't use your rattle while this is happening though.
- freeze = this item looks like an hourglass and freezes all the enemies from a brief period, you still take damage if you touch them though.
basics:
- do not jump on top of enemies, they will hurt you!
- inflate enemies and use them as platforms, or hit them to send them flying (attack other enemies).
You can send them flying horizontally, vertically or diagonally, but diagonally is the hardest one to do when you need to.
- if you fall from too high up you will be dazed for a moment when you hit the ground, you won't take any damage though.
- last stage: 7-3
cheats:
- stage select: Hold Up + A on controller 1, then also hold Down + B on controller 2. Hit select to choose any world/stage up to 6-3. Code will stay active until you reset.
sources:
Otocky
controls:
d-pad = move (incl. diagonals)
A + direction = main attack (unlimited)
B = powerup attacks (limited in ammunition, can be multidirectional or not, and do not require the D-Pad for usage)
basics:
- to finish a level, collect the bubbled musical notes (blue or red) until the notes gauge at the bottom of the screen fills up (five full notes).
During boss fights the notes gauge shows the current boss health.
- notes can be collected by shooting at them.
- if an enemy touches you, you lose a fraction of a collected note + you main attack balls became smaller.
After 7 hits you lose a life.
- last stage: 11
sources:
GBx
console ASCII art:
__________________________
|OFFo oON |
| .----------------------. |
| | .----------------. | |
| | | | | |
| |))| | | |
| | | | | |
| | | | | |
| | | | | |
| | | | | |
| | | | | |
| | '----------------' | |
| |__GAME BOY____________/ |
| ________ |
| . (Nintendo) |
| _| |_ """""""" .-. |
|-[_ _]- .-. ( ) |
| |_| ( ) '-' |
| ' '-' A |
| B |
| ___ ___ |
| (___) (___) ,., |
| select start ;:;: |
| ,;:;' /
| ,:;:'.'
'-----------------------`
Kaeruno Tameni | Kaeru no Tame ni Kane wa Naru | For the Frog the Bell Tolls
controls:
TODO
sources:
Maru's Mission | Oira Jajamaru! Sekai Daibouken | Ninja JaJaMaru: The Great World Adventure
basics:
sources:
Trip World | Gimmick 2
controls:
d-pad left|right = move
A = jump (in normal form, height of jump depends on how long you press the button), swim (in fish form, tap rapidly to swim up), fly (in flight form, tap rapidly to raise altitude)
B = attack: kick (in normal form), blow bubble (in fish form), use special attack in any special form
B + d-pad up = switch to upper standard forms: Fish -> Normal -> Flight
B + d-pad down = switch to lower standard forms: Flight -> Normal -> Fish
Start = pause
forms:
- Normal (standard): it is his most balanced form, enabling him to walk, jump and kick. He can only walk at half his normal speed in water (in addition to being unable to swim), though being submerged increases his jumping height.
- Flight (standard): you cannot turn around while flying (although you can use the dpad to speed up or slow down Yakopoo's flight) and flying into an obstacle causes Yakopoo to fall straight down and be stunned until he hits the ground.
- Fish (standard): swimming works similarly to flying, but Yakopoo may turn around at any time and colliding with walls does not stun him. He is also able to blow one bubble at a time while submerged when the B button button is pressed, which rises upwards until touching the surface after being spat out and can harm enemies.
- Flower (powerup): throw seeds into the direction he is facing; the angle and speed at which they are thrown depend on Yakopoo's relative horizontal and vertical movement speed at the time the B button button is pressed. When a seed collides with an enemy, a flower will temporarily grow on its head, immobilising the foe and enabling you to safely push it around until the flower vanishes.
- Tail (powerup): pressing B button causes him to use a tail to lash into the direction he is facing, which does as much damage as a kick if he hits an enemy with it, but has a greater range.
- Ball (powerup): Yakopoo turns into a ball, causing him to bounce continuously. While his bounces are normally no higher than his jumps in normal form, holding down A button greatly increases their height.
- Mini (collecting a powerup while in Ball form): this form behaves exactly like the normal form.
- Big (collecting a powerup while in Tail form): Yakopoo grows twice his normal height and gives him the power to spit fireballs in a straight line, which take out any opponent in their path in one hit, including bosses.
basics:
- powerups-triggered forms have a limited duration in time.
You cannot use the standard forms while they are active.
- unlike many other platform games, most of the enemies don't hurt the player on touch. Many benign enemies will become violent if attacked by Yakopoo however. Most of them just push Yakopoo around when not angered, while other enemies are able to attack in certain manners and do so freely.
- last world: 5
cheats:
- Level select: watch the entire intro. When the title screen appears, wait for the animal to walk by the text, then press select.
sources:
The Adventures of Star Saver | Rubble Saver
controls:
d-pad = move
A = jump (hold to slowly descend, if you have the Wing)
B (tap) = fire weapon
B (hold) = run
A+B + d-pad = manually use a life saver rope
basics:
- getting hit with throw out of your mecha suit, collect the "P" box to get a new one, or you will die with another hit.
- falling into a pit will use 1 life arrow, if you have them (check the 2nd row counter in the top-right).
You can also manually use these by pushing A+B with a direction. This can help you if you wish to ascend to a platform above you
- shoot star items to reveal a powerup: a gun upgrade or the Wing.
- triangles and the lion head item provides temp. invincibility.
- Hidden in the levels are bonus stages. When you are in the bonus stages, you'll be on a moving platform with a brick formation. Shoot the corners of the formation until all the bricks are gone. You'll see a lion which you must jump on the back of to gain some extra points. This will also catapult you near the end of the level. It is actually necessary to find the bonus stage in level 7 to progress since the boss of that stage is indestructible.
- last stage: 9
sources:
Aero Star | AeroStar
controls:
d-pad = move
A = jump -> you must land on a street or you will fall and lose a life (hold to stay in the air longer, req. the "JUMP" gauge on the top)
B = shoot
basics:
- there are 2 planes in this game. You can tell on which plane the enemy bullets are by their size (big or small), and dodge them by changing plane accordingly (e.g. jump to avoid small bullets).
- the main weapon can be switched and powered up via an icon released by a small carrier:
- "S" = Shield
- "L" = Laser (As long as you hold the B button down, it will continue to go straight: however, when you release the B button, it shall then split into two laser beams that go horizontally)
- "B" = single large missile
- "O" = Options (absorb bullets)
- "V" = Vulcan (wide frontal shot, best one)
- last STAGE: 7 (2 loops)
sources:
Super Mario Land
controls:
d-pad = walk
A = jump
B (hold) = run
B (tap with the fire flower powerup) = throw a fireball downwards -> you can only have 1 fireball at a time on screen. The fireball bounces off platforms and can also grab coins.
basics:
- kill most enemies by jumping over them. Koopas will explode in the game and are not kickable.
- enter the high exit door in regular stages to play a minigame for extra lives and powerups.
- to reach high platforms near the ceiling in underground stages you often have to find an hidden block with a trampoline in midair.
- last STAGE: 4-3
cheats:
- Expert Mode: When you beat the game, press any button while you're on the title screen. The cursor will change from a mushroom to Mario's face. Press Start to play the new Expert Mode that features enemies that are more difficult, more numerous, and in different places.
- Stage Select: Beat the game two times in a row, then keep pressing A. Pressing A after completing the game twice in a row activates a Stage Select. The more times you press A, the higher the stage you can go to.
sources:
Super Mario Land 2: 6 Golden Coins
controls:
d-pad = walk, swim
A = jump (press d-pad down in midair to spin and destroy blocks below you)
B (hold) = run
Start = pause (press Select to exit a previously completed level)
suggested zones order:
- TREE ZONE
- SPACE ZONE (accessed via the Hippo level upper exit)
- MACRO ZONE
- PUMPKIN ZONE (accessed via the Hippo level lower exit)
- MARIO ZONE
- TURTLE ZONE
basics:
- inside blocks you can find:
- coins (collect 100 for an extra life)
- mushrooms = turns you into big Mario
- heart = 1UP
- stars=temp. invincibility + extra lives fo every enemy killed after the.. while the powrup is active
- fire flower powerup = tap B to throw fireballs
- carrot powerup = turns you into Rabbit Mario, tap A to float in mudair
- money bag (rare) = 50 coins
- there are 2 kinds of breakable blocks:
- light blocks with happy faces: as big Mario jump below them to punch them, or jump and press down in midair to spin and destroy the blocks below you
- dark blocks with stunned faces: can only be destroyed with fireballs
- touch the bell near the "GOAL" exit of each stage to play a minigame for powerups and extra lives.
The bell in the middle of stages act as a checkpoint instead.
- some zones have secret exits with a star sign, leading to hidden stages.
- the game automatically saves whenever you beat a level, it doesn't save your powerup though.
cheats:
- Easy Mode: Press SELECT on the pipe screen
sources:
Super Mario Land 3: Wario Land
sources:
Atomic Punk | Bomber Boy | Dynablaster | Bomberman Collection
controls:
d-pad = move
A = drop a bomb
B (with the detonator powerup) = detonate a bomb
basics:
- "GAME A" is the actual "Bomber Boy" story game, "GAME B" is a straight port of NES' Bomberman with no extras.
- each location/city on the map is comprised of several "ROUNDs" that must be completed in a row.
Before entering a new location you can "MY TOWN" to buy new "PANEL" powerups or sell the ones you have.
Completing a location will unlock a new powerups in the shop you can purchase (check the icon in the top-right HUD of the map).
- before each round you can equip powerup PANELs. Some are permanent until you exit the current location, others will last only for a single round. You can equip PANELs multiple times for a greater effect.
- ELIXIR = revive you if you die
- BOMB UP = incr. n. of consecutive bombs you can drop
- FIRE UP = incr. bomb explosions range
- SPEED UP = incr. movement speed
- REMOCON = remote controller to detonate up bombs by pressing "B" (single-ROUND use)
- WALLPASS = walk over destructible blocks (single-ROUND use)
- BOMBPASS = walk over your bombs (single-ROUND use)
- FIREPASS = you won't die from your bomb explosions (single-ROUND use)
- TIMER = extend round completion time (single-ROUND use)
- best panels usage strategy: at the start of a new location, equip 3x SPEED UPs, 3x BOMB UPs, 3X FIRE UPs, and save the other single-ROUND use panels for the later more difficult stages (most useful: REMOCON, WALLPASS, FIREPASS, and TIMER).
- to finish a stage you must kill all the enemies and find the exit hiddden in a block before the "TIME" runs out.
If the timer reaches 0 you lose a life.
suggested stage order (easier to harder):
- HEVOL
- THULIA
- JAGORAZ
- GRAD
- CUOLECE
- WATHER
- WINDRIA
- FARIA
passwords (US Version):
Level 13 O,L,N,M,K,L,C,L,O,A,F,E,K,G,D,A,B,A,B,F
Level 14 B,A,E,F,P,E,D,E,F,A,F,E,K,G,D,O,L,O,L,L
Level 15 O,L,A,B,E,P,E,G,K,A,F,E,K,G,D,A,B,A,B,H
Level 16 D,J,D,J,O,H,K,H,I,C,N,M,I,H,B,L,O,B,A,F
Level 17 D,J,N,M,K,N,I,I,H,A,F,E,K,G,D,N,M,I,H,F
Level 18 N,M,A,B,E,F,M,K,G,J,G,K,E,F,O,D,J,N,M,L
Level 19 I,H,F,E,M,C,B,G,K,G,J,D,D,J,E,C,P,P,C,N
Level 20 I,H,K,G,D,I,N,M,N,F,A,H,A,B,M,G,K,E,F,L
Level 21 M,N,A,B,E,L,P,P,C,A,F,L,F,E,D,J,D,D,J,L
Level 22 M,N,O,L,B,O,J,N,M,C,N,J,N,M,B,K,G,C,P,H
Level 23 D,J,C,P,I,A,D,N,M,H,L,F,L,O,K,M,N,J,D,G
Level 24 M,N,K,G,D,F,M,A,B,J,G,C,G,K,O,A,B,O,L,J
Level 25 O,L,H,I,M,E,G,E,F,L,H,A,H,I,P,B,A,H,I,H
Level 26 D,J,E,F,P,L,P,L,O,C,N,J,N,M,B,E,F,L,O,H
sources:
Fortified Zone | Ikari no Yousai
controls:
d-pad = move
A = primary fire
B = jump (female char) | special weapon fire (male char, req. the gauge on the bottom-right) -> use to cross gaps and spikes
Select = pause and show the map and items
d-pad up (hold) + Start + Select = quick-switch char
basics:
- getting hit will deplete the "L" gauge on the bottom-left. Collect medkits dropped by enemies to refill.
"Up" boxes add 1 bar to the life of your current char -> try to distribute equally.
- taking a medkit with full health will be stored for later, and can be used to revive a dead partner in the pause menu.
- always keep some distance from enemies to easily dodge their bullets.
- to finish each stage you must find 1+ keys and reach the final boss.
- last STAGE: 4
passwords:
Level 1 1111
Level 2 3375
Level 3 1681
Level 4 1122
sources:
Ikari no Yousai 2
Donkey Kong 94
controls:
d-pad = walk, climb ladders and vines
A = jump
B (above some objects and enemies) = grab (press again to throw)
basics:
- you die with a single hit from most enemies and hazards. Falling from an higher platform will only stun you, unless very high.
- to deflect objects that are falling from a distance, do a handstand by holding down d-pad down and jump.
- to jump higher, do a backflip or an handstand jump (up to 3 times).
- in each world there are regual stages, where you have to reach the key and bring it to a locked door,
mid-boss "DK" stages, where you only have to reach Pauline,
and the final "DK" boss stage, where you have to grab the barrels and hit DK 3 times with them.
- collect 3 special items in a stage (an ufo, an umbrella and a box) will let you play a BONUS GAME for extra lives.
The remaining seconds counter will also grant you extra lives after each boss fight.
- last world/STAGE: 9 TOWER
sources:
Ghostbusters 2
controls:
d-pad = move
A = activate the Buster proton beam -> stun ghosts
B = activate the ghost trap -> capture ghosts
basics:
- all the Ghostbusters have the same ability, so it doesn't really matter who you choose.
- to finish each area, you must find and trap the number of ghosts shown in the bottom-right.
- always watch out for the trapper, because he can get stuck very easily.
- in most stages you can find some other busters waiting for you. Activating them will usually gives you a temp. powerup or health refill.
- the Buster you control and the Trapper have separate health bars, except during boss battles (check the "B" and "T" spheres on the bottom HUD).
So during the boss fights, use the Trapper as a human shield.
- last STAGE: 3, FLOOR 6
sources:
Bonk's Adventure | GB Genjin
controls:
d-pad = walk, crouch
A = jump
B = attack (tap quickly in midair for longer jumps)
sources:
Bonk's Revenge | GB Genjin 2
controls:
d-pad = walk, crouch, crawl
A = jump, swim
B = attack (tap quickly in midair for longer jumps)
basics:
- getting hit will deplete the hearts on the bottom-left, unless you are trasnformed. Collect hearts to refill or you will lose a life (respawn immediately with a press of a button).
- eating pieces of meat will advance Bonk into one of 3 forms which you can pick with a little bit of a roulette button-mashing.
- Master Bonk: increases the strength of Bonk's headbutts, and you can also jump and slam into the ground with a headbutt to cause a shockwave that will topple most on-screen enemies.
- Hungry Bonk: can cause ground shockwaves, as well as eating enemies.
- Stealth/Thief Bonk: can enter locked doors spread throughout the levels, and reach bonus rooms or a jail.
- collect 100 Smiley Faces for an extra life.
- small flowers found in stages will lift you off to a bonus area, where you can fight a shadowy duplicate of Bonk called Mechabonk in a best two-of-three arena bout.
You will each attempt to headbutt each other to knock your foe out of the arena.
- last ROUND: 6
passwords:
Stage 2 0320
Stage 3 7534
Stage 4 2821
Stage 5 7939
Stage 6 6359
sources:
Ganso!! Yanchamaru | Kid Niki
controls:
d-pad = walk, crouch, squat
A = jump
B = attack
basics:
- most destructible blocks have a fixed item inside, with the standard pellet being the most common.
Collect 100 pellets to get an extra life at the end of a stage (check the 3-digits counter in the bottom-left).
Some blocks contains Shurikens, that will be fired automatically everytime you swing a sword as long as you have them (check the 2-digits counter in the bottom-left)
Other rare items are "1-UP", a scroll that gives temp. invincibility and a door that gives access to a bonus room.
- last STAGE: 4-3
sources:
Astro Rabby
controls:
d-pad = move
A = jump (hold to jump higher)
B = shot bullets (check the "B" counter on the top)
basics:
- by jumping and landing on a "?" block, it exposes an item type underneath: "!"=extra points, skull=lose points, clock=+50s, and a heart (="PART" item, instantly complete a stage when found).
Jumping in the center of a cracked block will create a hole, where you can lose a life. But landing on the borders won't have any effect.
- by shooting at enemies in stages, sometimes they will drop powerups that you can use to increase your abilities: "B" = +10 Bullets, "J" = increases jump height", "S" = increases speed.
- in between stages, you will be allowed to get upgrades: BULLET STOCK = +30 bullets, PROTECTOR = protects from a single hit, POWER WING = greater jump, SHOCK ABSORBER = prevent from cracking normal tiles (cracked tiles will still be destroyed)
- the 3rd stage of each set will be a bonus "sound stage", where you have to match "?" blocks emitting the same sound frequency when activated.
- last stage: 8-3
sources:
Mercenary Force | Tenjin Kaisen
controls:
d-pad = move
A = shoot
B = cycle formation: "+", square, arrow and vertical line
Select = switch leader and rotate the formatio (the right-most char on the bottom HUD) -> use often to distribute hits across all the party, as those in the front usually takes more damage
A+B = sacrifice/transformation attack the leader -> use only when the leader is low on health and about to die
basics:
- best formation: 1x MONK, 2x SAMURAI, 1x SAMURAI (keep as the leader and sacrifice on bosses)
- collect coins dropped by enemies quickly as they disappear (check the yen counter in the bottom-right).
Spend these coins inside shops to buy health refills (SUSHI and TEA refills all the party, prefer these).
Health is not refilled after each stage, but you can hire new mercenaries if someone died in the last stage.
- try to stay on the right of the screen to dispose enemies before they shot at you and grab their coins.
- last ROUND: 6
cheats:
- 50000 Yen to Start + Scroll through the Stages: At the main screen, press and hold the Up Button, the Select Button, and the A and B buttons, then release all four buttons. Repeat this four more times for a total of five times, and then enter the game.
- Scroll through the Stages: At the main screen, press and hold the Up Button, the Select Button, and the A and B buttons, then release all four buttons. Finally, enter the game. After choosing your warriors, when it says 'Round 1' press the Right D-Pad button and you can scroll between Round 1 to 6.
sources:
Chalvo 55: Super Puzzle Action
controls:
d-pad = move
A = transforms you into a continually-bouncing sphere that can destroy blocks and most enemies -> use to jump over platforms, spikes, attack enemies, etc.
B (hold) = push special wheeled blocks and springs for positioning in the levels -> use to avoid spikes and traps
Start = pause, check the STAGE map and the collected gems
basics:
- to finish a STAGE, you must collect 5 gems and then locate the exit to a boss.
Most of the bosses won't attack you directly, instead opting to push you into hazards such as spikes and black holes. You usually have to hit a switch a couple of times to defeat them.
- special blocks include: the "GO!" block = remove the dotted blocks barriers in the current screen, black holes = lose 1 life when sucked in, warp block (looking like a TV with a glow inside) = teleport to another part of the current stage, star block = temp. invicibility + fall thru breakable blocks, "UP!" blocks = bounce higher for a while, chalvo face=1 extra life, black evil blocks = barriers to the stage boss removed when you have all the crystals.
- last STAGE: 8
passwords:
STSMFG Stage 2
DBDLBQ Stage 3
BFBQBT Stage 4
KFKLCM Stage 5
SPTQFG Stage 6
PRNQDS Stage 7
DHDKCB Stage 8
SPCLST Stage 9 (Special Stage)
JSSJSS Start with 50 lives
sources:
The Legend of Zelda: Link's Awakening | Zelda no Densetsu: Yume o Miru Shima
controls:
d-pad = move
A = use assigned item
B = use assigned item (hold to charge the sword)
Start = pause and open inventory (press Select to cycle the panels)
Select = pause and show the map
A + B + Start + Select = open save menu
items special uses:
- Bomb
- Boomerang
- Bow
- Hookshot
- Koholint Sword
- Magic Powder
- Magical Rod
- Mirror Shield
- Ocarina
- Pegasus Boots
- Power Bracelet
- Roc's Feather = jump over holes, avoid some enemies attacks
- Shovel
basics:
- Warp Holes can be found on elevated platforms at various points across the overworld. They can be used to warp Link to the next warp hole he has seen, in a specific sequence: Ukuku Prairie, Tal Tal Mountain Range, Tal Tal Heights, East of the Bay.
sources:
The Legend of Zelda: Oracle of Seasons
controls:
d-pad = move
A = use assigned item
B = use assigned item (hold to charge the sword)
Start = pause and open inventory (press Select to cycle the panels)
Select = pause and show the map
items special uses:
- Rod of Seasons: stands on a Tree Stump and use it to change the season (more seasons are unlocked as you progress)
- Ember Seeds (red): use to lit tourches and burn trees
- Mystery Seeds (green): use to get hints from the blue owl, random effect when shot.
- Pegasus Seeds (blue wing): run faster and jump further, also stop an enemy from moving.
- Scent Seeds (green): can attract certain monsters to the scent.
- Gale Seeds (blue tornado): warp you to a mystical tree, blow away an enemy when shot.
- Power Bracelet: pick up a rock, sign, bush, vase and other heavy objects.
- Bombs: break cracked walls and blocks, attack enemies
- Boomerang: stun enemies, collect out-of-reach items.
- Shovel: allows you to dig and remove earth and sand
- Magic Potion: revive when dead (sold at Syrup's Shop, can receive from Maple event).
- Slingshot: shoot seeds, can be aimed with the d-pad in 8 directions. Activate eye statues.
- Flutes: call an animal companion.
- Roc's Feather, Roc's Cape = jump over holes, avoid some enemies attacks, use trampolines
- Magnetic Gloves: can attract or pull objects by magnetic force (e.g. metallic balls and bases with a with "N" or "S" sign). With every press they alternate polarity.
- Magical Boomerang: can be guided with the d-pad by holding the A|B button. Some enemies are only vulnerable to it, not the sword.
- Hyper Slingshot: use to hit 3 targets at the same time
season effects: https://zelda.fandom.com/wiki/Seasons
- Winter: some trees lose their leaves and become thinner, allowing you to pass under them.
Some ponds, lakes, and rivers freeze over, allowing you to walk over them and snowdrifts may pile up in some places. They can act as a bridge between two places, or as a barrier.
- Spring: some ponds, lakes, and rivers flood from melting ice, raising the water level and covering brambles and other barriers, allowing some waterways to be navigable without the Flippers.
Flowers that were rock hard during the other seasons bloom, and regular flowers can now be chopped down.
Also in some places, Blast Blooms flourish, which can be used to rocket Link into the air, granting him access to high ledges.
- Autumn: Rock Mushrooms that were rock-hard during the other seasons are now ripe for picking when equipped with the Power Bracelet.
Leaves fall and cover holes in the ground, which you can walk over. However, if you stands on a hole for too long, you will fall through.
- Summer: some ponds, lakes, and rivers dry up, allowing you to explore the riverbed.
Additionally, vines grow in vertical crevices in walls, allowing you to climb them to access higher places.
basics:
- to enter a dungeon "LEVEL", you usually have to find special key, then find a portal to Subrosia (a subterranean lava world) and complete a quest here.
- obtain a Red Potion from the witches to revive you instantly when you die in a dungeon (same effect of a fairy in a bottle in other Zelda games).
- plant a Gansha Seed in Soft Soil spot when you can. They will act as warp points you can use with a Gale Seed.
- last dungeon/LEVEL: SWORD & SHIELD
sources:
Ninja Gaiden Shadow | Ninja Ryukenden GB: Matenrou Kessen | Shadow Warriors
controls:
d-pad = move, crouch
A = jump
B = sword attack
d-pad up + B = "Art Of Fire Wheel" diagonal attack (req. an icon on the bottom left, collect an orb with the same icon to restock)
d-pad up + A = shoots the grappling hook up -> use to latch onto the underside of certain platforms
basics:
- getting hit will deplete the "LIFE" gauge on the bottom-left. Collect potions to refill (can be only found inside item containers).
- last STAGE: 5
cheats:
- Stage Select: on the title screen, press and hold the SELECT, enter the combination:AAAABBBBABABABAB.
sources:
Battle Unit Zeoth
controls:
d-pad = move, aim
A = thrust and fly in the air (do not hold the button, just tap it)
B = shoot (hold to rapid fire)
2x B = "Hyper Bomb" (takes 2 units off your shield life, rarely useful)
basics:
- powerups and refills can be collected from each level by shooting item boxes that look vaguely like flags. There are only 2 separate actual weapons: "B" (Bullets, best one, can be shot out much faster), and "L" (Laser).
The "P" capsule will powerup the current weapon, collecting the same weapon capsule won't have any effect.
- getting hit will deplete the shield gauge on the bottom-left. Collect "U" capsules to refill, or you will game over when empty. The shield is not refilled after each stage.
- last STAGE: 5
cheats:
- Near-Invulnerability and Stage Select: at the title screen hold Down and press both the A and B Buttons together some number of times (1-5). You should hear a chime. You will not be invincible when you play the game, but you will have 30 times the normal health, which is more than enough. The number of times A+B are pressed should correspond to the stage number you wish to go to.
sources:
Vattle Giuce
controls:
d-pad = move
B = shoot
A = switch plane -> on the lower plane your hitbox is smaller, and you can avoid most enemies and bullets, but you can easily crash on walls and obstacles, so switch only to get powerups
basics:
- switch to the lower plane and destroy ground enemies to obtain powerups: "P"=weapon powerup, "E"=Energy refill, "S"=Speedup (do not take too many), "?" (random).
Powerups are only accessible on the lower elevation, but so are the obstacles, leading to a lot of close calls every time you want to risk getting a ship upgrade.
- getting hit will deplete the "D" big gauge on the right side of the screen. Collect "E" capsules to refill.
- last STAGE: 5
sources:
ZAS | Chikyuu Kaihou Gun ZAS
controls:
d-pad = move
B = shoot (hold for autofire)
A = combine and split up your support pods -> use to switch between spread vs focus fire
basics:
- the main weapon can be slightly upgraded by collecting powerup capsules.
There is also a shield capsule that can be picked up to give you a few extra hits before you lose a life (shown as a barrier surrounding the ship).
- last STAGE: 5
cheats:
- Extra Continues: to have 6 continues instead of 3, at the title screen whilst holding down A + B, press Select 60 times. A sound will be heard upon correct entry.
sources:
Avenging Spirit | Phantasm
controls:
d-pad = move, crouch, fly (as a ghost)
A = jump (fall down certain platforms by pressing d-pad down+A)
B = attack (diff. for each char)
Select (not during boss battles) = leave current body -> lose half your ghost energy, use sparingly
basics:
- best enemies to possess: fighter woman (short range attack but good agility), thug (like the gangster but with higher jump. Found at the end of STAGE 1), wizard/druid (high jump and slow descend), ninja (can throw Ninja Stars vertically), mercenary with homing missiles.
- you cannot be harmed in ghost form, but your ghost energy decreases the longer you are without a body (check the "E" gauge on the bottom-left).
Collect viles (with a "V" sign) to refill, or you will game over when empty.
- getting hit will reduce both the ghost energy and the life energy of your current physical body (check the "L" gauge on the bottom-left).
Collect small bottles to refill, or you will lose your current body and go back into ghost form when its empty.
- last STAGE: 6 (find 3 keys in the game to get the good ending, check the icons in the bottom-right)
sources:
Mega Man V | Rockman World 5
controls:
d-pad = move
A = jump
B = shot buster (hold to charge a longer shot)
Start = pause and switch current weapon (press Select to go to the item screen)
basics:
- getting hit will deplete the "P" gauge on the bottom. Collect "E" tanks to refill, or use the "ME" weapon.
- collect "P" Chips in stages to buy upgrades from Wily.
recommended stage order:
- NEPTUNE (Use your arm cannon, or later, Photon Missile (MA) or Electric Shock (JU))
- MARS (Use Salt Water (NE) or, later, Electric Shock (JU))
- VENUS (Use Photon Missile (MA))
- DARK MOON (Yellow Devil take 3) (Use your Mega Arm or Photon Missile (MA); try to plant the Photon Missiles a little before the eye opens since they pause before shooting forward)
- JUPITER (Use Bubble Bomb (VE))
- SATURN (Use Electric Shock (JU))
- PLUTO (Use Grab Buster (ME) when he's on the ground and Bubble Bomb (VE) when he hangs out in the corner of the ceiling)
- URANUS (Use the Mega Arm or Break Dash (PL) if you can hit with it. When Uranus jumps and closes off half of the screen, you can be crushed (and thus killed instantly) so stay near him.)
cheats (special passwords):
- Gives you all applicable itmes, all applicable bosses beaten, max P-Chips, and max lives.
R R E
E T E
T E R E
R E T E T
E R R R
sources:
Ganbare Goemon: Sarawareta Ebisumaru! | Starring Goemon - Konami GB Collection Vol.3
controls:
d-pad = move
A = jump
B = attack
basics:
- getting hit will deplete the meter on the bottom-left and make you lose you current powerups. Buy food, sleep at an hotel or visit a shrine to refill.
- jump near pots and flasks to get the item inside: coins, a lucky cat=weapon upgrades, a mask=increase your speed and jumping ability.
Jumping also make hidden ladders appear in some places.
- last stage: EDO (8th)
passwords (icons positions from top-left to bottom-right):
Stage 2 Hizen 1, 3, 4, 5
Stage 3 Nagato 2, 5, 2, 4
Stage 4 Yamashiro 2, 5, 4, 5
Stage 5 Echigo 3, 3, 2, 4
Stage 6 Dawa 4, 4, 2, 5
Stage 7 Mutsu 4, 6, 4, 4
Stage 8 Edo 3, 6, 2, 5
Stage 8 Edo (With the 7 Jewels) 4, 6, 3, 7
sources:
Kirby's Dream Land | Hoshi no Kirby
controls:
d-pad left|right = walk
d-pad up = fly up, enter doors, climb ladders
d-pad down = crouch, drop down some platforms
A = jump (hold to jump higher)
B (hold) = inhale enemies and blocks (press again to split or d-pad down to swallow)
basics:
- getting hit will deplete the "KIRBY" meter on the bottom-left. Collect bottled energy drinks and "M"=Maxim Tomatoes to refill.
- in this game you cannot acquire abilities by swallowing enemies, but there some temp. powerup items:
Microphone=screen-clearing bomb, Superspicy Curry=spit out fireballs rapidly, Invincibility Candy, Mint Leaf=keep flying+shoot infinite air puffs.
- last STAGE: 5
cheats (on the title screen):
- Enter Configuration Mode: Press and hold Down, Select, and B.
- Enter the Bonus Game (higher difficulty): Hold down Up + A + Select
sources:
Kirby's Dream Land 2 | Hoshi no Kirby 2
controls:
d-pad left|right = walk
d-pad up = fly up, enter doors, climb ladders
d-pad down = crouch, drop down some platforms
A = jump (hold to jump higher)
B (hold) = inhale enemies and blocks (press again to split or d-pad down to swallow. Some enemies will give you a special ability)
Select = discard current Ability or Animal Friend
Animal Friends abilities:
- Rick the Hamster: move faster, doesn't slide on ice.
- Coo the Owl: fly against wind currents and gusts.
- Kine the Sunish: swim against currents underwater and allow you to inhale while swimming underwater.
basics:
- getting hit will deplete the "K" meter on the bottom-left. Collect Health Drinks and Maxim Tomatoes to refill.
- there is 1 Rainbow Drop hidden on each island, and they often require a specific ability as well as an Animal Friend to access. Finding them is not an easy task, but collecting them all enables you to experience the true ending of the game.
- last LEVEL: 8
sources:
Metroid 2 | Metroid II: Return of Samus
controls:
d-pad left|right = move
d-pad down = crouch (press again to enter ball form), aim down while in midair, move elevators
d-pad up = aim up, exit ball form, move elevators
A = jump (hold to jump higher, hold with a direction to spin jump)
B = fire beam or missile (check the missiles counter in the bottom-right, collect the same icon dropped by enemies to restock 2)
B (in ball form) = drop bombs -> drop multiple bombs in midair to "jump" in ball form
Select = switch beam or missile
Start = pause (replace the counter in the bottom-right with the metroids left in current area only, instead of the total count)
regular walkthough:
- DESCENT (1st encounter) -> beat 1 ALPHA METROID
- TEMPLE (1st ruins/Chozo City) -> obtain: morph ball BOMBS, ICE BEAM (freeze enemies), SPIDER BALL (press down while in morph ball mode to stay attached to walls. You will lose grip when getting hit by enemies or your own bombs). Beat 4 ALPHA METROIDS.
- HYDRO (2nd ruins/Chozo City) -> obtain: VARIA SUIT (halves damage), WAVE BEAM, HI-JUMP BOOTS, SPRING BALL (jump while in ball form). Beat 6 ALPHA and 2 GAMMA METROIDs.
- INDUSTRIAL (3rd ruins/Chozo City) -> obtain: SPACE JUMP (allows you to repeatedly spin jump), SPAZER BEAM (fires 3 parallel lasers), PLASMA BEAM (goes through enemies and obstacles). Beat 2 ALPHA and 8 GAMMA METROIDs.
- MINE -> beat 1 GAMMA METROID
- TOWER (4th Chozo City) -> obtain: ICE BEAM, WARP BEAM, SPAZER BEAM, PLASMA BEAM, SCREW ATTACK. Beat 1 ALPHA and 1 GAMMA METROIDs.
- HIDEOUT -> Beat 4 GAMMA and 3 ZETA METROIDs.
- NEST -> Beat 1 ALPHA and 4 OMEGA METROIDs.
- GENETICSLAB (New Tourian) -> obtain the ICE BEAM back, beat 8 METROID larvae and the final boss.
basics:
- getting hit will knock you back and reduce your energy (check the "E" counter in the bottom-left).
Collect orbs dropped by enemies to refill.
- you have to find and kill all the metroids in current area to progress. Then the liquid decreases during an earthquake and you will gain access to a new area.
cheats:
- ista-death (useful to get a password and/or backtrack quickly to the beginning of the current area): while paused, press up + A on controller 2
sources:
Final Fantasy Adventure | Mystic Quest | Seiken Densetsu: Final Fantasy Gaiden
controls:
d-pad = move, push, talk
A = use equipped weapon (more powerful if the "Will" bar on the bottom is filled), examine
B = use equipped ITEM or MAGIC (req. MPs, check the counter in the bottom-center)
Start = pause and open the main menu to switch equipment
Select = pause and open the status menu with Save, Map and Status commands (always pause after using the Heal spell to restore DPs (game bug)))
basics:
- after you defeat a monster you will automatically receive some some Exp and Gold.
Exp is used to level up, during which you can customize 4 stats: Stamina=defense, Power=attack, Wisdom=magic, Will=faster attack power buildup.
Gold can be spent in shops (check the "G" counter in the bottom-right).
- to restore some HPs, use ITEMS like Candy, Cure or Elixir, or select "ASK" from the main menu when you have the Girl NPC with you.
- if you are poisoned or in the "Moog" condition, stay at the edge of the current area (in world map/field) or stay in front of the doorways (dungeons, towns, etc.) and go back and forth between this area and the other area. This will use up the time but will definitely cure Poison after a while. Doing this also lessens the effect of the poison. Your HP will drop at most 2 times only.
As alternative you can cure instantly with:
- Pois=Poison -> use Magic of Heal or Pure Potion
- Dark=Darkness -> use Magic of Heal or Eyedrp
- Ston=Petrified -> use Magic of Heal or Soft Potion
- Mong=Moogle -> use Magic of Heal or Moogle Potion
- some terrain and obstacles that can be cut or broken to allow travel:
- empty chests -> any weapon
- trees, thorns (in dungeons) -> Axe
- vines, ferns (in dungeons) -> Sickle
- rocks, pots, and some walls that makes a cranking sound when you strike them with a weapon -> Mattocks (and later the Morning Star which has unlimited uses)
- the most powerful sword is the Excalibur and the most powerful armor you can find is the Aegis Shield, Samurai Helmet, and the Samurai Armor.
These pieces of equipment can be found by killing certain enemies in the Tower of Gemma: Ninja, Demon Head, and Elephant.
- any combat NPC attack in the direction that you move, you can help guide their attacks.
- last area: Tower of Gemma
sources:
Gensan 2 | Daiku no Gen-san: Robot Teikoku no Yabou
controls:
d-pad left|right = move
A = jump
B = hammer attack -> can deflect most enemies projectiles
d-pad down = crouch
d-pad up = hold your hammer above your head -> protects from attack from above
B + d-pad down = ground pound -> stun enemies, use when surrounded
basics:
- killed enemies randomly drops: a rice ball (restore 1 LIFE HP, check the hammers at the bottom), an helmet (=protection for 1 hit, can be retrieved when lost), or an hammer (=bigger hammer for stronger attacks)
- last stage: 5 (2 loops)
sources:
Castlevania Adventure
controls:
d-pad = walk, duck, climb ropes up and down
A = jump
B = whip attack
basics:
- there are no subweapons in this game, so hearts restore health.
- collect 2 orb powerups to make your whip shoot fireballs.
Every time you get hit, you lose 1 upgrade.
- coins just increase the score.
- last stage: 4
sources:
Castlevania II: Belmont's Revenge
sources:
Castlevania Legends | Akumajou Dracula: Shikkoku Taru Zensoukyoku
controls:
d-pad = move, crouch, crawl, climb ropes (combine with A + d-pad down to drop quickly)
A = jump
B = whip attack
d-pad up + B = use equipped "SOUL WEAPON" (req. hearts, check the icon in the bottom-left)
A + B (tap togheter after an input pause) = activate "Burning Mode" (only once per life in every stage, check the "B" gauge) -> temp. invincibility, higher attack. Use against bosses.
Start = pause, skip dialogues
Select = pause and open the SOUL WEAPON select menu
SOUL WEAPONS:
- WIND: Stops enemy movement and attacks in all scenes except the area boss and stage boss battles. Cost: 5 hearts per use.
- ICE: Restores the player's entire life gauge. Cost: 20 hearts per use.
- FLAME: A flash attack effective against all enemies but area and stage bosses. Cost: 5 hearts per use.
- SAINT: Sends a wave in front of the player. Cannot be fired consecutively. Cost: 1 heart per use.
- MAGIC: Destroys an enemy other than the area and stage bosses and nullifies the enemy's attack. Cost: 5 hearts per use.
basics:
- the only difference between "Standard Mode" e "Light Mode" is the initial whip power level you start with.
- getting hit will deplete the "L" gauge on the bottom-left. Collect meat from candles to refill midstage.
- special weapons named "SOUL WEAPONS" are not obtained from candles in this game, but from bosses instead. They can also be switched at will in the Select menu. They still require hearts to use.
- there is also 1 "COLLECTION ITEM" that can be found in every stage. Collect them all for the best ending (check in the Select menu).
- last STAGE: 5
Standard Mode Passwords:
Stage 2 Axe, Axe, Empty, Knife
Stage 3 Axe, Cross, Empty, Candle
Stage 4 Watch, Empty, Knife, Meat
Bonus Knife, Empty, Candle, Meat
Stage 5-1 Watch, Holy Water, Meat, Candle
Stage 5-2 Knife, Candle, Candle, Candle
Super Password Meat, Candle, Candle, Meat
sources:
Kirby Tilt 'n' Tumble | Korokoro Kirby
controls:
tilt = move Kirby
quick tilt up = jump -> kill enemies and turn star blocks into clocks/time extends
A = jump out of a hole or a cloud, raise/lower popup floor blocks, fire an Air Blast (when flying)
B = make floor sections appear blue
d-pad = look around
Select = reset tilt balance
basics:
- collect 50 yellow starts for an extra life (see the counter in the bottom-right).
- Kirby can float on the water surface for only 3s before drowning and for 10s on sandy areas (check the timer in the top-right).
- getting a blue star sends you to the bonus game at the end of a stage.
- complete the game once to have free mini-game access.
- collect all 32 Red Stars to unlock the extra courses.
- last level: 8-4
sources:
Wario Land II
sources:
Wario Land 3
controls:
d-pad left|right = walk
d-pad down = duck, enter pipes
d-pad down+left|right = crawl -> pass under narrow pasages
B = charge attack -> kill enemies, destroy blocks
B (while holding an enemy) = throw enemy -> break blocks with enemy sign
B (hold) (while holding an enemy) = charges enemy throw -> break blocks in midair narrow passages
B, A = charge attack jump (longer than normal)
A, d-pad down + B = ground stomp -> kill enemies, destroy blocks, makes nearby enemies jump
d-pad down (on a slope) = roll down -> break blocks in low narrow passages
d-pad up = grab onto a fence or vine
d-pad down + A = duck jump -> enter narrow passages
trasformations:
- Hot Wario (from Flame-Bots, Flame Stand, Sun, Flame Pits) -> destroy flame blocks, light torches, destroy gray frogs
- Fat Wario (from Donut-Tossers, Apple-Tossers) -> destroy donut blocks
- Zombie Wario (from zombie heads) -> jump to fall through thin platforms
- Flat Wario (from Green Gyro-Copters) -> fit through narrow passages, float to hard-to-reach places and items, cross small gaps
- Bouncy Wario (from Hammer-Bots) -> bounce up to hard-to-reach places and items
- Yarn Wario (from silk worms, tree spider's webbing) -> destroy yarn blocks
- Vampire Wario (from bats) -> destroy Gray Frogs, fly
- Invisible Wario (from Mad Scienstein's Potion) -> pass through Eye Gates
- Puffy Wario (from Flying Octopi, Sorcerer Fox's Spiked Enemies) -> float up to hard-to-reach places and items
- Frozen Wario (from Snow Bears) -> destroy Gray Frogs, go through Spiked Objects
basics:
- to finish each stage you must find a colored key and the corrisponding treasure chest.
You can exit current stage also by entering blinking doors and from the pause menu.
- coins aren't that important in this game as they were in WL2.
Btw the color of the coins denotes what key you are close to.
- beat the game with all 100 Treasures to unlock a Time Attack mode.
In Time Attack mode your goal is to go into every stage and grab ALL 4 Keys, then exit (you can use any exit).
- Wario is ordinarily invincible in this game; the only possible way to get a Game Over at all is to lose to the final boss, which is the only enemy that can actually kill him.
sources:
Penta Dragon
controls:
d-pad = move
A [+ direction] = basic shoot attack
B = use a Mega-Flash bomb (if you have it)
Select = open status/items menu (press up/down to switch category, press A to use something)
basics:
- if you grab an Attack Item (A black square with any number of arrows on it), your attack type will change.
- If you kill a certain amount of enemies you'll transform into your dragon mode.
Your dragon form can shoot fireballs from her mouth, and makes boss battles a breeze (especially the mini-bosses). After a while you'll morph back.
- In Penta Dragon the bosses appear not at a certain point in the level, but in a certain point at time.
No matter where you are in the room, once the game timer hits 0, the screen will flash, all enemies will vanish, the music will change, and a large foe will appear.
Usually the bosses come in shifts. You will fight one type of boss and once you beat it, the enemies will re-appear and the stage will go on as normal.
Then, a set time later, a different boss will come at you and you'll have to fry it.
After that you'll have to fight the first boss again, then the second etc.
- last stage 7
cheats:
- Start With Lots of Items: at the title screen, select "Game Start". Now, at the "Stage 1 Load Screen", hold Up + A + Select until the game starts. If done right, your item and magic list will be full.
sources:
Kid Dracula | Akumajou Special: Boku Dracula-Kun
controls:
d-pad = move, crouch, climb ladders
A = jump (hold for higher jumps)
B = shoot fireballs
B (hold until flashing) = use current spell
Select = switch spell (check the icon and label at the bottom-left)
Start = pause and switch spells safely
spells:
- NOR = shoots a bigger more powerful fireball + can be combined with a direction.
- BAT = turn into a bat for a short time (5s). Useful for getting across large gaps, and flying over enemies. If you need to drop at any time press B or Select.
- ATT = shoot multiple bats in a protective arc. Useful when enemies are attacking from above.
- HMG = shoot multiple fireballs that home in on enemies. Good for bosses.
- UPD = allows Kid to walk on the ceiling for a short time. Press Select to drop down.
- BOMB = break through walls.
- UMB = deflects attacks. Press UP or DOWN to raise the umbrella above your head. At other times it's out in front of you.
basics:
- kill enemies with charged shots to obtain coins. Use coins at the end of each stage to win extra lives (easiest minigame: A - GRAB BAT).
- last level: 8
passwords:
Level 2 5613
Level 3 3272
Level 4 7283
Level 5 5346
Level 6 7225
Level 7 5539
Level 8 7158
sources:
Momotarou Dengeki: Momotaro Thunderbolt
controls:
d-pad left|right = move
d-pad down = crouch
d-pad up = check signs, enter doors
A = jump (hold for higher jumps)
d-pad down + A = drop down platforms
B = throw peaches (turn most enemies and projectiles into peaches)
B (near a peach) = grab
B (hold) = run
basics:
- you can jump over most enemies and use them as platforms.
- large peaches provide the most powerful attack (good for bosses), and turns into coins.
- collect 100 coins to get an extra life.
- collecting the kabob-like item to turn into an animal ally forms (icon cycling for a while):
- dog/cat = move faster, can run over small gaps
- monkey/kappa = jump higher, can climb trees, faster ladders climbing
- Pheasant/bird = can fly by tapping A
sources:
Momotarou Dengeki 2 | Momotaro Thunderbolt 2
controls:
d-pad left|right = move
d-pad down = crouch
d-pad up = check signs, enter doors
A = jump (hold for higher jumps)
d-pad down + A = drop down platforms
B = throw peaches (turn most enemies and projectiles into peaches)
B (near a peach) = grab
B (hold) = run
super forms abilities (uses the peach meter at the bottom):
- cat = hold B in midair to hover
- bird = press 2x A to fly straight
- monkey = ..
cheats:
- invulnerability: enter "五九〇一一五" as password
sources:
Motocross Maniacs | Bikers - Konami GB Collection Vol.3
controls:
d-pad = tilts your bike, pushing left will pop a wheelie
A = accelerate -> hold this to move forward. If you let go, you will immediately brake to a halt, even on ramps
B = use nitro boosters (check the "NTR" icons in the bottom-right, collect "N" items to restock) -> use to get items, make difficult jumps, and traverse complicated loops
basics:
- you will have to pop wheelies to get over small obstacles like rocks, or to get on top of ramps that are situated just slightly above ground. Do not hold it for too long or you'll lean back too far and bust.
In midair, you will often have to tilt your bike to the same angle that the ground below you is on. This is so you don't crash.
- try to stay on the high path whenever possible.
In the later courses, much of the ground is made of sand, which slows your bike down greatly.
- last course: 8 ("A" level gives you more time to finish)
sources:
Motocross Maniacs 2 | Crazy Bikers
controls:
d-pad = tilts your bike, pushing left will pop a wheelie
A = accelerate
B = use nitro boosters (check the "NTR" icons in the bottom-right, collect "N" items to restock)
sources:
Trax | Totsugeki! Poncotts Tank
controls:
d-pad = move
B = fire (hold down for autofire)
A = rotate the aiming turret clockwise
basics:
- getting hit will deplete the vertical health bar on the right and power down your weapon. You are also damaged by the explosions. Collect gasoline tanks to refill, or you will lose a life when empty (check the counter in the top-right).
- destroy carriers trucks to get weapon powerups and refills. Best weapon: 3-way fire.
- to avoid enemy fire, take cover behind terrain obstacles. You can also try to shot most projectiles, but the timing is tricky.
- do not touch land mines looking like big bullets.
- last STAGE: 4 - CAPITAL CITY
sources:
Banishing Racer
controls:
d-pad = move
A = jump
B = speed boost -> not an attack, move faster, use in midair for longer jumps
A, B = jump attack
basics:
- attack most enemies by jumping over them (some req. multiple hits).
- last STAGE: 5-3
cheats:
- stage select: at the title screen, hold Down, then press A+B multiple times, equal to the number of the stage you want to go to. Any more than 15 presses will bring you to the ending. Press Start once you're sure of which level to go to.
sources:
Gargoyle's Quest | Red Arremer: Makai-Mura Gaiden
controls:
d-pad = move
A = jump (press again to hover in midair and then use the d-pad to fly horizontally, consumes the "W" meter in the bottom-right)
B = shoot flame or selected ability
Start = pause bring up the action menu to select a magic ability or an item to use
weapons/abilities:
- Fire (diamond-like icon on the far left) = the basic projectile that you starts the game out with.
- Block Buster (boomerang-like icon) = a boomerang-shaped fireball that can break through certain types of brick. If you can't attach to it, odds are it can be taken down by this special brand of ammunition.
- Claw (ball.shaped icon) = a special type of projectile that forms a sticky surface on walls covered in spikes. When it's attached to a spiky wall, you can rest on it safely without fear of poke-age. It's only a temporary thing though, so be careful that you don't lose track and fall!
- Darkfire (on the far right) = your most powerful projectile. It's dark, large, and in charge, and it's the only thing that works against the fearsome King Breager.
basics:
- getting hit will deplete the "L" gaunge on the bottom-left.
To refill mid-stage, you can only use the "Essence of Soulstream" (has a bag-like icon in the pause menu) once per life or level.
- each town has someone who will exchange the game's currency ("VIALS") for "Talismans" that act as additional lives.
There's also someone who will give you a resurrection spell (aka, a password).
- last Chapter 11
passwords:
Level 2 MUPP-JMHW
Level 3 GJ7Q-KLVO
Level 4 SWXE-CBFJ
Level 5 BIF8-BRAZ
Level 6 FWGG-57CY
Level 7 HWTL-90AZ
Level 8 N5AQ-9RZF
Begin with extra items and boosted attributes. FFFF-FFFF
End of Game WPXF-4BDQ
Final Stage SWXE-CBFJ
Final Town (9 Lives, 99 Vials, 1 Essence of the Soulstream) DFJG-PLOC
Final Town (with 99 vials) 56CD-E67C
sources:
Shantae
controls:
d-pad = move, crouch, crawl
A = jump
B = attack, talk (near people)
d-pad left|right + B (hold) = run
d-pad up + B = use current item (check the icon in the bottom-left)
d-pad up = kick attack (if unlocked)
Start = check inventory, dances (B toggles inventory-dances), switch item in use
Select = enter|exit dance mode (press a button when the note lights up to do a dance move)
dance moves list:
Monkey [Transformation]: DR
Elephant [Transformation]: DL
Spider [Transformation]: DA
Harpie [Transformation]: DB
Heart [?]: ?
Scuttle Town [Warp]: DULR
Water Town [Warp]: DURLBA
Oasis Town [Warp]: DURRBA
Zombie Caravan [Warp]: DULLBA
Bandit Town [Warp]: DUBLBR
Tinkerbat [Advance Dance]: DUU
animal forms:
- Monkey = is fast and agile, and can climb walls and fit in those small hole to get to those hard to reach places. In the beginning of the game, however, it can't attack, so using from the get-go isn't always the wisest choice.
- Elephant = is slow and lumpy, and has the worst jump. However it's best at smacking down walls, and is the only form that can attack without the use of a item.
- Spider = can jump pretty high and can climb on spiderwebs, but cannot run.
- Harpie: can fly. Slow at waling.
- Tinkerbat (GBA only) = has a sword to attack with, and run and jump pretty well. It also has picked up a few traits from the other forms. It can climb walls like the Spider and Monkey forms, and can ram into things (down+B) like the Elephant form.
basics:
- you can save your game at Save Sage hut (there is one in every town).
- collect hidden baby squids and bring them to their mama in each town to unlock special warping dances (4 req. for each unlock).
- use FLOAT MUFFIN for temp. protection against pits.
sources:
Mole Mania
controls:
d-pad = move
d-pad up = read signs
A = talk to Grandpa Hint, dig, pop up from underground
B = grab stuff
B + d-pad = push/pull stuff
B (hold) + d-pad = throw stuff
B (when underground) = peek aboveground
items:
- black ball = used to kill enemies and smash exits.
- cabbages = used to kill enemies and collecting 20 nets you points. also, 5 gets you a quarter of a heart.
- barrel = blocks a hole and kills enemies.
- pipe = throw anything except cabbages into it and it is fired out the other end.
- map = shows you how big the level is.
- locator = shows you where grandpa, the bonus and the boss are.
- potion = refills your heart.
- give-up = lets you pass but you get no points for that room.
- exit door = smash it with a black ball to complete the room.
- enemies = all deal a quarter of a heart damage and can be killed with balls or cabbages.
basics:
cheats:
- obtain all items: During gameplay, pause, hold Select, and then enter Left, Right, Left, B, B, Right, Left, Right, A, A
sources:
Wendy Every Witch Way
controls:
d-pad left|right = walk
A = jump
A + d-pad up|down = reverse gravity
B = attack
Start = pause
cheats:
- debug menu: at the Title Screen, press the following buttons five times each: Left, Up, Right, Down, Select.
passwords (Normal Difficulty):
Minus, Circle, Circle, Minus. Cheat Password (Wand Powerup)
Star, Triangle, Minus, Minus. Level 1-2
Star, Plus, Minus, Square. Level 1-3
Star, Triangle, Plus, Circle. Level 2-1
Star, Minus, Minus, Plus. Level 2-2
Star, Triangle, Circle, Plus. Level 2-3
Star, Square, Square, Circle. Level 3-1
Star, Star, Triangle, Plus. Level 3-2
Star, Triangle, Circle, Minus. Level 3-3
Star, Square, Square, Star. Level 4-1
Star, Circle, Triangle, Square. Level 4-2
Star, Plus, Triangle, Circle. Level 4-3
Square, Star, Minus, Plus. Level 4-4 (Final Stage)
Square, Minus, Star, Plus. Advance World (Level ?-3)
sources:
SNES
controller layout:
L R
X
(d-pad) Y A
Select Start B
controller ASCII art:
L __ | | __ R
\ ___________________|_|_____________________ /
_,-' ____ '-._
,' S U P E R N I T E N D O _,-' `-._ `.
,' ___ -ENTERTAINMENT SYSTEM- ,' __ X `. `.
/ | | / / \ \ \
/ ___| |___ / __ \__/ __ A \ \
| | | ,. ,. | / \ / \ | !
! |___ ___| ,',' ,',' | \__/ __ \__/ | |
\ | | ',' '.' \ Y / \ / /
\ |___| SELECT START \ \__/ / /
`. ___________________ `._ B _,' ,'
`-._ _.'` `-._`'~-.,-~'`_.'`
`'~-.,-~'` `'~-.,-~'`
cheat codes:
Legend of Zelda: A Link to the Past
sources:
Micro Machines 2: Turbo Tournament
sources:
Flying Hero: Bugyuru no Daibouken
controls:
d-pad = move
B = shoot (hold for rapid fire. Combine with L | R to angle your shot, or L+R to fire backward)
Y = bomb (check the counter in the bottom-right. Restock to 3 when you die)
Select = switch speed (3 levels, check the wings in the top-left)
basics:
- collect 3 cakes to upgrade your weapon 1 level.
When you take a hit, your weapon will be downgraded 1 level.
If you are already at the lowest possible weaponry, you will lose a life.
- red baloons also provides switchable weapons:
- flakes : shoots snowflakes at your enemies. Slow but strong.
- lightning : shoots lightning at your enemies. Your shot grows in length. (short range, avoid)
- bulb : normal shot
- bluster : also normal shot?
- the devil-like icon adds a hornet swarm to your shot.
They are heat-seeking. Very useful upgrade.
- last stage: 5
sources:
Teenage Mutant Ninja Turtles IV: Turtles in Time
controls (TYPE C):
d-pad = walk
2x d-pad (if PLAYER DASH=MANUAL in OPTIONS) = dash
B = jump
Y = attack (diff. while dashing)
A = special attack -> consume some health, use only against bosses
B, Y = jump kick (press at the very top of your jump for the Somersault Slice)
B+Y | A (while dashing) = flying kick
basics:
- easier char: DON (long-reach weapon), MIKE (most powerful)
- getting hit will deplete the gauge on the top-left. Collect pizza to refill mid-stage.
Health is also refilled after each stage/SCENE.
- last SCENE: 10
sources:
Super Ninja-kun | Maru's Quest
controls:
d-pad = walk, crouch
2x d-pad = run
B = jump, climb walls (press rapidly while hanging on a wall to climb it) -> stun some enemies by jumping over them
Y = attack
L|R = switch weapon left|right
dpad up + Y = pickup stunned enemies (press Y to throw them)
A = Super Ninja Power (the gauge on the bottom must be full, collect small souls to refill)
menu translation:
1 PLAYER 2 PLAYERS
OPTIONS
options menu translation:
LIVES 3 5 7
ENHANCED MUSIC
ENHANCED SFX
basics:
- touching enemies won't damage you, while getting hit by a weapon attack will reduce the hearts in the top-left. Collect heart items to refill.
- there are several different ninja weapons to be found in the game.
You begin with the Shuriken, but after most bosses you defeat you gain a new ninja weapon you can use.
They all have infinite ammo and can be switched between by pressing the L and R buttons.
- last stage: 9
sources:
Stunt Race FX
controls:
d-pad = steer, tilt (in midair)
B = gas
Y = boost (req. the blue "BOOST" gauge on the bottom-left. Collect blue gems to refill)
A = brake (hold when stopped to reverse)
X = jump+horn
L|R = sharp turn to left|right
Select = switch camera
menu explanations:
- SPEED TRAX = GP mode (in order to successfully complete a race, you must reach the finish line and place 3rd or better)
- STUNT TRAX (compete on obstacle courses to collect stars scattered across the course and reach the goal before time expires. There are no rival cars.)
- BATTLE TRAX = 2P mode
- TEST RUN = practice mode (you drive the 4WD vehicle here on an empty special track)
basics:
- taking hits will incr. the red "DAMAGE" gauge on the bottom. Collect red gems to refill.
When the gauge is dangerously high, your vehicle will begin to smoke. If the gauge fills completely, your vehicle will crash.
- blue and red gems will re-spawn every lap in the same location on the track.
- beat "SPEED TRAX" on novice and expert to unlock the Master Class.
Then beat Speed Trax on the Master difficulty to unlock the "2WD" (Dirt Bike) car.
sources:
Dezaemon - Daioh Gale
controls:
d-pad = move
Y = shot
B = bomb (check the "BOMB" counter in the bottom-right, collect "B" icons to restock)
basics:
- "P" items increase the ship's power, "S" items increase the ship's speed, "SH" adds a 1-hit shield to the ship and "B" adds one bomb to the bomb stock.
- colored icons are used to change the weapon you're currently using: red corresponds to a vulcan spread pattern, blue activates a mix of straight and (slightly) homing missiles and green consists of a constant stream of homing bubbles. It takes just a few power-ups to reach maximum firepower, extra bombs appear often and you can get at least one shield per stage.
- best weapon: green (homing)
- last STAGE: 6
sources:
Earthworm Jim
controls:
d-pad = move, look up/down, climb, crouch, purchase items
B = jump
A = whip
Y = fire the Blaster
basics:
sources:
Earthworm Jim 2
controls:
TODO
sources:
...
Super Puyo Puyo | Kirby's Avalanche
sources:
Shounen Ninja Sasuke
menu translation:
QUEST
ACTION
1 PLAYER
2 PLAYER
sources:
Super Double Dragon | Return of Double Dragon
controls:
d-pad = walk
Y = punch, use weapon
A = kick
X = jump
B (hold) = block -> use often to grab enemies and attack them repeadely
L | R (hold) = charge the red meter in the top-left (then press Y or A to unleash a special "Dragon Move" attacks, diff. when charged 1% - 50%, 50-99% or 100% and blinking)
basics:
- getting hit will deplete the blue gauge on the top-left.
When empty you'll lose a life, but only when grounded by an attack.
There are no midstage health refills, but health is fully refilled after each stage/mission.
- last mission: 7
sources:
The Ninja Warriors Again | Ninjawarriors
controls:
d-pad = walk, crouch
Y = attack, grab and throw
Y (hold) = guard (can move while guarding)
B = jump
B + d-pad down = dash attack -> very useful to avoid enemy attacks
B + d-pad right|left (only some chars) = alt. dash attack
B, Y = midair attack (diff. if combined with d-pad right|left)
X = bomb (then the "BLASTER" gauge on the bottom-left is full, auto-refill over time, but clears when you fall down)
basics:
- easier char: NINJA
- getting hit will deplete the thin "PLAYER" health gauge on the bottom.
Collect "E" pickups found in boxes to refill.
- last STAGE: 8
cheats:
- Level Select: enter the following code at the Title screen.... if you want to change levels use the Right and Left buttons. Hold X + Y and press A - A - A - A - B - B - B - B - A - B - A - B - A - B - A - B
sources:
Act Raiser | ActRaiser
controls (ACT mode):
d-pad = walk
Y = attack
B = jump
A|X (int ver) | d-pad up+Y (Jap ver) = use magic (if equipped, req. scrolls to use, check the icon in the top-right)
basics:
- in each new area you must complete these task:
- select "Fight Monsters" and complete the ACT-1
- in SIM mode you must find and destroy all the Monsters' Lairs in the current map to proceed.
To do so "Direct the People" to explore the lands until they evolve.
Then guide them to each Monsters' Lair to seal it (some are hidden and must be unconvered with Miracles).
While completing these tasks, protect the constructions from the auto-spawing monsters by throwing arrows with Y and solve the population problems by doing Miracles (lightning=destroy bushes and small rocks, sun=dry swamps and snow, rain=make the desert cultivable, wind=blown enemies onscreen).
- select "Return to Sky Palace", then "Fight Monsters" again to play the ACT-2 and complete the area
- select "Sky Palace Movement" to go to the next area.
- in ACT mode TIME resets everytime you enter a new screen, and if it reaches 0 you'll die instantly.
- in ACT mode destroy blue statues with orbs to obtain items: apples to restore HPs (check the gauge on the top-left), scrolls=extra magic use, 1UP hearts, jewels=extra points, fire sword powerup and instant bombs.
Enemies do not release any item, so skip them if you can.
- health is also refilled at the end of each ACT, but not scrolls.
- you must save your game manually in the "Other -> Progress Log" menu while in the map.
- last area: DEATH HEIM (7th)
cheats:
- Professional Modeto access the hidden Professional mode, first, beat the game. Then on the title screen, highlight "New Game" and press Down or Select.
sources:
Act Raiser 2 | ActRaiser 2
controls (type 1):
d-pad = walk, crouch
Y | X = attack (can be aimed with the d-pad)
Y | X (hold until you start flashing) = magic attack (req. 1 scroll in the top-left to use, combine with a move to cast a different magic)
B | A = jump (press again to jump higher, or d-pad left|right to glide)
suggested stages order:
- INDUSTEN
- BENEFIC
- TORTOISE ISL.
- ALTHERIA
- TEMPONIA
- MODERO
- DEMON'S CAVE
- DEATH FIELD
- ALMETHA
- PALACE
- GRATIS
- STORMROOK
- TOWER OF SOULS
basics:
- to use your shield, simply stand still. You can also crouch to lower your shield, or press up to move it up. You cannot use your shield to block while you are moving or attacking.
- destroy grey statues to get refills: yellow/orange/green orb=HP, blue orb=scrolls, shining sparkles=1up.
- last stage: TOWER OF SOULS (7th)
passwords:
1-2 (Normal) XZKC XBZM WTHC
2-1 (Normal) JCLD XYTX TMCT
2-2 (Normal) MLWK BPZW YJCW
3-1 (Normal) MMFH MBKC FFTL
3-2 (Normal) MCSY HKHD ZFHC
4-1 (Normal) MFLT CMSP XWFZ
4-2 (Normal) MFLH MFDS MXPS
5-1 (Normal) MFMJ PLBW LPCX
5-2 (Normal MFMJ TTLK FPTP
6-1 (Normal) MFMJ TWSY HMTF
6-2 (Normal) MFXT SHJT CYTP
7-1 (Normal) [Part 1] MFCY BPXF DWKL
7-1 (Normal) [Part 2] MFCL YXKY DKDS
7-2 (Normal) [Part 1] MFCL SYMC MSXF
7-2 (Normal) [Part 2] MFCL SYMX WKTD
sources:
Makeruna! Makendou 2: Kimero Youkai Souri
controls:
d-pad = move, jump, block (opposite direction of the attack)
Y = weak punch
X = strong punch
B = weak kick
A = strong kick
d-pad D, DF, F + Y | X = Hadouken-like attack
d-pad F, DF, D, DF = flame raising attack
d-pad B, DB, D, DB, B + R = use magic to increase damage (check the blue bar below the HP)
main menu translation:
STORY MODE
VS MODE
CUSTOM STORY MODE
basics:
- last opponent in story mode: MAKENPO
sources:
Ranma 1/2: Chounai Gekitou Hen
controls:
d-pad = move, crouch, aim up
X = jump (press again to double-jump)
Y = punch
B = kick (different for each direction)
Y+B = flame column attack
A = special attack -> unlimited and powerful, use often for easy wins
L|R = block
d-pad forward + Y (near opponent) = grab+throw
main menu translation (from left to right):
- VERSUS (also works as practice mode)
- STORY
- OPTIONS
basics:
- easier char: Ranma-Chan (press right to stage select to pick)
- last opponent: RYOHGA
sources:
Spriggan Powered
controls:
d-pad = move
B (tap) = fire
B (hold) = charge special shot (req. the gauge on the top-right, destroy enemies and collect silver/grey orbs to refill)
A = shield (req. the gauge on the top-right, destroy enemies and collect silver/grey orbs to refill) -> absorb enemy bullets
basics:
- collect colored orbs to switch weapon. Collect the same orb 2 times to powerup.
- best weapon: green (homing spheres)
- some bosses/enemies glow violet when hit. The bosses that have big amounts of health glow in this order: violet - yellow - red.
- last stage: 6
cheats:
- level select: play BGM 00, SE 07, SE 09, SE 03 and SE 00 in that order in the sound test contained within the options menu to add a level select option to the menu, as well as a lives/credits option (Spriggan) and the ability to select the Super difficulty.
sources:
Kaizou Choujin Shubibinman Zero | Kaizou Choujin Schbibinman Zero | Shockman BS
controls:
d-pad = run, crouch
Y (tap) = punch attack
Y (hold) = charge the buster attack -> safely attack distant enemies
B = jump (hold to jump higher)
B, Y = jump kick attack
d-pad down + Y = crouch attack -> use to stun enemies and make them fly away from you
d-pad down + B = drop down platforms
d-pad down (hold 1s), d-pad right|left + Y = uppercut (P1 only)
B, 2x Y = energy jump kick attack (P2 only)
basics:
- collect batteries to refill your health (check the blue cells at the top-left).
Health is also refilled after each stage, and you may also get an extra health cell depending on your score ("LEVEL UP").
- last stage: 8
cheats:
- debug menu with stage select: Pause the game, hold B+X, and press R to open the Debug Menu. Move with the D-pad and make your selection by pressing Y. From the Debug Menu you can access the Sound Test. The Next Area and Stage Select options will appear if SW1 Flag 1 was previously enabled in the Flag Editor.
- Easy Mode: At the "1 Player / 2 Player" screen, hold L+R and press Start. If done right, the game will be in easy mode and you'll have 9 continues.
sources:
Front Mission: Gun Hazard
controls:
d-pad left|right = walk
d-pad up|down = rotate aim
2x d-pad left|right (if you have a "RD-" dash unit equipped) = dash
Y = fire primary weapon (check the name and ammos left in the lower top-left HUD, autorefills over time) (unlike the secondary weapon, this cannot be changed in battle. You'll have to do it from your carrier.)
A = fire Special weapon (check the name and ammos left in the lower top-right HUD, must be manually refilled with a BULLET item or from your carrier outside missions)
X = switch Special weapon
B = jump (hold in midair to use the jetpak if you have a "VU=Vernier Unit" equipped)
R (on the ground only) = shield -> protect from most enemy fire but gives a bit of recoil on impact
L (hold) = hold aim
Start = pause game and view subscreen with the map (red dots are enemies, blue dots are items), use an ITEM, view equipped secondary weapons ("ARM"), or send a CMD to the allies.
Select = exit mecha -> have unlimited jetpack and can access some areas the Panzer can't, but the Panzer can still be damaged by enemies.
d-pad down (hold) + B (below animated orange downward arrows) = exit mission/stage (will ask for confirmation if not complete), enter and exit doors
TRAILER/base menu translation:
Launch/Shop Return to Map Save
Equip Settings
basics:
- you can only move 1 step at a time in the world Map. Completed missions are shown in blue, new ones in red.
- when taking damage the whole HUD on the top will blink, and your HP gauge in the top-left will decrease.
The counter next to the HP gauge are the lives. When these runs out, the current mission fails and you go back to the map.
To refill your HPs, while in mission, destroy boxes to get medkits, or use "AID-" and "REP-" ITEMs from the pause menu.
When on the carrier between missions, select "Resupply" in the "Launch" menu to use some FUEL to restore your HP.
- falling from high places does not damage your mecha, while explosions does.
Be sure to take some distance when enemies or obstacles are about to explode (check the "ENE"=enemy meter in the top-right, which shows the HPs of the enemy you're shooting).
- each destroyed enemy has a value in "Funds" and "EXP" (experience points), both of which allow you to get better equipment.
When the "EXP" meter in the top-left fills and turns green, that means you have enough to level up, and you will do so when you leave the current map (check the "LVL" counter in the top-right).
It's possible to skip missions that are too tough for you simply by dashing through the level and ignoring the enemies. You may not get any EXPs, but you'll progress regardless. As this game allows you to revisit completed missions, you'll be able to return later to play through the level 'properly'.
All levels only have a limited supply of enemies. No matter what the type of enemy is, once you've reached your quota of kills, no further opponents are spawned. You can use this to your advantage in levels with both easy and tough enemies by concentrating exclusively on the weak opponents until the quota is filled.
If you are not shooting any enemies for a while, a new meter will display in place of the the "ENE"=enemy meter in the top-right, showing you the meter of how many enemies are left in a level. When it runs out, there will be no more random enemies in current area.
- earned Funds can be spent in Shops in between missions to buy new weapons and upgrades.
The best place to shop is in North America, as they almost always have the most up-to-date stuff. When you want to save a little bit of money, the Middle East shop offers a 10% discount on everything.
- the primary weapon series are "VG-"=Vulcan Gun, "SG-"=ShotGun (best one), "LG-"=Laser Gun, "NG-"=Napalm Gun.
Only the first 3 series can be upgraded in shops on these stats: MG=Magazines (no ammos per reload), AP=Attack Power, ST=Shot Time, RT=Reload Time.
- best Special weapons to buy: "HNP-"=Hand Punch (unlimited uses, but cannot be used in midair), "HMS-"=Homing Missile, "BNC-"=Bouncing Shot, "FBG-"=Fireball Gun, "EAP-"=Enhanced Armor Protection (not a weapon), "REP-"=Repair (not a weapon).
To actually use them, you must buy ammos for most Special weapons in the Shop and manually "Resupply" them before each mission.
- last operation/location: ATLAS (11th)
sources:
Melfand Stories
controls:
d-pad left|right = move
Y (tap) = attack
d-pad up + Y = back-attack + change facing direction
Y (hold) = guard
B = jump
d-pad down + B = slide -> more effective than guard to avoid attacks
X = use magic attack (check the colored orbs below the health bar)
basics:
- best char: NORA
- health is refilled after each stage and by taking food items (except mushrooms).
- unused magic attacks are lost at the end of each stage but thet give you bonus points.
- necklace items boost your stats and are also lost after each stage.
- last stage: CASTLE
sources:
Wild Guns
controls:
d-pad = move crossair and char
Y (hold) = autofire, tap to hit enemies on the same plane as you
Y (quick tap a few times and then let go) = throw the lasso -> temp. stun enemies. Can miss the target, avoid using it when there are a lot of enemies onscreen.
B = jump (press again to double-jump)
Y (hold) + B = dive and roll to the side -> temp. invincibility, use often to avoid attacks as alternative to jumping
X = use a bomb (check the small purple spheres on the bottom-left)
basics:
- CLINT posseses a longer roll, whereas ANNIE is a lot faster.
- watch for the "LOOK OUT!" speech bubble = incoming fire.
- the level continues until there's no TIME left (check the counter on the bottom-center).
Once the TIME runs out, you face a boss. Killing enemies makes the TIME go faster.
- all weapons you collect are temporary (check the ammos counter on the bottom-left).
- most enemy shots can be nullified by shooting at them, no need to dodge them all.
Shooting enemy bullets also refills the green gauge on the bottom-left. When completely filled, the extremely powerful Vulcan Gun is activated.
- money bags and colored jewels only provide extra points.
- last stage: "FINAL FIGHT" (5th) (each stage has 3 parts/sections)
cheats:
- Stage Select: At the Character Select screen, hold down the SELECT button and press A, A, A, A, B, B, B, B, A, B, A, B, A, B, A, and then B.
sources:
Ganbare! Daiku no Gen-san
controls:
d-pad = walk
B = jump
Y = attack
d-pad down + Y = ground pound -> stun enemies
d-pad up + Y = upper attack
d-pad up, right, Y = hammer throw attack -> good to safely attack enemies from a distance
X = bomb (check the "muscle" counter on the bottom-left)
B, X = alternative bomb -> most effective than the default one
basics:
- press Select at the main screen to access the options menu.
- collect rice balls to refill the health gauge at the bottom.
Health is also refilled after each stage, but you lose all the collected powerups.
- collect the circle powerup with the kanji symbol for temp. invinciblity.
- last stage: 4-2
cheats (enter at title screen):
- Infinite Special: Move hold up-left, Y and L and press Start
- Level Select: Holding R, down, right, down x3, right x2 (a chime will ring). The level select, once activated, is operated by starting a game and waiting for the level title to appear (written in yellow). Use up and down directions to select start level.
sources:
Final Fight 2
controls:
d-pad = walk
B = jump
Y = attack, pick up
Y (near enemy) = grab opponent (can be slammed, beaten, or thrown)
B, Y = jump attack (stun opponent)
B, Y + d-pad down = alt. jump attack (stun opponent)
Y + B | X | A ("EXTRA JOY" in the OPTIONS) = spinning/desperation attack -> if it hits someone consumes health, use only when surrounded
basics:
- easier char: HAGGAR
- last stage: 6 (beat the game on Hard and then on Expert Mode to see the True Ending)
sources:
Final Fight 3
controls:
d-pad = walk
2x d-pad = dash, leap back
B = jump
Y = attack, pick up
Y (near enemy) = grab opponent (can be slammed, beaten, or thrown)
B, A = jump attack (stun enemies)
2x d-pad, Y = dash attack
A | B+Y = spinning/desperation attack (if it hits someone consumes health) -> use when surrounded, and to avoid bosses aerial attacks
L|R (hold) = keep facing direction while walking
basics:
- easier char: HAGGAR
- when the "SUPER" meter in the bottom-left is filled,
press quickly 2x d-pad left|right, 2x down + Y to perform the SUPER move with Haggar.
- last stage: 6
cheats (req. debug mode enabled by default on EU ver. only. Hold Select until the Capcom logo fades out):
- L+R Recovery (refill energy): Press L + R during game play.
- STAGE SELECT: Holding L when selecting a character leads to a map of every area in the game, allowing you to select which stage to play. Pressing A switches between the map and a list of every area by name.
sources:
Kouryuu no Mimi
controls:
d-pad left|right = walk
d-pad down = crouch
Y = attack, throw
B = jump
A = use weapon (if you have it)
R = koryu attack
sources:
Phalanx: The Enforce Fighter A-144
controls:
d-pad = move
A = autofire current weapon + missiles
X = switch weapon (check the "STOCK" icons at the bottom-right)
B = bomb-like special attack (sacrifice the current weapon in use)
R = speed switch (check the arrows at the bottom-right)
basics:
- there are 2 types of weapon items, one for the main shot and another for missiles, all of them being designed by letters.
3 types of missiles can be used according to A (homing), B (straight) and C (guided, follows ship movement).
Shot types appear as L (laser), H (homing/hunter), E (energy charge) and R (ricochet).
- the "P" capsule is the powerup that upgrades 1 level of the main shot and refills 1 yellow cell of the energy meter at the bottom-left.
- with 3 weapons already in stock, taking a 4th one will make the leftmost weapon in display disappear. It works as a FIFO stack (first in/first out), so in order to preserve the oldest weapon acquired you need to get rid of one of the others before taking any new weapon.
- best weapons: Laser (L) (has rear shots in full power and will pierce through anything, inflicting double damage), Homing (H) (great for popcorn stuff), Homing missiles (A).
- the only weapon you lose when you die is the one that's currently active. Dying will strip you down to almost no firepower.
- last stage: 8
cheats:
- level select: hold R and press B when selecting the "System Configuration" menu. Now, press L + R on Controller 2 to add the lives/credits setting, and then B + A + X + Y for the Level Select.
sources:
Darius Twin
controls:
d-pad = move
Y = autofire primary weapon
B = autofire secondary weapon
basics:
- destroy a wave of red cubes to get a powerup: the red one powers up the main shot, the green one powers up the bomb/laser (bombs develop into lasers) and the blue one powers up the shield (green -> silver -> yellow).
There are extra icons for 1UPs, instantaneous smart bombs and a special one that's responsible for "switching" the style of the main weapon from the energy beam to the wave shot (best one, can pass thru obstacles) and vice-versa.
You don't lose powerups when dying.
- last stage: L (to get an alternative ending choose the path "ACDFHKL")
cheats:
- 50 lives: At the "Select Mode" screen, hold L+R on Controller 2, and hold Select and press Start on Controller 1. This will start the game with 50 ships for each player. This works on both "1 Player" mode and "2 Player" mode.
sources:
Super Nova | Darius Force
controls:
d-pad = move
Y = autofire main weapon (powered down when combined with the secondary weapon)
B = autofire secondary weapon (powered down when combined with the primary weapon)
R = switch secondary weapon between bombs/missiles (best one) and vertical lasers
basics:
- best ship: TYPE-3 (red, has spread shot)
- using both main and auxiliary weapons at the same time reduces the firepower for each, as if splitting the available energy between both weapons.
- all ships share a same secondary shot that's selectable, with the R button, between bombs/missiles and laser.
- to increase shot power for both weapons you need to collect the red powerup.
The blue powerup activates and upgrades the shield (green -> silver -> golden).
The green powerup icon, which only appears during meteor showers, yields random points or 1UPs.
- smart bombs appear in 2 ways: either they explode or they provide a thick laser beam that lasts for 3-4s, making the ship invincible.
- last stage: "O" (7th, can finish the game earlier by sticking to the lower choices, easier route "ACFIL")
cheats (pause the game, enter the code and un-pause to activate it):
- grants full Arm power: Y, A, X, B, L, R, L, R
- grants full Missile and Bomb: B, X, A, Y, R, L, R, L. Note: the code will not work if any of your Missiles or Bombs are on screen when paused.
sources:
Imperium | Kidou Soukou Dion
controls:
d-pad = move
Y = shoot
B = switch weapon (check the yellow icons at the top)
A = bomb (check the counter in the top-right next to "-<--", restock by grabbing "B" items) -> temp. invincibility
X = switch speed (check the 4 blue arrows in the top-right)
basics:
- lives consist of a red health meter in the top-right with 5 hit points.
In order to recover health, powerup and unlock new weapons it's necessary to kill enemies and add their value to the "EXP" counter at the top-left.
The lower "N-EXP" counter tells how many points you need to reach the next upgrade+health refill.
Getting hit will take away 1 health point and downgrade the currently used weapon by 1 level.
- last stage: 6
cheats:
-
level select (Jap ver only): At the title screen, highlight Options, hold L+R+Up and one of the buttons in the table below, then press Start.
Level Button to press
Level 2 B
Level 3 X
Level 4 Y
Level 5 None
sources:
controls:
d-pad = move
B = autofire primary + missile weapons
Y = toggle the "GAM" shield (consumes the blue gauge at the bottom-left, auto-refill when not in use) -> absorb most bullets. Deactivate when not necessary.
A = "GAM" spread attack -> use when you are surrounded by ships and projectiles
R = "GAM" melee attack (can be combined with an inverted d-pad direction)
basics:
- destroy small red carrier ships to switch weapons.
The primary weapon item will cycle between: V=Vulcan (wide, best one), L=Laser (narrow), W=Wave shot.
Missile pickup will cycle between S=Straight, B=angle missles (frontal up+down), H=Homing (best one).
The primary weapon can be upgraded 2 times by collecting the same item.
- there are no bomb and speedup powerups.
- last STAGE: 6
cheats:
- level skip: at any time during gameplay, hold Up+Left+A+B and reset. Now during gameplay, hold Select and press R to skip to the next stage, or hold Select and press L to return to the previous one.
sources:
Cybernator | Assault Suits Valken | Juusou Kihei Valken
controls:
d-pad left|right = walk
d-pad up|down = rotate aiming
Y = fire current weapon (check the charge bar in the top-right for the ammos left)
X = switch weapon (check the name in the top-right)
B (tap) = jump
B (hold in midair) = use jetpak to float upwards (overheats after a while, check the "OVH" sign in the top-right)
A (on the ground only) = dash
R (on the ground only) = shield -> protect from most enemy fire but gives a bit of recoil on impact
L = hold aim -> very useful in 0G sections
Start = pause game and view the map in the top-right (check the blinking spot for your next destination)
basics:
- every weapon in the game starts out at "L1" and can be powered up to "L3" (check the white counter at the top-right. The smaller colored counter below represents the number of "P" left to levelup).
Each time you pick up a "P" item (Power Chip), it is added to whatever weapon you have equipped at the time.
Additionally, some new weapons can be added to your arsenal by picking up Weapon Chips ("W" icons).
- grey boxes and destroyed enemies may also release "H" (Health Chips) that restores 2 units of health (check the red gauge on the top-center).
- last mission: 7
cheats:
- Extra Continues: At the title screen, hold Up+L+R and then press start.
sources:
Joe & Mac | Caveman Ninja
controls:
d-pad = walk, crouch
A = jump
B = weapon attack (can be aimed up)
B (hold) = charged weapon attack (do not keep charging too long or you will faint and lose health)
d-pad up + A = somersault jump -> avoid enemies, reach higher platforms
basics:
- getting hit will deplete the hearts in the top-left. Collect food to refill.
- weapons ranks: axe < flint < boomerang < stone wheel < fire
- last stage: 5
sources:
Congo's Caper | Tatakae Genshijin 2: Rookie no Bouken
controls:
d-pad = walk, crouch
B | A = jump, swim
Y | X = attack (can be aimed up to attack from below)
d-pad up + B | A = somersault jump -> reach higher platforms, avoid enemies
L | R + d-pad = run -> perform longer jumps while running
basics:
- you can stand on top of most enemies without taking damage and use them as platforms.
Some enemies will get stunned and you can roll or hit them to attack other enemies.
- whenever you get hit, you devolve into a monkey, and the next hit will kill you.
Scattered around the stages are red orbs. If you're a monkey, it'll upgrade back to a human, but if you're already human and collect 3 of them, you'll activate a "super" form (check the orbs at the top-left).
While in the super form the red orbs at the top-left will act as an health bar. You also jump higher and can even float by tapping the jump button repeatedly after executing somersault jumps.
If you grab red orbs while at full life, you'll gain an extra life.
- collect blue gemstones to roll the SLOT machine at the top. You can get extra lives and gain access to a special bonus round.
- collect 100 yellow gems to get an extra life (check the counter in the top-right).
- hitch a ride on a friendly pink pterodactyl to access a bonus round.
- stages may have more than 1 exit (the "NEXT" sign).
- last word: 6
passwords:
Valley World completed: Blank, Blank, Blank, Blank
Volcano World completed: Fuzzy, Congo, Star, Fuzzy
Water World completed: Crown, Monkey, Fuzzy, Monkey
Castle and Water World Completed: Star, Congo, Monkey, Crown
Castle World completed: Monkey, Crown, Congo, Star
Final Stage: Fuzzy, Crown, Star, Monkey
Stage select: Monkey, Star, Crown, Congo
sources:
Joe & Mac 2: Lost in the Tropics
controls:
- d-pad left|right = walk
- d-pad down = crouch, eat food on the ground -> health refill + temp. projectile attack
- d-pad up|down = climb vines
- Y | X = attack (can be aimed up)
- B | A = jump, ride animals
- B | A + d-pad down = exit animals
- L | R (hold) = run -> jump over big gaps
basics:
- collect small stone wheels used as a currency in the TIKI VILLAGE to buy items and refills.
- last stage: 8
passwords:
1 - Deep tropics HDMF GQJT KGRK CQBB
2 - Snowy Rockies GRJL KBLG JPDR HHCB
3 - Murky Swampland KGRF NFJP KCBC GGFB
4 - Scarlet Carpet RFGL JTCD QDMS FSDB
5 - Kali Village MJND BNCS TBDJ JJFB
6 - Gork's Lair MHDQ FDPS NJTP BGFB
sources:
Shodai Nekketsu Kouha Kunio-Kun
controls:
d-pad = move
Y = attack: punch, kick, block (press when the enemy attacks you), grab (very close to the opponent), stomp (stand NEXT your enemy when is lying on the ground), pick up (stand OVER your enemy when is lying on the ground)
d-pad down, Y (while standing over a fallen enemy) = pin attack
B = jump
A = talk to people, interact with the environment
Start = pause the game and access the menu
basics:
- fighting is done through random (and not-so-random) encounters.
Civilians can help you out, run away or team-up with the enemy.
You can hurt innocent people and gain EXP points, but you won't be able to make many friends that way.
- you learn new moves by leveling up with EXP points, not by purchasing special items like in the prev games.
- you will find most of the equipment like gloves, shoes and linings by beating a random enemy or given to you by a certain character.
Some of the rarer ones can be won at Game Centers.
- Ki Powers temporary enhance your stats and some can restore some HP.
- if your energy meter runs out, you will end-up in Kouji's apartment.
You can recover your energy by drinking drinks, using Ki power or sleeping in your apartment (in Hotel Osaka, the center room on the 2nd floor).
- the game progresses in real-time. If you sleep by day, you will wake up in night and vice-versa.
Some places or events aren't accessible during certain time periods.
- to save, go to Hotel Osaka and talk to Kouji (he's the guy on the 2nd floor to the room on the left)
or talk to Kouji using the public phone when you're far away from him.
- last area: Osaka Harbor
sources:
Shin Nekketsu Kouha: Kunio-tachi no Banka | River City Girls Zero
sources:
R-Type III: The Third Lightning
controls:
d-pad = move
X = autofire front cannon + lasers from the pod
Y (tap) = fire front cannon + lasers from the pod
Y (hold) = charge front cannon (check the gauge at the bottom-center, maxed out at 200%)
R = switch charged cannon between BEAM and HYPER mode (BEAM is like the prev. games. Fully-charged HYPER bursts into a close range spread and then fires a bulkier straight shot for a while before overheating)
B | A = send out|recall the pod
basics:
- best FORCE DEVICE pod: TYPE 2 - SHADOW FORCE (has extra firing shadow options)
- the lasers the pod fire depends on the color of powerup you get (different for each FORCE DEVICE).
Every time you grab a powerup your pod is upgraded, regardless of the previous one you get.
- the item gallery is completed by "S"=speedups (do not take too many), "M"=missiles (take 2 for max power) and "bits" options.
Missiles are of one type only and have a mild homing nature, whereas bits hover above and below the ship, providing extra protection.
- last stage: 6 (2 loops)
cheats:
- level select (Jap. ver. only): on the continue screen, press R 10 times, press L a number of times corresponding to the desired level (up to 6), then press Start.
sources:
Kat's Run: Zen-Nippon K Car Senshuken
controls (Type A):
d-pad left|right = steer
B = accelerate
Y = brake
A = use ITEM (if you have it, check the icon on the top-right)
L | R (if using manual transmission) = shift down|up
basics:
- Street Race game modes: straight run (10-tracks marathon), choice run (5 tracks run, the leader choose the next track).
- best car: Jimny (has max dirt = can take offroard shortcuts with good speed)
- with the exception of "N" cans (nitros), all items are weapons.
cheats:
- unlock the secret corridors (Miki and Sayoko) and the cop car: at the "Press Start" screen, hold "(A, B, Y, X)" and press "START".
sources:
HyperZone | Hyper Zone
controls:
d-pad = move
A | Y | R (tap) = shoot
A | Y | R (hold) = charge shot (not available in AREA 1 and 2)
B | X | L = brake
basics:
- when you ride across life beams, try slowing down before you reach it.
This gives you more time on the beams, which means more power.
Be sure not to slow do to a speed of 223, you will lose power when you reach that speed.
- for every 30000 points, you receive an extra life.
- last AREA: 8
cheats:
- level select: at the title screen press B, B, L, R, Left, Left, Select. Now you can push up to change levels.
sources:
Sailor Moon, Bishoujo Senshi
controls:
d-pad = walk
Y = attack, throw (while grabbing an enemy)
Y (hold) = charge projectile attack (can damage multiple enemies)
B = jump
B, Y = aerial attack
B + Y = desperate attack (consumes health, use only when surrounded)
B + d-pad down = grab items
menu translation:
1-PLAYER 2-PLAYER
OPTIONS
DIFFICULTY NORMAL
CONTINUES 3
BUTTON LAYOUT
BGM TEST
SFX TEST
VOICE TEST
EXIT
basics:
- best char: Sailor Jupiter (has stronger attacks, take out enemies faster)
- last stage: 5
cheats:
- very easy mode: press X and enter the options menu replaces the easy mode with "Nakayoshi" mode.
sources:
Sailor Moon R, Bishoujo Senshi
controls:
d-pad = walk
Y = attack, throw (while grabbing an enemy)
Y (hold) = charge projectile attack (check the small pink gauge in the top-left) -> damage multiple enemies on the same plane
B = jump
B, Y = aerial attack -> knock down most enemies
B, Y + d-pad down = alt. aerial attack that won't knock down your opponent so you can keep attacking
B + d-pad down = grab items on the ground (most will refill health)
X = bomb attack (check the counter next to the ribbon in the top-left, refilled after each stage and when collecting the ribbon icon)
A | B + Y = desperate attack (consumes health, use only when surrounded)
B + A (while grabbing an enemy) = slam throw -> this is the most powerful throw in the game and really helps on the bosses, but req. precise timing to pull off
main menu translation:
START CHIBI-USA -> very easy mode
OPTIONS BATTLE
options menu translation:
DIFFICULTY NORMAL
CONTINUES 3
MUSIC TEST
SOUND TEST
VOICE TEST
EXIT
basics:
- best char: Sailor Jupiter (has stronger attacks, take out enemies faster)
- last STAGE: 4 (NORMAL and HARD), 2 (EASY)
sources:
Bishoujo Senshi Sailor Moon S: Jougai Rantou!? Shuyaku Soudatsusen | SuperS: Zenin Sanka!! Shuyaku Soudatsusen
controls:
d-pad = move, crouch, jump, block
d-pad opposite = guard
2x d-pad back = backdash -> temp invincibility
Y = weak punch
X = strong punch
B = weak kick
A = strong kick
d-pad forward + A|X (near opponent) = grab
L | R (hold) + any attack (if enabled in the controls setup screen by pressing right) = weak | strong char-specific special attack (unlimited, but can fail)
main menu translation:
STORY TOURNAMENT (multiplayer)
1P vs 2P PRACTICE
1P vs COM OPTION
OPTION menu translation:
COM Level - INTIMATE/EASY/NORMAL/DIFFICULT (NORMAL is selected by default)
TIME LIMIT - ON/OFF
BGM - 00
SOUND EFFECTS - 00
VOICE - 00
EXIT
ABILITY CUSTOMIZE SYSTEM menu translation (press SELECT in the controls setup screen after selecting a char to access it) (from top to counter-clockwise):
- ELEMENTAL = powers up the elemental attack
- ATTACK
- LIFE
- HANDICAP = shooter special attack stunned timing
- DEFENSE
- ? = powers up the special attack
basics:
- best beginner char: SAILORVENUS (has long reach-strong punch and 1 projectile special)
- last stage: 08
sources:
Seifuku Densetsu Pretty Fighter
controls:
d-pad = move, crouch, jump, block
d-pad opposite = guard
X = weak punch
Y = medium punch
L = strong punch
A = weak kick
B = medium kick
R = strong kick
d-pad forward + Y|B|L|R (near opponent) = grab
OPTION MODE menu translation:
- LEVEL SETUP
- TIME SETUP
- HANDICAP
- KEY SETUP
- SOUND
- SPEED SETUP
basics:
- easier char: Kei (top-right spot. Has higher-range regular attacks. Alternate low strong kicks, blocks and grabs for easy wins)
- there is no final boss in this game. Once you defeat the 7 others fighters the STORY MODE is over.
sources:
Deae Tonosama Appare Ichiban | Go For It Tonosama
controls:
d-pad = move
B = jump
A = attack
Y = dash
X = trasform into father (if your TGR is >= 50%)
L | R = use magic (req. the green scrolls, check the icons on the bottom-left)
A (hold) = 2 sensou attack (Lord only)
d-pad left, right | down, up, A = spin attack (Lord only)
d-pad left, right, down, up, A = double fireball (Lord only)
d-pad up, down, up = 3 roses throw (Prince only)
B, d-pad rotation, A = multi-directional roses throw (Prince only)
d-pad rotation, A = arm attack (Prince only)
d-pad up, down, semi-circle to up, B = ground slam attack (Prince only)
menu translation:
1 PLAYER MODE
2 PLAYER MODE
OPTIONS
LIVES 3
HEALTH 3
TGR 0%
SOUND TEST 0
BGM TEST 0
MUSIC STEREO
CONTROLS
END
recommended stage order:
- DAY OF THE LIVING FAT
- THE CURSED VILLAGE
- FREE MILLY
- THE BIG BAD OLD MAN
- MR. VAMPIRE
- OPERATION DUMBO DEATH
- DOWN WITH THE KING!
- ABRA KADABRA
- MAYHEM ON MARS
basics:
- best char: Lord/Baka-dono (...)
- Baka-dono prefers tempura as food, Baka-ouji prefers castella (a kind of sponge cake).
- the magic spells are all the same, only changing the animation and special effects (water floods the screen, thunder shoots lightning in eight directions, etc.)
- map legend: purple triangles = regular stages, blue triangle = boss stages
- when transformed every move and hit you take or deliver drops your % (instead of your health).
Once it hits 0 you go back to being Baka-dono or Baka-ouji.
- you can easily backtrack and farm items from respawning enemies.
- look at the shadow when jumping as landing point.
sources:
Hashire Hebereke
controls:
d-pad = steer
Y = accelerate
...
menu translation:
1P game
...
2P game
Options
...
basics:
- if you win a race, you go on to the next course.
If you lose a race, it varies on whenever or not you move on. If you don't get first place, you have to at least top 2nd or 3rd place. Get 4th place and you lose the race and have to do the course again.
- some races you are taken to a bonus stage, where you have to race players and dodge a big black ball from squashing you. One of the main goal of the bonus stages are to collect items, which you could use for later courses for your advantage.
Winning or losing the bonus stage doesn't affect your winning streak.
- once you have completed the first 7 stages, you have to face clones of yourself, which if you do lose in any place under 1st, you have to do the course again. If you do go to the ending and finished all of the courses, the endings vary what character you use, as they are all unique and different. T
sources:
Trinea | Penta Dragon 2
controls:
TODO
sources:
Mickey to Donald - Magical Adventure 3
controls:
TODO
passwords:
Stage 1 Mickey, Minnnie, Daisy, Donald
Stage 2 Goofy, Minnie, Donald, Pete
Stage 3 Daisy, Goofy, Pete, Minnie
Stage 4 Minnie, Pluto, Mickey, Daisy
Stage 5 Mickey, Daisy, Donald, Pluto
Stage 6 Daisy, Pluto, Mickey, Pete
Stage 7 Pluto, Pete, Daisy, Minnie
sources:
Choujikuu Yousai Macross: Scrambled Valkyrie
controls:
d-pad = move
B = fire current weapon
Y = change form (cycle between jet fighter, Gerwalk and Battloid mecha mode)
!B & !Y = raise a shield to sway enemies (only works with some of them, can have 1 at most)
forms (for RICK HUNTER):
- FIGHTER: the fastest, shots lasers trepassing obstacles. You take more damage in this form.
- GERWALK: multidirectional bombs + straight shots blocked by obstacles. Averange speed and damage.
- BATTROID (mecha): shoot straight missiles + blockable shots. Can take enormous damage before it dies, so switch to it in difficult sections.
basics:
- best beginner pilot: MAX (BATTROID has homing shots)
- up to 3 "P" powerups can be grabbed for each transformation.
When you gain a Power part for one form, IT DOESN'T CARRY OVER TO THE OTHER TRANSFORMATIONS.
When you're hit, you lose a Power panel for that current form, as well as a spot of life.
- last stage: 7
cheats:
- level select: during the Zamuse title logo which appears when the game is turned on, press Up Left Down Right Up Left Down Right L R L R. The easiest way seems to be to rotate the pad counterclockwise twice and then enter LRLR.
sources:
SD F-1 Grand Prix
controls:
d-pad = steer
B = accelerate
A = use boost (in World GP and Crash Race), usw cannon (in Battle Mode)
Y = brake
R = use item (check the icon in the bottom-left)
Select = switch camera view
Start = pause (press A+B+X+Y simultaneously to retire from race)
main menu translation:
1 Player Mode Best Times
2 Player Mode Options
game modes:
- CRASH RACE = 5 rounds (Europe, Asia, Africa, North America, Paradise) of 5 races each. You can use items against your opponents (similar to SMK's GP Mode) and buy upgrade parts. -> beat this mode to unlock all bosses on select char screen (not in Crash Race)
- WORLD GP = 16 races, there are no items except blue turbo tokens and no parts shopping.
- TIME ATTACK
basics:
- easier char: TEAM BENETTON (B 195) (2nd from the top-left)
sources:
Tetris Attack | Panel de Pon
sources:
International Superstar Soccer | Jikkyou World Soccer: Perfect Eleven
sources:
controls (with the ball):
d-pad = move
A = short/low kick (aimed manually)
B = long/high kick (aimed manually)
Y = turn and pass to the selected receiver (aimed automatically)
R|L|Select = change pass receiver
controls (without the ball):
d-pad = move
Y = shoulder barge -> most effective move to take the ball
B|A = slide tackle
basics:
...
sources:
Legend of The Mystical Ninja | Ganbare Goemon: Yuki hime Kyuushuutsu emaki
controls:
d-pad = move, duck, snail on the ground, look, aim up (in action stages only)
B = jump (hold to jump higher)
Y | A = attack
R = switch weapon (check the icon in the bottom-center, the projectile weapons req. "$" coins to be used)
X = activate special "POW" attack (req. 10 scrolls for each use. Check the "POW" counter in the top-left and the exact scrolls counter in the pause screen)
Start = pause and select current special "POW" attack (check the icons in the bottom-left)
Select = pause and show the inventory
Goemon|Kid Yin weapons:
- pipe (default) -> at lv.3 became a yo-yo with spikes
- coins -> very useful, but costs $4 to use 1
- bombs -> not stronger than the other weapons)
basics:
- you can upgrade your weapons by collecting Lucky Cat icons.
- buy sandals to increases your running speed.
- if you get hit, you lose your weapon and sandals upgrade.
- you can get a password in 2 ways: when you lose all your lives and get a "game over" screen, or if you visit people in towns where you can keep "diaries".
- final stage: Warlock Zone 9
passwords:
1 MRbjhj
2 #rM/B/
3 8hXwow
4 W:3LNL
5 K=bPbR
6 1tl<H<
8 ''?kk5k
9 &xT>X>
Final Level H-WNxN
sources:
Ganbare Goemon 2: Kiteretsu Shougun McGuinness
controls (platforming stages):
d-pad = walk, duck, snail on the ground, look, aim up (in action stages only)
B = jump (hold to jump higher)
Y = attack
L | R = switch weapon (check the icon in the bottom-left, the projectile weapons can be charged and they cost coins to be used)
Start = pause and show the special items (check the icons in the bottom-left, press Select to quit current stage)
controls (inside "Goemon Impact" giant mecha):
d-pad = aim
Y = left punch
B = right punch
A = fire gun (check the bullets counter on the left)
X = bomb (check the counter on the bottom-center)
L | R = guard left|right
giant mecha OSD counters:
- on the top-center: opponent HPs
- on the right of the map: your HPs (auto-decrease over time)
- on the left of the map: bullets/coins counter
- on the bottom-center: bombs
basics:
- easier char: Sasuke (faster, jump higher, his standard weapon can become an infinite projectile)
- you can switch to a different char every time you load a savegame.
- to save your game, visit the INN in villages and pick the 3rd option to the right.
- collect coins to use the secondary weapons, buy food in villages to restore health and armors for temp. protection from hits.
Riceballs provides extra lives.
- after killing a certain amount of enemies, one will drop a lucky cat powerup that powerup your main weapon (up to 2 times).
However, getting a few hits will reduce the weapon's level again.
- rare golden lucky cat powerups raise maximum HP up to 5 bars, but dying will reset the gauge to normal.
- every stage ends on a tanuki statue that releases coins once broken. If you're riding some vehicle, you can stand over the statue and collect every coin.
- last area: 6 - Sky Boat Castle
sources:
Ganbare Goemon 3: Shishijurokube No Karakuri Manji Gatame
controls:
d-pad left|right = walk
d-pad up|down = enter doors, control elevators, aim up
B = jump, talk, check signs
Y (tap) = attack, pick up, throw
Y (hold) = run
R | L = switch weapon (different for each char, check the icon in the bottom-left, the secondary/projectile weapons cost coins to use, but are very effective and some can also be charged)
Select = switch char
A = use current char magic power (some req. scrolls to casts, check the counter in the bottom-left)
X = open the map (press the A button to switch views. In action stages it shows the locations of the doors as empty squares, key cards, the walker mecha teleport stations)
Start = pause and show the status screen
controls (inside "Goemon Impact" giant mecha, your healt is the "Oil" counter on the bottom-left, while the enemy health is on the top-center):
d-pad = aim punches and gun
Y = left punch -> destroy most enemy bullets, reflect some attacks
B = right punch (charged attack when the gauge on the top-left is full)
A = fire gun (check the "Ryo" counter on the bottom-right)
X = pipe bomb (check the skull counter on the bottom-right)
L | R = guard left|right -> absorb or reduce damage
chars special abilities:
- GOEMON
- powered up secondary attack: Fireball. Goes through some walls and barriers. -> activate unreachable switches
- magic power: Sudden Impact: causes Goemon's attack power to rise, but lowers his defense. -> optional
- powered up main attack: Chain Pipe -> grab into the green blocks with the swastika symbol.
- EBISUMARU (slow)
- powered up secondary attack: Magic shuriken -> bounces off of walls. Hit those hard-to-reach places.
- magic power: Mini-Ebisu -> causes Ebisumaru to become tiny, so he may fit through small gaps.
- powered up main attack: Dancer's Hoop -> press d-pad up + Y to grab onto yellow pegs and hit things above him.
- SASUKE (fast)
- secondary attack: Firecracker Bomb -> destroy shiny green/orange blocks, activate unreachable switches
- magic power: Jutsu: Sasuke shoots 8 fireballs from his body. -> optional
- powered up main attack: Golden Kunai -> destroy samurai statues
- YAE (fast)
- magic power: mermaid -> can swim underwater, pass under bridges
- MECH (slow, hold Y to dash, d-pad up+B to dismount, regular punches will destroy big boxes, step on the yellow wires to break them and fall down)
- magic power: changes according to current weapon: Fire will destroy iron doors, Ice will freeze enemies (then can be used as platforms) and jelly blocks (can destroy them after that).
Req. fuel to use, check the "EXXX/300" counter on the bottom-center. Collect big fire balls to refill or buy the fuel at shops.
basics:
- every 4 lucky cats you collect your life gauge will be increased by 1 (check the hearts at the bottom-left).
Weapon powerups are only obtained by interacting with NPCs and completing mini-tasks.
The 3 walker mecha special weapons are obtained in action stages instead.
- in action stages collect the elephant to have the full stage map, while the Arrow Puppet will show the stage boss location on the map.
There are also key cards in later stages in Neo Edo (the future). There are 2 kinds: Silver and Gold. Silver is only used once, and opens up silver doors (check the counter in the bottom-left). Gold is not ever used up, but only opens gold doors, and only in the stage you are in.
- stuff to purchase in shops: food (only refill health), helmets (block 1+ shots), armors (blocks 1+ hits).
- visit travel agencies to warp from one village to another (1st choice, check the suitcase symbols on the world map). You can also ask them to teleport the walker mecha (2nd choice).
- to save your game, visit an INN in the villages and pick the 3rd option on the right. You can also restore your health by choosing the 1st option and resting.
- last stage: 8
sources:
Ganbare Goemon 4 | Ganbare Goemon Kirakira Douchuu: Boku ga Dancer ni Natta Wake
controls:
d-pad left|right = walk
B = jump
Y (tap) = attack (can be aimed with the d-pad)
Y (hold) = run -> jump longer while running
R | L = switch weapon (different for each char, check the icon in the bottom-left, the secondary/projectile weapons cost coins to use, but are very effective and can also be charged if powered up)
X = use current char special ability (if you've obtained it, check in the pause subscreen)
Select = switch weapon, switch char (after beating the initial 4 planets)
Start = pause and show the status screen (press A to access the subscreen)
chars special abilities:
- Goemon = use the Chain Pipe to attack enemies and hang and swing onto orange manji/swastika blocks (can be aimed with the d-pad).
- Ebisumaru = perform the Ballerina Drill to attack enemies and break cracked blocks (combine with d-pad down for blocks below you),
- Sasuke = use the Climbing Knives to attach and climb walls.
- Yae = use the Mermaid Morph Skill to swim underwater.
basics:
- on the title screen, select the left option to play the game, then left for 1 player and right for 2 player. Also on the title screen, select right instead to enter the mini game practice mode.
- in villages, watch out for women in space suits, who give you money, slug women, who give you health, and bouncing thieves, who steal money off you (just whack them).
- buy Riceballs in villages and when you die in action stages, you will come back to life once.
- elephant items serve as checkpoints in action stages.
- collect 3 lucky cat figures on a single planet (Bronze, Silver and Gold, check in pause subscreen) to get an extra heart.
- in the 2nd village of 4 initial planet you must obtain a Special Ability before you can access the castle and beat the planet. This usually req. some backtracking to the 1st village. In the 2nd village you can also find a powerup for your projectile weapon.
- to save, go to an INN, then select the far right option, then the left option.
- last planet: Impact
sources:
Tiny Toon Adventures: Buster Busts Loose!
controls:
d-pad = move, climb, duck
B = jump
X | Y = drop-kick attack
L | R = dash (press again to stop) -> use to attack, climb walls
basics:
- while dashing press B to execute a dashing jump that allows you to jump farther than a regular jump.
- while dashing press down to execute a slide move that can plow through enemies
and allow you access through certain narrow passages.
- after you complete a level, you will get to play a bonus game wherein you can earn extra lives.
Quickest minigame: Babs, Find Your Friends
- the Children difficulty is basically "Easy" and in this mode you skip some level parts and never fight any bosses (including the last one). In Normal difficulty you to go through all the levels and you fight bosses at the end of some stages.
At the game over screen, choose "end" in children mode to obtain a password.
passwords (Children level only):
Level 2 Little Beeper, Montana Max, Elmira
Level 3 Gogo, Shirly the Loon, Sweety Bird
Level 4 Bookworm, Plucky Duck, Babs Bunny
Level 5 Montana Max, Babs Bunny, Sweety Bird
Unlimited Continues Plucky Duck, babs Bunny, Bookworm
game genie cheat codes:
Enable Stage Select when starting a new game
CB64-1F0F
DF64-1F6F
3C64-1FAF
Skip Bonus Games
6D68-14DF
Passwords work on any difficulty level [not just Children level]
7036-C001
sources:
DinoCity | Dino City | DinoWars
controls:
d-pad = move
B | A = jump
Y | X = attack
R = get off|on your dino
basics:
- best PLAYER TEAM: TOPS (throw darts as main weapon)
- last STAGE: 7
passwords:
2 8SHTK$S3HNDM
3 HF4N<NBC41KT
4 5SKXT$S9HNZ4
5 XKC5T$SWHNN4
6 5CX6D$SOHF94
Final Stage 8SSZ9ESOH4H4
cheats:
- Double Strength: On the title screen, press X + up, left, A + left, R + right, Y + left, Y + right, select + down
- Unlimited Strength: X + up, left, A + left, R + right, Y + left, Y + right, select + B + right, R + right, B + up, X + up, R + right, B + up, X + left
- Level Select: press R + Down, Up, R + Right, B + Up, L + Right, A + Right, X + Right, Y + Up, A + Left, Select + Left, L + Left, Select + Down at the title screen. A chime will confirm correct entry. (NOTE: For each instance of two buttons needing to be pressed (e.g. R + Down), press and hold the first button, then the second, then release both.) During gameplay, pause and press R + A + Select to enter the level select.
sources:
Rocky Rodent | Nitropunks: Mightheads
controls:
d-pad = walk
B = jump
Y (hold) = run (hump higher while running) -> avoid running when not necessary: you won't stop immediately when you release the button.
Y (tap) = hairstyle attack
basics:
- you can attack enemies by jumping on them, or via an hairstyle attack with Y.
- destroy orange garbage bins or gift boxes to get hairstyle powerups:
- red hairspray can = skew and throw enemies, destroy porous blocks, as well as cling to and jump up orange blocks with B.
- blue hairspray can = a mohawk that can be thrown at enemies like a boomerang or thrown into certain walls, from where it serves as a trampoline. The attack has a good range, but while your hair is flying you temp. lose the extra hit protection.
- yellow flower pot = green braids that can be used as a grappling hook to attach to yellow pegs.
- orange salon dryer = corkscrew-like hairstyle, lets you bounce on your head to jump higher than normal. Difficult to control, avoid.
- when you are attacked by an enemy, you lose your current haircut. With another hit you lose a life.
- collect 100 food items to get an 1UP.
You can also get an extra life by finding an hidden heart hold by a glove.
- small blue signs with an arrow act as checkpoints. The "ONE WAY" sign will end current stage.
- the megaphone item acts as an insta-bomb.
- last stage: RITMO CLOCK TOWER 3
sources:
Axelay
controls:
d-pad = move
B = fire air weapons ("SHOT")
A = fire ground weapons ("MISSILE") -> remap as the same button for "SHOT" in the SET UP menu for easier firing
L | R = weapon switch (check the icons in the top-right)
Start = pause
basics:
- there are no powerups or items at all to be collected.
The ship can be equipped with 3 different weapon types every time a stage starts (a new weapon always becomes available in between levels).
These weapons can be cycled with the shoulder buttons and work as backups for each other: every time the ship is hit by a projectile the current weapon is lost and the next available one is automatically activated. Once all weapons are lost you're left with a basic firepower capability.
- death happens when you get shot while using an empty weapon slot or whenever you collide against enemies, walls or bigger shots. Respawning brings back all 3 selected weapons again.
- best weapons: NEEDLE CRACKER (auto-aiming, unlocked in STAGE 3), EXPLOSION BOMB (attack from above)
- last STAGE: 6 (3 loops at NORMAL)
sources:
Contra III: The Alien Wars | Contra Spirits
controls (side-view stages):
d-pad = move, crouch, climb walls, aim
B = jump
B + d-pad down = drop down platforms, release grab
Y = fire current weapon
X = switch weapon slot I<->II (check the icons in the top-left)
A = use bomb (check the counter in the top-left)
R (hold) = 360° aiming while standing still (even when riding bikes or hanging)
L + R + Y = jump + fire both weapons while spinning
Start = pause and safely switch weapon
controls (top-view stages):
d-pad = move, aim
L | R = rotate left|right -> hold to counter the ground spinners rotation
B = duck (avoid bullets)
Y = fire current weapon
X = switch weapon slot I<->II (check the icons in the top-left)
A = use bomb (check the counter in the top-left)
L + R + Y = fire both weapons while spinning
Select = pause and view stage map
basics:
- destroy flying carriers to get either a "B"=temp. barrier or a weapon item: S = Spreader, L = Laser, F = Flamethrower (best one against organic enemies in later stages), C = Crusher Missile, H = Homing Missile (best one in most stages).
When you collect a weapon item the one in the current slot is replaced.
- in the top-down stages you must destroy all the bases shown on the map before procedding to the boss.
- last stage: 6 (2 loops) (the Jap. version allows the player to fight the true final boss on Normal mode, whereas the international versions only allows it on Hard mode)
cheats:
- 30 Lives (jap ver. only): At the title screen do a hadoken style motion that is Down, Down+Right, Right and press start. You should hear the player dieing sound effect if done correctly. You should position your cursor before entering it or you will start a 2 player game. You can position it above options and when you enter the options menu it will say Player Lives 30.
- level select (jap ver. only): make sure the cursor is one choice above your desired game mode (e.g. choose "Options" if you want to start the game in 1-Player Mode) and then quickly press Down, Down+Left, Left, Start (a Hurricane Kick command). You will hear an alien roar if you input the code correctly.
sources:
Yoshi's Safari | Yoshi no Road Hunting
controls (2P mode):
superscope fire button = shoot (hold for rapid fire with turbo on, check the "POWER" gauge on the top)
A | superscope cursor button = jump
A | superscope cursor button (during boss fights) = use item in the window in the top-right (if you have it)
d-pad = move, duck -> avoid attacks
X = slowdown
superscope pause button = pause, unpause game
items:
- fire flower = increases the maximum length of your "POWER" meter.
- powerup mushroom = recovers some of your health.
- super star = become invincible for a limited time, unable to be hit by enemies.
- nuts = reduce damage by 1 half.
- clock = 1 extra minute of time.
basics:
- shot flying "?" boxes to receive an item for immediate use or only during the boss fight at the end of the level.
Yellow boxes give immediate-use items, while blue boxes give boss-only items.
Unused boss-only items are lost the end of the level, but they give you some extra points.
- collect 60 coins for 1 extra life.
- shoot barricades to change the path Yoshi takes.
- each boss has a different weak point.
It's easier to shot boss attacks rather than avoiding them.
- last stage: 12.
sources:
Battle Clash | Space Bazooka
controls:
TODO
cheats:
- Difficulty and Level Select: At the title screen, hold L and press Select. You'll now be able to select from three difficulties, and will also be able to select from any stage (except the last one) by pressing the Cursor button on the Super Scope.
sources:
sources:
Super Mario World
basics:
- collect 5 big yoshis coins, or 100 regular coins in each stage to earn an extra life.
sources:
Yoshi's Island: Super Mario World 2
controls:
d-pad = move, duck, enter doors
B = jump (hold to float in the air, press d-pad down in midair for a ground pound)
Y = eat enemies and fruits (press d-pad down to create an egg, or press again to split out. If you ate a watermelon will split a special attack)
A = activate aiming cursor to throw an egg (press again to throw or keep held and throw when released)
Start = pause and select a special item to use
basics:
- you start each stage with 10 Stars ().
If you take a hit, Baby Mario flies off of you and begins to cry.
The Stars will then count down. If they reach 0, Kamek's cronies will kidnap Baby Mario and you'll lose a life.
To get Baby Mario back on your back, blast it with Yoshi's tongue, throw an ogg, or simply touch it before the countdown hits 0.
Yoshi's stars will count back up to 10 after recovering him. You can get more than 10 stars, however, if you lose Baby Mario, you will not be given back your lost stars.
- collect 100 coins for 1up.
- last world: 6
sources:
Jikkyou Oshaberi Parodius
controls:
d-pad = move
B = main weapon + missile shot
Y = powerup
A = bell power (if you have it, check the icon in the bottom-right)
Start = pause (press Select to open the save/load menu. You keep all the weapons you had when you save, but score goes back to 0)
menu translation:
- 1P start
- 2P start
- Load Game (if saved manually previously)
- High Scores (for current level of difficulty)
- Status screen (for individual chars and current level of difficulty)
- Options 1
- Options 2
basics:
- enable "REVIVAL" in "Option 1" to restart right where you die.
- disable "OSHABERI" in "Option 1" to turn off the narrator.
- best char: Ran (female cat) (has homing shot)
- bell powerups: blue (powerful bomb), green (inflate + invincibility), white (straight shot made of random messages in kanji, blocks bullets) brown (3x vertical energy bars) and yellow (points).
- collect all 70 hidden fairies to unlock the level select in "Option 2".
- last stage: 8 (2 loops)
cheats (at the Options Menu #1, press the following buttons):
- Round Select in "Option 2" menu: Press Down, Down, Down, Down, Up, Up, Up, Up, Right, Right, Right, Down, Up, Left, Left, Left, B, X.
- Stage Select in "Option 2" menu: Press X, X, X, B, B, B, L, R, Up, Down, Up, Down.
sources:
Space Megaforce | Super Aleste
controls (default):
d-pad = move
Y | A = fire
R | X = "S-Ctrl" -> toggle the curr. weapon's function (hold or tap dep. on the weapon)
B = bomb (hold and release to manually detonate it, or it will automatically explode when it reaches the top of the screen if no enemy is hit) (check the orange balls in the bottom-right, collect "B" items to restock) -> temp. invulnerability
Select = change movement speed (check the 3 squares meter at the top-left)
Start | L = pause
basics:
- best weapon: 2 "LAS" (homing lasers)
- switching to another weapon is done by picking up a numbered item with 3 initials representing the weapon name (there are static and rotating ones) (check the current weapon in the top-left small red box).
- there are 8 types of weapons to use, and each can be powered up by collecting "chips" (egg-like items): orange chips (regular), and green chips (levelup instantly).
Any orange chips collected is lost whenever the power level is increased by a green chip or a weapon pod, but not when switching weapons (check the blue "LV0" counter in the top-left).
- your health is tied to the level of the weapon. When the ship is hit, the weapon loses 4 levels of power (but it cannot go below 0). If the weapon is already at level 0 upon getting hit, you die.
- don't be afraid to fly into passive structures to search for hidden items. As long as it isn't touching enemies or their shots, the ship can bump against walls without harm.
Getting crushed between a structure and the bottom edge of the scrolling screen still results in death.
- last AREA: 12
cheats:
- debug mode: When the opening music starts playing, press Reset. Do this a total of five times. Next, at the same point in the game, hold L + R + Start and press Select to reset the game a total of eight more times. After resetting the game exactly 13 times in all, at the title screen, hold Select with the cursor on Options and press Start.
sources:
F-ZERO
controls:
d-pad left|right = steer
d-pad up|down (while in midair) = pitch nose up|down
B = accelerate -> tap repeatedly to quickly regain control during tight turns ("blast turn")
A = use an "S-JET"/Super boost (check the green "S" in the bottom-right, 1x available after each lap) -> use only in straight passages
L | R = lean left|right -> use for sharp turns
X | Y = brake -> not very useful
Start = pause
basics:
- when you are starting any race the word "READY" will pop up on the screen and you will hear 3 beeps.
After the 3rd beep and before it says "GO!!" hit the accelerator for an extra speed boost.
- getting hit will deplete the "POWER" gauge on the top-right. Run over the Pit Row, generally found in or around the home straight, to refill.
- in each lap, passing the goal line with a RANK/position lower than the indicated "SAFE" target (shown in the upper-left portion of the screen) will result in immediate disqualification.
If, at any time, you should fall below 20th, you will be disqualified regardless of the current lap target.
- jump plates increase your speed and sometimes lets you take shortcuts, so always go over them.
Always land from jumps by holding down.
- to unlock the MASTER CLASS, beat the game on EXPERT CLASS placing 1st, 2nd or 3rd in all 5 courses (any LEAGUE).
- races in each LEAGUE: 5
sources:
Uchuu Race: Astro Go! Go! | Freeway Flyboys
controls:
d-pad | L | R = steer
B = accelerate
Y | X = brake
A = use temp. powerup (check the icon in the bottom-right, if unused will switch after each lap: B=barrier, S=boost, P=invincibility)
basics:
- easier pilot: JET
- in the "ASTRO GP" mode, you are given 5 chances to get 3rd place or better.
Losing 5 times would ask you to continue the game using the standings earned prior to getting disqualified, but the 6th loss would lead to a game over.
- losing the race due to death (falling in pits, running out of energy, etc.) is impossible because the rescue vehicle is always available.
- avoid hitting opponents and track obstacles as they will bounce you back and make lose control.
- once you finish all 5 courses in a league, you get a tally of all your accomplishments and then you move up to the next league.
After the 3rd league, you have to try the hardest difficulty level in order to unlock the true ending.
cheats:
- race skip: on the title screen, press Left, Right, Left, Right, Left, Right, Left, Right, Left, Right. You should hear a chime to confirm. Press Select during a stage.
sources:
Heisei Inu Monogatari Bow - Pop'n Smash!!
controls:
TODO
menu translation:
...
cheats:
- Change Battle Settings: to change battle settings in 1P mode, enter the following on the title screen: Down, Left, Up, Right, Down, Up, Down, L. After, choose 1P battle and your difficulty and then on the character select screen you can choose character levels, types, rackets, etc.
Super Adventure Island
controls:
d-pad = move, crouch
B | X = jump
d-pad down (hold) + B | X = super jump
Y | A = attack (can be combined with a direction)
basics:
- collect fruits to refill the health/time gauge at the top-left. The gauge is also refilled after each stage.
- always avoid touching enemies and falling into pits.
- best weapon: boomerang (can be aimed up)
- the hidden blinking star which will warp you to a bonus stage.
In the bonus stage, you will bounce on springs to collect stars for points. These lead to 1-ups, as the stars are worth massive points. But each spring can only be used once, and if you fall you will go back to the regular stage.
- last round: 5-3
cheats:
- level select: wait for the title screen to appear two times, and on the second appearance, hold L, Right, and X and press Start.
sources:
Super Adventure Island 2
controls:
d-pad left|right = walk
d-pad down = crouch, activate switches
d-pad up = climb up, enter doors, speak, read
B = jump
Y (tap) = attack with the equipped WEAPON (check the icon at the top-left)
Y (hold) = run
A = use equipped MAGIC (if you have the WAND, req. magic bottles in the top-right)
X = pause and open the menu (check your coins, equip weapons, use special items in the "EQUIPMENT" menu)
basics:
- during random encounters you don't really have to kill all of the enemies; you just have to get to the far left or far right to exit.
sources:
Donkey Kong Country
controls:
d-pad = move, crouch, climb vines
B = jump, swim, let go vines
Y = attack, pick-up and throw barrells
Y (hold) = run, climb vines faster
Y, B (in mid-air) = roll jump -> useful for getting over to far away ledges, and to get items floating over empty pits
Y + d-pad down = hand slap (Donkey Kong only)
Y + d-pad down (while holding a barrel) = put down barrel
A = switch monkey, jump off animals
Start = pause (press Select to quit current level, if already finished)
animal friends abilities:
- rhino = runs fast, kill most enemies by frontal contact.
- ostrich = runs faster than rhino, but he is not capable of defeating any baddies. After jumping into the air, keep pushing the B Button to make Expresso flap his wings to slowly descend to the ground.
- swordfish = swim fast, attack underwater enemies with Y.
- frog = can stomp on almost any enemy and jump much higher than any Kong can.
- parrot = press A to fly, press Y to spit egg attacks
basics:
- kill most enemies by jumping over them or throwing barrels.
- use Donkey's bulk to easily reach Barrel Cannons faster and to crush enemies that Diddy has trouble with.
- in underwater levels, always give Diddy the lead, as he's smaller and swims faster.
- always grab barrels and hold them to protect you against a single enemy collision.
- visit Candy Kong to save your progress in each world.
sources:
Donkey Kong Country 2: Diddy's Kong Quest
controls:
d-pad = move, crouch, climb ropes
B = jump, swim, let go vines
Y = attack, pick-up and throw (can be combined with a direction)
Y (hold) = run, swim faster, climb vines faster
Y, B (in mid-air) = roll jump -> useful for getting over to far away ledges, and to get items floating over empty pits
Y + d-pad down (while holding a barrel) = put down barrel
Y (hold in midair) = helicopter spin (Dixie Kong only)
A (when you have both monkeys) = team up (press again to unteam, Y to throw the monkey) -> use team up throws to get to unreachable places, or temporary jump off animals.
X (when animal) = jump off animals
Select = switch monkey
Start = pause (press Select to quit current level, if already finished)
animal friends abilities:
- rhino = runs fast, kill most enemies by frontal contact.
- swordfish = swim fast, attack underwater enemies with Y.
- rattlesnake = can jump higher and kill enemies with spikes by jumping over them. Hold A to charge an higher jump.
- spider = cannot kill enemies by jumping over them, must always use the web attack (Y). Can run with Y and create platforms with L|R (press again L|R to stop and expand them in midair).
- parrot = press A to fly, press Y to spit egg attacks
basics:
- go to the Kong Kollege to save your game.
- pay Klubba to enter special stages of the Lost World (don't fight him as you'll always lose).
sources:
Donkey Kong Country 3: Dixie Kong's Double Trouble!
controls:
d-pad = move, crouch, climb ropes
B = jump, swim, let go vines
Y = attack, pick-up and throw (can be combined with a direction)
Y (hold) = run, swim faster, climb vines faster
Y, B (in mid-air) = roll jump -> useful for getting over to far away ledges, and to get items floating over empty pits
Y + d-pad down (while holding a barrel) = put down barrel
Y (hold in midair) = helicopter spin (Dixie Kong only)
A (when you have both monkeys) = team up (press again to unteam, Y to throw the monkey)
X (when animal) = jump off animals
Select = switch monkey
Start = pause (press Select to quit current level, if already finished)
animal friends abilities:
- elephant = can pickup barrels and spray water (L|down+A=grab, R|A=shoot) (check the gauge on the bottom-right)
- swordfish = swim fast, attack underwater enemies with Y
- parrot (2 variants) = press A to fly, press Y to shoot eggs (green kind only) or pick up barrels (purple kind only)
- spider = cannot kill enemies by jumping over them, must always use the web attack (Y). Can run with Y and create platforms with L|R (press again L|R to stop and expand them in midair).
basics:
- if there is a crack or a weak spot on the ground, stand next to the crack, pick Kiddy Kong up (A Button) and throw him (Y Button) up and slightly towards the crack and Kiddy will bust the crack open.
- to water bounce with Kiddy Kong: roll (Y) down onto the water, then hold Y. Press B when you are going to land on the water to bounce higher. You can only do it twice in a row.
- collect silver coins to play minigames at SWANKY'S TENT or buy stuff from the bears. DK Coins do not give any extras.
- you can get extra lives by collecting 100 bananas, finding the 4 "KONG" letters in each stage, finding the hidden ballons or beating a minigame.
- go to Wrinkly's cave to save your game.
- when you have new parts/items visit FUNKY'S RENTALS to get new vehicles and reach new words on the map.
- to unlock the Lost World, using the jet ski or hovercraft, swim several clockwise circles around four rocks (On the first section of the map) for as many times as you can, until Lost World forms.
sources:
Pop'n TwinBee
controls:
d-pad = move
B = autofire
Y (tap) = fire ground bombs (check the crossair)
Y (hold) = charge punch/melee attack -> more powerful than regular shots, but has a lower range. It can deflect pink bullets.
A = "Chibi blaster" bomb (check the counter in the bottom-left) -> temp. invincibility
X = transfer energy action (2P mode only, it transfers energy from the life bar of Twinbee to Winbee or vice versa)
R (while the 2 ships overlaps) = throw partner (2P mode only, grab your partner and start swinging him around)
bells colors:
- pink bell: shield
- green bell: new mini
- blue bell: speed up
- flashing bronze bell: chibi blaster bomb
- silver bell: larger main shot
- purple bell: spread shot
basics:
- best Mini Formation: Twinbee (blue ship) Engulf (3rd choice)
- lives are replaced by a single health bar that gets refilled at the start of every level. Each hit takes away a portion of the health bar and one of the options you have activated, while pink hearts uncovered by specific ground enemies serve to refill the health bar.
Once the health bar is depleted it's game over, and that makes the shield the single most important item of the game.
- you will probably spend most of your time hunting down pink=shield, green=options, and flashing bronze=extra bomb bells.
- last stage: 7
cheats (enter while paused ingame):
- 8 Continues: A, B, Y, X, R, L, Up, Down, Right, A, A, A
- 9 Chibi: up, up, up, down, down, down, left, right, left, right, left, right, B, A, B, A, B, A
- Add mini-bees: down, down, up, up, B, B, X, X, right, left, A, Y
- Full Energy: Select, A, Y, A, Y, X, B, X, B, R, R, Select
- Invincibility: A, Y, A, Y, L, R, L, R, X, B, B
- Level Select: Up, Left, Up, Left, Up, Left, Left, Left, Right, Right, Right, Down, Left, Down, Left, Down, B
sources:
TwinBee: Rainbow Bell Adventures
controls:
d-pad = move, run, enter doors
d-pad down (in midair) = hover
B = jump, swim
B + d-pad down = drop down
B (hold) = charged jump (can be charged while walking, also works as an attack)
Y = attack
Y (hold) = charged attack
A = shoot a laser (if you have the gun powerup, less effective on bosses than charged attacks)
X = grab, release item
Start = pause and view current stage map
Start + Select = quit current stage
world map legend:
- a red dot signifies a level you have not cleared yet
- a gold dot signifies a level where you've found one but not all exits
- a gray dot signifies a level where you've found all the exits, but not all of the secrets
- no dot signifies that the level has been cleaned out completely
basics:
- it is possible to fly higher by stepping on the enemy when you push the button B.
- you can break walls and rocks with the charged jump or punch.
cheats:
- Exit A Stage: Pause the game and press Up, Right, Down, Left, Up, Right, Down, Left, Up, Right, Down, Left, A, B, X, Y.
- Full Health and All Power-Ups: Pause the game and press: Up, Up, Down, Down, L, R, L, R, B, A
- Invincible: Pause the game and press L, R, L, R, A, B, X, Y, L, R, L, R, A, B, X, Y and unpause
- Suicide: Pause the game and press Up, Up, Down, Down, Left, Right, Left, Right, B, A
- Switching characters: Pause the game and press Up, Up, Down, Down, Left, Right, Left, Right, B, A
- Move Anywhere On The Stage: Pause the game, press A 5 times, B 5 times, X 5 times, Y 5 times, L 5 times, R 5 times and unpause. Now, hold Start to pause the game and while holding, press the directional keys to move anywhere on the stage map. If you wish, press R to remove the map from the screen.
passwords:
Start on world 2 RhKBP
Start on world 3 Rb43D
Start on world 4 QQrwd
Start on world 5 Pp4pd
Start on world 6 tTkHd
sources:
Super Metroid
controls (recommended setup):
d-pad left|right = walk, aim weapon (even down in midair)
d-pad down = kneel (press again to roll into a ball if you have MORPHING BALL | press L+R to aim up)
R|L = aim weapon up|down at 45° angle
B = jump (hold for higher jumps)
Y = fire current weapon
A (hold) = run
X = cycle ITEMs / special weapons (check the icons at the top of the screen)
Select = quick switch back to the default weapon
Start = pause and view the map screen
special moves:
- Wall Jumping - (l), (B), (r), (B), repeat or (r), (B), (l), (B)
Wall jumping consists of spin jumping onto a wall, and then jumping
off the wall in the other direction. This is an extremely important
technique and comes in two flavors: two-wall and single-wall. First
start with a spin jump. Brush up against the wall, and while in the
spin, press away from the wall. Immediately press and hold the jump
button. In a two-wall situation, you should be spinning against the
other wall. Just repeat the process. The single-wall situation will
be a tad bit more difficult. You will have to maneuver back towards
the wall while spinning, and repeat the wall jump. Timing is really
critical. Imagine saying "Ta-da" after a successfull trick. At "ta"
you should press away from the wall, and press jump at "da." (Don't
forget the dash button for more height!)
- Super Jump - hold (L) and (l) or (r), (d), (B),
There are three types of super jumps, one of which is in the intro,
near your ship. Start with a power dash, and press down at any time
during the flashing stage. Samus will then flash yellow/white which
means you can now do a super jump. First press jump and immediately
press (u) for a vertical jump, (R) for a diagonal jump, and (l)/(r)
for a horizontal jump. (Use the "ta-da" technique.)
- Charged Spin Jump - hold (Y) until flashing, (l) or (r), (B)
Hold down the shoot button until Samus begins flashing. Continue to
hold the shoot button and spin jump. If Samus comes in contact with
and enemy, it will take a bit of damage (most of the creatures from
Brinstar can be killed with the charged spin jump).
- Bomb Spread - hold (Y) until flashing, (d), (d)
The bomb spread uses regular bombs. Charge up with the charge beam,
and morph into a ball. Five bombs will disperse. This is often used
to eleminate any parasitic enemies when your super missles are gone
and your power bombs are too precious to waste.
- Bomb Climbing - while morphed, (Y), wait a moment, repeat
Bomb climbing is not used in the speed run. However, there are many
instances where wall jumping might prove far more difficult. Timing
is critical. Count by "one-one-thousand, two-one-thousand," etc. to
time your bombs. Set one, and just before it explodes, set off your
second bomb. While falling from the explosion, keep your ears tuned
for a small clicking sound. This will tell you when to set the next
bomb. Also, the quick flashing of a bomb is a sign of detonation in
a split second. You might want to use this flash and set several of
your bombs to better insure that you will continue your bomb climb.
- Beam Shields - select power bombs and hold (Y)
Equipping the charge beam and one (only one) other beam, charge the
arm cannon with power bombs selected. A beam shield will appear. To
add some special effects, quickly add and remove various beams. Now
keep in mind that while a beam shield is up, you cannot shoot. This
means power dashing and the grapple beams are the only attacks that
will work.
- Energy Crystal Recharge - hold (L), hold (R), (d), hold (d), hold (Y)
If you have 10 super missles, 10 power bombs, and are extremely low
in health, select the power bombs and hold down (all four) the dash
button, aim up, and shoot button while in morphed form. Your energy
meter will be replenished.
ITEMs / special weapons (from left to right):
- MISSILEs = open red doors.
- SUPER MISSILEs = do as much damage as 5 normal missles. Open green doors and green gates. You can also use them to kill the eye creatures on various doors.
- POWER BOMBs (release in morphball form only) = open the orange/yellow doors. They are also very powerfull and can take out an entire room of enemies.
- GRAPPLING BEAM = grab onto special blocks marked with a "+" (and some enemies)
- X-RAY SCOPE (use with dash button held down) = allows you to see through fake or special barriers such as fake walls and dash-blocks
map legend:
- pink areas = visited areas
- purple "S" = save point
- yellow "S" = last save point used (respawn here if you die)
- "M" = Map computer / download stations
- white dot = area with hidden item uncollected, also used for missile and energy recharge stations
- metal/grey doors = req. all the enemies in the current room to be killed. Can be opened when flashing.
- blue door = already opened
- red/pink door = req. 5x MISSILEs or 1x SUPER MISSILE to unlock
- green door = req. a SUPER MISSILE to unlock
- yellow door = req. a POWER BOMB to unlock
basics:
- getting hit will deplete the "ENERGY" counter in the top-left.
Any solid pink blocks indicate an additional 99 energy available in reserve. When the digits reach 0, a pink block is used up. If no pink blocks are available, you will die.
To refill, collect Energy Capsules dropped by enemies, find an Energy Tank, or a energy refill station.
- the game can only be saved at certain spots called Save Stations. These are individual rooms that consist of one or two entrances and a tube in the middle. On the map, they appear as a sector with the letter "S" on it.
sources:
Mega Man's Soccer
controls with possession of the ball:
d-pad = move
Y = pass (can be combined with a direction)
B = shoot (can be combined with a direction)
A = clearing kick | centering pass | punt
R (hold) + B = power shot (max 2 per game, 80% of the time make it in the goal)
Select = toggle the radar
Start = pause
controls without possession of the ball:
d-pad = move
Y | X = slide tackle
A = shoulder tackle
B (if the ball is in the air) = headshot
Select = toggle radar
Start = pause
recommended order (Capcom Championship):
- Elecman
- Cutman
- Fireman
- Woodman
- Skullman
- Needleman
- Dustman
- Pharaohman
- Enker
- Protoman
basics:
- best team layout:
- FORWARDS: Mega Man, Protoman, Enker
- HALF BACKS: Pharaoh Man, Fire Man, Air Man
- FULL BACKS: Elec Man, Dust Man, Cut Man
- GOALIES: Bubble Man, Wood Man, Needle Man, Toad Man
- if you can, put Bubbleman as your goalie. He can block a whole lot of super shots.
- use the formation mode to your advantage. Capitalize on your strengths. Exploit the enemies' weaknesses.
- if you're afraid of super shots, use the sweeper mode to block them. (The sweeper tends to take the super shot and then the goalie can pick up the ball)
- if you're in a crowded area, punting is probably your best choice.
- pass back and forth a lot while you run. Check the radar for blue dots to pass to.
- the best way to steal the ball is with the slide tackle.
- if you're on your side of the field and the ball is close to your goalie, do not be afraid to pass to your goalie.
Because everyone runs off when the goalie has the ball, be sure to use this to your advantage.
- easy scoring: you score 90% of the time by shooting from the corners of the penalty box's semicircle or from the edges of the goal box.
passwords (Capcom Championship only):
Beat Blues. _ _oo_o_ _,oo_ooooo,oo_oooo_,oo_oo_o_,oo_ _ _ooo,oo_o_oo_,_ _ _ _ _o_o,_oo_o_o_
Beat Cut Man. o_o_ _ooo,o_oo_ _ _ _,_o_o_o_ _,_ooo_ _oo,ooo_oooo,_ _ _ _o_o_,o_ _ _ _ _ _o,_ _ _ _ _ _ _ _
Beat Dust Man. _oo_ _ _o_,_ _ _oo_o_,_o_o_o_o,_ooooooo,_ooo_ _oo,_oo_ooo_,o_ _ _o_oo,_ _ _ _ _ _ _ _
Beat Elec Man. ooo_ _ _oo,o_ _oo_oo,oo_o_o_o,ooo_ _ _oo,o_ _o_ _o_,_o_oo_ _ _,ooo_oooo,o_ _ _o_oo
Beat Enker. _ _ _o_o_o,oooooooo,oooo_ _oo,ooo_ooo_,o_ _ _o_oo,_ _oooo_o,_o_ _ _o_o,_o_ _o_oo
Beat Fire Man. _oo_ _ _o_,_ _ _oo_oo,_ooo_o_ _,_o_ooooo,oo_ooooo,oo_o_ _oo,ooo_oooo,_ _ _ _o_o_
Beat Needle Man. _ _o_ _oo_,o_oo_ _ _ _,_o_o_ _ _ _,ooo_ _oo_,o_ _o_oo_,_oo_ _o_ _,_ _ _ _o_oo,o_o_ _ _ _ _
Beat Pharoah Man. o_ _oo_oo,oo_o_o_o,oooo_ _oo,_o_ _oooo,_ _o_o_oo,o_ _ _ _ _ _o,_ _o_ _ _ _o,_ _o_ _ _ _o
Beat Skull Man. _o_ _o_ _o,_ _ _oo_oo,_ooo_o_ _,_o_oooo_,oo_o_ _oo,oo_ _ooo_,_ _ _ _o_o_,o_ _ _ _ _ _o
Beat Wood Man. o_o_ _ooo,_ _oo_ _ _ _,_ooo_o_ _,oo_ooooo,oo_o_ _oo,oo_ _ooo_,_ _o_o_oo,o_ _ _ _ _ _o
sources:
Kid Klown in Crazy Chase
controls:
d-pad left|right = move left|right
d-pad up = speed down
d-pad down = speed up
X | Y | A | B | L | R = jump
basics:
- to finish a level, you must accomplish 2 tasks:
- Reach the bomb that Blackjack planted at the end before it detonates. If you don't make it before the bomb goes off, you lose a life and all items you collected, and you must start over.
- Collect one card each of spades, hearts, diamonds, and clubs. If you fail to do this, you must start the level over, but you don't lose a life and you retain items you collected. The cards will be in the balloons you find along the way. If you get all the cards on the first try and make it to the end, you'll get a heart, which helps you get a better ending.
- collecting coins lets you access the bonus levels at the end (where you try to get more health),
- last STAGE: 5 (get all 5 Honey Hearts and don't use any continue for the good ending)
cheats:
-
stage select: On the title screen, hold L and R on both controllers. Then hit the correct button on both controllers, at the same time:
Stage 2: press A Button
Stage 3: press B Button
Stage 4: press X Button
Stage 5: press Y Button
sources:
Nankoku Shounen Papuwa-kun
controls:
d-pad = walk, crouch
B = jump
Y = punch (on the ground), jump kick (in midair) -> can push some blocks
A = hadouken-like attack (consumes 1 blue orb, check the counter at the top-left) -> not effective with every boss
L | R = slide left|right -> good frontal attack, also used to pass under narrow passages
Y (while sliding) = rising kick -> good midair attack from below
L | R (in midair) = diving kick -> good midair attack from above
d-pad down + Y = leg sweep
items:
- blue orb = increases orbs count by 1
- various food = slightly refills your life meter
- fish-head = completely refills your life meter
- mini-Shintaro = extra life
- heart = added to your heart meter (check the "X/4" counter at the top-left). When you collect 4, you gain an extra level of life.
basics:
- destroy big blocks of any shape to get refills.
- when you defeat an enemy, you gain experience points, which are needed to levelup (up to 5). Check the "Lv" counter at the top-right and the points needed for the next level.
- food restore your health (check the pink bar and the lives counter in the top-left). Health and lives are also fully restored when you finish a stage or levelup.
- when you start a new game, you have access to the 1st stage of the main island, and the lower 3 islands:
- the 1st island in the bottom left only represents Papuwa Island, and has no importance to the actual gameplay.
- the 2nd island is used to create and input passwords. Passwords consist of a sequence of 3 portraits. The leftmost option will exit the password screen. By highlighting a portrait and pushing up or down, you can cycle through all of them. The rightmost option will attempt to enter in the password. Note that passwords will not save your orb count, life meter, experience level or amount of lives. It only counts how many stages have been completed.
- the 3rd island allows you to change the sound settings. The first option is for Stereo sound, and the second one is for Monaural sound.
- last stage: 8
sources:
controls:
d-pad = walk (hold to run), climb, crouch -> run to perform longer jumps and cross gaps
B = jump
B (while in air) = tail jump -> jump higher and attack enemies
Y | A = throw Pec (attack enemies), grab, throw items
basics:
- do not jump directly on enemies, attack them with Pec or the tail jump.
- you can find Pec in chests all throughout the game. If you get hit, Pec will die.
If you take another hit without Pec you lose a life.
- chests may also contain: 10 stars, 1UPs, an air tank that lets Pec float in the air giving you a ride, and a spike helmet that lets Pec chew on stuff he couldn't before.
- collect 100 stars to get an extra life (check the counter in the top-left).
- last scene: 17
passwords:
Scene 01 Mining Town Ablaze Cherry: House, Grape: Stump, Orange: Table
Scene 02 Grounder's Mine Cherry: Tree, Grape: Balloon, Orange: Stump
Scene 03 Tunnel Chase Cherry: Tree, Grape: Table, Orange: Balloon
Scene 04 Lumberjack Forest Cherry: Table, Grape: Stump, Orange: Balloon
Scene 05 Catry's Tree Fortress Cherry: Table, Grape: House, Orange: Stump
Scene 06 Eaten!! Cherry: Balloon, Grape: House, Orange: Tree
Scene 07 Ancient Pyramid Cherry: Stump, Grape: Table, Orange: Tree
Scene 08 Mouse Trap Cherry: Table, Grape: Tree, Orange: Stump
Scene 09 Gilson's Pirate Ship Cherry: Balloon, Grape: Tree, Orange: Table
Scene 10 Island of Ruin Cherry: Tree, Grape: House, Orange: Table
Scene 11 Beecroft's Stronghold Cherry: Balloon, Grape: Stump, Orange: House
Scene 12 Underground Passage Cherry: House, Grape: Stump, Orange: Tree
Scene 13 Visconti's Castle Cherry: House, Grape: Balloon, Orange: Stump
Scene 14 Throne Room Cherry: Tree, Grape: Table, Orange: Stump
Scene 15 The Tower Cherry: Tree, Grape: Table, Orange: House
Scene 16 Hall of Mirrors Cherry: Stump, Grape: House, Orange: Tree
Scene 17 Royal Throne Room Cherry: Stump, Grape: Balloon, Orange: Tree
cheats (Enter the following at the title screen):
- Introductory Level Skip: Press Start + Right + Y.
- Invincibility and High Jump: Hold Right, Y, L and A, then press start. During the game, press L to become invincible and R to jump higher.
sources:
Smart Ball | Smartball | Jerry Boy
controls:
d-pad left|right = move
d-pad up = stretch upward, attach to ceilings, go up through pipes
d-pad down = flatten, go down through pipes
B | A = jump, swim
Y | X (hold) = run (can jump longer while running), stay attached to walls, throw balls (Jap ver. only, can be combined with a direction)
L | R = throw balls (US ver. only, can be combined with a direction)
basics:
- you can jump on most enemies and use them as platforms or a ride.
- attack enemies by flattening down (safest), jumping over them and squashing them down, stretching upward, or throwing balls.
- except for the letters, all items come in purple flowers. Stand on the flowers to make them bloom and you can get the items. Some flowers yield more than one item:
- red ball = a normal ball that you fire at enemies (check the counter in the top-right).
- iron ball = a heavy black ball that can be fired at enemies. Unlike a normal ball, it can be picked up over and over again. You cannot jump as high with iron in your body, and you cannot run at all.
- green seed = when you drop a seed, you will plant a beanstalk that can be used to reach a higher area.
- jump ball (white ball win a red arrow) = it gives you the ability to jump much higher than normal.
- "Life" blue heart = refill 1 heart
- "H.Up" clear heart = increases your max health by 1.
- collecting all the "JERRY" letters in a stage gives you 1 extra life.
- last round: 8-B
cheats:
- stage select: when the title screen reads "Push Start Button", press UP, UP, DOWN, DOWN, LEFT, RIGHT, LEFT, RIGHT, B, A, SELECT, START
sources:
Jerry Boy 2 | Jelly Boy 2
controls:
d-pad = move, go through pipes
d-pad up = stretch upward, enter doors -> damage enemies for a few secs in this state
d-pad down = flatten, open boxes -> damage enemies for a few sec. in this state
B = jump, swim
Y (hold) = run -> jump longer while running
A = use current char SPECIAL ability (unlimited, but has some reload time after use, check the icon in the top square)
chars special abilities:
- MARINE (blue blob) = can shoot a ball. It arks a bit upwards, but it can be aimed with the d-pad.
- MINT (green blob with a star) = throws her star at an enemy. It shoots straight forward, and can be aimed with the d-pad (best one).
- YOLK (orange+brown blob) = can dash at high speed across the screen, damaging enemies and can destroy yellow+orange blocks.
- CARM (pink blob with a ribbon) = best swimmer, she can dissolve and drop through small platforms.
- ED (purple blob with glasses) = can lay a bomb. It takes a few moments to detonate, and he can only lay one at a time, but it is very strong. His bombs can also destroy certain blocks.
- SCHENNA|SIENNA (brown blob with a dog tail) = can wag his tail rapidly to descend slowly.
suggested stage order + char:
- STAR PARK, MARINE
- LOST WORLD, MINT
- NINJA WESTERN, YOLK
- CRAZY OCEAN, CARM
- WONDER SPACE, ED
- MOTOR MAZE, YOLK
- DARK PALACE, YOLK
basics:
- you can jump on most enemies and use them as platforms or a ride.
- collect 100 colored jelly beans in stages for an an extra life (check the counter in the top-right).
- enemies do not drop anything, items are only found in small orange boxes with a downward arrow:
- red heart = 1 heart refill (if health at the top-left is already full gives temp. invicibility)
- empty heart = collect 4 for an extra hit point (check the heart pieces on the top-right)
- CHECK! = checkpoints
- black puzzle pieces (hidden) = collect all of them (9) to see the true final boss and ending
sources:
Hagane: The Final Conflict
controls:
d-pad left|right = walk
d-pad down = duck -> use to avoid some attacks
Y = attack with current weapon
X | Select = switch weapon next|prev (check the icon in the HUD)
B = jump (press again before the apex of his leap for midair somersault) -> use to avoid enemies, do longer jumps
d-pad up (when jumping) = grab onto the ceiling
B, d-pad down = drop kick (hold down to keed attacking the same enemy) -> very safe attack, use often
d-pad down, B = slide (not an attack) -> risky move, better to avoid
A = bomb (check the scrolls in the top-right)
L | R = somersaults to the left|right, backflip when facing right|left
L | R, Y = Dragon Punch special attack (tap L|R quickly multiple times for charging) -> risky move, better to avoid
L | R, B = Flying Kick special attack (tap L|R quickly multiple times for charging) -> risky move, better to avoid
basics:
- wall climbing: if Hagane hits a wall while performing the midair somersault, he will bounce off of it.
- prefer the sword as your main weapon as it is faster. Use kunai and grenades for distant enemies.
- attacking enemies from below with the grappling hook (or above by grabbing the ceiling) is always safer.
- last stage: 5-5
cheats:
- level select: in the config menu, play songs 04, 03, 10, and 18 in the music test. Start the game, pause, and press L+R+X to warp to the level select. To choose a level, stand under its number and press B. Level numbers containing a "B" are the bosses.
sources:
X-Kaliber 2097 | Sword Maniac
controls:
d-pad = walk, crouch
B = jump
Y = slash -> quick short-range attack
A = front stab -> slow long-range attack
A (in mid-air) = downwards stab
L | R = "Power Slash" energy wave, freeze you inplace -> use to attack distant enemies when not surrounded
X = guard -> can block most attacks, gives some recoil
basics:
- getting hit will deplete the blue gauge on the top-left. Collect energy capsules to refill.
- keep an eye on the red timer of the top. If it reaches 0 it will kill you.
- last STAGE: 6
cheats (press at the title screen):
- Invincibiltity: Left, Left, Right, Right, Down, Up, Right, Up, Up, Up. Go to the Options menu and activate the "No Damage" option.
- Level Select: Right, Right, Left, Left, Up, Down, Left, Down, Down, Down. Then press A to select the level.
sources:
Super Mario Kart
controls:
d-pad = steer
B = accelerate
A = use item (check the icon in in the top-right. Combine with d-pad down to drop some items behind)
Y = brake
L | R = jump -> use to start a power slide
X | Select = switch rear view mirror
basics:
- collect coins on tracks to gain some extra speed.
...
sources:
Super Mario RPG: Legend of the Seven Stars
controls (outside battle):
d-pad = walk
Y (hold) = run
B = jump
A = talk, examine
X = open menu
controls (in battle):
A = attack
Y = magic (Special Command)
B = defense, run away (Etc. Command)
X = item menu (Item Command)
basics:
- if you touch an enemy you will initiate combat and lose the 1st turn. Jump over them instead to perform the 1st attack.
- when you attack, you can do a Timed Hit by pressing A right as the first hit connects with the enemy. That way, you'll get an extra hit in and deal some more damage too.
Timed Hits also can work while the enemy is attacking you. If you press A right as the hit is about to connect with you, you'll guard against the attack and reduce the amount of damage received.
sources:
Holy Umbrella: Dondera no Mubo!!
controls:
d-pad = move, crouch, enter doors
B = jump
Y (tap) = attack
Y (hold) = run
A = use character's special ability
X = use item
L|R = switch partners
Start = pause and bring up menu screen
partners:
- boy -> can grab orbs (press A), falling attack (jump and press down), umbrella hovering (press A in mid-air), can climb walls
- Bonto (small, blue bird) -> can double jump (press B in mid-air) and can enter in narrow passages.
- Saki (girl) -> can slide (press A), wall jump.
- Dondera (evil girl) -> can shoot fire indefinitely (press/hold A).
umbrella powers:
- Ice (): an ice cube is left behind. Grab it with A and throw it at another enemy to attack, or use as a stepping stone to reach a higher area.
- Wind (): a wind orb is left behind. Grab it with A and throw it at another enemy to attack.
- Fire (red): a fire orb is left behind. Grab it with A and throw it at another enemy to attack. These orbs float upward, as well as forward, when thrown.
- Water (): a water orb is left behind. Grab it with A and throw it; it'll circle the hero as a forcefield of sorts, only disappearing when hitting an enemy.
- Thunder (): a thunder orb is left behind. Grab it with A and throw it; it'll bounce up and down rapidly while moving forward.
- Cloud (): a black orb is left behind. Grab it with A and throw it; it'll spin around you, moving outward with each spin, damaging all enemies in the way.
basics:
- the plain attack of the latest umbrellas is more powerful.
sources:
Sky Blazer | SkyBlazer
controls:
d-pad = run, duck, crawl, climb walls
B = jump (hold to jump higher) -> you can grab and climb most walls and still attack from them
Y = puch, kick -> absorb some projectiles
X = use current magic spell (req. the red gauge at the top-right, collect red vials to refill) -> most provide temp. invincibility
L | R | Select = switch magic spell (check the orange icon at the top, the "X" shows how many units the current spell req.)
Start = pause and safely switch magic spell
spells:
- Aura Attack (the spell you start with) = fire a moderately powerful blast at your enemy. -> nice if you want to try to reach an enemy at a longer range, but nothing that'll save your life later in the game.
- Comet Flash = fly in a straight line. -> good for getting across large holes and gaps that cannot be easily jumped across.
- Heal = a spell that has the ability to restore a bit of life. Use sparingly. You just might need it.
- Lightning Strike = hits all targets on the screen with a lightning blast.
- Star Fire = attack that blasts outward in nine directions.
- Time Stop = freezes all enemies on the screen. Can actually work on one boss in the game.
- Warrior Force = doubles your attack power.
- Fiery Phoenix = lets you fly. Req. to break down Ashura's impenetrable defense.
recommended stage order:
Stage 2: Faltine's woods
Stage 3: The temple Infernus
Stage 4: Cliffs of Peril
Stage 5: Tower of the Tarolisk
Stage 6: Gateway to eastern plain
Stage 7: Petrolith Castle
Stage 8: The falls of Torment
Stage 9: Lair of Kharyon
Stage 10: The sandrivers of Riol
Stage 11: Fortress Shirol
Stage 12: Cavers of Shirol
Stage 13: Gateway to eternal winds
Stage 14: Storm Fortress of Rl´har
Stage 15: Shrine of weeping Widow
Stage 16: Dragonhill Forest
Stage 17: The great tower
Stage 18: Shrine of Destiny
Stage 19: Raglans Citadel
basics:
- collect green vials to refill health (check the green "E" gauge at the top-left).
Collect 100 gold diamonds to get a 1-Up.
- best spells against bosses: Comet Flash, Heal.
- passwords can be obtained from the SHRINES where the Old Man lives (select "SHOW MYSTIC PATTERN").
passwords to access to all levels of a map with 99 lives:
World 1 XTXT O-T- XOT- -T--
World 2 OTOO O-TX XOTT TXTO
Final Level OTOO OXT- XOXT TXTO
sources:
Magical Quest Starring Mickey Mouse | Mickey no Magical Adventure
controls:
d-pad = walk (walk down slopes to run)
B = jump (hold while landing on enemies to jump higher), swim
Y = use current costume special ability (some req. the gauge on the bottom-right)
A = switch selected costume (check the icon on the bottom)
L|R = select costume
Start = pause and safely select costume
costume abilities:
- normal = grab and throw items
- magic turban = shoot magic at your enemies (limited use, get magic lamps to refill), breathe underwater and fly on carpets. If you hold the Y button down, you can charge up your shot.
- firefighter = take out fire enemies and obstacles using the hose (limited use, get hydrants to refill). You can also use the hose to push grey blocks and large rocks.
- mountain climber = use the hook to grab blocks, swing from the gray pegs, and to climb to higher places (can be aimed with the d-pad).
basics:
- attack enemies by jumping on them or by throwing items.
- collect gold coins to buy stuff at the GENERAL STORE found inside some hidden doors.
- collect hearts to restore your health (check the hearts on the top-right). Health is also refilled after each SECTION final boss.
- each boss is better fought with a specific costume (check nearby refills for an hint).
- last SECTION: 6-4
cheats:
- get Max Hearts, 990 coins, 9 Lives, the Magician and Fireman outfit upgrades and 990 seconds on the timer: Hold Start + Select on both controllers before collecting a small heart from the small yellow boxes. If done correctly, the Capcom Logo music will play.
sources:
The Jetsons: Invasion of the Planet Pirates | Youkai Buster: Ruka no Daibouken
controls:
d-pad left | right = walk
d-pad down = crouch
d-pad up = use switches
B = jump
Y = vacuum -> suck enemies, powerups, stick on walls, grab objects
L | R (hold) = run -> use for longer jumps
powerups:
- heart = health refill
- food, crystals, stars = extra SCore points
- "P" = increase vacuum power (check the POW bar at the upper-right)
...
basics:
- do not touch enemies directly, suck them into the vacuum, or throw stuff at them.
- wall/ceiling climb: stick to a wall with Y, then alternate B and Y.
- to enter narrow passages, crouch and use the vacuum.
- last stage: 7
cheats:
- stage select (Jap version only): go to the "Options" mode. After that, press/hold any of the arrow key for about 5s. Note: This will not work for "Game Level: Easy", it is only applicable for "Normal" and "Hard".
sources:
Umihara Kawase
controls:
d-pad = walk, crouch, enter doors
B | X = jump
Y | A = cast the fishing line (can be combined with a direction)
If the line hooks onto something, you must continue to hold the button down to remain attached.
As soon as you release the button, the line will unhook.
d-pad down|up (while something is hooked) = reel in|out
L|R | d-pad (while gameplay is paused) = pan camera
Start = pause
Select = open the replay menu
basics:
- to kill most enemies, hook your line into them and reel them in your bag.
Or, simply touch them with the hook to make them dizzy and pass over them.
- all enemies respawn after a while, unless you are near the respawn point.
- shortest path: 00-36; 52-55 (1 boss)
- longest path: 00-18; 23-42; 26-57 (1 boss)
field map:
F00-F01-F02-F03-F04-F05-F06-F07
| |
F10-------F11-------*08-F14-F15-F16-F17-F30--------------,
| | | | |
*:Boss | *40 F20 F33-F37 |
08 25 36 | | | | |
40 49 56 | !35 F21-F22-F38-F41 |
| | | |
!:Ending |-------------F18------------F23-F24-F42-F43-*49-----,
28 35 55 57 | | | |
| *25-F26-F31-F46-F47 |
Missing Fields | !28 | | |
09 13 19 | F29-F34-!35 F48 |
27 32 39 | | |
44 53 54 '----------------------------F12-*36-F45-F50-F51-*56 |
| | |
| !57 |
'-----------------F52-!55
game genie cheat codes:
Jump in Midair
DDB0-4404
Invincibility to Enemies
6DBB-3F61
6DB4-CDAD
Infinite Lives
C268-1DAF
sources:
Bonkers
controls:
d-pad = walk, crouch
B = jump
Y + direction (when the DASH bar is full and blinking) = dash -> avoid using as an attack, can kill only some enemies
d-pad down (while dashing) = roll attack (use to enter narrow passages)
X = throw a bomb (check the counter in the top-right)
X + d-pad down = roll a bomb (check the counter in the top-right)
special items:
? balloon = bust it open by Bomb or Dash, and get a prize.
WARNING, some contain a Beezle.
You can also use them as platforms, to reach higher areas.
badge = looks like your basic, golden police badge.
Get ten and you get one Bomb added to your maximum.
Hyper Juice = a red bottle with a cork in it.
Causes you to turn red and dash continually for about eight seconds.
Although you can still can be knocked out of it if you hit or get hit by an enemy, and of course certain objects you bump into.
recommended stage order:
- Wacky Studios
- Neighborhood
- Cruise Ship
- Underground
- Toon World
basics:
- kill most enemies by jumping on them or throwing bombs, not by dashing.
- if you need to get to a higher place, jump on an enemy to get a boost.
- throw a bomb to Fall-Apart Rabbit to obtain a special item.
cheats:
- 10 HEARTS: At the title screen hold right press A B X Y
- 9 lives: At the title screen press down up right left X B A Y
- 99 BOMBS: At the title screen HOLD LEFT PRESS B A Y X
- Infinite hearts and bombs: At the title screen press down right up left B X A Y
- Invincible: At the title screen press right left up down Y B X A
sources:
Psycho Dream
controls:
d-pad = walk, crouch
Y = attack
B = jump (hold to jump repeatedly, not higher)
L|R (hold with the d-pad) = run -> jump higher while running
A = bomb (check the counter next to "F.AT" in the top-left)
basics:
- getting hit will deplete the red bars on the top-left. Collect red crystals to refill.
- enemies drop several types of colored crystals:
green = 4s temp. invincibility, purple = bomb restock, red = health refill,
yellow = hand weapon switch or powerup, blue = gun weapon switch or powerup.
- last stage: 5
cheats:
- Level Select: Upon starting the game, hold Y, X, R, and Start on Controller 2 until the Riot logo fades out. Select either Start or Continue on the title screen to access the level select screen. Press Up or Down to select your level and Y to start.
sources:
Run Saber
controls:
d-pad = walk, crouch, climb walls
2x d-pad = run
B = jump (press d-pad down in midair for a jump kick attack)
d-pad up + B = energy jump -> very useful, use also when surrounded
Y = saber attack
L | R = slide attack left|right
X = bomb attack (check the counter next to the red ball in the top-left)
basics:
- getting hit will deplete the red bars on the top-left. Collect medkits to refill.
- other pickups include: blue Saber-Up (=incr. the saber power), red/pink orbs (=bombs restock), and 1UP.
- last STAGE: 5
cheats:
- level select: hold B + Y + Right + Select at the Atlus screen. A level selection option will appear on the main menu when the buttons are released.
sources:
Kendo Rage | Makeruna! Makendou
controls:
d-pad = walk, crouch
Y = attack (can be aimed up and even down in midair)
Y (when the upper PSY meter on the bottom-left is yellow or flashing, auto refills while not attacking) = charged attack (diff. for each weapon)
B = jump (hold to jump higher, combine with d-pad down to drop platforms)
A = dash attack (waste some of your HP, but is very powerful) -> temp. invincibility, use only when necessary or during boss fights
basics:
- walk down slopes to run faster and make longer jumps.
- collect food items to restore your health (check the lower H.P. gauge on the bottom-left).
Your health is also refilled after each stage.
- collect a colored ball to switch weapon (check the current one in the bottom-center):
- blue = wave (starting weapon)
- red = fire, also extends your kendo stick
- green = fencing
- yellow = 1 hit protection (check the counter in the bottom-right) -> collect as many as possible when you do not want to switch weapon, since there are no weapon powerups
- the powerup balls always cycle the colors in this order: red, yellow, blue, green.
Getting the same color twice has no powerup effect.
- last ROUND: 7
cheats:
- round select: when the words "Game Start/Configuration" appear, press X, Y, A, B, X, Y, A, B, then press Start.
sources:
Magical Pop'n
controls:
d-pad = walk, duck, crawl
Y = sword attack (can be combined with a direction)
Y, Y, Y = larger arc sword attack
B = jump, activate button (for teleport pads and such)
d-pad down, forward, B = slide
A = magic attack (consumes stars, check the casting costs at the top bar below the icons)
Select = super magic attack (consumes more stars)
L | R = switch magic (check the icons on the top)
magic abilities/items (from left to right):
- energy beam = fires a quick energy blast that shoots off sparks when it hits the enemy.
- exploding wand = throws a bomb like a grenade that explodes on impact. The blast doesn't hurt you, and destroys the lollipop-looking blocks.
- grappling hook (no cost) = latch onto hooks to get across pits
- ice blast = fires 3 balls of ice in front of her, damaging enemies or freezing the fire blocks you'll find.
- fire blast = blows out a fireball. Hold the button down for a continuous stream.
- inner sonic = the princess goes rollin' across, and up, the screen. You still take damage from enemies and hazards.
basics:
cheats:
-
debug menu: Pause the game and press Up, Down, X, Y, Left, Right, A, B, Up, Up. You will hear a sound to confirm the code entry. When you unpause and pause the Debug Menu will appear.
SPEED: Activates slow motion mode. Press Left and Right to change the number (up to a maximum of 063), and Start to toggle slow motion on or off. The higher the value, the slower the game will run. Note that a value of 000 seems to be interpreted as 255, so don't choose that.
MUTEKI: Press Start to toggle invincibility on or off. You'll still take damage, but the life meter will automatically refill when it hits zero.
FULL POWER: Exactly what it says on the tin. Press Start to give yourself full health, 9 lives, 99 stars, and every special power.
STAGE/AREA: Lets you choose any section of any stage. Press Left and Right to change the values. Stages 201-225 are reserved for special things like stage intros and cutscenes, while 226-255 seem to be unused (and may even crash the game/emulator).
stage 2 = 033
stage 3 = 045
stage 4 = 079
stage 5 = 113
stage 6 = 147
MAP JUMP: Press Start to warp to the stage/area specified by the previous two options.
EXIT: Exits the debug menu and resumes normal gameplay.
sources:
Super Ghouls 'n Ghosts | Chou Makai-Mura | Choumakaimura
controls:
d-pad = move, duck, climb up|down ladders
Y | A = attack
Y | A (hold until the gauge at the top is yellow, req. the Golden Armor) = magic attack -> temp. invincibility, use often
B = jump (press again to double-jump)
basics:
- treasure chests are hidden throughout each stage. They may be revealed by either passing a specific (but unmarked) point on the screen or using the magic associated with the bow. For the former, the vast majority of trigger points are reached by double jumping.
Chests may contain: new weapons, an armor, a shield, a trap or an evil magician who casts a spell at you.
- the green/bronze armor will upgrade your weapon, and the gold armor allows you to use charged/magic attack, but they provide no extra protection.
Collect shields to get protection from enemy shots (not melee attacks).
- sacks of gold only provide extra points.
- best weapons: dagger (high rate of and powerful), bow, Tri-Blade (when upgraded home in enemies, but it is slow)
- last stage: 8 (2 loops)
cheats:
- level select: highlight "Exit" on the option screen with controller one. Hold L + Start on controller two and press Start on controller one.
sources:
Mega Man X
controls:
d-pad = move, climb ladders
B = jump
A | 2x d-pad = dash
A | 2x dpad, B = dash jump (req. leg enhancement)
Y = fire current weapon (hold for charged shot)
L | R = switch weapon
Start = pause and view the status screen
recommended stage order:
- Chill Penguin (Use the X-Buster or, later, Fire Wave)
- Storm Eagle (Use X-Buster or Chameleon Sting)
- Spark Mandrill (Use Shotgun Ice)
- Flame Mammoth (Use Storm Tornado; the Boomerang Cutter will chop off his nose)
- Armored Armadillo (Use Electric Spark)
- Launch Octopus (Use X-Buster or Rolling Shield. If you are playing the SNES version and have the Boomerang Cutter, you can use it to chop off his arms which prevents him from spinning and/or sucking you dry. (Thanks to Dave for telling me about this.))
- Boomer Kuwanger (Use Homing Torpedo)
- Sting Chameleon (Use Boomerang Cutter or Homing Torpedo)
basics:
- to climb a wall, jump against it a press the jump button repeatedly.
passwords:
To have all Turbo Hearts, all Sub-Tanks, and all Armor Upgrades with no bosses defeated 3475 5668 258
4 Sub-Tanks, All Turbo Hearts, All Upgrades, All Bosses Defeated 8441 2176 4423
All 4 Tanks, all heart tanks, and all bosses defeated. 2653 3858 7584
All abilities, heart tanks, sub-tanks, all bosses defeated, Zero's buster 8447 4666 6156
All armor upgrades, subtanks 6624 5468 8588
All Bosses Defeated - No Leg/Body/Helmet/Buster/Heart/SubTank 4723 2486 1324
All bosses defeated 2 turbo hearts 2 subtanks 4653 4688 7884
All bosses except Boomer Kuwanger and Sting Chameleon dead. 2137 3188 8121
All bosses except Sting Chameleon dead. 2556 2582 7114
All powerups and armor upgrades, all bosses beaten the first time through. 3676 4667 5148
All Subtanks & Hearts, NO Armor & Weapons 3748 8612 5524
All Upgrades No bosses Defeated 6485 1146 2321
All Upgrades, All bosses defeated, 1 turbo heart. 5583 4618 5824
All Upgrades, Chill Penguin Defeated, Storm Eagle Defeated 4423 8832 7824
All weapons, sub tanks, hearts, and levels completed 8141 2136 4426
Everthing unlocked ecxept no beaten Sigma 7431 3842 8523
everyone accept sting chameleon defeated, 6 heart tanks, 3 armor upgrades, and 3 sub-tanks 8437,2788,8161
Everything obtained except Leg Capsule 8441 2336 2421
Final Sigma Level/Last Battle 3733 6838 8744
First mini-level beaten 1764 1488 7748
Full armor, 2 hearts, 2 sub-tanks, Chill Penguin, Storm Eagle and Flame Mammoth deafeated 1447 1838 1271
Get an extra life tank 5447 4177 4536
Leg Dash,Helmet enhancement with no bosses defeated 1422 1412 7756
sources:
Mega Man X2
controls:
d-pad = move, climb ladders
B = jump
A | 2x d-pad = dash
A | 2x dpad, B = dash jump
Y = fire current weapon (hold for charged shot)
L | R = switch weapon
Start = pause and view the status screen
recommended stage order:
- Wheel Gator (Use Strike Chain. Stay on the ground unless he goes under.)
- Bubble Crab (Use Spin Wheel)
- Flame Stag (Use Bubble Splash and his pattern of attack is different!)
- Morph Moth (Use Speed Burner)
- Magna Centipede (Use Silk Shot)
- Crystal Snail (Use Magnet Mines. Attach one to the wall behind you, then hit the snail. Often he will shoot from his shell and hit the mine you planted on the wall!)
- Overdrive Ostrich (Use Crystal Hunter)
- Wire Sponge (Use Sonic Slicer to slice and dice!)
passwords:
All armor, 8 hearts, 4 sub-tanks, all Zero parts, 1st maverick hunter level 1462-3327-6488-3246
All bosses defeated 3467 8843 3528 7651
All Items (Including Zero's Parts) 1462 3327 6488 3246
All Upgrades, All Zero Parts, Maverick Stage 2 1462 3327 6488 3246
All Upgrades, All Zero Parts, Maverick Stage 3 7366 7123 6188 3681
All Upgrades, All Zero Parts, Maverick Stage 4 8377 8143 6828 7651
All Upgrades, All Zero Parts, Maverick Stage 5 7366 7123 6188 3681
Beginning Boss defeated 1528 3834 3451 2281
Have all Heart Tanks. 8221-3336-5351-2246
Have all Sub Tanks and Heart Tanks. 8181-3336-6351-2226
Have all Sub Tanks. 7521-7232-1151-5626
Maverick Stage 1, All Zero Parts, all upgrades 6474 6357 4728 7226
No Bosses Defeated but Fully Equipped 7146 3387 6246 1246
Start a new game with Zero's Parts 7741 7232 3451 2747
Start at Last Level with Full Power 7366 7123 6188 3681
sources:
Mega Man X3
controls (Mega Man X):
d-pad = move, climb ladders
B = jump
A | 2x d-pad = dash
A | 2x dpad, B = dash jump
Y = fire current weapon (hold for charged shot)
L | R = switch weapon
Start = pause and view the status screen
recommended stage order:
- Toxic Seahorse (use turbo and just stand and blast him while he's firing that acid burst at you (don't stand too close though!) or Frost Shield)
- Tunnel Rhino (use Acid Burst)
- Volt Catfish (use Tornado Fang)
- Crush Crawfish (use Triad Thunder)
- Neon Tiger (use Spinning Blade or simple turbo shots)
- Gravity Beetle (use Ray Splasher)
- Blast Hornet (use Gravity Well)
- Blizzard Buffalo (use Parasitic Bomb)
basics:
- most major bosses in this game change their fighting style when their energy reaches the halfway mark.
passwords:
3421 2337 6378 7156 All 19 items obtained w/Vile destroyed w/Leg and Arm Capsule
8447 4335 6646 5556 All heart tanks, all subtanks, no robot changers, no bosses defeated.
5418 3153 6877 3155 All Weapons, Hearts, Ride Armors w/Zero's Saber
1454 3535 6162 7162 At last boss with everything, including Golden Suit.
5414 6585 6872 3112 Doppler Stage 1 - All weapons, hearts, subtanks, robot armors, gold chip, and zero saber
8127 4365 6316 5311 Dual Air Dash, Hyper Crash, Energy Recharge, no bosses defeated
8841 5233 6646 5856 F-Ride Armor 4 Heart Tanks 3 Sub Tanks Leg Capsules No Bosses Defeated
1454 3365 6162 7183 Gives you all Heart Tanks, Sub-Tanks, Ride Armor, Regular Armor pieces (No Super Chips), Maverick Weapons, and the Z-Saber
5114 4185 6872 3111 Have Everything Except Z-Sabre, and have 3 of the 4 Chips
6414 4585 6872 3111 Last level with all power ups
8317 1683 6772 3876 Start off at Dr. Doppler's lab
8127 4565 6316 5316 Super Armor, Dual Air Dash and Energy Recharge, no bosses defeated
8127 4535 6316 5311 Super Armor, Dual Air Dash and Hyper Crash, no bosses defeated
8127 4565 6316 5351 Super Armor, Hyper Crash, and Energy Recharge, no bosses defeated
sources:
Mega Man VII | Rockman 7: Shukumei no Taiketsu!
controls:
d-pad = move, climb ladders
Y = shoot (hold to charge-up)
B = jump (press twice to use the jet pack if equipped with Super Adapter)
down + B = slide (disabled if using Super Adapter)
L | R = cycle through weapons
Start = pause and show status screen
Select (while on the stage select screen) = go to Auto's shop
recommended stage order:
- Cloud Man (Use Danger Wrap if you have it)
- Junk Man (Use Thunder Bolt)
- Freeze Man (Use Junk Shield)
- Burst Man (Use Freeze Cracker, or, later, Scorch Wheel)
- Clown (Hit the head with fully-powered Mega Buster shots and Danger Wrap bombs.)
- Slash Man (Use Freeze Cracker or Scorch Wheel)
- Spring Man (Use Slash Claw)
- Shade Man (Use Wild Coil. Use the Thunder Bolt or the Scorch Wheel to get through the darkened area of his stage. Or you can bypass the dark area altogether by destroying the outer shell of the pumpkin.)
- Turbo Man (Use Noise Crush, and bounce each shot off the wall behind you first!)
basics:
- use Rush Jet or Super Adapter to skip difficult sections.
- super-shots are practically worthless in many cases as the shots are only worth two normal ones, and it's easier to simply rapid-fire. So don't get too much in the habit of charging up.
- collect Bolts and go to the Auto's shop to buy powerups.
passwords:
All eight stages at beginning w/ Super Adapter unlocked 4735 2557 5886 8352
All eight stages at beginning, 4 E-Tanks, 4 W Tanks, S Tank, and 999 Bolts 1751 8117 6486 6326
First set of robot masters and Turbo Man defeated 8275 2746 3547 8333
Have 4 Energy Tanks,4Weapon Tanks, and a Super Tank 8731-2587-5416-4366
Start at 1st set of bosses with 999 bolts and all items except the Proto Shield 7553 8157 6215 7314
Start at 2nd set of bosses with 999 bolts and all possible items 7853 8124 3245 7314
Start at Last Level with Full Power 6853 5646 1241 7515
Starts at final Wily level with all weapons, items and 999 bolts. 1415 5585 7823 6251
Dr. Wily's level part 2 8235 7652 2547 2133
Dr. Wily's level part 3 1235 7452 3547 8173
To have all Turbo Hearts, all Sub-Tanks, and all Armor Upgrades with no bosses defeated 3475 5668 258
sources:
Castlevania: Dracula X
controls (type A):
d-pad = move, crouch, climb and descend stairs
B = jump
2x B = jump back
Y = whip attack
Y + UP = item attack (consumes hearts)
X = item crash (consumes hearts)
basics:
- there are a few different endings in the game. To get the best one you need to do certain things (like rescue Maria and Annet).
passwords:
2 Blank, Holy Water, Axe Axe, Axe, Axe Axe, Holy Water, Holy Water
3 Holy Water, Blank, Blank Axe, Axe, Blank Blank, Holy Water, Holy Water
4 Axe, Axe, Axe Blank, Holy Water, Holy Water Axe, Heart, Heart
4 (Alt.) Holy Water, Axe, Holy Water, Axe, Blank, Heart, Axe, Blank, Axe
5 Holy Water, Heart, Fire Fire, Holy Water, Axe Holy Water, Heart, Heart
5 (Alt.) Axe, Heart, Axe, Axe, Blank, Axe, Heart, Heart, Blank
6 Holy Water, Axe, Axe Holy Water, Blank, Holy Water Axe, Holy Water, Blank
7 Holy Water, Holy Water, Holy Water Axe, Blank, Heart Blank, Blank, Axe
Final Heart, Axe, Holy Water Fire, Fire, Fire Axe, Holy Water, Fire
sources:
Rockman & Forte | Mega Man & Bass
controls:
d-pad = move, climb ladders
Y = shoot (hold to charge)
B = jump
d-pad down + B = slide
Start = pause and show status screen
L | R = switch menu
controls (Bass/Forte only):
2x d-pad left|right | A = dash
d-pad up|down + Y = shoot up/down
recommended stage order:
Cold Man (use buster, or try Lightning Bolt or Copy Vision)
Burner Man (push him onto the spikes with the Ice Wall; make sure he's on the screen when he hits the spikes or you might not inflict the additional damage)
Pirate Man (use Wave Burner (believe it or not) and try to hit him with it while he's dry... or just rapid-fire the sucker to death)
Ground Man (use Remote Mine)
Tengu Man (use Spread Drill and hit him with the biggest drill if you can; no, knocking him into the pit doesn't help since he can fly)
Magic Man (use Tengu Blade; hit with the swipe itself—not the projectile—for best damage)
Astro Man (use Magic Card)
Dynamo Man (use Copy Vision or buster.)
basics:
- make good use of your items:
- switch to the Super Recover before picking up energy capsules, and use the Energy Saver whenever you're using a Master Weapon.
- whenever Mega Man finds a quiet area and is missing any energy at all, equip the Auto Recover and stand still for a while. Gates right before boss battles are usually quiet. Mega Man can use the Auto Recover even during a battle, but it won't refill as fast if you are constantly moving around.
- some of the levels are poorly designed when playing as Mega Man, but remember you can use the Ice Wall to increase both the height and the width of your jumps. It won't get you as high as Bass's double-jump, but you can jump on top of the Ice Wall to reach higher areas. Also push the Ice Wall before jumping onto it, and you can ride it across spikes or use it to cross wide gaps (jump off the Ice Wall as it falls).
sources:
Sparkster
controls:
d-pad = move
B = jump
Y = attack
Y (hold) = charge your rockets (release to Spin attack, release + control pad = fly in that direction)
L | R = rolling attack to the left|right (if you press it too many times, you'll get dizzy and be unable to move)
basics:
- getting hit will deplete the hearts on the top-right, collect apples and bananas to refill.
- collect 100 gems/jewels to get an extra life (check the counter in the top-left).
- last level: 7 (easy), 8 (Normal), 9 (Hard and Very Hard)
passwords:
Normal Level 1 T:CACA M:CABA B:BACC
Normal Level 2 T:NNBB M:NNCA B:ANAA
Normal Level 3 T:ABNN M:BCAA B:ABCB
Normal Level 4 T:NNBB M:BABN B:ANCB
Normal Level 5 T:BACC M:ACAA B:NCAN
Normal Level 6 T:ANBN M:BCNA B:ABCB
Normal Level 7 T:EBAE M:EACA B:AAAE
Normal Level 8 T:ANAB M:NBAN B:ACAN
Hard Level 1 T:NNAB M:NCCN B:NCCN
Hard Level 2 T:BCNC M:AANN B:ANCN
Hard Level 3 T:CABA M:CBBN B:ABAC
Hard Level 4 T:NNCB M:NCBN B:NCCN
Hard Level 5 T:ANCN M:BNNN B:BAAC
Hard Level 6 T:CCNA M:CBCN B:ABAC
Hard Level 7 T:CCBC M:CCBN B:CBAC
Hard Level 8 T:NBCN M:NBCN B:BCCN
Hard Level 9 T:BANA M:ANNN B:CNCN
sources:
Super Bonk | Super Genjin
controls:
TODO
sources:
Super Genjin 2
controls:
TODO
passwords:
First Boss Defeated, 3 1/5 Hearts 234322
Second Boss Defeated, 3 2/5 Hearts 144412
Third Boss Defeated, 3 2/5 Hearts 331124
Fourth Boss Defeated, 3 2/5 Hearts 113213
Fifth Boss Defeated, 3 4/5 Hearts 423422
sources:
Cotton 100%: Marchen Adventure
controls:
d-pad = move
Y = primary fire (hold for rapid fire)
B (tap) = drop ground bombs (unlimited, the trajectory depends on how fast you are moving)
B (hold) = charge and launch fairies attack -> very powerful, pass thru obstacles and barriers
A = use magic attack (check the orbs counter in the bottom-right, restock by collecting blue orbs with a cane icon released by bigger enemies)
X | L | R = switch magic + fairies formation (check the 3 icons in the bottom-right)
Start = pause
basics:
- best magic setup: FIRE DRAGON, BUBBLE, BARRIOR (rightmost one).
- pick up yellow and red gems to charge the "EXP" gauge on the bottom-left. When filled you will power up your main weapon and bombs.
- when you get hit you lose 1 life (check the lives counter next to the broom in the bottom-left), 1 fairy and some EXP.
The only extend granted by the score comes with 50K, 100K and 200K points, but there are several extra lives hidden in the scenery that show up and move upwards when their area is shot.
- last stage: 7
cheats:
- 9 Credits: at the title screen press Select six times
- Max Experience: at the magic select screen, press: X, L, R, Right, Left, Select. If done right, the words "Power Up" will appear on the top. Now, while playing, press Select to increase your experience bar to the max.
- Stage Select: at the magic select screen, press: Up, Down, Left, Right, Up, Down, Left, Right, B, A. If done right, the number "1" will appear next to the character. Just press Up or Down to select your starting stage.
sources:
Super Castlevania IV | Akumajou Dracula
controls:
d-pad = move, crouch, climb ladders
B = jump
Down + B = jumps down off of stairs
Y = whip attack (can be combined with a direction)
Y (hold) = flail around a limp whip using the d-pad (does half the damage of the normal attack)
R = special weapon attack (if you have it, consumes hearts)
Start = pause
basics:
- always try whipping walls. Some may contain hidden secrets within them.
- if you're below an enemy, it's usually easier to just whip up through the floor and kill it.
- you can't jump up stairs like in later games.
- best weapon: the cross/boomerang.
- once you die and get a game over you'll be given a password.
passwords (use with a blank name):
Level 2 Space-Space-Space-Space, Firebombs-Space-Space-Space, Space-Space-Space-Space, Firebombs-Space-Space-Space
Level 3 Space-Space-Space-Axe, Firebombs-Space-Space-Space, Space-Space-Space-Space, Heart-Space-Space-Space
Level 4 Space-Space-Space-Firebombs, Firebombs-Firebombs-Space-Space, Space-Firebombs-Space-Axe, Space-Space-Space-Space
Level 5 Space-Space-Space-Space, Firebombs-Space-Space-Space, Space-Space-Space-Axe, Firebombs-Axe-Space-Space
Level 6 Space-Space-Space-Space, Firebombs-Firebombs-Space-Space, Space-Firebombs-Space-Axe, Firebombs-Axe-Space-Space
Level 7 Space-Space-Space-Firebombs, Firebombs-Hart-Space-Space, Space-Heart-Space-Firebombs, Space-Axe-Space-Space
Level 8 Space-Space-Space-Space, Firebombs-Firebombs-Space-Space, Space-Firebombs-Space-Firebombs, Firebombs-Firebombs-Space-Space
Level 9 Space-Space-Space-Axe, Firebombs-Firebombs-Space-Space, Space-Firebombs-Space-Firebombs, Heart-Firebombs-Space-Space
Level A Space-Space-Space-Heart, Firebombs-Heart-Space-Space, Space-Heart-Space-Heart, Axe-Firebombs-Space-Space
Level B Space-Space-Space-Axe, Firebombs-Space-Space-Space, Space-Space-Space-Heart, Heart-Heart-Space-Space
Level B (Dracula) Space-Space-Space-Firebombs, Firebombs-Firebombs-Space-Space, Space-Firebombs-Space-Space, Space-Heart-Axe-Space
sources:
DoReMi Fantasy | Do-Re-Mi Fantasy
controls:
d-pad = move, crouch
d-pad + Y (hold) = run
B = jump
Y = blow bubbles -> use to capture enemies
Y (hold, release when Milon is flashing) = special attack in 5 directions
basics:
- you can capture enemies in bubbles, or jump on top of them.
- if you run into an enemy that's into a bubble, it will float away. If this floating bubble hits any other monsters, they will also become encased in a bubble, and float off with the 1st monster.
- health is shown via the Milon suit color: green > blue > red.
When you die you lose all your inventory.
- break the brick-like things, they often hold good things.
- last world: 7
passwords:
World 2 1940
World 3 3938
World 4 5488
World 5 0615
World 6 6072
World 7 0730
Start Stages Powered Up(You can use another password after entering this one) 2525
sources:
Great Circus Mystery Starring Mickey & Minnie
controls:
TODO
passwords:
1 - The Jungle Pluto, Donald, Mickey, Goofy
2 - The Haunted House Goofy, Donald, Mickey, Minnie
3 - Caves Donald, Goofy, Pluto, Mickey
4 - Frozen Plains Minnie, Mickey, Donald, Goofy
5 - Barons Castle Mickey, Goofy, Donald, Minnie
sources:
Pocky & Rocky
controls:
d-pad = move
Y | A = attack with Magic Cards/Leaves (hold Y to keep throwing)
B = attack with Magic Stick -> deflect projectiles
L | R = bomb attack (if you have it)
X = sliding (no temp. invincibility)
Start = pause
powerup orbs:
Blue orb = powers up your default weapon. Collect 3 blue orbs in a row to have this weapon at full power.
Red orb = change your weapon to a fireball. Collect 3 red orbs to have this weapon at full power.
Green Orb = increase your bomb stock by one
basics:
- use the Magic Stick to get rid of small enemies and deflect most projectiles
- slide to avoid collisions with big enemies or shots (useful in boss fights)
- last stage: 6
cheats:
- stage select: at the select player screen, hold down the X and Y buttons while pressing A,A,A,A,B,B,B,B,A,B,A,B,A,B,A,B,START
sources:
Pocky & Rocky 2
controls:
d-pad = move
Y = throw magic cards (hold for rapid fire)
B = use the magic wand -> deflect projectiles
A = use magic = transform into your partner (press again to go back to Pocky) -> not very useful
R = throw the partner (bomb-like attack) -> very useful against bosses
items:
- black sphere = increase the power of the magical cards
- clothes = gives more hits
- keys = open the locked chests and doors
- cards with the faces of your partners = change your partner by the one that's in the card (will cycle through all of them)
partners special abilities:
- Rocky = none
- Little Ninja = can open locked chests without keys
- Bomber Bob = can grab big boulders
- Tengy = can fly
- Scarecrow = none?
- Digger = can dig tunnels
- Ottobot = can fly
basics:
- best basic partner: Rocky the Racoon
- each time you are hit, you lose 1 point of the clothes and 1 point of power.
- all the collected powerups are reset at the end of each level.
passwords (USA ver.):
HT1J Level 2
V3BX Level 3
F87N Level 4
S2YP Level 5
6DZ4 Level 6
TR5C Level 7
GZLR Level 8
5K0Q Level 9
0MW9 View ending
sources:
Ghost Sweeper Mikami: Joreishi ha Nice Body
controls:
d-pad = move, crouch
B = jump
Y = attack
d-pad up + Y = round attack -> good for flying enemies
B, d-pad up + Y = grab hanging platforms (press up again to jump over them, also performs a kick attack)
X = use a talisman (check the icon and the counter in the bottom-right)
talismans:
- green talisman = sucks all enemies onscreen into a void
- blue pendant | green droplet = freeze all enemies for a period of time
basics:
- break small pots to get weapon powerups (check the icon in the POW box at the bottom-center): yellow lightning (best one, has the longest range), blue one (2 spikes of ice as slight angles both upwards and downwards) and red one (short-ranged crescent slash).
Getting hit once reverts you to the NORMAL weapon.
- collect food to restore your health (check the hearts at the bottom-left).
- collect a question mark item for temp. invincibility, and a Mikami doll for an extra life.
- last REPORT: 7
level passwords (enter in options):
Report 001 0000
Report 2 House on the Hill 9378
Report 3 Cat Ride 6159
Report 4 Cursed Greenhouse 8584
Report 5 Mikami the Witch 6251
Report 6 Construction Site 2697
Report 7 The Playboy Mansion 1023
The Final Battle 0926
sources:
Hameln no Violin Hiki | Hamelin no Violin Hiki
controls:
d-pad left|right = walk
d-pad up (in midair) = slow down fall with the cape
d-pad down = duck
Y = pick up Flute and other throwable objects (press Y again to throw)
B = jump
A = attack
X = call Flute, when she is in costume makes her normal again
Start = pause and open costume select screen
Flute costumes:
- osterich = allows you to cross spikey pits.
- frog = can jump very high and cross spikes.
- robot = crosses spikes and punches down walls when you jump on it.
- curling ball = throw her, and she'll mow through everything in her way. (not very useful)
- orangutan (used only once)
- penguin = can walk on land and swim on the surface of water.
- fish = a flying suit. You seem to be able to control the up and down fine, but it does left and right on its own. It's a pain to control
- duck = like an upgrade for the penguin. It walks on land, swims on water, and when you jump on it it dives.
- monster = like the orangutan only used later in the game.
- frisbee = throw Flute and she whirls around everywhere. (not very useful)
- elephant = like the robot, only instead when you jump on it it squirts water. Great for extinguishing jets of flame. Also like the robot it's slow.
- UFO = don't bother to ride this one, it doesn't seem to be meant for it. It's really a safe way for Flute to tag along while Hamel jumps from ledge to ledge. Plus (and this is the best part) it fries enemies when they come in contact with her. Using this costume is the only way I can beat Sizer.
- eagle = the ultimate in flying suits. It outclasses the fish in every department except when you want to go straight up for short distances. Goes left and right like the other costumes, but when you press down it swoops a little. The harder you press, the lower it goes. Absolutely essential for later levels. Moderately slow.
- octopus = like the eagle in every way except under water. Only needed once.
- bomb = ??
basics:
- Flute never dies in the game, so you can use her as a weapon against enemies.
But if Flute has 100% HP at the end of the stage, you get a 2 star bonus.
- collect 4 stars and you get to go to a bonus room at the end of some levels.
- collect coins to buy capes and shields in towns and reduce the damage taken. Towns also have inns which recover all Hamel's HP.
- last world: 4
game genie cheat codes:
Infinite health
C96C-C761
C9B9-1461
Infinite lives
C26B-1FD0
Unlock All Stages On Map
DD20-14D8
D620-1468
Unlock All Costumes
BB28-1FDB
4E28-1F0B
D828-1F6B
sources:
Go Go Ackman
controls:
d-pad = walk (hold to start running), crouch, climb ladders
2x d-pad left|right = run -> perform longer jumps while running
B = jump (hold to use the jetpack after stage 4), swim
Y = melee attack (hold to charge a wave attack), use current weapon (check the icon at the top, unlimited uses, but lost when you get hit, lose a life and after each stage)
A = bomb attack (check the counter on the top-right, collect the same icon to restock, up to 3)
d-pad down + B = slide -> not an attack, use to pass under narrow passages
basics:
- you can jump on top of small Tenshis (cherub-like angel enemies) and then touch them to launch to other enemies koopa-style.
- collect icons in squares to get new weapons, a skull for temp. invincibility, an heart or a bottle of beer to refill your health (check the red bars in the top-left).
- collect 100 souls from defeated enemies for an extra life (check the upper counter in the top-right).
- last stage: 5
cheats:
- Level Select: at any time, hold Start+Select+Down+B+Y+L+R on controller 2, then reset the game.
sources:
Go Go Ackman 2
controls:
d-pad = walk (hold to start running), crouch, climb ladders
2x d-pad left|right = run -> perform longer jumps while running
B = jump (combine with d-pad up for higher jumps)
Y = attack with current weapon (hold to charge a wave attack) (check the icon at the top, unlimited uses, but lost when you get hit, lose a life and after each stage)
X = grab and throw enemies, even in midair
A = throw a bomb (check the counter on the top-right, collect the same icon to restock)
d-pad down + B = slide -> very useful, avoid and attack enemies
basics:
- you can jump on top of small Tenshis (cherub-like angel enemies) and then touch them to launch to other enemies koopa-style.
- collect icons in squares to get new weapons, a skull for temp. invincibility, an heart or a bottle to refill your health (check the red bars in the top-left).
- collect the same weapon icon more than once to level it up (check "L1" in the top-right). Getting hit will level-down the weapon instantly.
- collect 1000 souls from defeated enemies for an extra life (check the counter in the top-right).
- last stage: 5
cheats:
- level select: at the title screen while holding Select on both controllers, press A to start on Stage 2, B for Stage 3, Y for Stage 4, and X for Stage 5.
sources:
Go Go Ackman 3
controls:
d-pad = walk, crouch, climb ladders
d-pad up = enter doors, switch char above the rotating arrows signs found in later stages
2x d-pad left|right = run -> perform longer jumps while running
B = jump (combine with d-pad up for slightly higher jumps)
Y = attack with current weapon (check the icon at the top-right) (auto-charge a wave attack when not used)
d-pad down + B = slide attack -> very useful, avoid enemies + temp. invincibility
X = throw a bomb (check the counter on the top-right, collect the same icon to restock) -> save for bosses
A = use an item (check the icon above "<->" in the top-right)
L|R = switch item (check the icon above "<->" in the top-right)
basics:
- jump on top of weaker enemies to stun them, then go near to grab them and press Y to throw.
- getting hit will deplete the red bars on the top-left, collect hearts or the bottle to refill.
- collect souls from defeated enemies to buy items in shops hidden in some stages (check the counter in the top-right).
- collect icons in squares to get new weapons (the same weapon multiple times will increase the level), a skull for temp. invincibility.
- last STAGE: 5
cheats:
- level select: at the title screen while holding Up, L, and R at the same time, press Start to access the Level Select screen.
sources:
Super Back to the Future Part II
controls:
d-pad = move
Y | A = jump + attack (tap repeately for better control in midair)
B | X (hold) = run -> jump higher while running
basics:
- attack most enemies by jumping over them.
- collect coins to buy refills and powerups at the vending machines (check the counter at the top-right, no need to save them for later stages).
- the bandaids in the top-left represent your health. If you have 3 already, a refill will give you an extra life.
Bandaids are also refilled after each stage.
- last stage: 6-2
passwords:
0-1 Back
1-1 Open
1-2 (Griff) Boss
2-1 Head
2-2 (Griff) Frog
3-1 Iron
3-2 Bust
3-3 (Jazzman) Wolf
3-4 Blue
3-5 (Hammerman & Ringmaster) Lion
4-1 Jack
4-2 Qeen
4-3 King
4-4 (1985 Biff) Bear
5-1 Pink
5-2 Eyes
5-3 Rock
5-4 (3-D, Skinhead, and Matches) Zero
6-1 Wink
6-2 (1955 Biff) Biff
sources:
Magical Taruruuto-kun: Magic Adventure
controls:
...
menu translation:
TODO
basics:
- On the worldmap you can run into friends and enemies who will challenge Taru to minigames. Win and he gains extra takoyaki and powerups.
- you can attack enemies in a level with the tongue, and you can also eat the many takoyaki scattered throughout the level.
Takoyaki can also function as platforms, though, so they shouldn't all be eaten.
At the end of a level you can use the takoyaki eaten to purchase temporary power ups.
- last world: 5
sources:
Demon's Crest | Demon's Blazon: Makaimura Monshou Hen
controls:
d-pad = move, enter doors
B = jump (press again to hover in midair and then fly horizontally with the d-pad)
Y = attack
A = curr. crest ability (default to headbutts -> break object in BG line statues, windows, etc.)
X = use item/spell (check) -> not very useful
Start = pause and switch equipment
suggested stages order:
- Colosseum
- Catacombs (from the village)
- Forest (land in the patch that has what looks like a dinosaurs skeleton)
- Towers (three towers)
- Atlantis (Greek Parthenon surrounded by a ring of mountains and sitting atop a body of water)
- Tidal Caverns (from the Forest)
- Under Atlantis (from Atlantis)
- Ice Palace (in the mountains)
- Mountain
- Phalanx's Tower
FIRE POWERs:
- FIRE = normal fire weapon has long range but little effectiveness against enemies.
- BUSTER = same range but much more power. Allows Firebrand to blast through stone blocks.
- TORNADO = reach higher areas. Only two tornados may appear at a time.
- CLAW = grab onto walls with spikes. Shoot the claw at the spikes, and Firebrand then can grab onto the claw and climb up the dangerous walls.
- DEMON FIRE = the most powerful weapon
CREST POWERs (morph into another form):
- CREST OF EARTH: Morphs Firebrand into the Ground Gargoyle, who has great speed and the strength to break stone statues.
- CREST OF AIR: Firebrand becomes the Aerial Gargoyle and can soar much higher in the air. Weapon is very powerful disc. Aerial Gargoyle cannot grab hold of walls or platforms.
- CREST OF WATER: Allows Firebrand to survive in the water as the Tidal Gargoyle. When morphed into any other form, Firebrand cannot survive underwater. The Tidal Gargoyle allows him to breathe and search the depths. His tidal weapon can break some stone blocks that are submerged.
- CREST OF TIME: Slows time down and allows Firebrand to become the Legendary Gargoyle. It decreases the amount of damage inflicted by enemies. Also, Firebrand's skin shall become like iron to help reduce damage. Overall, the Legendary Gargoyle reduces the damage by one-half.
basics:
- getting hit will deplete the red orbs in the top-left. Use potions to refill.
- after each stage/boss fight, visit the village and buy single-use spells and potions.
- to be able to buy SPELLs, you must have a clear Vellum and the appropriate amount of money to afford it. However, almost all of these spells are useless, except:
- Imp (Summons an imp)
- Death (Summons Death) = Works well at clearing the screen and works on some bosses as well
- to be able to buy POTIONS, you must have an empty Urn/bottle and the correct amount of money. The potions are far more useful than the spells:
- Mercury = teleports you back to the beginning of the level
- Sulfur = teleports you to the world map
- Herb = restores 5 health
- Elixir = resurrects you with 4 health
- Ginseng = restores you to full health
- TALISMANS offer permanent auto-abilities:
...
- select "END" at the "GAME OVER" to obtain a password, which can be entered at the "CONTINUE" screen.
passwords:
stage 2 GDBF - YLFV - HZJS - ZHCS
stage 3 HDDM - NTKB - HQLF - XKLD
stage 4 VWNP - XSQX - CGBH - BPJB
stage 5 DKHH - UMHH - UMBH - CSWN
stage 6 YZHF - MMXK - VJDR - GMWQ
stage 7 PBGX - RVNG - KGKX - WRSB
All Items, Can Fight Phalanx in Final Form,can Fight Dark Demon. TDGM JRMB DBWB ZWSB
All power ups, items and life extensions in possesion before fighting Phalanx YDQM-RRMC-FJGL-DTSG
Boss Mode RBNL XHGB VGBB LYLD
Dragon Defeated, 1st Crest, and 1st Urn ZVHW FBBR VKZS TVTS
Phalanx's Palace available early with all possible powerups obtained (Bad Ending) CDDZ-GSHL-FTGL-FPMR
play as ultimate gargoyle FDQP QRMB FGNH GTKL
Ultimate Passcode (New Stage) QFFF KNRR DDLR XGTQ
sources:
Kirby's Dream Land 3 | Hoshi no Kirby 3
controls:
d-pad left/right = walk around (press twice and hold in either direction to run)
d-pad down = squat down, drop through thin floors, swallow enemies
d-pad up = go through doors, climb ladders
B = jump (press repeatedly to fly)
Y = inhale, exhale, blow air bubbles underwater, attack with current ability
d-pad down | A (while an enemy is in Kirby's mount) = copy power
d-pad down + B = slide attack
X = take, release an Animal Friend
A = call Gooey (takes away some of your health. You can gain it back by inhaling and swallowing him)
Select = get rid of current ability
Start = pause
animal friends abilities:
- ChuChu: she sticks to ceilings and can fly for short amounts of time.
- Coo the Owl: he can fly against wind currents and gusts.
- Kine the Fish: he can swim against currents underwater and allow you to inhale while swimming underwater.
- Nago the Cat: he can jump 3 times consecutively before touching the ground.
- Pitch the Bird: he can fly pretty well, but not as well as Coo.
- Rick the Hamster: he doesn't slide on ice; when near a wall, press B to kick off the wall.
basics:
- best powers: Cutter, Electricity, Fire, Umbrella
- you get a heart when you fulfill a secret mission in the level.
Usually the level's picture will give you a hint on what to do.
Whenever you enter the section with the secret mission, it will play a special sound.
Getting all the hearts is the only way to fight the final form of Dark Matter!
- last world 6: Hyper Zone
sources:
Star Fox | Star Wing
controls (CONTROL A):
d-pad = move, aim (inverted)
Y = fire blaster
A = bomb (check the icons in the bottom-right)
B = brake (req. the purple gauge on the bottom-right)
X = boost (req. the purple gauge on the bottom-right)
2x L | R = barrel roll -> repel enemy fire
L | R (hold) = title left|right -> use to fly in narrow passages
Select = change camera
basics:
- at the start of the game you can choose a route/LEVEL for the rest of the game.
The easier couse is LEVEL 1, followed by 2 and 3.
- there are 3 types of rings, all of which restore your SHIELD:
- yellow ring = small SHIELD recovery, obtained from enemies only.
- grey ring = restores half of your SHIELD
- blue "Supply" ring = restores half of your SHIELD and acts as a checkpoint
- the Power Shield gives you invulnerability for 3 hits - your shield cannot be damaged.
Your Arwing will be replaced by a wire frame. The magnitude of the projectile or surface that contacts you doesn't matter.
- the main blaster weapon can be upgrated 2 times by collecting the "T"=Twin Blaster.
The same item also repair ship broken wings.
- last stage: VENOM
sources:
Star Fox 2
controls (CONTROL A in Flight Mode):
d-pad = move, aim (inverted)
B = fire blaster (hold to charge)
X = use ITEM (diff. for each ship type, check the icon and coutner in the bottom-left)
A = brake (req. the purple gauge on the bottom-right)
Y = boost (req. the purple gauge on the bottom-right)
2x L | R = barrel roll -> repel enemy fire
L | R (hold) = title left|right -> use to fly in narrow passages
Select = switch between 1st and 3rd person cameras
basics:
- instead of a linear series of missions you are able to roam freely the Lylat System, represented by an interactive map screen.
The game map runs in real time whenever the player is moving or engaged in battle: enemy ships fly around, planets are conquered, missiles are fired, etc.
When the player's ship makes contact with an enemy, planet or base the game changes to an action perspective for the duration of that encounter.
The game ends when Andross' base is destroyed, then the player's performance is rated and scored.
- before beginning the game you must select 2 chars. You will be using these characters for that entire game.
There are two characters per Arwing model, with no diff. except for the color.
You can select which of both characters you want to control by pressing Select on the map screen.
When your main character dies you can still keep playing with your 2nd character (though you will not be able to use again the other character for the remainder of the game), but note that both characters have only 1 life, so if you lose them both it's the end of the game.
Chars diff. for speed, shield and pre-equipped item.
Note that any char can use any Special Item if it's collected inside one of the levels or encounters.
- best team for beginners is Fox and Peppy.
- getting hit will deplete the SHIELD points in the bottom-left. Collect Recovery Capsule : Restores 1 Shield point.
Pepper Coins will replenish all your shields.
- collect the Twin Blaster capsule to powerup your blaster.
sources:
Secret of Mana | Seiken Densetsu 2
controls:
d-pad = move
B = attack (hold to charge attack), talk -> show 'get wacked' message when your hit lands.
A = dash into the direction you're facing (req. 100% at the bottom-left)
Y = access menu of controlled character (use items, equip, etc.)
X = access menu of ally. Press again to switch allies.
Select = switch controlled char
chars special abilites:
- Boy (Randi) = he's not capable of casting magic, but delivers more powerful attacks.
- Girl (Primm) = she is a typical support character, casting mainly defensive and healing spells while her combat ability ranks about average.
- Sprite (Popoi) = his specialty in battle is attack magic, allowing him to deliver devastating amounts of damage from a safe distance. His attack, defense and HP are the lowest of the team and he learns special attacks with weapons very slowly.
weapons special uses:
- spear = the strongest weapon you will get in the game, so strong that a fully- charged attack sends monsters flying.
- whip = attach to ground pegs and cross gaps
- axe = can be used to mow down rocks/stone that are blocking your path
basics:
- visit the inns in villages often to restore the party health and MPs.
- talk to Watt in villages to levelup your weapons (each weapon req. a specific orb obtained from a boss or found in a chest).
- status effects can be cured by using a Medical Herb (item) or by using Remedy (spell, Undine).
sources:
sources:
VB
Virtual Boy Wario Land
controls:
Control Pad left/right = move
Control Pad down = duck (press d-pad left|right to crawl)
L | R = dash -> destroy some blocks
A = jump, swim (press d-pad down in midair to body slam)
B = attack, throw
powerups:
- Viking helmet -> body slam will destroy blocks beneath Wario
- Eagle statue -> hold A when jumping to fly. Attack with B.
- Dragon crystal -> press B to breathe fire
basics:
- every level has a key to get to the next level.
- there are treasures in levels: 1, 2, 3, 5, 6, 7, 9, 10, 11, 13.
- the Eagle statue and Dragon crystal powerups can be combined -> King Dragon Wario
- last level: 14
cheats:
- level select: press A, B, A(2), B(2) at the main menu.
sources:
N64
controller ASCII art:
| |
_,.-'-'-.,_
______| |______
,-' | NINTENDO | `-.
,' _ `.
/ _| |_ (^) \
| |_ _| (<) (>) |
\ |_| (S) (B) (v) /
|`. ___ (A) ,'|
| `-.______ ,' _ `. ______,-' |
| | `. | (_) | ,' | |
| | \`.___,'/ | |
| ! | | | |
| / | | \ !
\ / | | \ /
`._,' \ / `._,'
\ /
`._,'
to access the buitin mempak saves manger:
press Start when a game is booting up https://www.dkoldies.com/blog/get-access-to-your-n64-game-memory-pak-files-in-this-hidden-screen-/
Super Smash Bros.
sources:
Paper Mario
sources:
Mystical Ninja Starring Goemon | Ganbare Goemon: Neo Momoyama Bakufu no Odori
sources:
Goemon's Great Adventure (U) | Mystical Ninja Starring Goemon 2
sources:
Donkey Kong 64
sources:
Conker's Bad Fur Day
sources:
Rayman 2: The Great Escape
controls:
Control-Stick = move, run
A = jump, climb walls, swim up (tap repeately)
A (in midair) = helicopter flutter (press again to stop and fall)
B = shoot
Z = target enemy, reset camera behind, dive underwater
Z (hold) + Control-Stick = strafe/move sideways -> avoid enemy fire
C-up = switch camera angle
C-left|right = rotate camera
C-down = reset camera behind
L = check guide
R = switch OSD display
basics:
- collect yellow Lums to unlock new abilities and entry to new worlds
other special lums:
- super yellow lums = Ancient recognisable by their larger size and big smiles. They are five times more powerful than Yellow Lumz.
- red = restore life bar.
- purple = by shooting them, Rayman can grab onto them and swing from one to another, thereby crossing vast areas without touching the ground.
- blue = restore Air Gauge when moving under water.
- green = acts like checkpoints
- silver = give new abilities to Rayman
- collect Power Fist to increase the level of shots up to 3 (check the yellow icons in the top-left).
- breaking 10 cages increass Rayman's Life Bar.
- to save press Start in the Hall of Doors.
- last level: 19 THE CROW's NEST
sources:
Cruis'n USA
controls:
Control Stick | d-pad left|right = steer
Z = accelerate
L | R = brake
d-pad up|down | C-up|down = manual shift up|down
C-right = switch OSD
A = switch camera
B = switch music
basics:
- easier car: '63 Muscle Car
- in "CRUISE THE USA" mode you must finish in 1st place to advance to the next race.
If you fail and choose not to continue, you can retry the last race later from the main menu (your progress is saved automatically).
If you beat all the races, you will "upgrade" your car.
- to avoid losing speed, do not race offtrack, or touch other vehicles from behind (avoid the opposing lane on the left).
- last race: WASHINGTON DC
sources:
Cruis'n World
controls (PRESET 1):
Control Stick | d-pad left|right = steer
A = accelerate (double tap to Pop A Wheelie -> faster acceleration)
B = brake
A + B = drift
C-down = turbo (check the counter in the bottom-left)
C-left = switch BGM
R = gear down
R + A = gear up
C-up = view in
C-right = view out
L | Z = horn
basics:
- easier car: BANZAI GTV (no neeed to drift)
- last track: FLORIDA (WORLD CRUISE)
sources:
Cruis'n Exotica
controls (CONFIG 1):
Control Stick | d-pad left|right = steer
A | L = accelerate (double tap to Pop A Wheelie -> faster acceleration)
B = brake
Z = N2O boost ()
C-right = camera switch
R = switch BGM
C-left = horn
d-pad|C up|down = up|down shift
basics:
- place 3rd or better to advance in Exotica Mode.
sources:
Star Soldier: Vanishing Earth
controls (MOVE=control pad):
d-pad= move
A = normal attack
R = roll -> repel bullets + temp. invicibility, use often
B = multi-directional bomb (check the "Ex" counter in the top-right, collect the green "E" boxes to restock)
L = frontal bomb (check the "Ex" counter in the top-right, collect the green "E" boxes to restock)
C-down = switch speed + backfire attack (check the "MID" label in the top-left)
C-up = toggle HUD
basics:
- easier ship: ??
- collect 3x yellow "P" boxes to incr. your main weapon power (check the "Lv 1-0" counter in the top-right).
- last MISSION: 6
sources:
Viewpoint 2064 (prototype)
controls:
Analog Stick = move
A = shoot, hold for LOCKON missiles (up to 8)
R (hold) = frontal shield using the option (unlimited use, but cannot shot while in use) -> any blocked shots are absorbed into the energy meter
B (when the blue ENERGY meter in the bottom-left is full) = wave cannon (absorb shots with R to refill)
basics:
- taking hits will deplate the orange "SHIELD" meter on the bottom-left. Take "S" stars to refill.
The shield is also refilled after each stage.
- there are 3 powerups with the fire, lightning, and ice which orbit the players ship.
The power ups are called "OPTIONS" like in R-Type, and you can switch between them via pickups.
Each powerup increases firepower and blocks shots on the side.
The Fire and Lighting power ups function properly, but the Blizzard power up does not change the shots at all, and the player fully invincible instead of anything ice-related.
The side shields can also be moved in front of the player ship and can block incoming fire, but prevents players from shooting.
- at the end of each stage, are prompted to select a new branching stage.
To see all 3 endings play the last stages in this order: ..., 14, 11, 13.
sources:
GoldenEye 007
controls:
TODO
sources:
Rakuga Kids
controls:
TODO
sources:
Yoshi's Story
controls:
Control stick = move, swim, push, duck
A = jump
A (hold in midair) = flutter jump
A, Up, A (hold) = higher jump
Control stick down (in midair) = ground pound (stun some enemies or change their colors, reveal secrets, etc.)
B = lick (can be combined with a direction)
R = sniff (look for hidden places in the ground and/or air. Then ground pound on them.)
Z = aim and throw eggs (bring up the aiming cursor, aim with the control stick and then press Z again or B to cancel. The egg will not go beyond the "X")
L = toggle fruit frame
Start = pause and check current stage scores
Yoshis favorite fruits:
- all = melons, today's lucky fruit
- green = water melons
- yellow = bananas
- red = apples
- pink = apples
- blue = grapes
- light blue = grapes
- black = anything, including peppers
- white = anything, including peppers
basics:
- collect 30 fruits to clear each course (check the fruit frame or the pause screen to see how many left).
- conserve your eggs. Instead of using an egg to defeat a baddie try a hop, or a stomp, or a lick.
- try to eat only current Yoshi's favorite fruits and enemies colors.
- eat the same fruit/enemy in series for more points. Eat 6 melons in series to make any Yoshi super happy (invincible).
- avoid collecting coins (mostly useless).
- when an egg hits a wall or the "X" it will explode and cause a small radius of fire.
The radius of the explosion is caused by how healthy you are.
sources:
Wipeout 64
controls:
Control stick = steer
A = accelerate
B = fire current weapon (check the icon in the top)
Z | R = left|right air brake -> makes sharp turns easier but slow you down, so use them sparingly
C-down = drops current weapon
C-up = change camera
basics:
- best vehicle: AG Systems
- drop any Autopilots you get (won't steer you around mines)
- turbo boosts are best saved for the checkered area near the end of each lap.
- if you have a shield, wait until you hear that voice say something and then use it immediately.
sources:
Wave Race 64
controls:
Control Stick left|right = steer (move towards the bottom for a sharper turns)
Control Stick up|down = shift your weight -> ...
A | Z = accelerate
B = brake (avoid bouncing when you hit a big wave)
R = slide (perform sharp turns)
C-left|right = turn camera left|right
C-up|down = camera zoom in|out
basics:
- best watercraft: M. Jeter
- the small number next to your current position ("Rank") is the required position to advance to the next race in the championship.
- to do a quick start press the A button as the light turns green at the start of a race.
- do not miss any ring to avoid slowdowns. If you pass a buoy correctly, your engine's power will increase by one level, and your JET SKI watercraft‘s speed will increase. If you miss more than 5 the race is over.
- shift your weight backwards for longer jumps and perform more stunts.
sources:
Tsumi to Batsu: Hoshi no Keishousha | Sin and Punishment: Successor of the Earth
controls (type 2):
Control Stick = aim the crosshair
d-pad|C-left|right = strafe left|right
2x d-pad|C-left|right (double tap) = roll (good to avoid attacks)
d-pad|C-up = jump (press again to double jump)
Z = shoot
Z (tap near enemy or projectile) = sword attack -> more powerful than distant shooting and can also be used on some projectiles (Counter Attack)
L | R = toggle aiming mode: manual (red) and auto lock-on (blue-inactive & yellow-active) -> prefer manual aiming mode which shoots considerably more powerful shots.
basics:
- to reset your time limit defeat a Commander (mini-boss or swarm leader) and get a "Commander Bonus".
- last stage: 3-3
sources:
Star Fox 64
airwing controls:
Control Stick = move, aim lasers (inverted Y axis)
A = fire lasers
A (hold) = charge homing blast (release it when it locks on)
B = fire Smart Bombs (press B again quickly to detonate them early) (can be combined with lock on)
C-Left = boost forward (consumes the boost gauge)
C-Left + Control Stick Down = somersault
C-Down = brake (consumes the boost gauge)
C-Down + Control Stick Down = U-turn (only in all-range stages)
R | Z = tilt right|left (press twice to do a barrel roll)
C-Right = receive supplies from ROB64 (when the icon appears on the center-top of the screen)
C-Up = change the camera
Start = pause and check teammate damages
landmaster-specific controls:
R+Z = hover for a limited time
blue-marine-specific controls:
B = fire Homing Torpedo (infinite, but can only fire another after the previous one hits)
powerups:
GOLD RING: Collect 3 of them to increase your life gauge. Collect 3 more for an extra life.
SILVER RING: Refills your life gauge a little.
SILVER STAR RING: Refills your life gauge a lot.
...
basics:
- barrel rolls are good to avoid enemy fire and for narrow passages.
- somersaults are good to avoid incoming enemies from behind
- preserve bombs for boss battles. Always throw them with lockons.
- easiest route to choose: all the way to the right (Corneria - Meteo - Fortuna - Sector X - Titania - Bolse - Venom 1)
sources:
Mischief Makers | Yuke-Yuke!! Trouble Makers
controls:
d-pad left|right = move
d-pad down = duck, check clanpot
A = jump
A + up = higher jump
A + down = slide
B = grab, release, throw, defend (can be combined with a direction)
C left/right | d-pad left/right twice = dash (stronger if executed with the dpad)
C down | d-pad down twice = roll (enter in narrow paths)
C down | d-pad down twice (holding object) = shake object
C up | d-pad up twice (in midair) = hover
L | R = speak (press again to advance text)
Z = skip movies
gems:
- red = adds to red gem count (collect 10 to guy a countinue)
- blue = restores a small amount of health.
- green = restore a large amount of health.
- gold = adds to gold gem count. Used to view more of the ending cutscene.
basics:
- to clear most stages you must find the big Blue/Green star.
Smaller red stars act as warp gates inside the level instead
(some will appear only after some objective is completed)
- use sliding (A+down) on the ground and dashing in the air.
- try shaking everything you can grab.
- best attack method is grab and throw.
- to jump using the clanball, first grab it. Then press the direction you want to jump and B.
- last world: 5
sources:
Kirby 64: The Crystal Shards
controls:
C-Stick left|right = walk
2x C-Stick left|right = run
C-Stick up = climb up ropes, ladders, chains, etc.
C-Stick down = squat down, swallow enemy/item inside your mouth
C-Stick down + A = slide kick attack
A = jump (press while in the air to fly), swim underwater
B = inhale, spit out, use current ability
C | L | R = get rid of current ability, hold enemy/item over your head (press again to throw straight up)
Start = pause and view current abilites
basics:
- to obtain a power combo:
- press C | L | R and throw the star to the enemy, or make him touch the star.
- spit out an enemy to another
- inhale 2 enemies at the same time (more difficult)
- best power combos:
- fridge(electric and ice) attacks with food which you can eat,
- light saber(electric and spike) kind alike darth muals light saber, is a fast powerful sward type weapon,
- burning sword (fire and spike) it's a huge ass sword you can swing or toss at enemies,
- shurikan bombs or spikey mine (bomb and spike or cutter) throws shurikans that stick to surfaces and enemies, then explodes, or turns into onna those floating spikey creatures,
- ice flake (ice and ice) turn into giant snowflake that stabes enemies who get to close,
- drill (earth and spike) drill that drags you along till you release attack whcih fires it at enemies,
- boulder(rock and rock) turns into giant rock that can roll along the ground, makes you imortal to enemies,
- magnet rock (electric and stone) throws a boulder ala yo-yo at enemies
- in stages there are special colored blocks which require a specific ability to be destroyed:
- Bomb = Black
- Burn = Red
- Cutter = Green
- Ice = Blue
- Needle = Orange
- Spark = Yellow
- Stone = Brown
- last world: Ripple Star
sources:
F-Zero X
controls:
Control Stick left|right = turn
A = accelerate
B = boost (enabled after the 1st lap, uses energy)
C-down = brake
Z | R = shift weight (good for heavy turns)
2x Z | 2x R = side attack
R + 2x Z | Z + 2x R (hold one button and press the other twice) = spin attack (good to attack a group of cars)
L = switch lead indicator on/off
C-up = look behind
C-right = change view
basics:
- to have a better start start holding the accelerator just as the announcer says "Go!",
- for deep turns, letting go of the accelerator is always good. Braking is seldom necessary, but don't forget that your brakes are there.
- don't overturn at high speeds. You'll lose your grip. Move the stick over slowly, not sharply.
- if you lose your control of the car, let go of the accelerator very briefly.
- a bump from behind gives you a nice boost of speed, and costs very little energy.
This can go the other way as well, so don't hit someone else from behind.
- while you're in the air, going down gives you speed, but the air gives
less resistance than the track. Try to go diagonally forward and down.
Remember to straighten yourself out before landing.
sources:
Extreme-G
controls:
...
cheats (enter as name):
- RA50: exit the race when in first place to win
- ARSENAL = Eeapons Code
...
sources:
Extreme-G XG2
controls:
Analog Stick = steer
Z = accelerate
B = brake
R (hold) = Quick Turn
A = Fire Maxi-Bolt (hold to charge)
C-down = nitro
C-right = Activate Pick-Up
C-left = Drop Pick-Up
C-up = Reverse View
L = Screen-In-Screen Reverse View
d-pad up|down Zoom In|out Camera
basics:
...
cheats (enter as name):
- Level Skip (While racing pause the game & quit): RA50
- No Fog/Pop Up: PIXIE
- Overhead view: SPYEYE
- Random Course in time trails: JUGGLE
- Remove an Engine: MISPLACE
- Removes all forms of meters, gauges, and panels from the screen: NOPANEL
- Tron Mode: NEUTRON
- Unlimited Nitro: NITROID
- Unlimited Weapons: MISTAKE
- Venom Bike: 68QCMH3H9HT
- Wasp Bike: 55HZ1MH3H9H1
- Your bike will get an extra boost of speed and acceleration: XCHARGE
cheats (enter as password):
- Every Level, Bike and Duel Mode Unlocked: 27PVNM6F45S1
- Master code/all tracks,bikes,and riders: 6D3HXM6F45sQ
sources:
Diddy Kong Racing
controls:
Analog Stick = steer
A= accelerate
B = brake
Z = fire weapon, horn
R = powerslide (car), turn sharply (plane and hovercraft)
C-up = toggle camera
C-right = toggle radar/speedometer
C-down = toggle race info
basics:
- boost start: press A just before the announcer says 'Go'.
- collect 10 bananas to increase your top speed.
- collect colored balloons to get an item: red=missiles, blue=speed boosts, green=dropper, rainbow=magnet.
- Super Boost: before landing on a zipper or using a blue balloon, let go of the acceleration button to get a much stronger longer lasting boost then normal.
- Get the 4 original trophies, to unlock the secret world. In this world, get all the baloons, and the final trophy. (Giving you 47 baloons, and 5 trophies). Take on Wizpig (the one in the fifth world, future fun land).
When you win, you'll unlock the ''Adventure Two'' option. In this mode, you collect silver colored baloons, and all the courses are mirrored. In addition, you can now choose to play a course in ''Adventure'' or ''Adventure 2'' mode, in the track mode.
cheats (enter in the cheat menu):
- Adds Music Test to audio menu: JUKEBOX
- All balloons are blue: ROCKETFUEL
- All balloons are green: TOXICOFFENDER
- All balloons are rainbows: OPPOSITESATTRACT
- All balloons are red: BOMBSAWAY
- All balloons are yellow: BODYARMOR
- Bananas slow you down: BOGUSBANANAS
- Changes horn sounds: BLABBERMOUTH
- Computer is better: TIMETOLOSE
- Display ROM Checksum: DODGYROMMER
- EPC lock up display: EPC
- Four wheel drive: OFFROAD
- Free Balloon: EOLAOBFENRLONE
- Fully powered-up balloons: FREEFORALL
- Large players: ARNOLD
- No bananas in multiplayer mode: NOYELLOWSTUFF
- No zippers: ZAPTHEZIPPERS
- See Credits: WHODIDTHIS
- Small players: TEENYWEENIES
- Start with 10 bananas: FREEFRUIT
- Two players can use the same character: DOUBLEVISION
- Two-player Adventure: JOINTVENTURE
- Unlimited bananas: VITAMINB
- Weapons disabled: BYEBYEBALLOONS
sources:
AeroGauge | Aero Gauge
controls:
Analog Stick = steer, fly up and down
A = accelerate
B = brake, reverse
C-Down = change the camera view
Z (hold) = drift while turning
basics:
- for a quick start, hold A + B before the race begins. Release B immediately after the commentator says "Ready".
cheats:
- All Tracks & Vehicles (USA Version): at the title screen, when the words "Press Start" appear on the screen, hold L + R + Z on controller two. Now, while holding those buttons, press and release Up + C-Down on controller two. Then, press Start on controller one before the title screen disappears.
- Unlock all cars: highlight a car and press L,R,C-Up,Down,Right,Left
- Car Adjust option: go to option menu and hold L and R,then press Analog-stick's Up,Left,Down,Right three times on controller one.
sources:
Bakuretsu Muteki Bangai-O
controls (3D Stick Shooting mode):
d-pad = 8-way move
2x d-pad = dash
Control stick | C buttons = 8-way shooting
L = switch between Riki and Mami mode
Z | R = special shot (uses up 50 Special Power points, regardless of how many bullets are fired)
A = thrust, same as up (not very useful)
B = directional shoot (not very useful)
Riki mode (blue-hair guy):
- "Attack" mode. Best used in wide-open areas.
- shots home in on enemies shortly after being fired.
- shots disappear when they hit a wall.
- enemy fire destruction ability is low.
- shots have high damage (125% of Mami's firepower)
Mami mode (red-hair gal):
- "Defense" mode. Best used in narrow areas.
- shots home in on enemies only after hitting a wall.
- shots rebound when they hit a wall.
- enemy fire destruction ability is high.
- shots have lower damage (80% of Riki's firepower)
menu translation:
Begin Playing
Options Menu
Sound Test
Record Erasure
3D Stick Shooting (default) | Movement
Missile tracks (must be unlocked)
Return to the Main Menu
basics:
- fruit are used to charge your special weapon. Fruits are obtained by destroying stuff:
- best stuff to destroy are cars.
- best fruits are watermelon and pineapples.
- red doors are one-way doors.
- blue doors open when you have destroyed a certain enemy or enemies.
- leep holding the special shot button and wait until the last second before firing.
The more incoming missiles/bullets about to hit you, the bigger your bullet count on the Super Shot.
-
Combo Service Stations: when you destroy 100 or more enemies with a single shot, special shot, or
while invincible, a combo meter will pop up behind your robot and display a counter.
Once your combo stops, a yellow vortex will appear where your character is.
Enter this vortex to power up your robot thanks to Level no Okan.
You will be presented with several options, depending on how large your combo was.
You can power up "n" levels, where "n" is your combo size divided by 100 (rounded down).
The available powerups are:
Shot Damage n-Up
Shot Penetration n-Up
Life n-Up
V (only shown as an option in 500+ combos)
Points (n X 10000)
- last stage: 44
sources:
Banjo-Kazooie
controls:
Control Stick = move, run
A = jump (hold to jump higher), swim, fly, use flying/spring jump pads
B = attack, roll (while running), dive underwater
A, A = flutter (long jumps)
A, B = air attack
Z = crouch
Z, A = backflip -> the highest jump possible, use to reach high places
Z, B = Beak Barge -> smash obstacles
A, Z = ground pound -> smash obstacles, activate switches
Z (hold) + C-left = Talon Trot -> run up climb steeper slopes, run faster, can't attack in this position
Z (hold) + C-up|down = egg firing
Z (hold) + C-right (req. Golden Feathers) -> temp. invincibility
C-up = first-person view
C-down = change camera zoom
C-left/right = rotate camera
R = reset camera behind
transformations:
Termite Can stick to steep surfaces that Kazooie cannot
Crocodile Can attack by biting, wade through the piranha infested waters, and play the Mr. Vile's mini-game.
Walrus Can swim in frozen water, race Boggy for the first time, and allows you to enter Wozza's Cave
Pumpkin Can squeeze through tight spaces
Bee Can fly anywhere and land on plants Banjo can't step on
basics:
- when falling from higher heights, use the Flutter just before you hit the ground to save some health.
- collect Mumbo Tokens (req. to transform in the Mumbo's Hut). Ignore musical notes and Jinjos (not essential).
Most transformations cannot attack, and most of them can walk underwater with no need for air.
sources:
Banjo-Tooie
controls:
TODO
transformations:
World Transformation Unique Abilities Spell Usage
Isle O' Hags Dragon Kazooie Can enter any world, allows Fire Breath and infinite Fire Eggs Heal Heals the sick Styracasourus
Mayahem Temple Stony Can play kickball (both here and in Hailfire Peaks), can understand other Stonies Summon Controls the Golden Goliath
Glitter Gulch Mine Detonator Can detonate TNT bundles, can deal damage by self-destructing CAUTION- Doing this deals also 1 unit of damage to self!(can't self-destruct if only 1 unit of health remains) Levitate Lifts up heavy objects
Witchyworld Van Can pay for attractions, can open special doors, can kill enemies by running into them Power Powers certain rides
Jolly Roger's Lagoon Submarine Can withstand extreme pressure, can fire torpedoes Oxygenate Makes water breathable
Terrydactyland T-Rex Can talk to other dinosaurs, can open certain doorways (Baby T-Rex) Enlarge Makes things bigger Can scare away tough cavemen, kill enemies by running into them or by roaring (Daddy T-Rex)
Grunty Industries Washing Machine Can enter mechanical-personnel doors, can wash clothing, can damage enemies by shooting Banjo's briefs (underwear) EMP Disables equipment
Hailfire Peaks Snowball Can grow and recover health by rolling in snow, can kill enemies by rolling fast into them Life Force Revives dead people
Cloud Cuckooland Bee Can fly, can shoot eyeball-piercing stingers Rain Dance Causes plants to grow and rainbows to form
sources:
Chameleon Twist
controls:
Control-Stick = move, control tongue
A = jump, talk
B (hold) = unroll tongue, spit many enemies (attack)
Z = tongue-stand (hold for higher), spit single enemy (attack)
R = aim nearest target
L = switch camera
C-up|down = camera zoom in|out
C-left|right = rotate camera
special moves:
- quick rotation: when Davy grabs a stake with his tongue, press A while holding B to make him wing around the stake. Press Control-Stick to determine the direction he rotates.
- tongue high jump: run, hold Z and press A.
- tongue guard: rolling your tongue around your body.
basics:
- last stage: 6 Ghost Castle
sources:
Snowboard Kids
controls:
Control-Stick left|right = steer
A = jump
A (hold) = crouch (release a press some direction patterns to do a flip)
Z = use weapon (if you have it in the 1st box)
B = use item (if you have it in the 2nd box)
any C (in midair) = grab your board and perform tricks
basics:
- best characters: Slash
- quick start and recovery: if you hit a wall, get hit by an item, or stop moving for some other reason
tap A lightly a couple of times get get moving again.
- collect coins to buy item (and weapons) from blue (and red) boxes all over the course.
If you don't have enough coins to buy an item and run into the box you'll slam into it as if it was a solid object.
The remaining coins can be used to puchase special boards from the board shop.
- after a player enter the gate to the chairlift there's a few seconds where it
cannot be used again. This is indicated by a small red light next to the gate.
- for sharper turns press the stick south-west or south-east.
sources:
Castlevania 64
controls (default Type A):
Control-Stick = move, run
Z = crouch (press while running to slide and damage some enemies. If you keep Z pressed you can also walk crouched)
A = jump (keep hold to grab ledges in midair, then press Control-Stick up to climb)
B = distance attack (Carrie can charge homing energy balls by holding down the button for a while)
C-Left = short-range attack
C-Down = item attack (consumes Red Jewels, check the counter in the upper-right below the weapon icon)
C-Right = pick up items, open doors, interact, check
C-Up = change camera, look around
R (tap) = lock on nearest enemy, reset the camera behind
Start = pause and use items
basics:
- best char: Carrie (has homing energy balls as distance attack)
- best weapon: Cross
- collect GOLD to buy stuff from the merchants (check the Contract scrolls on the floor to see them).
- always keep a stock of Purifying Crystal and Cure Ampules to cure from the VAMP and POISON STATUS respectively, or you will die after a while (check your STATUS in the upper-right).
- use sun/moon cards to switch time of day (6:00 a.m./p.m., check the clock in the top-left)
- "Power-up" items will increase the level of your distance attack (up to 3).
- check White Jewels to save your game (there is no autosave or checkpoints).
- last stage: 5 (Easy), 10 (Normal)
sources:
Jet Force Gemini
controls:
Control-Stick = move
...
char abilities:
- Juno = lava walking (without losing health)
- Vela = swim and dive underwater for an unlimited amount of time.
- Lupus = brief midair hovering. -> can cross large gaps
basics:
sources:
Last Legion UX
controls:
Control-Stick = move
A = jump (press again to double jump)
B = fire Primary Weapon (Hold B to charge certain weapons)
C-Left | Up-C = fire secondary weapon
C-Down = Lock-On
R = 8-way fast strafe (gloat anywhere fast, but you can't turn)
Z = block
A+B = melee attack
Z+B = super attack (can be used in air, and I recommend doing so with most)
Z+A = Instant Kill (rips out opponent's power core, hard to connect with)
Start = skip dialog (you will press this more than you can possibly imagine)
basics:
- Story mode is arcade mode in any other fighting game. 1P mode in the menu is just a standard 2-player mode where both players can select their char.
- best robot: Bebaion?
- best strategy: hold down R pretty much always, and release when you need to turn. Double jump and aim often.
- some of the secondary weapons sound cooler than they are, because they're often easy to dodge if your opponent has any degree of speed or skill.
sources:
WSx
Kaze no Klonoa: Moonlight Museum
controls (horizontal):
Y-pad = move, enter doors, read signs
A = use yoyo -> grab enemies, activate switches, etc. (press again to throw them)
B = jump (hold to flutter) (press again while holding an enemy to double jump and throw it stragiht below you)
basics:
- getting hit will deplete the hearts on the bottom-left. Collect the same icon to refill.
- there are 3 Star Fragments in every VISION/level which must be collected to open the star door and proceed to the next one (check the small icons in the bottom-center).
- in every single level, there are 30 gems you can collect. A ruby is basically a large gem, and when you collect one, it counts as 5 gems (check the "0/30" counter in the bottom-right).
- last VISION/stage: 5-6
sources:
Judgement Silversword: Rebirth Edition
controls:
Y-pad = move
X1 = Wide shot
X2 = Linear shot (narrow, deal more damage) (can be combined with Wide shot by holding X2 and tapping X1) -> use against stronger enemies
X4 = activate frontal Shield (req. the blue "%" counter in the bottom-left, decrease when absorbing bullets, but not when touching enemies. Replenishes when not in use)
basics:
- the ship's hitbox is that small square in the very center of its sprite.
- try to take out enemies as quicly as possible to reduce bullets flying on the screen.
- there are no powerups. you can only grab 1UP/Extends refills dropped by enemies, which also gives you temp. invicibility.
- stages are very short in the beginning, increasing in length and difficulty as the game progresses. They connect to each other seamlessly as you clear successive waves of enemies and fight the "JUDGES" bosses.
- last AREA: 31 (do not use any credit to access it)
cheats:
- Unlock all setups (incl. a stage select): enter set up menu, then "information", then enter the following code: Start (8 times), Y3, Y2, B, Y1, Y4, Y3, Y4, A, B, Y2. A sound will confirm the code and all setup bonuses will be unlocked, such as debug-shot, stage select and more.
sources:
GBA
soft-reset combo:
Start + Select + A + B
Motocross Maniacs Advance | Maniac Racers Advance
controls:
d-pad = roll -> use only for landing
A = accelerate
B = use Nitro (check the "NTR" counter in the top-left, collect "N" items to restock) -> use on ramps, over enemies and obstacles
L = use item (check the icon in the top-right)
R = brake -> not very useful, just release the accelerator
basics:
- CHAMPIONSHIP is the main game mode, where you can unlock stuff.
- your race will end if you run out of GAS (check the meter in the top-right). Collect Gas canisters on the track to refill.
- the higher parts of the track are usually faster and have less obstacles to avoid.
- ignore the loops if you do not need to refill Nitros or Gas.
sources:
Iridion II
controls:
d-pad = move
A = shoot
B = spend the last blue powerup orbs you pick up to either enable a new weapon for use, or levelup the weapon(s) you already have (up to 2 times)
L | R = switch current weapon (check the icons in the top-right)
Select = locks the drones in place
basics:
- before each stage you can choose a single weapon to start with. More weapons can be enabled by picking blue capsules items.
Best weapons: green one
- getting hit will deplete the circular blue gauge on the top-left. Collect rare "E" items to refill midstage.
- last stage: 14
passwords:
- Unlock Arcade and Challenge Mode 4RC8!
- Show secrets !S3CR3TS!
- rotating satellites !R0T8!
sources:
Mario vs. Donkey Kong
controls:
d-pad = move, climb ladders
A = jump
B = pick up an item
Advanced Controls:
- Handstand: Down + A
- Handstand Jump: While in handstand, press A
- Double Handstand Jump: After first jump, hit A when touching the ground
- Backflip: Back (Left/Right, depending on direction facing) + A
- Wire Grab: Jump + Up
- Wire Swing: Hold Up, A to jump
basics:
- regular stages are comprised of 2 sections, in the 1st you have to grab and bring the key to the locked door, in the 2nd you only have to reach the bubble trapping a Mini Mario and grab it.
Collecting 3 colored boxes along the way will then let you play a bonus game for extra lives.
The last 2 stages in each world are special: in the "M" stage you have to guide the mini marios to the toy box and grab it, while the "DK" stage is a boss fight where you have to hit Donkey Kong 3 times with a barrell.
- last world: 6
sources:
Pinobee: Wings of Adventure | Pinobee no Daibouken
controls:
d-pad left|right = walk
d-pad up = hover (when on ground), climb up walls (when attached)
d-pad down = crouch (when on ground), descend (when hovering), climb down walls (when attached)
A = jump (press again in midair for a Flying Dash + aim with the d-pad, check the "Dash!!" counter on the left. You must land on the ground or attach to a wall to reset)
Start = pause and check the collected ITEMS
basics:
- attack enemies by either jumping or dashing on them. Also do not touch the water as it will damage you.
- getting hit will deplete the "LIFE" gauge on the bottom-left.
- collect pink flowers to increase the "ENERGY" counter on the top-left, affecting movements speed.
- collect small red "?" capsules to get: LIFE refills, temp. powerups, flowers, and an numbered card suit that will increase your stats when you complete a set (check in the "ITEMS" pause menu. When the screen is full you wont be able to get more items, so start dropping them according to the EFFECTs you want to obtain).
- big crystals found in stages acts as checkpoints.
- to finish a stage you must touch a rounded portal with lights.
Futuristic telepods will warp you to another part of the current stage instead.
- every time you finish a new level, Pinobee writes in his diary.
Many levels have some extra task to perform, like activating a switch, rescuing some crickets, popping a bubble with a seed in it, etc.
The way the game judges how well you completed the level is a Pinobee Head at the top-right of the Diary Entry Screen.
All the stages also have an amount of "Golden Enemies" to dispatch.
The diary tells you what you missed, so that you can go back and perfect your work.
To get the happiest ending, you must have all 27 diary pages happy (Pinobee with a wide smile).
- last STAGE: 27
sources:
controls:
d-pad = move, crouch, aim up and down
A = jump
B = fire current weapon (special weapons have limited ammos, check the "ARMS" counter in the top-left) (hold to autofire if enabled On the FILE SELECT screen), melee attack (near an enemy)
R = throw a grenade (on foot), Fires cannon/missile (inside a vehicle) (check the "BOMB" counter in the top-left)
L (when inside a vehicle) = kamikaze attack
basics:
- there is no gameplay difference between Walter and Tyra.
- getting hit will deplete the green "LIFE" gauge on the top-left. Collect food to refill.
- collect CARDS dropped by prisoners to get upgrades (some are permanent and equipped automatically, some are optional).
Check the collected cards with their effects in the "BASE CAMP" menu.
- last MISSION: 5
sources:
Sonic Advance
controls:
d-pad = move, crouch, look above|below
A = jump (press again in midair for a char-specific move)
B = attack (char-specific)
basics:
- easier char: Tail (can fly by tapping A in midair)
- each of the normal Zones contain 2 Acts: Act 1 is completed by passing a signpost and Act 2 is completed by defeating a boss.
- each normal Zone contains 1 big Special Spring, which leads to a 3D Special Stage.
Grab enough rings to collect a Chaos Emerald. Rescue the floating Chao to earn a Continue.
- beating a stage in the "MAIN GAME" mode with a char will unlock the same stage in "TIME ATTACK" mode with the same char.
- last Zone: 6 (find all Chaos Emeralds to accesss the Final Zone)
sources:
Sonic Advance 2
sources:
Sonic Advance 3
sources:
Metroid Fusion
sources:
Metroid: Zero Mission
sources:
Klonoa: Empire of Dreams | Kaze no Klonoa: Yumemiru Teikoku
basics:
- in every world, the 4th stage is a snowboard , and the 6th is an autoscrolling. beat both to access fhe boss.
sources:
Klonoa 2: Dream Champ Tournament
Kirby: Nightmare in Dreamland | Hoshi no Kirby: Yume no Izumi Deluxe
Kirby & The Amazing Mirror | Hoshi no Kirby: Kagami no Daimeikyuu
sources:
Konami Krazy Racers | Konami Wai Wai Racing Advance
sources:
Mario Kart: Super Circuit
Mario & Luigi: Superstar Saga
sources:
https://archive.org/details/NintendoGameBoyAdvanceManuals/Mario%20%26%20Luigi%20-%20Superstar%20Saga%20%28USA%2C%20Australia%29
Legend of Zelda: The Minish Cap
sources:
F-Zero Climax
controls (TYPE1):
d-pad left|right = turn
d-pad up = brake
d-pad down (while jumping) = coast -> avoid losing speed when landing
A = accelerate -> hit rapidly to quickly regain control
B = use boost (unlocked after 1st lap, press again to use the Super Boost icons on the bottom-right)
L|R = drift left|right
2x L|R = side attack
L+R = spin attack
L+R, B = spin boost
basics:
- best chars: Captain Falcon, Lucy Liberty/Elegance Liberty.
- to unlock the character profiles for all characters, complete the 'Challenge' option in Survival mode with your desired character.
sources:
Ninja Five-O | Ninja Cop
controls:
d-pad = walk, crouch, climb -> crouch to collect pickups from the gound
B = shuriken attack
R = katana melee attack (more powerful in midair)
A = jump (press again in midair to extend the grappling hook and attach to the ceilings -> use to reach higher platforms and swing across large gaps)
A + B = special attack (req. the green gauge on the top-left. Kill enemies or collect the blue lightning bolt to refill (the katana is more effective) -> temp. invincibility. Bomb attack if the gauge is full.
L (hold) = pause and use d-pad to look around
basics:
- getting hit will deplete the red bar in the top left and level down your shuriken attack. Collect hearts to refill the health, and yellow lightning bolt icons to levelup your weapon.
- destroy suitcases with your sword to obtain keys and open colored doors. Keys can also be held by enemies.
- the red door is the stage exit
- rescuing all the hostages provides a bonus.
- to wall jump, swing away from the wall first before jumping again, or you fall down.
- last MISSION: AIRPORT (EASY), LAUNCH SITE (NORMAL)
sources:
Castlevania: Circle of the Moon
sources:
Castlevania: Harmony of Dissonance
controls:
d-pad = walk, crouch
A = jump (hold for a higher jump) (press again to double jump if you have the Sylph Feather)
B = attack
d-pad up + B = sub-weapon attack (different if a SPEELBOOK is enabled, consumes the the MP blue bar instead of hearts)
d-pad down + L + R = quick turn on/off SPEELBOOKs
d-pad down + A = slide attack
d-pad down, up + A = high jump (if you have the Griffin's Wing)
L|R = dash left|right -> use often to avoid attacks and tap repeadetly to run
Start = pause and show the status screen
Select = show the map
basics:
- to destroy the orange stone blocks equip the Crushing Stone and use the charged attack.
- to destroy the orange stone blocks in the ceilings equip the Crushing Boots and use the high jump.
sources:
Castlevania: Aria of Sorrow | Castlevania: Akatsuki no Minuet
controls:
d-pad = walk, crouch
A = jump (hold for a higher jump) (press again to multi-jump after obtaining ability)
B = attack
L = use equipped ability, like BACKDASH
R = invokes a Guardian Soul (set using a BLUE SOUL, usually a special ability)
d-pad up + B = Bullet Soul Attack (set using a RED SOUL) (req. the the green bar in the top-left. Autorefills over time and by collecting hearts)
d-pad down + A = slide attack (after obtaining ability)
Start = pause and show the status screen (use items, equip gears and special abilites/Souls)
Select = show the map (red rooms are save points, yellow rooms are teleports)
basics:
- getting hit will deplete the red gauge on the top-left. Use potions or food to refill while in battle.
Save starions also refills your health and clear any POISON/CURSE status.
- Souls are obtained by defeating enemies and provides special abilities and attacks.
Souls come in 3 colors: RED (which are BULLET-type souls that you use by pressing UP + ATTACK),
BLUE (GUARDIAN-type souls that you use by pressing/holding R), and YELLOW (which are ATTRIBUTE-type
souls that are active whenever you equip them). You can equip ONE of EACH as you play.
- money can be spent at the castle entrance by talking to HAMMER. You can buy maps, weapons and more.
sources:
Gradius Galaxies | Gradius Advance | Gradius Generation
controls:
d-pad = move
B = fire main weapon
R = fire missiles
A = sets up powerups
basics:
- best ship: Type=B, Barrier=F-Field
- last stage: 10
sources:
Wario Land 4
controls:
d-pad = run, crouch, crawl, climb ladders, enter pipes, swim, pickup
d-pad down (on slopes) = start rolling in the direction of the slope -> pass under narrow passages
d-pad down (in midair) = ground pound (Super Ground Pound if from high in the air) -> kill most enemies and break blocks
A = jump -> jump over enemies to stun them
B = charge attack, throw (hold to charge throw and destroy blocks), swim faster (underwater)
R (hold while running) = dash attack -> break hard blocks
A, down = ground pound (do this high in the air to Super Ground Pound)
transformations:
- Fat Wario (eats an apple thrown by a monkey enemy) = a lot slower and can't jump very high at all, but after jumping, you will create a shockwave capable of breaking blocks. Wario can also break strong blocks and even kill enemies by running into them. It is cured by walking continuously.
- Yarn Wario (hit by a worm's string shot) = roll around and will not be able to control your movement until you hit a wall or sturdy object.
- Puffy Wario (stung by a bee) = cheeks will inflate to a giant size and he will begin to float. You can use this method to reach inaccessible areas. If you touch anything though, you'll deflate and fall back down to the ground.
- Flat Wario (crushed by some sort of heavy object) = when he jumps, he will slowly glide back down to the ground. By jumping, you can navigate past holes and glide right into narrow passages. It is cured over time.
- Bouncy Wario (hit by a hammer-wielding enemy) = his legs will turn into springs. Wario will be able to continuously jump until he hits some sort of ceiling. When you jump, you will stay in the air until you hit a ceiling; you can even smash right through blocks.
- Zombie Wario (touched by an undead enemy) = become very slow, but you can kill enemies just by touching them. Also, if Wario jumps, he will fall through platforms until he hits solid ground. It is cured by touching light or water.
- Vampire Bat Wario (hit by a vampire bat) = can fly by pressing A. It's useful for reaching high platforms. It is cured by touching light.
- Flaming Wario (touches any type of flame) = catch on fire and begin to run around. He is almost uncontrollable at this point, but you can determine where he goes. Wario can break certain blocks this way. It is cured by hitting three walls or coming in contact with water.
- Snowman Wario (hit by a snowball) = if steps on a slope, he will roll down and increase in size. He can break certain blocks this way. It is cured by hitting a wall.
- Frozen Wario (attacked by a Yeti's frozen breath) = freeze and become motionless. While you can't control Wario, he'll begin to slide across the ground. It is cured by hitting a wall.
recommended stage order:
- Emerald Passage
- Topaz Passage
- Sapphire Passage
- Ruby Passage
- Golden Pyramid
basics:
- getting hit will deplete the hearts in the top-left. Collect hearts to refill.
- to exit a stage you must press the frog switch and go back to the vortex entrance before the time runs out.
- in each stage you must find a key to unlock the door to the next stage,
and 4 Gem Pieces hidden to access the Boss of the current Passage/world.
Some of these will be only accessible after pressing the frog switch.
- in every Passage just before the Boss Room, there is a Mini-Game Room which has 3 games where you can earn Frog Medals to use in the Item Shop. Below is the list of games. When you went through a level, you collected gems which gave you a score. That score is the currency you use in the Mini-Game Shop.
- your game is always saved when you go back to a passage.
sources:
Mega Man Zero | Rockman Zero
controls (mode B):
d-pad left/right = move
d-pad up = talk, enter doors, interact
A = jump
B = use main weapon (hold to charge)
R = use sub-weapon (hold to charge)
2x d-pad | L = dash
recommended mission order:
- Intro Level (Underground Laboratory) - Get Z-Saber
- Save Reploid (Disposal Center) - Get Thunder Chip
- Destroy Train (Subway)
- Find Shuttle (Desert)
- Retrieve Data (Underground Laboratory) - Get Triple Rod
- Occupy Factory (Subway) - Get Flame Chip
- Rescue Colbor (Subway)
- Find Hidden Base (Desert) - Get Ice Chip
- Duel in Desert (Desert)
- Protect Factory (Subway)
- Stop the Hacking (Desert)
- Save Base from Mechaniloid (Resistance Base)
- Save Base from Hanumachine (Resistance Base)
- Neo Arcadia (fortress levels)
basics:
- if you choose "Give Up" after dying (or if you use the Escape unit), the current mission fails and you can never go back into it again.
- Cyber-elves are your main powerup in this game. You sometimes find them trapped in boxes (break the box to free them, then touch them to collect them) or by recovering chips or other parts from enemies.
Elves often must be "raised" by "feeding" them energy crystals. Usually, elves will perish when you use them, so they are a one-shot deal. Also, an elf which has a permanent effect (such as raising your maximum health) will give you a permanent deduction to your rank for the rest of the game once it is used.
You have to use the Trans Server to equip them.
- Chips are essentially items that you equip. They have different effects depending on the chip. Elemental chips give your weapons an Element which can burn, freeze, or paralyze enemies that are vulnerable to them. Each boss is more vulnerable to a single Element.
sources:
Mega Man Zero 2 | Rockman Zero 2
controls (mode B):
d-pad left/right = move
d-pad up = talk, enter doors, interact
2x d-pad left/right | L = dash
A = jump
B = use main weapon (hold to charge)
R = use sub-weapon (hold to charge)
recommended mission order:
- Hyleg Ourobockle (Rescue Reploids)
- Poler Kamrous (Destroy Computer)
- Panter Flauclaws (Supply Train)
- Phoenix Magnion (Destroy Power Generators)
- Mini-Stage (Residential Area)
- Burble Hekelot (Forest)
- Fighting Fefnir (Shuttle Factory)
- Sage Harpuia (Crystal Cave)
- Fairy Leviathan (Computer Zone)
basics:
- you don't download Cyber-elves using the Trans Server anymore. Instead, talk to Ciel and ask about Cyber-elves.
sources:
Mega Man Zero 3 | Rockman Zero 3
controls (mode B):
d-pad left/right = move
d-pad up = talk, enter doors, interact
2x d-pad left/right | L = dash
A = jump
B = use main weapon (hold to charge)
R = use sub-weapon (hold to charge)
recommended mission order:
- Blazin' Flizard (Use Thunder Chip)
- Deathtanz Mantisk
- Childre Inarabitta (Use Flame Chip)
- Devilbat Schilt (Use Ice Chip)
- (Missile Factory)
- Anubis Necromancess V (Use Ice Chip)
- Hanumachine R (Use Thunder Chip)
- Blizzack Staggroff R (Use Flame Chip)
- (Area X-2)
- Cubit Foxtar (Use Thunder Chip)
- Glacier Le Cactank (Use Flame Chip)
- Volteel Biblio (Use Ice Chip)
- Tretista Kelverian
basics:
- the Cyber-elf system has seen a great overhaul.
Elves are now classified into two groups: satellite and fusion.
Fusion ones work almost the same as from previous games.
Satellite elves are the ones that circle around you on the world map and are also from the previous games—however, the difference here is that you may use them as often as you like.
You can have up to two satellite elves active at a time. Additionally, some elves can be used even before they are fully "grown." If you choose to feed those elves, they increase in their abilities.
- certain blocks can be destroyed or pushed around with the Recoil Rod's charged attack.
- rebound jump: if you charge up and fire the Rod straight down, Zero will rebound off the ground higher than his jump (kind of like a pogo-stick). You can couple this with a dash to do a dash-rebound-jump (or something like that).
- you get life energy refills from nearly every enemy you defeat in cyberspace, so in some cases it can be helpful to go through the cyberspace version of a stage rather than the real world.
sources:
Mega Man Zero 4 | Rockman Zero 4
controls (mode B):
d-pad left/right = move
d-pad up = talk, enter doors, interact (hold to hang on rails and wires)
2x d-pad left/right | L = dash
A = jump
B = use main weapon (hold to charge)
R = use sub weapon (hold to charge)
Select = discard weapon grabbed with the Z-Knuckle
Start = pause and check current lives, mission "LEVEL" (=ranking), collected E-Crystals, equip weapons, EX SKILLS, Chips (=special ablities),
recommended mission/bosses order:
- NOBLE MANDRAGO
- TECH KRAKEN (use a Flame elemental attack)
- PEGASOLATA ECLAIR
- HEAT GENBLEM (use a Thunder elemental attack)
- FENRI LUNAEDGE (use a Flame elemental attack)
- POPLA COCAPETRI
- SOL TITANION (use a Thunder elemental attack)
- MINO MAGNUS (use an Ice elemental attack)
best "Chip" item recipes (parts order is not importart, and you do not need the actual recipe to make them):
- DoubleJump = Faital, GangaGun, GyroCannonH, C-Hopper
- Q-Charge1 (quick charge) = BeamWalker, RB-Cannon
- A-Recover1 (restore HP when you stands still) = Poplan, V.Fencer
- Quick (run faster) = Kerberos (x3)
- Reflect (reflect enemy bullets with a Saber slash) = Ceratanium, Gyrator, RefleBeemer
- Strong (body armor, survive when touching deadly spikes) = GangaGun, Ceratanium
... https://strategywiki.org/wiki/Mega_Man_Zero_4/Chips_%26_Sub-Tanks
basics:
- to start a new stage/mission talk to the Operator in the "CMD" Resistance trailer.
You can also talk to Ciel and save by picking "Manage Data".
- getting hit will deplete the life gauge on the left and the mission final ranking. Collect Energy Tanks (capsules with a red core) dropped by enemies to refill.
You can also use a Sub Tank in the pause menu to refill (rare to find).
When you die you restart at the last checkpoint (auto).
Collect "Z" icons for extra lives.
- use the Z-Saber most of the time with regular enemies, as it deals more damage than the buster, and it is able to damage enemies above and below you.
- the Z-Knuckle weapon can be used to "steal" most enemies weapon when used to finish them.
The weapon you get replaces the Z-Knuckle in your equipment slots, so you can't use the Z-Knuckle again until you lose the new weapon, or press Select to discard it.
The Z-Knuckle can also be used to pull certain objects.
- you can get a defeated boss "EX Skill" (=special elemental attack) only if playing in "NORMAL MODE" and with the "hard" weather (the stage icon on the map must be glowing).
To obtain the EX Skill, you must equip the Z-Knuckle and give the boss the finishing blow with it.
Unlike weapons obtained from regular enemies, these skills are permanent and more than 1 can be equipped at the same time.
They are used by performing various combos described in the equip menu.
- collect "parts" (looking like a square with an wrench icon inside) occasionally dropped by regular enemies to make "Chips" (=permanent special abilities) in the "LAB" trailer. You must follow the correct parts "Recipe" to make a Chip.
- in this game you can have just 1 Cyber-elf equipped. You level her up by giving her "E-Crystals" (capsules with a green core) dropped by regular enemies.
To actually choose the abilities, go to your Cyber-elf page on your subscreen and move the cursor to a category.
As you change abilities, note the level indicator on the upper right. If you go higher than the max level, you will lose points from your rank when completing stages. Otherwise there is no penalty.
- in "EASY MODE" all Cyber-elf are already powered up, you begin the game with 2 full Sub-Tanks and 9 lives, and are more powerful.
However, you can't change the weather in this mode, so you can't get EX Skills.
- last mission: ???
sources:
Crayon Shin-chan - Arashi o Yobu Cinemaland no Daibouken! | Shin chan - Aventuras en Cineland
controls:
d-pad = move, climb poles/trees, talk
A = jump (press again to double-jump)
B = attack
R = call helper
L = switch transformation
helpers:
- Hiroshi = help performing high jumps
- Misae = performs powerful attacks, destroy blocks
- Himawari = crawl in narrow passages and collect items
- Shiro = dig sparkling spots
basics:
- kill most most enemies by jumping over them.
- last stage: 12
sources:
Crayon Shin-chan: Densetsu o Yobu Omake no Miyako Shockgaan! | Shin chan contra los Munecos de Shock Gahn
controls:
d-pad left|right = move
d-pad up = talk, enter doors, climb poles, trees
A = jump (press again to double-jump)
B = attack
L = pause and switch transformation
R = pause and open the menu to call helper (req. stars, you can switch the helper cards in the map before entering a stage)
transformations special abilities:
- regular Shin chan
- Kamen Rider Shin-O = can wall kick, double jump for a swirl attack, tap B to fire a laser gun (consume the yellow gauge on the top-left, destroy blocks with a bolt) -> safely attack distant enemies
- raccoon = jump higher, hold A to glide in midair and follow the air currents. Press B in midair for a tail attack (cannot attack while on the ground).
- penguin = tap B repeately for a quick melee attack on the ground. Can swim and attack enemies by holding B underwater.
- elephant = hold d-pad up to attach to pegs and lianas. Press B to attack with your trunk and push big blocks, hold d-pad down + B to suck them. Press d-pad down in midair to ground pound.
...
helpers cards symbols:
- "!" = ??
- punch glove = bomb-like attack
- ladder = help reaching higher places
- looking glass = gives hints
- speaker = bomb-like attack
...
basics:
sources:
Pocky & Rocky with Becky | Kiki Kaikai Advance
controls:
d-pad = move
A = throw magic cards
B = melee attack -> deflect projectiles
L | R (not during boss fights) = use a bomb (check the counter next to the yellow ball in the bottom-left)
basics:
- best char: Rocky (has homing missiles with the blue scrolls)
- you must find a key in each stage to reach the boss.
- last Chapter: 7
cheats (press the following buttons on the title screen to achieve the desired effect):
- Chapter Select: Up, A, Left, B, Down, L, Right, R, Select
- Expert Mode: Up, Down, Right, Left, Left, Right, Down, Up, Select
passwords (Pocky):
2nd Level H1NVR9c music note 2
3rd Level Z6Vy club club fgG
4th Level TSG613d spade t
5th Level dot +2w8 music note hnt
6th Level c7V2y diamond ggk
7th Level 1dy diamond mzzLl
sources:
Advance Guardian Heroes
controls:
d-pad = move
A = jump
A + direction (in midair) = dash
2x A + directon = homing jump (to current homing marker)
B [+ direction] = attack
R = defend, barrier (drains your magic meter)
R (when about to be hit, check the "!" over enemies) = counter attack
R (hold) + B = magic attack
L = cycle current magic attack
A + B (when top right meter is flashing) = activate Hyper Mode (MP guage refills, faster movement speed, won't be knocked out from attacks)
A + B (while in Hyper Mode) = activate Re-Hyper Mode (consume a chunk of your Anger Guage) = temp. invicibility
basics:
- best initial char: Enn.
- if you are having difficulty with the timing of the counter attack then you
can try repeatedly tapping the R Button when an attack is used
against you. This will consume more MP, but it is safer and the
only way to block some multi-hit attacks.
-
collect the crystals to level up at the end of each stage:
VIT (Vitality) : Total Hit Points
MND (Mind) : Total Magic Points and MP Recovery Rate
ATK (Attack) : Increases Physical Attack Damage
DEF (Defense) : Decreases Physical Attack Damage received
MATK (Magic Attack) : Increases Magic Attack Damage
MDEF (Magic Defense): Decreases Magic Attack Damage received, and makes counter timing easier
MOB (Mobile Power) : Increases Movement Speed and Anger Guage's rate of increase.
- when your HP reaches zero, then a "devil" appears and offers you an immortal body in exchange for your gusoul. You will lose all crystals that you have gained in the level though.
- finish the game on Normal difficulty to unlock the Time Attack Mode.
- last stage: 6
cheats:
- unlock everything + stage select: By inputting Right, Left, L, R, Up, Select, Select quickly while the Treasure Logo is showing, you'll unlock quite an extensive debug mode. The code is actually well known, since it unlocks absolutely everything, which would usually need you to complete the game multiple times. With Debug Mode enabled, going to the Story Mode screen will show a stage select underneath the 1/2 Player Select, which can be changed using Left and Right.
sources:
Astro Boy: Omega Factor
controls:
d-pad = move
2x d-pad = dash
A = jump (press again in midair combined with a direction to use your jets and reach higher places)
B = punch
d-pad down + B = kick
d-pad up + B = finger laser -> long range attack
R = arm cannon (req. the "SUPER" counter in the top-right > 0) -> directional, most powerful weapon
L = machine gun (req. the "SUPER" counter in the top-right > 0) -> hit all enemies on screen and stun some of them
A + B + d-pad (hold) = EX dash (req. the "SUPER" counter in the top-right > 0) -> dash while attacking enemies
Select = view omega factor and upgrades
Start = pause menu
basics:
- hearts refill your health and also charge your special moves (check the green gauge at the top-left).
- with every character you find, you can upgrade one of your abilities, including LIFE (health), PUNCH (attack power), LASER, SHOT (machine gun strength), and JETS boosts.
You can also upgrade your "SENSOR" ability, which makes certain levels easier, allowing you to see in the dark or through thick steam.
- last stage: 7-5
sources:
Tiny Toon Adventures Buster Bad Dream | Tiny Toon Adventures: Scary Dreams
controls:
TODO
passwords:
Level 2 Shirley, Sneezer, Montana Max
Level 2 Boss Elmyra, Sneezer, Shirley
Level 3 Sneezer, Montana Max, Dizzy Devil
Level 4 Sneezer, Montana Max, Shirley
Level 4 Boss Plucky, Sneezer, Hamton
Level 5 Plucky, Hamton, Buster
Level 6 Dizzy Devil, Shirley, Buster
Level 6 Boss Hamton, Sneezer, Fifi
Level 7 Buster, Montana Max, Elmyra
Level 8 Plucky, Hamton, Shirley
Final Battle (Hard) Shirley, Sneezer, Sneezer
Final Battle (Standard) Plucky, Fifi, Plucky
sources:
Drill Dozer | Screw Breaker: Goushin Dorirurero
controls:
TODO
sources:
Gunstar Super Heroes
controls:
TODO
basics:
sources:
Yoshi Topsy-Turvy | Yoshi's Universal Gravitation
controls:
d-pad = move, crouch, look up
tilt = modify platforms stepness, move boulders, balls, lifts, ... (there are only 3 levels of tilt: normal, left, and right. Fine-tuning of the level of tilt was not present.)
A = jump (hold to flutter in midair)
B = extend tongue, eat enemies, apples, and other items
basics:
- getting hit will deplete the flower petals in the top-left. Eat hearts to refill or you will lose a life when empty.
- to go to the next area, you must touch a ring made of stars (Checkpoint). When you touch one, you cannot go back to the previous area.
At the end of the level, you must touch the Goal (a large star) to exit and unlock the next level.
If you accomplished the stage mission, you also win an Happiness Medal and get a chance to play a Bonus Mission (minigame).
- to pass each world/Chapter you need to accomplish the number of missions shown in the map screen ("Objective").
- last Chapter: Six
sources:
DK: King of Swing
controls:
L | R = grasp with left|right hand, rotate while held down, move left|right (on foot) -> releasing after building momentum will cause DK to travel in that direction for a short time
L+R = grasp with both hands, jump (on foot)
L+R (hold) = charge attack
B (if you have 10+ bananas) = activate Banana Heal -> heal 1 heart
A (if you have 20+ bananas) = activate Go Bananas -> temp. invulnerability
d-pad = move (on foot)
basics:
sources:
Densetsu no Starfy | Sutafi | Stafy
controls:
TODO
sources:
Kuru Kuru Kururin
controls:
d-pad = move
A | B (hold) = increases your speed
A + B (hold) = further increase to your speed
L | R = makes a horn sound (can be combined with A and B for variations)
basics:
- if you press Select while you are still in the map area you can change the size of the stick.
This allows you to get through tighter gaps and makes the game FAR easier.
- to get a perfect, you must clear the stage without receiving any damage.
Getting a perfect on all 35 stages in the Adventure mode unlocks 3 final stages.
- last zone: 10
sources:
NGC
controller ASCII art:
,,..--~~~~--..,,
,-'L_,-' '-',_R-.
/_.'``'-. NINTENDO ,- `'.\ <--Z
,' `. GAMECUBE ,' ,'Y) . / ,-'___-. \ / (_,'_ ( \ \
! / ,' `. \ | ! ,' . \X| | | | | (_) | | ! (_) | ,-. | A | |_/ ! | \._,' / ! |( B )`._,' |
|\ -.___,-' \..-~'~-../ -' /| |. . ,' ,' | |-., | | \ / .---. ,.-| |. | | | | / .-. \ ,' |
| |\ || | | \ '-' / /| |
| | \ / \ ---' / ! ! | |-.,-' `-.,-' ! !
\ / \ /
\ / \ /
._,'._,'
access BIOS menu with a disc inserted:
hold A while powering on the console
Shadow The Hedgehog
sources:
Dream Mix TV: World Fighters
controls:
Left Analog stick | d-pad = move
A = Jump
B = Attack, Throw
X = Special attack (can be charged with some chars)
Y = Grab, Throw
L|R = guard
menu translation:
1-World Fighters Mode: This is the single-player story mode where
you'll unlock everything.
Pause Menu:
a-Resume
b-Exit to Title Screen
2-KyaraDama Survival: The versus or melee mode. Play against the
computer or friends. 1-4 players.
a-Entry: Set players 2-4 to Man, Com, or X (no player).
b-Rule: The number of rounds necessary to win a match (1-3)
c-Handicap: Press down for Weak or up for Strong.
d-Go!
Pause Menu:
a-Resume
b-Return to Character Selection
c-Return to Rules Selection
d-Exit to Title Screen
3-Caravan Mode: A set of 8 challenges. High scores are saved.
Pause Menu:
a-Resume
b-Restart Challenge
c-Return to Caravan Mode Menu
d-Exit to Title Screen
4-Library: View data about each of the game's characters after you've
finished World Fighters Mode with them, as well as bonus
data for the A ranks you score.
5-Options:
a-Autosave: On or Off
b-Vibration: On or Off
c-Save: The left option is Yes and the right is No.
d-Load: The left option is Yes and the right is No.
e-Exit
basics:
- easier char: Licca-chan ()
- At the beginning of every match, hearts shoot out randomly.
Grab as many as you can, as they serve as your life meter.
You lose hearts every time you get hit.
When your hearts are depleted, you shrink and your KyaraDama (soul) floats upward.
Pick it up and you'll return to normal size, although your hearts will still be empty.
If someone else gets your KyaraDama, you stay small and lose the match.
The winner is the last person with their KyaraDama.
- last stage: 7 (story mode)
sources:
Smashing Drive
controls:
Control Stick left|right = steer
A = accelerate
B = brake -> Just like in Sega's Crazy Taxi, you can perform a skid style turn by quickly sliding your finger from the 'B' to 'A' button. The drift effect is short-lived however.
R = horn, use powerup -> the horn will make cars in front of you move out of the way
basics:
- to unlock new shifts in ARCADE mode, you must finish each route before the time runs out AND beat the CPU opponent.
- always try to take ramps for shortcuts and to get powerups.
sources:
Wave Race: Blue Storm
controls:
Control Stick left|right = steer (tilt diagonally to drop speed and make a tigher turn than a Lean Turn)
Control Stick (in midair) = perform stunts
A = accelerate
B | Y = crouch -> reduce waves impact
L | R = lean left|right -> tigh turns without losing speed
Z | X = turbo (req. the yellow Power Meter on the bottom-right full, correctly pass buoys or complete stunts to refill)
C stick = camera control
basics:
- beat CHAMPIONSHIP mode at various difficulties to unlock new courses.
You receive points based on your finishing position in the race:
1st = 12 pts, 2nd=10 pts, 3rd=8 pts, etc.
You need to earn a set number of points to clear each race (show in the "REQUIRES" box).
When all of the races have ended, the rider with the most points becomes champion.
Also, if you place in the first 3 ranks, you will clear the difficulty level and be able to choose the next.
- easier chars: RYOTA HAYAMI, AYUMI STEWART
- for a rocket start, begin accelerating at the moment the signal at the Start line turns green.
- you will see red and yellow buoys floating throughout the curse.
You must pass red buoys on the right and yellow buoys on the left.
You will receive a Power Meter level-up every time you correctly pass a buoy or complete a stunt.
If you miss 5 buoys, you will be forced to retire from the race (check the icons in the bottom-left).
- if you go beyond the course boundaries marked by the round buoys, the Course Out countdown will begin.
If you do not return to the course by the count of 5, you will be forced to retire from the race.
cheats (Choose "Options" from the main menu, then hold Z + X followed by pressing Start. A new password menu should appear):
- Play Dolphin Park, stunt mode normal KTUPWNPD
- Play Expert Championship without having to unlock it AJXY8P53
- Play La Razza Canal, time attack hard MJV8LKL6
- Play Lost Temple Lagoon, time attack hard LQ3TRKTE
- Play Lost Temple Lagoon, time attack normal J784WMHF
- Play Southern Island, stunt mode expert WCX5WP5A
- Ride a Dolphin, Free Roam DLPHNMOD
sources:
Super Smash Bros. Melee | Dairantou Smash Brothers DX
controls:
Control Stick = move (tap quickly to dash), crouch
A = regular attack (combine with a Control Stick direction for a strong attack, tap repeately for a Smash Attack, hold to charge), pick up and use items (press Z to discard them)
B = char-specific special move (can be combined with a Control Stick direction)
X | Y | Control Stick up = jump (press again for a midair jump, up to 3)
L | R = put up shield -> each time you're attacked while the shield is up, it gets smaller; if it gets too small it'll shatter, leaving you stunned for several moments!
L | R + CS up|down = dodge attacks
L | R + CS left|right = roll
L | R + A | Z = grab -> once you grab your opponent you can hit them a few times by tapping the A-button before you throw them
C-Stick = alt. instant Smash Attack (cannot be charged)
d-pad = taunt
basics:
- beat Classic and Adventure 1-P modes to unlock new chars and All-Star Mode.
In Classic mode you play 11 battles with random opponents.
In Adventure mode, you play XX free roaming stages.
- easier chars: Mario, Yoshi, Sheik, Puff, Marth
- instead of having an actual life meter, your damage is recorded in percentages.
Each time you take damage, the % on your meter goes higher. The higher the %, the easier it'll be to knock you off the stage. You start off at 0%, and can normally last to around 200%.
- you need Coins in order to continue if you lose all your lives in 1-P mode, and to bet them in the Lottery for chances to win new trophies.
You obtain coins when using Smash attacks when playing in 1-P mode (1 Coin per Smash hit), and in "Race to the Finish" bonus stage when playing Classic 1-P mode.
sources:
Sonic Riders
controls:
Control Stick left|right = steer, perform tricks in midair, move forward/backward when on foot
A = jump -> hold when approaching a ramp, release at the tip of the ramp to jump higher
B | X = air boost, attack rivals (consume air)
L | R = brake, air slide (consume air) -> use on tight corners
L + R = exit Turbulence
basics:
- easier chars: Power type chars (can destroy incoming obstacles)
- try to keep you air gauge filled or you will be forced to run on foot (slower).
- collect rings to level up, incr. max and refill air. falling on a pit level you down.
- last race in story mode: Babylon Garden
sources:
Viewtiful Joe
controls:
Control Stick left|right = move
Control Stick up|down = dodge attacks (check the skull icon position) -> do often, will daze enemies
A = jump (hold for higher jumps, press again for double-jump when transformed)
Y = punch (land 4 combo strikes for a finisher attack)
Y + Control Stick down = uppercut -> launches opponents straight into the air
X = kick (land 4 combo strikes for a finisher attack)
L (when transformed) = use VFX "Slow" power (req. the VFX gauge on the top-left, auto refills when not in use) -> use to dodge or defect bullets, attack spinning enemies
R (when transformed) = use VFX "Speed" power (req. the VFX gauge on the top-left, auto refills when not in use) -> use to attack distant enemies/objects with afterimages, became ignited after striking multiple hits and immune to lava
C-Stick (when transformed) = use VFX "Zoom In" power (req. the VFX gauge on the top-left, auto refills when not in use) -> perform more powerful attacks when active
B = zoom camera
Z = skip cutscenes
basics:
- simply mashing punch will unleash a 4 hit combo ending with a finisher. The same can be done with kicks. The punch finisher cannot be canceled by another punch, and the same goes for the kicks. However, any punch attack can be canceled into a kick at any time and vice-versa, so you can extend your combos by alternating between punches and kicks. You can also cancel a ground attack into and air attack on hit by pressing up before the next attack.
- collect burgers to restore your LIFE (check the hearts in the top-left).
- the VFX gauge on the top-left begins to deplete whenever one or more VFX Powers are active, and refills when no VFX Powers are active.
If the gauge completely depletes, you will turn back into normal Joe. In this state, his attack power and defense are halved, and he cannot use any VFX Powers, double jump or use any special attacks.
Fortunately, you will automatically turn back into Viewtiful Joe once the VFX gauge reaches a certain threshold.
- earn V-Poins by striking enemies and objects, dodging attacks, deflecting projectiles, and breaking things.
V-Points act as both a form of currency and a way to track your score (check the counter in the top-right).
The best way to earn V-Points is via a Rock-On combo: simply land an attack on a dazed enemy while using VFX Slow. Every hit you land during this time will increase the V-Point multiplier at the top of the screen.
You also can pick up V-Points directly in the form of V-Coins, which can be dropped by enemies, found in boxes, or won from slot machines.
At the end of each episode you will be able to spend the V-Points in the "Power Up!" store and save your game.
- best moves to buy: Sliding, Air Joe, VFX Turbo Charger
- last episode: 7
sources:
XG3: Extreme G Racing | XGIII
sources:
XGRA: Extreme G Racing Association
sources:
Paper Mario: The Thousand-Year Door | Paper Mario RPG
sources:
Legend of Zelda: The Wind Waker
sources:
Legend of Zelda: Four Swords Adventures
sources:
Legend of Zelda: Twilight Princess
sources:
Chibi-Robo!
sources:
Star Fox Adventures
sources:
Star Fox Assault
sources:
Metroid Prime
sources:
Kururin Squash!
sources:
Luigi's Mansion
controls:
Control Stick = move
A = examine, open doors, continue dialogue
B (hold) = turn flashlight off
R = vacuum
L = expel current element (if loaded)
X = switch to 1st person view (Gameboy Horror), examine with A
Y = map
Z = inventory
basics:
- to catch a regular ghost:
- stun it with the flashlight to freeze it and make its heart appear
- immediately press R to start vacuuming it
- while vacuuming, press the C control stick in the opposite direction of the ghost multiple times (like a fishing rod)
- look into mirrors to warp back to the entrance.
- spot fake doors by vacuuming them (only real doors will shake), or by checking your Gameboy Horror (only real doors are marked).
sources:
Super Mario Sunshine
controls:
Control stick = move
A = jump, swim
B = talk, grab, dive in water, let go grabs (ropes, items), punch revolving gates
R = squirt, refill tank (while in water)
R (fully hold) + direction = hold position and squirt around
Y = switch to 1st person view and look around with control stick (Mario cam)
L (hold) + direction = sidestep
L (in mid-air) = ground pound
Left stick, Right stick, A = Side somersault
A + rotate control stick = spin jump
B+direction (when holding an item) = throw, pull
B+direction (while running) = slide (over areas covered by liquid)
A, B = body slam attack
X = switch noozle (check the icon on the bottom-left)
R (hold) = splash water (diff. for each noozle)
L = reset the camera behind
C stick left/right = rotate camera
C stick up/down = zoom in/out camera
Z = show map
controls on yoshi:
A, L = ground pound
A, A (hold) = flutter in the air
R = split juice
X = dismount
B = tongue, swallow enemies, fruits
noozle abilities:
- Hover Nozzle (blue) = hover in the air
- Rocket Nozzle (red) = fly upward -> reach high places
- Turbo Nozzle (gray) = dash -> jump to out-of-reach places
basics:
- stun most enemies by squirting them.
- when falling from high places use a ground pound to avoid taking damage.
sources:
Wario World
controls:
Control Stick = move
A = jump
B = punch, pick up items or KO'd monster, throw (charge for further throws)
R (hold) = dash
A (while dashing) = long jump ("The Corkscrew Conk")
R (in midair) = ground pound
R (in midair, while holding an item/monster) = "Piledriver" -> useful to open steel trap doors
L | Z = vacuum coins up with mouth ("Hyper Suction")
spin Control Stick in circles = spinning attack ("Wild Ding-Swing") -> useful to activate some switches
C-Stick = rotate view when inside trap doors
basics:
- enemies drop coins when defeated, and tend to regenerate if the area is left and returned to later. The coins are used to purchase items.
- collect Wario statue pieces inside trap doors to finish each level. Some are hidden and you may need to backtrack to find them.
- last world: SPARKLE LAND
sources:
F-Zero GX
controls:
Control Stick = steer, raise/lower nose
A = accelerate
B = brake
Y = boost (consumes ENERGY, check the gauge on the top-right)
L|R + Control stick direction = slide-turn -> reduces speed, best with cars with higher max speed
L+R + Control stick direction = drift-turn -> incr. speed, best with cars with higher acceleration
Z + Control stick direction = spin attack -> attack rivals nearby
X + Control stick direction = side attack -> attack rivals nearby
dpad up|down = switch camera angles
basics:
- the best way to handle jumps is to push the stick forward immediately and boost downwards. You will actually increase speed thanks to the gravitational pull.
sources:
PN03 | P.N. 03
controls:
Control Stick = move forward/back, turn left/right
L = sidestep left
R = sidestep right
Z = 180° turn
A = shoot (Palm Shot basic attack), enter doors
(custom d-pad sequence), A = perform an Energy Drive move (check the pause menu) (consumes energy in the yellow bar)
B = jump (can be combined with a direction, but there are no side jumps)
Y = crouch (then use L|R|Analog Stick up|down to roll)
X = change Lock On target
C-Stick = change camera angle
basics:
- take cover while the enemies are firing and wait to attack.
- best Aegis Suits: Intera Guardian, Ultra Fusion, Ultra Guardian, Blackbird
- if a door have a yellowish color, all the enemies in the current room must be destroyed to proceed
- last mission: 11
sources:
Kirby Air Ride
controls:
Control Stick up|down = raise/lower the nose
Control Stick left, right = Quick Spin
A|L|R = brakes and boosts once you let go the button,
auto fall when in the air,
inhales enemies,
uses the inhaled enemy power,
activate boost panels
C-Stick = camera
basics:
- best cars: Dragoon, Hydra
- if you swallow a "garbage enemy" (an enemy without a power), you'll automatically spit it out at the nearest enemy
sources:
Billy Hatcher and the Giant Egg
controls:
Control Stick = Move
A = jump
B = speak
B (while carrying an egg) = Egg Shot -> attack enemies
A, A (while carrying an egg) = Bounce Jump -> jump higher
A, B (while carrying an egg) = Egg Dunk = sends your egg down into the ground -> activate switches, attack enemies
A, A (hold) (while carrying an egg) = Egg Driver -> like Egg Dunk, but you go with the egg
A, R (while carrying an egg) = Egg Roll -> usefull for reaching platforms as you are propelled further with a roll than a regular jump
R (while carrying an egg) = dash and attack enemies
R, A (while carrying an egg) = long jump -> increases your jumping range to make it across bigger gaps
R (while the egg is glowing) = Rooster Call -> hatch the egg
X = command animal -> attack or interact with the environment
Y = use item
L = centre camera, lockon
C-Stick = rotate camera
basics:
- there are many different kinds of eggs containing items and Egg Animals. The content of the egg is determined by the design.
Feed the egg by rolling it over fruit and watch it grow. When fully grown, it will start glowing. Now is the time to hatch the egg.
If it is a creature (and most commonly is), walk up to the creature to "tag" it. A musical note will appear to show it is now under your control. You can now attack enemies with the creature, as well as overcome different types of obstacles (press "X").
- the goal of each level varies: on a lot of the levels it will simply be getting from A to B, and on some it will be racing an opponent, or finding trapped chickens.
Each level (or mission) has a name giving you some idea of what you'll be doing in it, and you always get a short message at the beginning to help you.
Every time you complete a mission, you get an emblem of courage. The 5 main missions must be worked through in order, but when you unlock the extra missions by rescuing the 3 other main characters in the games, they are accessible as soon as you begin a world.
The 1st mission of each world involves you rescuing the world's elder from its golden egg, and then the 2nd mission involves you playing through a level and then fighting the world's boss.
After you have completed the first 2 missions, the next world is unlocked.
- last world: 7 Giant Palace
sources:
NDS
DSLite console ASCII art:
/ _________________________ \
| |.-----------------------.| |
| || || |
| || || |
| || || |
| . . . || || . . . |
| . . . || || . . . |
| || || |
| || || |
| ||_______________________|| |
|____ '-------------------------' ____|
(____|__________________'__________________|_||_)
| _________________________ |
| |.-----------------------.| |
| _ || || (X) |
| _| |_ || || (Y) (A) |
| |_ _| || || (B) |
| |_| || || |
| || || |
| || || |
| || || ()start |
| ||_______________________|| ()select |
| '-------------------------' |
\_______________________________________________/
latest cheat dbs:
Castlevania: Dawn of Sorrow
sources:
Go! Go! Cosmo Cops! | Shutsugeki! Acroknights
Kururin Doughnut: Okashi na Recipe
sources:
Contra 4 | Contra: Dual Spirits
controls:
d-pad = move, crouch, aim (hold "R" to stand still and aim with the d-pad)
B = jump
Y = shoot
L = switch weapon
A = discard current weapon
X = grapple hook -> grapple up to rails on the top screen
basics:
- beat the game on any difficulty to unlock Challenge Mode. Challenge Mode is what you use to unlock the other bonus materials.
- best weapons: S=Spread Shot, H=Homing.
- last STAGE: 9 (NORMAL, HARD), 7 (EASY)
sources:
Kururin Doughnut: Okashi na Recipe
controls:
TODO
Sonic Rush
sources:
Mega Man ZX | Rockman ZX
controls:
d-pad = move, talk, interact, crouch (only as Human)
B = jump
Y = attack (hold to charge)
R = secondary attack
L = dash
X = pause and quick switch transformation
A = activate Overdrive Mode (req. Biometal Gauge) -> temp. incr. attack power
Start = pause and switch Biometal/tranformation, use items, check map and inventory
recommended missions order:
- Locate Giro (head up the ladder and right from the B-2 transerver door)
- Pass the Test (start at the B-2 transerver. You have to find the Guardians in order, from left to right. When you're finished you must run all the way back to the transerver because the one they leave you at doesn't allow you to transport, contrary to what the Guardian says to you.)
- Mavericks Detected
- Search the Plant (transport to Area B-2, go right until you reach Area C-2. In the far right end there is fountain. Just right of the fountain, there is a yellow door leading to E-1.)
- Save the People (transport to E-7, exit right to reach Area I-1)
- Fight the Mavericks (from B-2, go left, climb the ladder and go right until you reach Area D-3. Open the gate in the right end to find another room, still in Area D-3. Now head to the right end of the room to find the gate leading to Area G.)
- Find the Survivors (transport to Area B-2, go left to Area B-3. At the top, head right to find the gate leading to Area F-1, covered in cold snow.)
- Secure the Biometal (from A-2, go left until you reach Arean A-1. At the beginning of A-1, wall jump to the top to find a yellow door leading to Area A-3. Go in there. You will find a door leading to Area H-1 in the right end, after jumping to the top of some platforms.)
- Protect the Lab (from H-1, go right until you find a purple door with a "L-1" sign)
- Attack the Excavators (from B-2 transerver, go right until you find a yellow door with the letters 'C-3' on)
- Recover the Disk (from A-2 transerver, go left until you reach A-1. In A-1 there are two black doors in the left end. Enter the rightmost of these two doors to find Area A-4, which is a cave-like place. You will find the entrance to Area J in the lower right end of the cave, in the water. You must crouch under a narrow passage while being in human form to get there.
- Stop the Dig (find the door leading into M-1 in the upper left end of Area A-4)
- Repel the Army (transport to D-2, then go right all the way to Area O-1)
- Destroy Model W (transport to D-2, go left and enter the big gate)
Biometal abilities:
- ZX: can charge both your buster and your saber. If you slash while pressing Up while you are in the air, or slash more than once while in midair, your character performs a circle-slash.
- HX (thunder): can air-dash, including straight up. It can also hover (press jump while in the air).
- LX (ice): can swim and perform air-dashes underwater. Double-jump (or air-dash) to activate swim mode; you can maneuver your character freely with this. You will get knocked out of it if you take damage, however.
The lower screen of this model shows you your surroundings. A Cyber-elf points out items you can pick up that are within range. This model does not slide on ice.
- FX (fire): can fire by using either the left or the right arm, or both at the same time. Model FX cannot move while shooting, which is one of its disadvantages. Your normal shots are a rapid volley of small fireballs. They're more powerful than ZX's regular shots, though not as strong as charged shots.
You can use the lower screen to customize the paths that the shots fly in.
You can also shoot straight up by holding d-pad up while firing (in this case your customizations are ignored).
- PX: can stick to ceilings and ledges; press Up to latch on. To drop off, hold Down and press jump. If you are holding onto a ledge, you can hoist yourself up by double-tapping Up, or just jump. Also, Model PX is invincible while dashing.
This model fires up to four small daggers with each press of the button.
The lower screen of this model shows you a radar view of the current screen; this view will reveal hidden passages and breakable walls. Enemies are marked on the radar with "!" symbols.
bosses elemental weakness:
- Hivolt (Ice)
- Hurricaune (Ice)
- Lurerre (Fire)
- Leganchor (Fire)
- Fistleo (Thunder)
- Flammole (Thunder)
- Purprill
- Protectos
basics:
- Vent's dash ability is a little shorter than Aile, while Aile gets more recoil when shooting than Vent gets.
- Transervers are terminals who let you save your progress and
accept new mission. Transervers colored yellow also let you transport to
other yellow Transervers. Once you've completed a mission, you need to find
a transerver and select 'Mission Report' to tell the Command Center that
you've completed a mission, and are ready to start a new one.
- When killing normal enemies, not bosses, you will notice that
they often drop various items. The items dropped by normal items are:
- 1UP: Restores one life, like green mushrooms in Super Mario
- Energy: Restores your energy gauge
- E-crystals: Used to repair your Biometal Models at the Guardian HQ
- Biometal Energy: Restores the overdrive gauge
- Once you've found a Subtank, the subtank will
appear on your pause menu, and get filled with energy when you collect
energy packs. If you run low on energy while fighting, you can access the
pause menu and fill your energy bar with energy that has been stored in your
Subtanks earlier. Note that the Subtanks will only start storing energy
after your energy gauge has been filled. This way, collecting energy is
smart, even if your energy gauge is completely full.
- Biometals are gained by defeating the pseudoroid
bosses in the game, and lets your character Megamerge (transform) into
different forms. Each form, or Biometal Model, has special abilities. Some
models let you jump higher, while others provide weapons that are better
suited for many situations than the ones you've got from before are.
In addition, some Biometal Models have an elemental alignment tied to them.
- The bosses that keep the Biometal Models with them
before you defeat them have a weak point on their bodies. Attacking this
weak point will deal lots of damage to the boss, but at the same time, it
will damage the Biometal Model they are keeping. If you damage their
Biometal a lot, you will have to pay lots of E-crystals to repair it after
battle.
When you use Model H, you can see where bosses' weak points are.
The less you hit this weak point, the higher level victory you get (with Level 4 requiring that you don't hit it at all). This has the added benefit of increasing the base weapon energy for each form, so you don't have to farm E-Crystals to repair the Biometals.
sources:
Mega Man ZX Advent | Rockman ZX Advent
controls (Type A):
d-pad = move, talk, interact, crouch (only as Human)
B = jump
Y = attack (hold to charge, diff. for each form, can be combined with d-pad up|down with some forms)
R = sub attack (hold to charge, diff. for each form)
L | 2x d-pad = dash
X = pause and quick switch transformation
Start = pause and switch tranformation, use items, check map and inventory
transformations abilities:
- "H" (Human): can crouch, crawl, and float along the surface of water. However, you can't dash or wall jump. This form comes with a Buster Shot that cannot be charged.
- "A" (Model A): missiles lock-on as sub weapon. Hold "A" to activate bomb-like GigaCrush (consume all SP).
- Rospark (green icon, lightning): bulb form, is slow on the ground, can't jump very high, and can't dash or climb walls or ladders. His main weapon, the Rose Wire, is used like a whip, while his sub weapon, the Bulb Shot, only fires straight up. Both attacks become Lightning elements when charged, and use weapon energy then.
Rospark is most useful for his ability to grab onto and climb vertical wires and poles, where he changes into his more powerful Flower form. Press Up dpad when in front of a wire to grab onto it, and he can then climb up and down on it with Up dpad and Down dpad. If there is another wire next to the one he's on, he can climb across to it by holding Left dpad or Right dpad and using the Rose Wire. When charged, the Rose Wire can electrify other wires.
When on a wire, his sub weapon becomes the Rose Stinger, which fires a spread of four projectiles at different angles. When charged, it fires three Lightning element projectiles. If all three hit a wall, floor, or ceiling, they form a triangular field between them that damages any enemy within the triangle. This uses weapon energy.
- Buckfire (fire, red icon): Pressing the Dash button performs his Slash Dash, which can damage enemies, but it doesn't make him go any faster. He can't cling to walls, and his wall kick launches him away from the wall with such force that he can't turn in midair to land back on the same wall at a higher point than he kicked off from. Thus, he can't climb single walls, though he can wall kick back and forth between two walls. He can't climb ladders, either.
If you hold Up dpad and release a charged attack on the ground, he performs Rockit, where he launches himself straight up and damages enemies above him. He can break some blocks with this move, and it carries him much higher than a normal jump, so it can be used to reach high places. Try transforming at the peak of the attack into someone who can climb walls to reach high areas. This uses weapon energy.
Release a charged attack in midair to perform his Meteor Kick, a powerful kicking attack that rockets him diagonally down and forwards. This move can break some blocks, and it uses weapon energy.
- Chronoforce (ice, blue icon): can swim freely about underwater, and can water-dash in 8 directions by pressing the Dash button while in water. Unlike Thetis, however, he can't be knocked out of swim mode by an attack.
He attacks by shooting Ice Needles straight forwards. These are Ice elements. His charged attack is the Time Bomb, which slows time for the rest of the world for a few seconds. This uses weapon energy.
His upper shell is heavily armored and can deflect enemy shots. It's also immune to spikes, enabling him to push up underwater platforms that have spikes on the bottom.
- Hedgeshock (lightning, yellow icon): dash is a rolling attack that can damage enemies. By holding Down dpad and dashing, he can fit into small passageways and damage enemies in them. However, if either attack doesn't kill the enemy, the impact will also damage Hedgeshock. He also can't climb walls, but he can climb ladders.
His main weapon fires small yellow bullets straight forward, much like Grey's basic buster gun. When charged, he fires a spread of five Lightning elemental shots in a half-circle; upwards if he's on the ground, downwards if he's in the air, and two shots up and down if he's on a ladder. This uses weapon energy.
- Vulturon (white icon): can hover by holding the Jump button in midair. Unlike Aeolus, whose hover ability simply slows his descent, Vulturon doesn't descend at all while hovering, so he can float across large gaps. Also unlike Aeolus, his hover ability works underwater. However, he continually uses up weapon energy while hovering.
He can also stick to walls without sliding down, and by doing so can lower barriers that are suspended by a pulley system. However, he can't dash or climb ladders.
His weapon, Sound Vibration, projects a circular aura around himself to damage nearby enemies. When charged, he swings his guitar out to strike enemies.
- Queenbee (red icon) = can fly by pressing the Jump button repeatedly, although each press uses weapon energy. She can also lift certain objects that have a yellow docking ring on top; stand on the ring, press Down dpad to dock with it, then press the Jump button repeatedly to lift it.
- Argoyle (purple icon) = has an unlimited dash. He can't climb walls, but he can climb ladders.
Throws explosives for his main weapon.
His sub weapon, when charged, summons a ghost form of him, which can pass through walls and grab items for you.
- Bifrost (ice, blue icon) = his subweapon can destroy the yellow blocks with the electric Xs inside them.
Due to his immense size, he doesn't fit through doors and some corridors, he walks slowly, and he can't dash or climb walls or ladders.
- Model H | Aeolus (Wind/elecricity, green helmet icon) = air-dash sideways and upward.
Enemy Analyzing feature which displays enemies' life meters and bosses' weak points on the lower screen.
- Model F | Atlas (flame, orange helmet icon) = charged shot also throws a punch attack that can break some blocks.
- Model L | Thetis (ice, blue helmet icon) = can swim and dash freely about underwater.
Item Scanner, which points out nearby items on a map on the lower screen.
- Model P | Siarnaq (purple helmet icon) = can hang from ceilings, rails, and certain platforms by holding d-pad up. Attacks by throwing Kunai and Shuriken.
Allows you to see a larger area around you when in dark places, and the Radar Scope shows a map of your surroundings and enemy locations on the touch screen, which is useful in dark areas.
recommended missions order:
- Train (Get Buckfire)
- Tower of Verdure (Get Rospark)
- Arctic Ice Floe (Use Buckfire a lot here; get Chronoforce)
- Oil Field (Get Atlas)
- Legion HQ (Get Siarnaq)
- Highway (Get Thetis)
- Floating Ruins (Get Aeolus)
- Control Center (Use Aeolus; get Queenbee)
- Scrapyard (Get Vulturon)
- Quarry (Get Model ZX)
- Waterfall Ruins (Get Argoyle)
- Mysterious Lab (Get Hedgeshock)
- Bio Lab (Get Bifrost)
- Undersea Volcano (Get here via Bio Lab3)
- Ouroboros
basics:
- easier char: Ashe (her charged shots bounce off walls)
- Time is short and bosses take longer on Expert, but there are no other differences with Easy mode.
- the transerver system is a bit different here. You now activate "Warp Points" (100 EC a pop) which allow you to teleport to them via a transerver. Unfortunately, this is a one-way operation; once you transport to a particular location, you have to run back on foot.
- you still pick up new transformations from every major boss you fight, which are then used in much the same way, just now you actually turn completely into the boss in question.
Many forms that you will gain in the game have certain elements tied to them. The same goes for your bosses, and even normal enemies:
Here's how the elemental system works. Strong element first -> weak element after:
- Fire -> Ice
- Ice -> Electric
- Electric -> Fire
- items that can be found include: SubTanks (extra energy containers), Life Up item (inr. energy gauge), Biometal Upgrades (incr. Special gauge), datadisks (tips and story infos), E-crystals (currency to use in shops).
sources:
Super Princess Peach
controls:
d-pad = run (hold L|R to walk slowly), crouch, enter doors, pipes
A = jump (press again in midair for Floatbrella)
B = whack enemies (holding down in air for Poundbrella, Hold then release for Chargebrella, press rapidly while running for Dashbrella)
Y = whack enemies
X = scoop
blow into mic = shoot bubbles
R = access the Shop (when on the world or level select screens)
touchscreen icons = activate a special ability (req. the yellow emotion bar at the top left of the top DS screen)
special abilities:
- yellow happy emotion will let you fly and spin
- blue sad emotion will let you cry and run quickly
- red angry emotion will set you on fire and make you heavy
- green enjoyment emotion will gradually recover your health.
basics:
sources:
Yoshi's Island DS
controls:
d-pad = walk, crouch, enter pipes, doors, aim eggs, look up|down (press X while looking to switch top|down screen)
B = jump (hold in midair to flutter, press d-pad down to ground pound)
Y = eat an enemy (then press d-pad down to make an egg, or press again to spit out)
A|R = bring up crosshairs for egg aiming (press again to shoot, press X|L to lock the cursor in a specific direction)
X = lock the aiming cursor (press again to unlock)
Start = pause and check the collectibles for the current stage
babies abilities (hit the stork's pouch to switch, sometime you may have to backtrack to a diff. stage to get the correct baby):
- Baby Mario: show red "M" blocks that can be used as platforms. Run faster by holding the "Y" button. Thrown eggs bounce off the walls a couple times.
- Baby Peach: hold "B" over wind currents to fly in midair and reach higher platforms.
- Baby DK: climb vines and swing on ropes hanging from above. When you throw eggs, they will become explosive. These explosive eggs will let you break certain cracked blocks as well. But they do not bounce off walls. Hold d-pad down and press "Y" for a dash attack.
- Baby Wario: his magnet attract coins and other metallic objects when you get close enough to them. You can also pull metal blocks if you face away from them and walk away, as well as metal platforms by jumping below them.
- Baby Bowser: shoot fireballs by pressing "Y", which means you cannot eat enemies and make eggs with him in tow. The fireballs he shoots can be used to melt ice blocks and light torches on the walls so you can better see your surroundings.
basics:
- you start off each stage with 10 stars. However, if you are attacked by an enemy, your baby will fly off in a bubble and you will begin to lose stars. If you don't recover the baby by the time you reach zero stars, you lose a life. Once you recover the baby, you will regain stars (assuming you had less than 10), topping off at 10. Collecting more stars will act as a timer extension should you be attacked and lose the baby temporarily.
- in each stage, there will be a few sets of collectible items to be found: stars (30 total), red coins (20 total), Smiley Flowers (5 total) and 1 big coin with a baby face (visible only if you have the matching baby).
- there are 20 red coins scattered through each level. They are disguised as regular gold coins, but when you collect them, they make a different sound. Keep in mind that you can also collect red coins (or any coins for that matter) by shooting eggs at them.
- in addition to the stars and coins, there are 5 flowers to be found in each stage. If you collect all five, you gain an extra life. At the end of the stage, where you jump through the ring, flowers (which invoke the bonus stage) will appear on the ring, increasing your chances to get a bonus round. Like the coins, you can also shoot eggs to collect the flowers.
- in many stages you can find a key to open a locked door and play a minigame. The minigame will be playable again from the main menu.
- touch a Super Star to turn into Superstar Mario and walk over ceilings.
You can also find a morph bubble in some stages that provides you special abilities like the helicopter and the mole.
- last world: 5
sources:
New Super Mario Bros.
controls:
d-pad = walk, crouch, enter pipes, hill slide, wall slide (jump towards any wall and keep pressing the D-pad in the direction of the wall)
A | B = jump (press d-pad down in midair to ground pound), wall jump, swim
X | Y (hold) = run (press d-pad down while running to slide under gaps)
L | R = scrolls camera to the left | right (Camera resets with any movement)
touch lower screen = uses item (tap item to use)
basics:
...
cheats:
- Play as Luigi in single player mode: at the "select a file" screen, keep pressed L and R buttons and choose one of your saved game files with the A button.
- Secret Challenge Mode: while paused on the map, press L R L R X X Y Y to enter the secret Challenge mode. You will now be unable to go back to an area that has scrolled off the screen while playing a level. This cheat only works after you finish the game.
sources:
Mario Kart DS
controls:
d-pad = steer
A = accelerate
B = brake (hold with d-pad down to go in reverse)
X | L = use item (hold d-pad up to throw forward, hold d-pad down to drop behind)
Y | tap touchscreen = change the map view
R = jump (hold while accelerating with d-pad left | right to drift and gain extra boosts)
sources:
Super Mario 64 DS
controls:
d-pad | touch = walk (hold Y to run)
B = jump (press again when landing on the floor for double and triple jumps), flip jump
A = puch, kick, swim
R = duck, crawl
R + A (while standing still) = sweep kick
R + A (while running) = slide kick
R (hold while running) + B = long jump
R (hold while standing still) + B = backflip
R (in midair) + B = ground pound
L (tap) = center camera
L (hold) + d-pad = rotate camera
X = zoom in|out, look around
chars differences and special abilities:
- Yoshi = he has the highest jump of the four, but he cannot punch/kick or grab enemies and objects and his ground-pound can't defeat/break bricks or Boos. He has average running and swimming. He's taller than the others. Mario is the only character that can Wall Jump.
Powerup = Yoshi's mouth fills up with heat thanks to the Power Flower. Pressing A button will make him exhale flames. His fire breath will melt most enemies as well as some forms of ice that others can't break.
Swallow enemies = Instead of punching, the A button button makes Yoshi shoot out his tongue. If an enemy is caught by his tongue, he'll retract it to his mouth. Pressing A button again will spit the enemy out while pressing R button swallows the enemy, causing Yoshi to lay an egg that will follow him. To throw the egg at a target, press A button. Yoshi can also swallow fire and spit it out, but he can only hold one flame at a time. Not all enemies can be converted to eggs or even swallowed.
Flutter Jump = Holding B button while jumping gives Yoshi more air time with a flutter jump. It not only lasts higher and longer than Luigi's scuttle, but also gives him a little extra height to reach far and high places. He can only perform this while single or double jumping.
- Mario = he is the shortest in height, but his swim, speed, power, and jumping abilities are all exactly average across the board.
Powerup: Mario is the only character that can gain 2 power ups from red switch blocks: a Power Flower and a feather. His Power Flower ability makes him inflate himself into a balloon. Pressing B button will help him float upward while pressing R button will immediately deflate Mario to normal. The feather gives Mario the Wing Cap, which gives him the ability to fly. Mario can take off the ground by doing a triple jump or shooting himself out of a cannon. His flight controls are inverted, meaning Up dpad will make him go down and vice versa.
- Luigi = he is the second-highest jumper (but best) of the four, but has slightly less attack power than Mario and Wario. Luigi is almost as average as his brother, except in jumping. The reason he's slightly weaker is because he moves slower when carrying enemies and is skinner, but throws them the same distance. Other than that, their power are equal. He's the best and fastest runner and swimmer.
Powerup = Luigi gains the ability to turn invisible with the Power Flower. It will allow him to walk through certain types of walls and enemies will go right through him, similar to the Vanish Cap in the original game. Except he can't go through ice.
Luigi's backwards somersault is not only the highest, but he also slowly descends with a spin jump. It's useful for traversing over large gaps.
Water Run: Holding Y button while running toward a body of water will allow Luigi to dash across the surface for a few seconds, due to his light body.
Scuttle = Holding B button while jumping allows Luigi to kick his legs for a little extra distance. He can only do this during a single or double jump.
- Wario: his power and weight are really amazing and he is also the toughest, but his jumps are really short and his running and swimming are pitiful.
Powerup = Wario's body gets coated with metal by the Power Flower, similar to the Metal Cap in the original game. He can run into some enemies and take no damage from their attacks, like Invisible Luigi. His extra weight allows him to walk underwater and resist high winds and currents.
Wario is the only character strong enough to break black-colored bricks as well as other certain formidable large objects that others can't. His strength also lets him punch, kick, and throw enemies the farthest as well as ground pound pegs once instead of 3 times.
basics:
- you need to find the corresponding keys to unlock other chars. Once you do, you can switch between the chars by entering their room near the Rec Room (located on the second floor on the right wing of the castle).
You can also change chars by finding the caps of them in levels, although this only temporarily selects a char until you exit the level. Caps can also be selected on the star select screen by touching the caps at the bottom of the touch screen.
- Easy Healing: if you have taken damage just jump in some water that you can be submerged in and rise to the surface then you will have your enegy filled up.
You can also regain health by collecting coins and walking through small floating hearts found in levels.
- total stars: 150 (gain access the cannon outside the castle when all are collected)
sources:
Nanostray
controls:
d-pad = move
A = shoot with current weapon
B = weapon boost / laser (req. the "ENERGY" gauge on the bottom. Recharging the weapon gauge is done by collecting blue coins released whenever you kill complete waves of small enemies. One coin is sufficient to refill the whole gauge.)
X = bomb (check the counter on the bottom-right)
R = suck coins
touch icons in the bottom screen = switch weapon
basics:
- a health bar allows the ship to take some hits before blowing up.
It does not, however, protects it against collisions, which are fatal and mean instant death.
Every credit starts with five lives and there are absolutely no health recovery items or extends of any kind.
- gold coins only provides extra points.
- last stage: ...
sources:
Nanostray 2
sources:
Space Invaders Extreme
sources:
Ninja Gaiden: Dragon Sword
controls:
tap and hold, then drag to any direction = walk, run
slide up = jump (2x times to double jump)
any button other than START and SELECT = guard
any button other than START and SELECT + tap = roll
slide (when the character is falling) = quick landing
tap = projectile attack
slide horizontally on the foe = horizontal slash
slide vertically on the foe = vertical slash
after any slashing, slide up = lift
4x slide down (and hold to charge) = Ultimate Technique -> tip: charges faster based on the quantity of Essences around
basics:
- defeating enemies will spawn the Essence which is increase your
Gold (Yellow), Health (Blue), and Ki (Red).
When you stop moving the character you would absorb all these Essence that are floating.
- last chapter: 13
sources:
Freshly-Picked - Tingle's Rosy Rupeeland
sources:
The Legend of Kage 2
controls:
d-pad = move, crouch, aim, climb walls
2x d-pad left|right = run (on the ground), dash (in midair) -> perform higher jumps while running. Press A to stop running and perform a dash slice.
B = jump (hold to jump higher)
d-pad down + B (when unlocked) = slide -> pass under some narrow passages
A = melee weapon attack
Y = ranged weapon attack (deals less damage than melee attacks)
X = Ninjitsu special attack (req. MPs, check the colored gauge at the bottom-left)
L|R = switch Ninjitsu (check the colored icon at the bottom-left, unlock more by finding colored spheres in stages and combining them in the menu after each mission)
basics:
- easier char: Kage (throws shurikens with superior range)
- you can attach and attack while on walls and ceilings.
- get items and refills from hidden chests and orange ninjas in stages. Coloured magatamas will permanently increase your health and MP.
- last mission: 13
sources:
Simple DS Series Vol. 18 - The Soukou Kihei Gun Ground
controls:
TODO
menu translation:
TODO
sources:
Bangai-O Spirits
controls:
d-pad = move, aim
A = dash attack, cancel an EX attack
Y | X = fire 1st normal weapon (double tap to fire inplace)
B = fire 2nd normal weapon (double tap to fire inplace)
Y | X + B (tap) = mix/unmix normal weapons (a "-" appear between the weapon's name when they are mixed)
L | R (hold) = charge EX weapon (release to fire) (check the counter in the top-left next to the blue meter)
L + R (tap) = mix/unmix EX weapons
normal weapons:
- Homing: Shots move towards any nearby enemies. Good for large areas.
- Bounce: Shots bounce off of walls. They will bounce towards nearby enemies whenever possible. Useful in narrow areas.
- Napalm: Shots explode on impact, damaging nearby enemies. Good for sword enemies.
- Break: Shots absorb incoming projectiles and continue on their path.
- Sword: Melee attack that destroys all shots and pushes most enemies back. Does not stop other melee attacks. Moves Bangai-O forward with each use. Cannot be MIX'ed with other weapons.
- Bat: Just like sword, only shots are reflected and there's a delay between hits, leaving you vulnerable to attacks. Cannot be MIX'ed with other weapons.
- Shield: A shield will block attack from one direction. By default, the shield will block in the direction Bangai-O is moving. To fix the shield in one spot, press the fire button while holding the D-Pad in the direction you want it in. Press B on its own to reset the shield to block in front again. Cannot be MIX'ed with other weapons.
EX weapons:
- Homing/Bounce/Napalm/Break: Same as their normal versions.
- Direct: Missiles spread out, then attack the closest enemy.
- Reflect: All nearby boxes and enemies are thrown backwards or in the direction you set with the D-Pad. Does not have to be charged and cannot be MIX'ed with other EX weapons.
- Freeze: Unlike any other weapon, this EX attack does not directly harm enemies. Instead, the entire field freezes for a set time depending on how long you charge the attack. Without a counterattack, a max of 3 seconds of freeze time is possible, but a counterattack can make it at least 4 seconds. Cannot be MIX'ed with other EX weapons.
basics:
- best weapons to try (not for all stages): Homing + Break
sources:
Osu! Tatakae! Ouendan
main menu translation:
Single Player
Multi Player
Options Tutorial
options translation:
Rankings (azure button) High Scores (green button)
Tutorial Transfer (orange button) More Options (pink button)
Difficulty Select (before song select):
Insane (if unlocked)
Hard (if unlocked)
Normal
Easy
Song Pause:
Resume
Restart Song
Quit
Stage Failed:
Retry?
Yes No
sources:
Densetsu no Stafi 4 | Legend of Starfy 4
controls in water:
d-pad = swim
d-pad + A (hold) = swim faster
d-pad up + A = jump out of the water -> higher than regular jump
B = spin attack (do not spin too many times or you will be stunned)
X = enter doors, speak, interact
Y (hold) = charge Spill ability -> consumes the SP bar fully, collect pink pearls and kill enemies to refill it
L | R = select Spill ability (check the icons in the bottom-left)
controls outside water:
d-pad left|right = walk
A = jump (Starfy can double-jump if unlocked)
A (hold) = gliding in the air
B = run -> jump higher while running
X = enter doors, speak, interact
d-pad down = crouch
d-pad down (while running) = pass below some small spaces (Starfy only)
d-pad down + left/right = crawl under low passages, walk on fragile platforms (Starly only)
d-pad down + left/right + Y = low spin (Starly only) -> destroy blocks
d-pad opposite to the wall + A = wall jump (Starly only)
A, A, d-pad down + B (in midair) = ground pound attack (Starfy only) -> destroy blocks
SP attacks:
- regenerates your health for some time (LEARNED AT LEVEL 2-4).
- randomly may turn your enemies into coins OR into poop, which damages you (LEARNED AT LEVEL 5-3).
- turns Starly invincible for a while (LEARNED AT LEVEL 8-3).
- Stafi and Kyorosuke will appear and they will be able to move up A LOT (LEARNED AT LEVEL 9-3).
map legend:
- "!" = your next objective
- big red doors = door to the map
- grey statue (ワ-プじ七"う) = warp to Vine King
- statue with crown (ワ-プじどう王) = Vine King
- green small doors = inlevel doors (both opened and locked)
- snake doors (Tobira Majin) = opened once the game is completed once
pause menu translation:
- Dress room (orange tab)
- Hints and items for current stagex (green tab)
- Review moves (red tab)
- Save and quit (yellow tab)
basics:
- on the main menu, you can press start (or use the stylus on the purple shell) to continue.
- to advance to the next stage touch the char on the map with the "!" on it to talk with him (you can press Start to skip the dialogue entirely).
Then press the big square button in the bottom-left to play the next stage.
When the stage objective is accomplished you will hear a chime, then you can warp back to the stage entrance by talking with the Vine King.
- in some stages you will need to press down on the ring bell to switch to Starly (the pink female starfish) to proceed.
After beating the game you can switch between Starfy and Starly by pressing Select in the middle of the levels.
- last world: 9 Degil's Castle
sources:
The Legendary Starfy
controls:
d-pad = swim (in water), walk (on land)
Y = spin attack -> if you spin more than 3 times without any pause you will get dizzy and lose control for a while
B (hold) = swim faster (in water), run (on land) -> perform longer and higher jumps while running
B (tap) = jump (on land)
d-pad down = duck -> run and duck to slide under passages
X = enter doors, talk
transformations:
- dragon = blow fire with Y (can be oriented with the d-pad)
- seal = can swim around fast and Y does an ice shard attack -> destroy ice walls
- chicken = cluck with Y to attack and turn some enemies into platforms, also used to activate the bells. The chicken can also fly over air currents.
- ghost = press Y to drop a spirit bomb, that explodes with time or when an enemy touches it. Press B to vanish and pass thru enemies and spikes unharmed.
basics:
- collect pearls to refill your health (check the hearts at the bottom-right), and to buy random clothing from the shop.
- reach the portal in regular stages to exit to the map and unlock the next stage.
Most stages also have an hidden Star Door (a blue door with a small star over it) leading to a time-based minigame. Beat the minigame to unlock a secret stage in the map.
- treasure chests are a minor collectable in this game and only provide extras: side-story text and clothing items.
Only in secret stages you can also find blue treasure chests with an Heart Gem inside (gives an extra heart when you collect 3), and Special Pearls providing transformation upgrades.
- select Kyorosuke in the bottom screen to get hints about hidden stuff in current area.
Kyorosuke will get an exclamation mark when a star door is in the room, and treasure flashes more and more wildly in his eyes the closer you get to a treasure chest.
- talk to the mermaid inside the purple shells to save your game in-stage. You can also quick-save via the pause menu (this save is single use).
Talk to the creature with the book to exit the map mid-stage (you will restart the stage from the last save this way).
- last world: 8
sources:
Kirby: Canvas Curse | Touch! Kirby
sources:
Kirby: Squeak Squad | Mouse Attack
sources:
Kirby Mass Attack
controls:
tap empty space = walk
tap repeately empty space = run
flick a kirby = jump in the direction of the flick -> attack blocks, enemies, activate switches and other objects
hold a kirby and slide = group and carry your kirbys in midair
basics:
- collect fruits to gain extra kirbys (check the "Fruit" gauge and the big "1/10" counter on the top screen). Green melons are worth more than other fruits.
When a kirby takes a hit, it will become "KO'd" and blue, and can be revived by flipping him into a Recovery Ring.
Some hits will make him stunned instead, or may kill him instantly. White dead kirby can be brought back to life by flipping other kirbys over them.
- when a kirby contacts an enemy it will start fighting him. You can help your Kirbys win the battle by tapping on the enemy repeatedly.
- underwater controls are the same on land. Keep an eye on the air gauge on the top-left. Swim into air bubbles to fill up your air gauge.
- eat a Jumbo Candy to make your Kirbys huge for a short time, increasing their attack power.
- if you fail to complete a stage 3 times, a Lollipop/Invincible Candy will appear in parts of that stage to help
- on the world map, each stage has a number showing how many Kirbys you need to enter that stage. The actual stage number is shown in the top screen.
There is no specific order by which the stages need to be cleared, but some stages are locked and requires getting the rainbow bubble found at the end of few a specific stage in the same world (not hidden, can't be missed if you finish each stage regurally). Extra stages can also be unlocked by hitting a switch.
Beat the world boss and go to the star to warp to another world.
- medals are a minor collectable found in stages to unlock extras like minigames. Except for 1 special Rainbow Medal which must be found in every stage to access the final world.
- last world: Necro Nebula (5th)
sources:
Wii
pair a wiimote: https://www.wikihow.com/Connect-a-Wii-Remote
- open the Wii Remote battery bay.
- press the red "Sync" button on the back of the Wii Remote.
- flip down the SD card cover on the front of the Wii
- press the red "Sync" button next to the SD card slot
- Wait for the lights to stop flashing. Once the light on the Wii Remote is solid, the Remote has been successfully synced.
MEMO: cannot sync while in Homebrew Channel.
New Super Mario Bros. Wii
sources:
Super Mario Galaxy
sources:
Super Mario Galaxy 2
sources:
Super Paper Mario
controls:
d-pad = move, duck, talk, examine
2 = jump, swim upwards
1 = use a Pixl
wiimote aiming = examine people and things, find and reveal hidden items and structures; use some items
chars special ablities:
- Mario = press A button to flip between 2D and 3D.
- Princess Peach = After jumping, hold the 2 button to use her umbrella to float even further. When on the ground, press Down dpad to use her umbrella as a shield.
- Bowser = You can use his fire breath to light candles. His size and weight prevents him from jumping as high or to run as fast as the other characters.
- Luigi = hold Down dpad then release to perform a super jump that doubles your attack power.
Pixl abilities:
- Tippi: teveal hidden objects
...
sources:
NiGHTS: Journey of Dreams | NiGHTS: Hoshi Furu Yoru no Monogatari
sources:
Sin & Punishment: Star Successor | Sin and Punishment 2
controls (GC Controller):
...
sources:
Gunblade NY & LA Machineguns
Wario Land: Shake It! | Wario Land Shake | Wario Land: The Shake Dimension
controls:
d-pad = move, crouch, climb ladders, enter pipes
2 = jump (press d-pad down in midair to ground pound. Gets stronger when jumping from higher platforms)
1 = dash attack, throw items
shake down wiimote = Earthshake Punch -> stun most enemies, interact with some objects
tilt = aim
basics:
- to finish each stage, you must reach the Merfle Barrel, shake it to free the Merfle inside, and then a timer will start to count down.
Now all of the red blocks in the level will vanish, but a lot of areas will now be blocked by blue blocks, preventing you from going back to those areas.
You now have to rush back to the start of the level before the timer reaches zero; if you don't, you will be able to exit, but will NOT get to keep any treasures you found in the level.
- jump on top of most enemies to stun them. Then you can grab and throw them to far away objects, or to attack other enemies.
- getting hit will deplete the hearts on the top-left.
Most enemies have garlic that you can shake out of them, to restore some health.
- grab bags and shake them to get the coins inside (much more than just dashing into them).
Coins are needed to buy maps in the "Pirate Shop" and access new area/worlds.
Without enough coins you are stuck and forced to repeat past stages.
So always look for bags and big diamons that are worth a lot.
- minor collectables that can be found in stages are: 3 treasures and Secret Maps (unlock extra stages, revealed by standing in the right spot on certain stages and punching the ground).
- last area/world: 5
sources:
Super Smash Bros. Brawl | Dairantou Smash Brothers X
controls (GC controller):
Control Stick = move, duck, drop through platforms, fast fall, enter doors
2x Control Stick = dash
X | Y | Control Stick up = jump (press again to double jump/fly in midair)
A = standard/fast attack (focused/more powerful if combined with a direction), grab item (press A gain to use it, or Z to drop it)
B = strong/slow attack
C Stick | tap Control Stick+A = smash attack (greater launching power than other attacks, hold A to charge)
L|R = shield (hold and tap the stick for a dodge move), flip upright after falling to the ground (tech)
Z | L+A | R+A (near opponent) = grab
d-pad = taunt
basics:
- easier chars: Yoshi, Meta Knight, Kirby, Pikachu, Donkey Kong, Ice Climbers, Snake
- The "Subspace Emissary" is the adventure/story mode, where you can easily unlock new chars.
When playing a level for the first time, many cutscenes will pause just before gameplay begins, showing a view of all available chars.
A message will display how many stock the level allows, and a cursor will appear that allows choosing which characters to play.
The order chars are chosen in is the order they will appear: they will cycle through in that order until all stock is depleted.
- in adventure mode, each stage is made up with several scrolling sections.
In some of them you are blocked until you beat all the spawning enemies.
- your health is represented by the % counter in the bottom-left.
You lose 1 life when at 200%, or falling down a pit.
Collect food for a small refill, or the big hearth to refill fully.
- minor collectables that can be found in boxes are: trophies/statues, stickers and CDs (=additional songs).
- last stage: The Great Maze (story mode)
sources:
Cruis'n
controls (Control Pad mode):
d-pad left|right = steer (tap only, do not hold)
d-pad up|down = manual shift up|down
2 = gas
1 = brake
A = nitro (req. the blue N2O slots on the bottom-right, must be purchased)
B = switch BGM
- = switch camera
+ = pause
basics:
- play Circuit mode and finish in the top 3 to unlock new tracks.
- new cars are unlocked by earning and spending money.
- last track: MULHOLLAND DRIVE (12th)
sources:
Donkey Kong Country Returns
controls (Wiimote horizontal):
d-pad = walk, crouch
2 = jump (press again to float with Diddy)
1 (hold) = run, grab barrels, vines and cling patches (press again to throw)
wiimote shake = ground pound -> stun enemies nearby, activate switches and destroy cracked blocks and platforms from above
d-pad down + wiimote shake = blow -> estinguish fire, uncover items hidden behind some scenery
d-pad left|right + wiimote shake (with Diddy on Donkey kong back) = roll -> attack multiple enemies on the same platform
+ = pause
basics:
- attack most enemies by jumping over them, throwing barrels, or by rolling over Donkey Kong.
- getting hit will deplete 1 heart on the top-left. Collect an heart or a DK Barrel to refill.
- you can get extra lives by collecting red ballons before they fly away or collecting 100 bananas (check the counter in the top-left).
- if you are having trouble on a particularly tough stage and lose a life enough times, a tutorial pig will appear and offer Super Kong's assistance to complete the stage.
- collect banana coins to spend in the Cranky's Kong Shop found on the world map to get extra lives and single-use "INVENTORY" items, which you can equip before each stage.
In each world you can also buy a key for 20 coins to unlock an extra stage.
- collect all the hidden Puzzle Pieces in a stage in a single run to unlock either music or artwork.
- collect all the 4 "K O N G" letters in a stage in a single run to get a Star Medal. Get all of the star medals in any world, and you will unlock a secret stage, where you will find an Orb instead of an exit barrel.
You'll need all 8 of these to unlock the Golden Temple and the very end of the game.
- last WORLDs: VOLCANO (8th)
cheats:
- 3 Extra Lives: Begin playing one of your game saves with a low battery charge on your remote to initiate a message from Cranky; he will warn that your battery is low and award you extra lives to help you out.
sources:
Sengoku Basara: Samurai Heroes | Sengoku Basara 3
controls (classic):
Left Analog = Move (tap twice to run)
Right Analog = Move camera
b = jump (some char can jump in midair), Recovery/Mount horse
L = guard/parry + reset camera
x = Normal Arts attack (hold to charge) -> fast and focused
y = Super Art attack (can be swicthed before each battle, diff. when moving) -> slow and wider
ZL (req. the green gauge full) = Hero Time -> slow down enemies
a (req. the blue gauge full) = BASARA Art -> acts as a long, powerful combo specific to each character. You are invincible when performing + activate Hero Time for the Ultimate BASARA Art
L + Left Analog = Second Special Art attack
R (when unlocked) = Third Special Art attack
Left Analog + x (when unlocked) = Fourth Special Art
- = taunt|ally assist
+ = pause, skip cutscenes
basics:
- red boxes can provide either rice balls (=health) or blue flasks (=BASARA Art refills).
- each char obtains 4 Special Arts throughout the game. They deal much more damage than Normal Arts and are also much more stylish. A variety of Special Arts can be executed with different button combinations. Combine them with Normal Arts for an endless amount of combos. An additional art is the Super Art. Three of these are obtained as the character levels up, but only one can be equipped at a time. Go to the Equip screen pre-battle to equip the Super Art you're most comfortable with.
- Zennys are the currency acquired in battle by breaking your boxes (blue coloured) and defeating enemies normally.
Your Zennys are spent at the Basara Mart.
- materials are items you find in treasured boxes during battle. They are used to create accessories.
- last battle/war (in story mode): 10
sources:
Kirby's Epic Yarn | Keito no Kirby
sources:
Kirby's Return to Dream Land | Kirby's Adventure Wii
controls (horizontal wiimote):
d-pad = walk, climb ladders, crouch, drop down some platforms
2x d-pad = run -> cross small gaps
2 = jump (tap again in midair to fly)
1 = inhale (press again to split or d-pad down to swallow), attack with current ability
shake wiimote + 1 = inhale harder -> inhale big blocks and enemies
- = eject current ability
+ = pause and check current ability moves
basics:
- getting hit will deplete the bar on the bottom-left. Collect food to refill.
- collect 100 stars in stages for an extra live. Red stars are worth 10, and the blue stars are worth 30.
The game does not save the number of lives you have.
- all grabbed items except the key and candle wear out after a while, so move quickly when holding them.
- collect hidden Gears in stages to unlock minigames, Challenges and Copy Rooms in the spaceship (check the gears found in the top-left).
- in some stages you can find 1 special sparkly enemy. Super inhale and swallow him to get a time-limited Super Ability that allows you to destroy star-decorated blocks (check the rainbow gauge below Kirby while in use).
Keep destroying the scenery until you find an hidden star-shaped warphole, which leads to a dark auto-scrolling stage, ending with a boss fight and 2 gears when you defeat him.
Unlike the standard abilities, ejecting a Special Ability will cause the star to burst almost immediately, rather than bouncing for a while.
- last level/world: 7
sources:
The Legend of Zelda: Skyward Sword
controls:
Nunchuk Stick = move
C = First-person view
Z (tap) = center camera behind
Z (hold) = lock-on | Z-targeting
Wiimote shake = swing sword
Nunchuk upward = raise shield (push Nunchuk forward for a Shield Bash while raised)
Nunchuk + Wiimote move in a horizontal motion together = Spin Attack
A = put away sword, talk, read, interact, sidestep or jump backward (while Z-targeting)
A (hold while moving) = run (shake Nunchuck while running for a forward roll) (check the green Stamina Meter on the top-left)
B = equip a subweapon (hold to select subweapon)
- = equip an item (hold to select item)
1 = show equipment subscreen
2 = show help
+ = show map
d-pad down = talk to Fi
basics:
- in this game, you will have two separate areas for storing equipment. Your
main items will be in a menu accessible via the B button, and are always
carried. You also have an Adventure Pouch, received near the beginning of the
game, which holds secondary items such as shields, medals, and Bottles. You
can access the items in your pouch by pressing the - Button. Hold it and use
the Wii Remote to point at the item you want to use/equip. Shields are
automatically equipped, and do not become unequipped if you select something
else to use, like a Bottle.
Initially, your Adventure Pouch only has four slots for storage. That means
if you receive an item during your adventure and no slots to take it, it will
be automatically sent to the Item Check girl in the Skyloft Bazaar. You can
buy three additional slots at Beedle's Airshop, and find one more from a
chest activated by a Goddess Cube, giving you a maximum of eight slots.
sources:
FAST Racing League
controls (Classic Controller):
Left Stick = move
a = accelerata
b = brake, reverse
a+b = slide
ZL = switch color black-white (req. 1 square)
ZR = boost (req. 5 squares)
basics:
- best init. car: Faia VM
- to boost at start of race, press the accelerator at the exact time that the announcer shouts 'GO!'
sources:
Kyotokei
controls (Classic Controller):
d-pad = move
y (hold) = autofire shoot
b = switch color -> you'll absorb enemy shots of the same colour, filling up your homing missile gauge. The more you fill the gauge, the more devastating the homing missile shot will be when you unleash it.
l | r (when the bar in the bottom-left has 1 dot filled) = bomb attack
basics:
- complete a level on hard difficulty, and you'll unlock that level in practice mode.
- last stage: 5
sources:
Illvelo Wii: Illmatic Envelope | Arcade Shooter: Ilvelo
controls (Classic Controller):
d-pad x=x move
A = shoot
2x B (tap) = launch and recall the "DOLL" modules (can be combined with a direction)
B (hold when the modules are deployed) = move the detached modules in the same direction the ship is moving -> use to deal lot of damage to stronger enemeies
C | X (when the bar on the bottom-left is full) = bomb (unlimited uses, destroying enemies and inflicting damage fills the bar)
!A = brings up a shield -> absorb most bullets, except flames and lasers
basics:
- touching an enemy with your ship does not result in life loss so some enemies can spawn from the bottom of the screen or jump from the sides without killing you in unfair ways.
- destroing some enemies may release some items:
- point item (white icon in the shape of a computer folder, with a blue kanji on it) = extra points
- weapon level-up (blue, green or orange icon in the shape of a computer file)
- shot type change (circular item with a number on it) = blue 1 = spread shot/vulcan, green 2 = locking lasers, orange 3 = bubbles.
- life up (red envelope with a heart and "Life" on it) = increases your life count by 1 (represented by the numbered rects on the bottom-left)
- bomb refill (circular icon with a dark blue outer ring)
- bonus stage entrance : some are uncovered in plain sight, some appear after destroyin 3 colored star spots.
- key = obtained by clearing the bonus stages withgin the time limit (check the moving star on the big right bar). Keys are needed to access the True Last Boss.
- mail (green file folder icon with "Mail" written on it) = unlocks story stuff
- Milestone logo = another minor collectable
- on the top-right HUD, underneath the score, you can see 3 numbered gauges. Those display the experience level of your weapons. From left to right : Shot, Modules, and Shield.
Using weapons against enemies and destroying the enemies with the weapons generates experience points that are added to the gauges and level-up the weapons.
- last stage: 5
AR cheat codes:
Infinite continues
0032e81b 00000001
sources:
Radirgy Noa Wii
controls (Classic Controller):
d-pad = move
a = shoot
b = sword/melee attack
c | y (when the blue "ABS" gauge on the bottom-left is full) = activate the deflector shield -> melts bullets, damages enemies and makes you invincible for a while
basics:
- weapons are switched by colored powerups, which you can swipe to switch weapon:
The Red powerup is a cross, or X firing pattern which is most fitting considering the platform its hosted on, while Green is a more standard shot and Yellow provides a front and sideways shot.
Collecting the same color will increase your shot level.
- collect purple items to refill your ABS completely, or refill slowly by destroying enemies.
- health is never refilled (check the green battery meter in the top-left)
- once initiated a barrier will provide an x2 multiplier to all enemies vanquished as well as a certain amount of invulnerability.
If enough enemies are killed before the meter runs down, and the ABS is kept active, this will continue to double the current multiplier level until it reaches x16, but can be further boosted to x32 if you start to combine the ABS with a charged sword attack.
(check the green wifi meter in the top-left for the current multiplier)
- last stage: 8
sources:
Castlevania: The Adventure ReBirth
controls (Classic Controller):
d-pad | Analog stick = walk, crouch
a = jump (can change direction mid-air)
b = whip
d-pad up + b = secondary weapon attack (consumes hearts, check the counter in the top-left)
basics:
- best weapon: axe
- last stage: 6
cheats:
- level select: at the title screen, select Game Start and hold right on the d-pad for a few seconds. You'll be able to select and play any levels you have previously reached on the same difficulty.
sources:
Contra ReBirth
controls (Classic Controller):
d-pad = move, aim, climb
y = fire
b = jump
d-pad down + b = drop platform
x = switch weapons
R (hold) = fix position while aiming
+ = pause
basics:
- best weapons: "H" (Homing missiles), "S" (Spread shots)
- when you die at easy level you keep your current weapons.
- finish the game at different difficulties to unlock different extras.
- last level: 5
cheats:
- debug menu code (EU ver. only): press jump and Pause together on the title screen.
sources:
Gradius Rebirth
controls (Classic Controller):
d-pad = move
b = shoot + missile
a = powerup (check current one in the bottom-left)
basics:
- you can turn on autofire button in the options.
- destructible targets will show orange explosions when shooting them. Blue explosions means indestructible.
- you can only pass thru areas you can fire thru.
- last stage: 5 (2+ loops on normal or higher difficulty)
cheats:
- All 4 Options: Pause the game then input: Up, Up, Down, Down, Left, Right, Left, Right, Shoot, Powerup
sources:
Muramasa: The Demon Blade
controls (Wii Classic Controller):
Left Stick | d-pad left|right = run
Left Stick | d-pad up = jump (hold to glide, press again for a double jump)
Left Stick | d-pad down = crouch, drop down platforms
Left Stick | d-pad down + left|right = roll/emergency dodge -> escape enemies
b (tap) = blade attack (press 3 times for a simple blade combo), repel projectiles (hit the button just as they are to make contact with you), midair recover
b (hold) = guard (consume the blue gauge under your blade name when hit, auto-refills over time)
b (hold) + d-pad up = upward attack -> attack airborne enemies
b (hold) + d-pad down = low slash (on the ground), dive attack (in midair) -> attack enemies fallen on the ground
b (hold) + d-pad left|right = running slash (on the ground), flying slice attack (in midair) (up to 3 times in a row) -> use against bigger enemies to avoid their attacks
d-pad down (hold), b (hold and then release) (on the ground) = rolling jump attack -> most powerful regular attack in the game, break enemies guard, attack airborne enemies
y = use current blade Secret Art (consume the blue gauge under your blade name, auto-refills over time)
x = use item (check the icon in the top-right)
L (hold) = switch equipped blade (check the colored icons in the top, when the Blade Gauge lights up will also unleash a bomb-like attack that stun weaker enemies)
R = switch equipped item (check the icon in the top-right)
a = examine, talk, enter, breaks barriers if you have the right sword (no need to equip it)
Select = switch map display
Start = pause and access equip menu
basics:
- the Life Flame in the top-left is pretty much your HP and when it runs out, you'll start back at the area you died at.
Collect and use Food to restore health. Each Food item will restore a different amount of Life Flame, will give some Spirit, and some "Fullness" (check the gauge on the top-right).
Cooked Food always has 100% Fullness, but provide more stats increase.
Unlike food, all pellets and tablets can used at any time when you are damaged, even when Full. All of them also yield 10 Spirit. Also, there are items that recover certain status effects (like Poison).
- the Soul Power is the blue bar underneath the name of the blade you have equipped. Everytime you use a Special Art or Guard with your blade, the bar will decrease. Once the bar is completely empty, it will break in half and you'll either have to fight with a broken blade or switch to a different one.
You can restore the Soul Power bar by finding Souls or let it regenerate over time while you use a different blade. Repelling attacks also decreases the Soul Power bar.
- collect the green Souls to boost the Soul Power bar and forge new blades in the pause menu.
- check the map to find areas with hidden items (there is a red basket sign). When you find a small blinking spot, press a to Examine it and get an item.
- check the red flag and the arrow near the map at the top for your next destination. Buy full maps from a villager for easier exploration.
- in some sections you must talk to all the NPCs before you can proceed.
- last act: 8
sources:
Metroid: Other M
controls (side view, horizontal wiimote):
d-pad = move, run
d-pad any direction (whenever an attack is incoming) = "sensedash" evasive move -> very useful
d-pad any direction + 1 (whenever an attack is incoming) = quick charge shot
2 = jump
d-pad + 2 = Spin-jump
1 = fire beam, drop bombs (in Morph Ball form)
1 (hold) = charge beam
A = toggle Morph Ball form, fire missile while locked on
+ = display the map screen ()
controls (search view, vertical wiimote aiming at the screen):
hold the Wiimote straight up + A (hold) = "Concentration" -> restore missiles and some energy
A = fire beam, hold and release for fire charge beam. Lock on to fire missile or super missile by hold and release the same way.
B = examine. Hold it if your pointer is locked on to something.
shake wiimote = "sensedash" evasive move
basics:
- powerups are unlocked only when certain story events occurs (no need to find them).
sources:
Sonic and the Secret Rings
controls:
tilt Wii Remote left/right = steer Sonic
tilt Wii Remote backward = walk backwards
1 = slow down or stop
2 = jump (Hold to charge for higher and farther jumps)
2 (in midair) quickly land.
2, thrust Wii Remote forward in midair = Air-dash forward, perform the Homing Attack if an enemy is in range
d-pad up = Speed Break
d-pad down = Time Break
basics:
...
sources:
Sonic Colors
sources:
Mega Man 9 | Rockman 9: The Ambition's Revival!!
controls (wiimote):
d-pad = move
2 = jump
1 = shoot
+ = open weapon|item selection screen
- = shows challenges list
recommended stage order:
- Galaxy Man (Use arm cannon or Concrete Shot)
- Jewel Man (Use Black Hole Bomb)
- Plug Man (Use Jewel Satellite)
- Tornado Man (Use Plug Ball)
- Magma Man (Use Tornado Blow)
- Hornet Man (Use Magma Bazooka)
- Splash Woman (Use Hornet Chaser)
- Concrete Man (Use Laser Trident)
basics:
- the only way to save the game is to clear or die to a stage.
sources:
Mega Man 10 | Rockman 10: Threat From Outer Space!!
controls (Wii Classic Controller):
d-pad = move
b = jump
a (tap) = shoot
a (hold) = charged shoot (Proto Man only)
d-pad down + a = slide (Proto Man only)
L|R = select weapon
+ = open weapon|item selection screen
- = open menu
recommended stage order:
- Sheep Man (Use R.Striker)
- Pump Man (Use T.Wool or arm cannon)
- Solar Man (Use W.Shield)
- Chill Man (Use S.Blaze)
- Nitro Man (Use C.Spike)
- Commando Man (Use W.Cutter)
- Blade Man (Use C.Bomb)
- Strike Man (Use T.Blade)
basics:
- unlock Hard Mode by beating the game on Normal difficulty.
- last stage: Wily 5
sources:
Ghost Squad
GTI Club: Supermini Festa!
controls (Classic Controller):
...
basics:
- win races in Quest mode to unlock new cars and parts.
Rodea the Sky Soldier
controls:
TODO
basics:
sources:
3DS
River City: Tokyo Rumble | Nekketsu Kouha Kunio-Kun SP: Rantou Kyousoukyoku
controls:
d-pad | cpad = move (double tap to run)
A = punch, pick up and attack with weapons
B = kick, throw weapons
Y = jump
X = change command given to ally
L = switch the screen angle
R = zoom the screen in and out
Start = open the Pause Menu
stylus = view the map
basics:
...
sources:
Super Smash Bros. for Nintendo 3DS | Super Smash Bros. 4
controls:
LS = move, crouch
2x LS =run
Y | X = jump
A = weak attack
LS + A (at the same time) = smash attack
B = strong attack (can be combined with a direction)
R | ZL (hold) = shield (flick LS when attacked to dodge), drop item
L | ZR | A (while shielding) = grab an enemy
d-pad = taunt
game modes:
- Smash = custom single-battle mode
- Smash Run = chose a char, play in a free-roaming arena for 5min to collect boost items (with unlimited lives), then fight in a random "Final Battle" and get extra bonuses
- Games & More
- Solo
- Classic Mode = play 6 battles with a chosen char. The 6th battle is a special boss, followed by the end credits.
- All-Star Mode = play again all other unlocked players in separate rounds
- Training
- Stadium
- Multi-Man Smash
- Target Blast
- Home-Run Contest
basics:
- easier chars: Pit, MetaKnight, Pikachu, Link, Toon Link, MegaMan, PacMan
You can equip additional powerups via the "Setup" screen.
- if you want to unlock new characters quickly, go to Smash (offline) and set your stock to 1. Then immediately fall to your doom as each match begins. Keep repeating that process until you have played enough brief matches to unlock all desired characters.
Alternatively, you can beat Classic mode multiple times.
When "A Challenger Approaches" battle appear, you must win to unlock the new char (will say "XX Joins The Battle").
sources:
Yoshi's New Island
controls:
d-pad = walk, run, crouch
A = jump (press d-pad down in midair to ground pound -> break some blocks, stun some enemies)
B = tongue
Y | R = egg throw (press again to throw, d-pad down to cancel and use the next egg, X | L = stop aim)
basics:
- getting hit will make baby Mario fly away and star depleting the star counter.
Hit the bubble before the timer runs out to get Baby Mario back, or you will lose a life.
- blue doors lead to the next stage section, while pink doors lead to optional minigames.
Whirly doors lead to a transformation/gyro-based minigame.
- collect 100 yellow coins to earn an extra life. Some of them are red coins in disguise.
They are additionally spawned if enemies are hit with a Yellow and Red Eggs.
- red coins and Smiley Flowers are minor collectables.
Getting a flower in the Goal Ring roulette will gives you Egg Medals.
5 is the maximum number of Egg Medals for a single level run, but the player can replay the level to get the level maximum of 30. 10 Egg Medals give the player a 1-UP, 20 Egg Medals give the player three 1-UPs, and 30 Egg Medals give the player a vehicle challenge, an extra level based on a transformation that a Yoshi can complete to get extra lives.
- Gigantic eggs are either spawned from a large Egg Block or from eating a Mega Guy or a Mega Kantera.
When thrown, they break through many obstacles and defeat enemies and certain bosses.
sources:
Mighty Gunvolt
controls:
d-pad = move, climb ladders
Y = shoot (hold to charge, diff. for each char)
B = jump
L+R = toggle widescreen (stretched)
basics:
- easier non-DLC char: GUNVOLT (can jump in midair to easily skip enemies, aim charged shot)
- getting hit will deplete the bar on the top-left. Collect hearts to refill.
- gems and food only provide extra points.
- last stage: MIRROR
sources:
Luigi's Mansion: Dark Moon
controls:
TODO
sources:
Kirby: Triple Deluxe
controls:
d-pad = walk, crouch, fly, enter doors, climb ladders
2x d-pad left|right = run
B = inhale (press again to spit or d-pad down to swallow and copy abilities of some enemies)
d-pad dpwn + A = slide -> destroy some blocks
A = jump (tap in midair to fly)
Y = attack
X = drop current ablity
L | R = guard, dodge move -> reduce damage from enemies attacks, even against bosses
Y = use current item on the touchscreen
basics:
- getting hit will deplete the health meter on the bottom-left. Collect food to refill.
- collect enough Sun Stones hidden in stages to unlock the boss stage at the end of each world.
Collecting all of them will also unlock an EX Stage for each world.
- collect 100 colored stars for an extra life.
- keychains are minor collectables that will increase your savefile rank.
- in some stages you will come across the Miracle Fruit ginving you the Hypernova ability.
- last Level/world: 6
sources:
Kirby: Planet Robobot | Hoshi no Kirby: Robobo Planet
controls:
d-pad = walk, crouch, fly, enter doors, climb ladders, open chests, grab and drop items
2x d-pad left|right = run
B = inhale (press again to spit or d-pad down to swallow and copy abilities of some enemies), throw items
d-pad dpwn + A = slide -> destroy some blocks
A = jump (tap in midair to fly)
Y = attack
X = drop current ablity
L | R = guard (combine with d-pad for a dodge move) -> reduce damage from enemies attacks, even against bosses
Y = use current item on the touchscreen (obtained from Bandana Waddle Dee)
basics:
- getting hit will deplete the health meter on the bottom-left. Collect food to refill.
- collect enough Code Cubes hidden in stages to unlock the boss stage at the end of each world.
There are 3 in regular stages, check the icons in the bottom screen.
Collecting all of them will also unlock an EX Stage for each world.
- in some stages you can find a Robobot Armor that will increase your attack power, allowing you to destroy stage obstacles.
The robot can also double jump and interact with mechanisms like screws by pressing d-pad up.
Press dpad up when next to an armour terminal to dismount.
- green batteries need to be grabbed and carried inside machines to activate them.
- collect 100 colored stars for an extra life.
- stickers are a minor collectable than can be used to decorate your Robobot Armor in the Sticker Room.
- last AREA/world: 6
sources:
Super Mario 3D Land
sources:
Code Of Princess
controls:
d-pad left|right = walk
2x d-pad left|right = run
d-pad up = jump
B = weak attack
A = normal attack
2x d-pad down, A|B = special attack -> very effective
X = toggle burst -> stun enemies nearby + incr. ATK (consumes MP)
Y = lock-on attack -> will incr. damage on locked enemy (good on bosses)
L|R (hold) = guard
L|R (hold) + up|down = change plane
L|R (hold) + 2x left|right = backstep
R (hold) = skip cutscenes
level up points:
- Vitaliy: Increases max HP
- Piety: Increases max MP
- Attack: Increases physical attack
- Defense: Increases physical defense
- Mind: Increses magic attack and defense
- Speed: Increases movement speed
basics:
- best initial chars: Zozo, Solange
- attacks can be used to block other attacks, including projectiles.
- last chapter: 31
sources:
Mario Kart 7
controls:
circle pad = steer
A | Y = accelerate
B = brake, reverse
R = jump, start drifting -> get extra boosts
A | Y + B = spin turn/turn on the spot
X | L = use item (drop behind when combined with circle pad down)
tap lower screen = switch map view
d-pad up = switch to first person view
basics:
- for a Rocket Start, start accelerating before the 3rd light turns on.
- collect coins to increase your top speed and to unlock new car parts (up to 10 per race).
- finish 1st in 150cc GP cups to unlock more chars.
sources:
Kid Icarus: Uprising
air battles controls:
circle pad = move, dodge attacks (move right before getting hit)
touchscreen | R+circle pad = aim
L (hold) = rapid fire (stop shooting for 1s until the reticle gets big for a charged shot)
L (tap quickly near enemies) = melee attack
d-pad (any) = bomb (check the blue orbs in the lower screen bottom-left, auto-refills over time)
land battles controls:
circle pad = move, dodge attacks (tap right before getting hit)
2x circle pad (hold) = dash (get tired after a while) -> perform diff. attacks when dashing forward|sideways|backward
touchscreen | R+circle pad = aim, look around (swipe to turn left|right)
L (hold) = rapid fire (stop shooting until the reticle gets big for a charged shot)
L (tap quickly near enemies) = melee attack
R = reset camera on the back
X = zoom
d-pad left|right = select special power (check the icons and counters in the lower screen bottom-left. Equip diff. powers before each Chapter in the menu)
d-pad down = use special power
basics:
- before starting a new level/chapter you can equip weapons, special powers, and increase the stage "Intensity" (difficulty+rewards) via the Fiend's Cauldron.
Some chapter areas are only accessible over a certain Intensity level ("Intensity Gate").
- weapons are categorized based on different types and values, the higher the value the more powerful it is.
You can collect additional weapons throughout your story. However, the power of your weapons depends on the difficulty of your game, the harder the game the better the weapons you can find.
- easier weapons to use: Bows (long-range homing shots), Claws (good for short-range).
- the easiest way to obtain better weapons is to fuse the ones you have in the "Gear" menu.
- you earn hearts by defeating enemies and converting weapons and gems.
Hearts can be used to change the Intensity and buy new weapons in the "Arms Altar" menu.
- in Land Battles the "Guide arrow" below your char will show your next destination.
There are also green arrow signs to guide you in the stage.
A flame barrier indicates you have to dispose all the enemies in the area to proceed.
- collect food or the "Drink of the Gods" to instantly refill your health in-stage (check the bar at the top-left). You can also use the "Recover" special power if you have it.
If your health bar is depleted, the bar will disappear and you will enter "Crisis mode".
If you take too much damage in Crisis mode, you will die and have the option to CONTINUE (=restarting from the last checkpoint with a lower Intensity/difficulty) or quit and RETURN TO MENU.
- eggs are a minor collectable in the game and they can be used to obtain "Idols" (anmimated 3D models) in the "Idol Toss" minigame.
- last Chapter: 25
sources:
Liberation Maiden | Kaihou Shoujo
controls:
circle pad = move (hold to start dashing)
circle pad + (hold) l = strafe
touchscreen = aim (auto lockon, release to fire)
swipe the sword icon on the touchscreen (when the gauge is full) = bomb (auto-refills while destroying enemies)
basics:
- getting hit will deplete the circular gauge on the bottom-left.
This functions as both your shields and your weapons attack power.
- always check the map on the bottom screen for your next targets.
Primay objectives are displayed with a "M." Sub-missions are displayed with an "S."
Tapping the "Menu" button gives you more details on your objectives and lets you see your current purification percentage.
- last stage: 5
sources:
Legend of Zelda: A Link Between Worlds
controls:
circle pad = move
a = grab, check, talk, open doors, throw, merge with facing walls (press again to exit) -> use to reach other platforms and avoid enemies
b = sword attack (hold until flashes to spin attack)
R (hold) = shield (cannot use the sword while guarding)
L (hold when you have the Pegasus Boots) = run
y = use the equipped item (if assigned) -> consumes magic
x = use the equipped (if assigned) -> consumes magic
select = open items menu and equip them
d-pad = move the camera
deep water controls:
b = swim faster
a = dive
basics:
- use the tornado rod on metal plates on the terrain, and to enstinguish fire.
- use the Net to catch fairies and bugs.
Fairies in a bottle will revive you automaticalky when you are dead.
You can bring bugs to the Bee Man in Kakarijo Village and exchange them for rupees.
- collect 10+ baby Maiamais and bring them to its mother in a cave to the north of Lake Hylia to upgrade items.
- use the bell item on the lower-left of the touchscreen to teleport.
sources:
The Legend of Zelda: Tri Force Heroes
controls:
circle pad = move
a = grab, throw, check, talk, open doors, swim, totem other herores (only the hero on the bottom can move)
b = sword attack (hold until flashes to spin attack)
y = use the equipped item (diff. for each Link) -> consumes magic (check the meter in the top-left, auto-refills over time)
L = run
R (hold) = shield (cannot use the sword while guarding)
select = open items menu and equip them
x = take a picture
d-pad = move the camera
touchscreen icons = switch Link (1P mode only)
basics:
...
sources:
Legend of Dark Witch
controls (type 1):
d-pad left|right = walk
d-pad left|right (when about to get hit) = block
d-pad up|down (hold) = look up|down
y = shoot
b = jump (hold to hover if you have the WING powerup)
a = get highlighted powerup in the bottom-left bar
x = change weapon ("skill" menu)
L|R = quick switch weapon
boss weakness:
- Icke: Dia Missile (Klinsy's weapon)
- Kuito: Lord Attack (Rudy's Weapon)
- Klinsy: None/Over helm (Herbert's Weapon)
- Herbert: Boing Boing (Kuito's Weapon)
- Mari: Illusion Shot (Litty's Weapon)
- Urken: Dark Matter (Mari's weapon)
- Litty: High Power Beam (Icke's Weapon)
- Rudy: Timing Half (Urken's Weapon)
- Codino: High Power Beam(Icke's Weapon)
Stoj: Boing Boing (Kuito's Weapon)
- Blad: Dia Missile (Klinsy's weapon)
- Pelusa: None/Over helm (Herbert's Weapon)
- Franzer: Dia Missile (Klinsy's weapon)
- Franzer Awakened: None
- Zizou: None
- Zizou Awakened: None
basics:
- kill enemies to collect "Tres" (blue small butterflies) and fill the powerup slots on the bottom.
You lose tres when hit.
You also keep the tres by the end of the level, where you can spend it in the "Growparts" menu to permanently boost your weapons and stats.
- each boss has a weapon they are weak to.
- last stage: Riva Princess
sources:
Legend of Dark Witch 2 | Majin Shoujo Episode 2: Negai e no Daika
controls (TYPE 1):
d-pad left|right = walk
2x d-pad left|right = run
d-pad left|right (when about to get hit) = block
d-pad up|down (hold) = look up|down
y = shoot (hold for autofire but check then thin "Capacity" bar at the bottom-left)
b = jump (hold to hover if you have the WING powerup)
a = get highlighted powerup in the bottom-left bar
x = change weapon ("skill" menu)
L|R = quick switch weapon
ZL = reset to default weapon
ZR = special magic attack (when the "REVENGE" sphere at the bottom-left is glowing) -> use against stage bosses
basics:
- every stage has 4 hidden hidden blue crystals (Pura Syega).
Collect them to buy stuff in the shop.
Magic items from AL's shop are single-use (not very useful).
Best Status Growth stuff to buy: Tres, Attack
- last stage: Port Campania (Pelusa)
sources:
Legend of Dark Witch 3 | Majin Shoujo Episode 3: Yuusha to Gusha
controls:
d-pad = walk, climb ladders
y = shot
b = jump (hold to descend slowly if you have the WING powerup)
R = "Lord Attack" dash (even in midair) -> use multiple times to cross long gaps, and to evade enemies
a = install (in manual or semi-auto modes) -> get the highlighted powerup in the bottom-left bar
x = use MAGIC ITEM (check the counter in the bottom screen, switch before each stage in the "PAPELNE TRADE" menu)
basics:
- getting hit will deplete the hearts on the bottom-left. Falling in pits will only deplete 1 heart.
- shooting, dashing and WING consumes the "Capacity" gauge on the bottom-left.
Stop perfoming these actions to let the gauge refill.
- collected Tres can be spent in the "PAPELNE TRADE" to buy permanent powerups.
- last stage: Day
sources:
Yumi's Odd Odyssey | Sayonara Umihara Kawase
controls:
d-pad = walk, crouch, enter doors
B = jump
Y | R = cast the fishing line (can be combined with a direction)
If the line hooks onto something, you must continue to hold the button down to remain attached.
As soon as you release the button, the line will unhook.
d-pad down|up (while something is hooked) = reel in|out
L = time stop
?? = pan camera
Start|Select = pause
basics:
sources:
Shantae and the Pirate's Curse
controls:
d-pad | circle pad left|right = walk
d-pad | circle pad down = crouch
d-pad | circle pad up = enter doors
b = jump (press again for air-jump up to 3 times if you have the CANNON, also works as a downward attack)
y = hair whip attack
a = talk, check, fire pistol -> activate distant eye switches
x = activate lamp -> suck up dark magic, scents
r (in midair) = float with hat (longer jumps), ride wind upward (req. HAT)
l = backdash (on ground), scimitar down thrust (in air) -> destroy purple blocks on the ground
d-pad | circle pad left|right (hold until you blink), y = dash (req. BOOTS) -> destroy grey blocks, can walk on skypes
basics:
- collect hidden red squids and bring them to SQUIDSMITH in Scuttle Town to get extra life hearts.
- best powerups to buy in Scuttle Town shop: Shampoo, Silky Creme, Auto-Potion (restores all HP when Shantae is defeated)
- talk to Risky to travel to different places. Use the Pirate Flare to teleport back to Risky.
- find all 20 Cursed Cacklebats, kill them and absord the dark MAGIC to get the best ending.
sources:
Azure Striker Gunvolt | Armed Blue Gunvolt
controls:
d-pad | circle pad = walk
b = jump (hold R | a in midair to descend slowly)
L | 2x d-pad | circle pad = dash/run
y = fire tags -> deals little damage to enemies, each enemy can be tagged up to 3 times, making the circular marker change color
R | a (hold) = Flashfield (req. the EP gauge in the top-left, also the half-circle around the player) -> deals great damage to 3x tagged enemies, much less via direct contact
2x d-pad | circle pad down = fully recharge EP
touch icons in the bottom screen = use Special Skill (req. SP=skill points, on the bottom-left)
recommended stage order (1st columnt to the left from top to bottopm, then the 2nd):
- Subaquatic Base
- Media Tower
- Biochem Plant
- Datastore
- Stratacombs
- Pharma Lab
basics:
- if the EP gauge reaches 0 it will overheat (check the "%" counter in top-left + the arc blue gauge arour you).
Manually refill before that happens.
- you are vulnerable only on low EP.
- check your blue/green health gauge at the top-left. If it gets empty it is game over, and you will restart from the last checkpoint.
Collect bottles to refill it.
sources:
Azure Striker Gunvolt 2 | Armed Blue: Gunvolt 2
controls:
d-pad | circle pad = walk
b = jump (hold R | a in midair to descend slowly as Gunvolt)
L | 2x d-pad | circle pad = dash (even in midair) -> used by Copen to "tag" enemies
y = fire laser (as Copen, straight if untagged) | fire tags (as Gunvolt, deals little damage to enemies, each enemy can be tagged up to 3 times, making the circular marker change color)
R | a (hold) = "EX WEAPON" Flashfield (req. the EP gauge in the top-left, also the half-circle around the player) -> deals great damage to tagged enemies, much less via direct contact
2x d-pad | circle pad down = fully recharge EP
x | touch icons in the bottom screen = switch EX WEAPON (as Cogen) | use Special Skill (req. 1-3 SP=skill points, on the bottom-left) (as Gunvolt)
basics:
- easier char: COPEN (can dash in midair)
- getting hit will deplete the green gauge on the top-left. Collect...
- Copen uses a different equipment system than Gunvolt. Rather than being a series of items stratified by type, Copen loads subroutines (subs) into his gear to gain various effects such as increased attack power. Subs vary in size and effect, and his gear only has so much capacity, so don't overload it. Doing so can result in unfortunate effects, such as reduced defense.
Copen's tagging system can be described as "reverse Mighty No. 9". By dashing into a foe, Copen can tag it to fire a stream of homing shots at that foe until the tag wears off or until the foe is defeated. Copen can only tag one enemy at a time, but the nature of his dashes allows him to bounce off enemies and chain kills for Kudos.
- last stage: Prayer (The Garden 4)
sources:
Blaster Master Zero
sources:
WiiU
boot in Wii mode (vWii) directly:
as soon as the Wii U logo shows, press and hold B on the Wiimote or Wii U GamePad.
(If the lights on the wiimote stop blinking, Press and hold B again.)
If done successfully, you will hear a chime.
This also enables the Control Pad working as a wiimote sensor bar.
https://gaming.stackexchange.com/questions/117153/wii-u-launch-directly-to-wii-menu
Yoshi's Woolly World | Yoshi Wool World
controls (wiimote):
d-pad = move, crouch, enter pipes, doors
2 = jump (hold in midair to flutter, press d-pad down to ground pound)
1 = flick out tongue -> eat most enemies and interact with objects (press again to spit things out or press d-pad down to swallow and make a yarn ball)
A = throw a yarn ball
+ = pause and check status, activate a Power Badge by spending the collected crystals
basics:
- Mellow Mode is the game's "Easy Mode".
You can switch between modes at any time in the game, even during a level.
In mellow mode:
- Yoshi will fly across the screen until you release A,
- Enemies Do Less Damage and Yoshi Picks Up More Hearts.
- All Question Mark Winged Clouds Are Visible
- Make 2 Eggs From One Enemy
- getting hit will deplete the hearts, hit a winged "?" cloud or reach a checkpoint to refill.
- minor stage collectables are: Wonder Wools (unlocks new yoshis), Smiley Flowers (get a chance to play a minigame at the end of current stage), Stamp Patches (hidden in crystals, unlock stamps you can use in Miiverse).
- hidden door with a red "?" flag will bring you to a transformation mini stage where you have to reach the exit within the allotted time. Collect clocks to gain some extra time.
- last world: 6
sources:
Kirby and the Rainbow Curse | Kirby and the Rainbow Paintbrush | Touch! Kirby Super Rainbow
controls:
draw ropes = create platforms to guide Kirby
tap Kirby = boost, attack (tapping and holding when you have 100 point stars for a more powerful attack)
trasformations:
- Kirby Tank = tap the screen to target shoot
- Kirby Submarine = touch the screen to set destination. Automatically fires missiles. you can direct the missiles by drawing a rainbow rope.
- Kirby Rocket = automatically flies in a set direction, but drawing a rainbow rope can guide him
sources:
Tank! Tank! Tank!
controls (Wii U GamePad):
Left Stick = move, aim
b | x | a| y | r | ZR | L | ZL = shoot
basics:
sources:
Star Fox Zero
controls (Wii U GamePad):
Left Stick = move
GamePad motion controls = aim
Right Stick left|right = rotate ship
Right Stick up = boost (req. the blue gauge on the bottom-center)
Right Stick down = brake (req. the blue gauge on the bottom-center), hover (in Walker and Landmaster modes)
Left Stick down + Right Stick up | X = somersault (req. the blue gauge on the bottom-center)
Left Stick down + Right Stick down | B = U-turn (req. the blue gauge on the bottom-center)
2x Right Stick left|right = barrell roll
ZR = fire main lasers, hold to charge and lock enemies (more locks are available when you powerup your main lasers)
R | Right Stick (tap) = fire bomb
ZL (hold) = look at your next target -> check the Wii U GamePad for FPV
A = switch vehicle
Left Stick (tap) | Y = reset targeting reticule
- = swap TV and Gamepad screens
Start = pause, check your allies status
basics:
- if you pause the game and look down at the gamepad menu, there will be several options, including the setting to keep "Motion controls always on", and turning them off. Doing so will cause the reticle to be centered in front of the Arwing when not shooting, just like the old Star Fox games.
However, this mode doesn't get rid of the motion controls completely. When holding down the fire button, the player has the option to move around the gamepad to use the gyro controls once more, and it stays open for at least a second in case you're re-positioning yourself for aiming.
- collect silver and gold rings to refill your health (check the orange bar in the top-left).
- collect the "L" powerup to upgrade you main lasers. After 2 upgrades you can lock-on more enemies.
- last stage: Venom
sources:
Splatoon
controls (Wii U GamePad):
LS = walk
RS = look (disable Motion Controls in the Options for vertical look)
ZR = shoot ink -> attack enemies, interact with some environment items
ZL = switch squid form, use launchpads -> swim in your own ink to recover ink, climb walls and slopes
R = use sub weapon (req. ink meter almost full, check the icons in the bottom-left)
d-pad left|right = switch sub weapon (check the icons in the bottom-left)
X = jump (also when in squid form)
Y = reset camera
basics:
NSW
Clockwork Aquario | Tokeijikake no Aquario
Sonic Frontiers
Super Smash Bros. Ultimate | Dairantou Smash Bros. Special
sources:
Bayonetta 2
controls (Switch Pro Controller, Type A):
Left Stick = walk, run
Right Stick = move camera (press to reset)
B = jump (press again for double jump, hold to descend slowly)
X = punch (hold to shoot hand guns) -> alternate with a to unleash various combo attacks
A = kick (hold to shoot heel guns) -> alternate with x to unleash various combo attacks
Y = attack with your current weapon, interact
R = quick switch weapon
ZR = evade (can be combined with a direction) -> execute when attacked to enter "Witch Time" slowmo mode (longer duration when dodging a projectile attack)
2x ZR = transform (diff. depending on location)
L (when shown onscreen) = enter "Umbran Climax" (combo kill enemies to refill the purple magic gauge on the top-left and reactivate) -> temp. increase attack power
ZL = lock on enemy
d-pad = use items
d-pad down = taunt -> nearby enemies will be enraged, refilling the Magic Gauge
- = pause and show menu to switch weapons, use items
+ = pause and show menu to skip cutscenes
transformations (Beast Within):
- Black Panther = run faster, make longer jumps
- Crow (must be purchased for 20,000 halos at the shop, 2x RT in midair to activate) = fly for a short period of time, it can help you make a jump you couldn't previously or give you a few more feet after a jump.
- Bat (must be purchased for 20,000 halos at the shop, RL at the instant an attack hits to activate) = escapes the attack, pushes the enemy away and can activate Witch Time. This is purely defensive, however the slightest bit of damage will be delt to the enemy.
- Snake = swim underwater (use the Right Stick to go up/down)
basics:
- getting hit will deplete the gauge on the top-left. Use a Green Laurel or Herb Lollipop to refill.
Collect 2x Broken Witch Heart to increase the gauge.
- the Magic Gauge on the top-left is required to perform Magic Techniques like the Umbran Climax, Torture Attack, Climax (press X+A when prompted).
The Magic Gauge fills when you defeat enemies consecutively or activate Witch Time.
- best items to purchase in the SHOP: Bat Within, ...
- last CHAPTER: XVI
sources:
Super Mario 3D World
controls (Switch Pro Controller):
LS | d-pad = walk
Y | X = run
B | A = jump
ZL | ZR (hold) = crouch, crawl
ZL | ZR (in midair) = ground pound -> use to destroy some blocks
Y | X (in midair as cat Mario) = dive attack
Y | X (while crouching) = somersault -> can break blocks that you can't ground pound.
ZL | ZR (hold until Mario will begin to shake), b | a = crouch jump -> higher
L + R = Enter a Bubble
- = use the powerup in the bottom-left box
d-pad up = Item Reserve
R = use touch cursor
RS = look around
R3 = reset camera
basics:
- easier char: Peach (can hover in midair, but she is the slowest runner)
- when jumping check your shadow as landing spot.
- collect hidden green stars to unlock extra stages.
- last world: 8 + 4 specials
sources:
Bowser's Fury - Super Mario 3D World
controls (Switch Pro Controller):
LS = move (hold Y|X to run)
B = jump (press ZL|ZR in midair to ground pound)
Y = grab item (press again to throw), use curr. powerup special ability
ZL|ZR = crouch
ZL|ZR + Y = roll (even in midair)
LS rotate = spin (press B while spinning for a Spin Jump)
RS = move camera
d-pad up | X = use item reserve (check the icons in the bottom-left, hold to use right away without selecting)
R = use touch cursor (aim with LS and press again to interact) -> use on "?" painted walls
L = reset camera/touch cursor
+ = pause
- | d-pad right = open map (...)
d-pad down = snapshot mode
d-pad left = amiibo
powerups special abilities:
- Super Bell (Cat Mario) = can climb walls with the claws
- Fire Flower = fireballs show invisible walls
- Boomerang Flower = grab faraway items with the boomerang
- Super Leaf (Tanuki Mario) = float downward by holding the jump button
basics:
- Lake Lapcat is the main location for the game.
This large area is split up into a bunch of tiny islands, where you can explore and grab some Cat Shines, the main collectible in the game.
There is no set pattern to the progression, for the most part, although you won’t have access to the entire Lake Lapcat from the beginning.
That brings up the main mechanic of the game, the Giga Bells.
As you collect Cat Shines, you will eventually unlock the ability to use the Giga Bell in the region in which you're currently exploring.
Whenever Fury Bowser comes out to play and you’ve collected enough Cat Shines to unlock the Giga Bell, that will also become available. Go collect it to start a battle with Fury Bowser and upon beating him, then you will unlock another region with more islands.
- Every few minutes, Fury Bowser emerges from the Fury Sun and begins rampaging, only taking damage if Mario collects a Cat Shine.
However, Giga Cat Mario is able to battle him directly, as they are both at a similar size.
Defeating Fury Bowser in direct combat gradually reveals new islands of Lake Lapcat to explore.
- total Cat Shines: 100 (50 req. to finish the game)
sources:
Mario Kart 8 Deluxe
controls (Switch Pro Controller):
LS | d-pad left|right = steer
Y | A = accelerate
B = brake, reverse
ZR | R (tap) = hop/jump, air trick (when on ramps)
ZR | R (hold while steering) = drift
ZL | L = use item, horn
LS | d-pad up|down (while gliding) = adjust gliding height
X = Rear View
- = display map
basics:
- press and hold the accelerator button when "2" stops fading in and starts fading out for a rocket boost at the start of the race.
- gain mini-turbos via:
- long drifts
- hop on ramps (jump boost)
- jump near or hit an obstacle or an oppenent in an antigravity zone (won't slow you down like does normally)
- collect coins (up to a maximum of 10) to increase your speed and unlock new vehicle parts at the end of the GP.
- finish any GP in 1st place to unlock new chars.
- the 0/6 stars function at the upper left after a race are for marking your favorite races/highlights (check Mario Kart TV in the main menu).
sources:
New Super Mario Bros. U Deluxe
controls (Switch Pro Controller):
LS = move, crouch, slide (on slopes), climb, enter doors and pipes
LS down (in midair) = ground pound attack
A | B = jump
A | B (hold in midair when Flying Squirrel) = glide
A | B (hold in midair when on Yoshi) = flutter jump
X | Y = run, throw fire|iceballs (if you have the powerup)
X | Y (as Yoshi) = extend tongue
L | R | ZL | ZR = spin jump, dismount Yoshi, baby Yoshi abilities, spin underwater
L | R | ZL | ZR (in midair when Flying Squirrel) = midair jump -> very useful
X | Y + L | R | ZL | ZR = pick up objects (hold to carry)
basics:
- upon completing the game once and unlocking Superstar Road, the Propeller Hat and Penguin Suit powerups are made available from the Toad Houses located there. Once obtained, they can used in any level in the game.
sources:
Hyrule Warriors: Definitive Edition | Zelda Warriors: Hyrule All-Stars DX
controls (Switch Pro Controller):
Left Stick = walk
Left Stick (keep holding for a while) | b (hold) = run
B (tap) = roll, evade
ZL (tap) = reset camera
ZL (hold) = guard -> it avoids all damage from enemies ahead, except a rare few who break guards
Y = quick attack
X = strong attack
A (when the yellow horizontal bar is full) = special attack
L | R3 = lock-on target (only main enemies)
RS left|right (when locked on) = cycle targets
RS = move camera
R (when the green vertical bar is full) = activate Focus Spirit -> gives higher stats while it lasts, no hitstun, and you cannot die event if you have no hearts left.
A (while in Focus Spirit mode) = do a Focus Spirit attack (will drain your remaining magic)
ZR = use item (check the icon in the upper left)
d-pad left|right = cycle items
d-pad up|down = switch char
- = toggle mini map display
+ = pause, skip char victory/appearance animations, opening chest animations and the victory/defeat screen
item weapons:
- bombs: destroy boulders, broken walls
- boomerang = stun enemies, cut the dark vines blocking the way
- bow+arrows = kill Deku Babas (poisonous plants), safely attack/stun enemies from a distance
- hookshot = reach high places
basics:
- each scenario has a restricted set of chars that can be used and a recommended element (check the suggested char with the thumbsup icon).
- to conquer a keep you must kill the regular enemies inside until the bar on the right with the its name fills up and the keep boss appears.
- collect triforce pieces to fill up the yellow gauge.
collect jars to fill up the green gauge.
- last scenario: 14
sources:
Yoshi's Crafted World | Yoshi Craft World
controls (Switch Pro Controller, Type A):
d-pad | LS = move, crawl
A = jump (hold to Flutter Jump, press L|down in midair for a Ground Pound -> use on legs and breakable blocks)
B = stick out tongue -> eat enemies and make eggs (some enemies cannot be eaten, press again to spit out), interact with some objects
X | R | ZR = throw eggs (aim with d-pad | LS, also in foreground/background layers)
basics:
- "Mellow Mode" is like easy mode: less damage from enemies, hold A to fly higher, etc.
- getting hit will deplete the hearts. Look for Question Mark clouds that provide bonus Hearts.
You can also pass by Bell Checkpoints where you get healed, and some enemies nearby get turned into Hearts.
- collect Smiley Flowers in stages and give them to robot NPCs in the world map to unlock new parts of the map
(not a minor collectable like in prev. games).
- to finish each regular stage you must reach the Goal.
You get extra flowers for collecting 100+ regular coins, 20 red coins and having all the hearts when you cross the finish line.
A few courses in the game are scoring-based challenges in timed or auto-scrolling settings, with the player's final score translating into an amount of Smiley Flowers as a reward. These levels are marked below with an arrow (▷).
- collected coins can be spent at the gatcha machines on the map to get Costumes (provides temp. hit protection when equipped).
- last world: Shadowville
sources:
Kirby Star Allies
controls (Switch Pro Controller, Type A):
LS = walk, run, enter doors, climb ladders
d-pad = walk (double tap to run)
d-pad down + A = slide attack
A = jump (tap repeatedly in midair to fly)
B = inhale (as plain Kirby), attack
X = throw an heart and turn an enemy into a friend (also works with a Copy Essence) -> if you have 4 friends, the game will pause and you will have to select a friend to replace
LS | d-pad up (hold) = combine friends' powers -> you can add fire, ice, electricity and other power effects to a weapon. Always try to have diff. elemental powers in your party
L|R (hold) = guard (tap LS|d-pad while guarding to dodge)
- | Y (hold) = drop ability
L + Y = drop a friend
+ = pause and view current ability techniques
basics:
- getting hit will deplete the "P1" health gauge on the bottom-left. Collect food items to refill.
- collect 100 Point Stars to get a 1UP.
- Picture Pieces are a minor collectable to unlock artwork pics.
- doors with a red star contain a mini quest for a bonus item.
If you fail you can re-enter the door as many times as you like.
- Big Switches are hidden in stages. Find them to open Extra Stages and the Dream Palace (=roulette for friends).
- last world: 4 Far-Flung Starlight Heroes
sources:
Hyrule Warriors: Age of Calamity | Zelda Musou: Yakusai no Mokushiroku
controls (Pro Controller):
LS = walk (keep holding for a while to run)
B = dodge move
Y = quick attack
X = strong attack
A (when the yellow horizontal bar is full) = special attack
RS = move camera, switch target
R3 = lock-on target (only main enemies)
R + Y|X|A|B = use a rune (limited usage, has a reload time) -> use when a big enemy is attacking and the corresponding icon is shown to stun him
L + X|Y|A = ready a rod = elemental Fire|Ice|Lightning attack (then aim and use with Y, limited usages, collect items to refill)
L + B = use healing item
ZL = guard (hold)
ZR = char-specific unique attack/action (Link=bow+arrows)
d-pad up|down = switch char
runes:
- Remote Bomb = destroy some blocks, break the guard of defensive enemies.
- Stasis = freeze enemies or objects. Use against enemies with spinning attacks
- Cryonis = create a block of ice. Use to stop charging enemies in their tracks.
- Magnesis = grab and pull metal objects. Also effective against enemies with metal equipment.
basics:
- easier chars: Link, Impa
- while in battle getting hit will deplete the hearts on the top-left. Pick apples and consume them with L + B to heal.
Unlike in Breath of the Wild, you won't be able to pause the menu to heal up repeatedly during a battle.
Food is selected at the start of a mission, and will provide you with special buffs, but it will not give you moment-to-moment healing.
- collect materials in battles to fullfill secondary quests on the map and obtain extra abilities/hearts for your party.
- you can quickly levelup you chars by spending money at the Military Training Camp near the center of the map.
- best strategy against stronger enemies:
- keep them locked and dash with B when they attack, then counter-attack at the right moment
- use the right rune when promted to stun them, or use an elemental ability for the same effect (must be the correct element if the enemy is not neutral)
- when the enemy gauge is empty strike a fatal blow with X
- last Chapter: 7
sources:
Donkey Kong Country: Tropical Freeze
controls:
LS | d-pad = move, swim
A | B = jump, swim boost (press again in midair to hover if you have the ability)
Y | X (while standing still) = ground pound -> stun enemies, break the block you are standing on
Y | X (while moving) = roll attack -> cut the grass and reveal some hidden items
Y | X (tap repeatedly when you have a partner) = shoot popgun
ZL | ZR = grab, throw, pluck, combine, dismount
L + R = Kong POW -> turns enemies into items. The Kong you have as your companion will determine what the enemy turns into
basics:
- Funky Kong has 5 hearts and does not take damage when you land on most spikes, however enemies will still hurt you.
You can jump twice in mid-air which means you can jump higher and slow down your fall by holding the jump button. You can also roll and corkscrew as much as you want and breathe underwater.
Donkey Kong instead can obtain extra abilities via 3 partners:
- DD = Diddy Kong: his jetpack allows him to hover in midair and get speed boosts underwater. His Peanut Popgun can be used to shoot and stun or distract enemies for a brief moment.
- DX = Dixie Kong: her ponytail allows her to get a short lift or fall slowly in midair. Underwater, her hair can also be used as a propeller, conferring more agility in her swimming; secret exits can be found with her hair as well, by going through currents. Her Gumball Popgun can shoot bubble gums at enemies.
- CK = Cranky Kong: His cane can be used to defeat hard-to-stomp enemies, and as a pogo stick in order to jump higher and on spikes. Also with his cane, he can whack enemies underwater. His popgun shoots dentures at enemies.
- to finish each level you must reach and touch the Slot Machine Barrel.
Some levels also have a secret exit, and by reaching it, you unlock an alternate path from the world map that leads to another level.
- you can get 1 extra life by collecting 100 bananas or 1 red baloon.
- collect coins in stages to spend in the "Funky's Fly 'n' Buy" shop found in every world map.
Most useful items: Green Balloons (=prevent you from falling down a bottomless pit), Blue Balloons (=automatically refills your air meter when it's empty).
- puzzle pieces are a minor collectable to unlock artworks.
- a special temple level opens once all of the KONG Letters in that world are collected.
At the end of the temple level you obtain a Mysterious Relic.
- last world/island: 6 (7 if all the relics are collected from the temple levels)
sources:
Mighty Gunvolt Burst
controls:
d-pad | LS = move
B = jump
Y = shoot
A = char-specific special skill
L|R = switch equipment
suggested stages order and boss weakness:
- City (Grounddigger): All Elements
- Oil Platform (Pyrogen): Press
- Water Works Bureau (Cryosphere): Heat
- Power Plant (Dynatron): Slicer
- Mine (Seismic): Impact
- Radio Tower (Aviator): Analyzer
- Military Base (Battalion): Freeze
- Highway (Brandish): Smash
- Capitol Building (Countershade): Shock
- Gateway (Beck or Gunvolt): Shock (if Gunvolt), Press (if Beck)
- Subspace (Briar Guardian): Heat and Slicer
- Distopia (Plasma Legion): Shock and Analyzer
- Cyberspace Colosseum (Fake Player): All Elements
- Teseo (Giant Robot): Impact and Smash
- Teseo (Exposed): Freeze and Analyzer
basics:
- easier non-DLC char: GUNVOLT (can jump in midair when unlocked)
- getting hit will deplete the gauge on the top-left. Collect hearts or fruits to refill (fruits must be consumed manually from the pause menu).
- CPs ("Cost points") are needed to equip powerups in the CUSTOMIZE menu. They can be collected in stages.
- for easier platforming, try to get in the in Radio Tower stage "RIGEL B9" (for Beck) or "RIGEL GV" (for Gunvolt).
"Aerial Action" will be added to the customizing elements. Aerial Action helps you to expand the action in the air, Beck will be able to perform "Air dash" and Gunvolt will be able to use "Mid-Air Jump".
- bosses only have elemental weaknesses. You can tell if you are using the correct one when the little impact animation when you shoot them is green.
sources:
Legend of Zelda: Breath of the Wild
controls:
LS = walk, run, climb, swim
L3 = toggle crouch/stealth mode
RS = move camera (press to reset)
R3 = toggle googles (move and zoom with RS)
A = interact, grab items on the ground, speak, open chests
B = sprint (check the green stamina gauge), put away
X = jump (even when climbing), dodge move (when attacked), use glinder (in midair)
Y = attack with current weapon (hold to charge)
ZL (tap) = center camera
ZL (hold) = lock on, raise shield (combine with LS to strafe, X to hop and backflip)
ZL (hold) + A (right before enemy attack) = parry attack
ZR (hold) = use bow (release to throw an arrow) -> arrows are limited, but can be picked and reused after each thrown
L = use rune magic -> infinite uses, but they have a cool down period
R (hold) = throw current weapon -> use only when damaged
d-pad right (hold) = quick switch weapon (select with RS)
d-pad up (hold) = quick switch rune magic (select with RS)
d-pad left (hold) = quick switch shiels (select with RS)
d-pad down = whistle -> calls nearby registered horses, attract enemies
+ = pause and switch equipments, use items
- = pause and view the map
controls (riding horse):
LS = move
LS down = stop
A = speedup (check the icons on the bottom)
L = slowdown
B = dismount
runes magic:
- MAGNESIS: attract and move metallic objects. -> they can be climbed and used as a platform
- REMOTE BOMB: create a bomb in your hands. Press R to throw or B to drop. Then press L to detonate. -> stun and damage enemies, destroy cracked walls
- CRYONIS: create a pillar of ice from a water surface. They can be climbed and used to access higher places. Use again on an ice pillar to destroy it -> uncover underwater chests, raise bars blocking the way, block enemies attack.
- STASIS: stops an object in time while storing its kinetic energy. The stored energy will act upon the object when the flow of time resumes. -> use on big boulders to throw them in air
- CAMERA: take pictures
suggested walkthrough:
- Great Plateau
- Dueling Peaks
- Hateno Village
- Zora's Domain
- Vah Ruta Dungeon
- Goron City
- Vah Rudania Dungeon
- Gerudo Town
- Vah Naboris Dungeon
- Rito Village
- Vah Medoh Dungeon
- Captured Memories
- The Master Sword (optional)
- Hyrule Castle
basics:
- getting hit will deplete the hears in the top-left. Pause and eat food to refill.
- weapons will break after a while. When this happens, hold "R" to throw them off, then quickly press d-pad left to switch to another.
- climb and activate orange towers to obtain overworld map sections.
- find shrines to activate warp points. Complete the puzzles inside to obtain a Spirit Orb. Pray the godness statue found in villages to trade 4 sprit orbs with an heart or a stamina upgrade.
- find hidden Korok seeds and exchange them with Hestu to expand your inventory.
Hestu can be found on the road to Kakariko Bridge.
- rupees are hardly found in the overworld. You can easily obtain them from enemy-filled camps. Clear out these and you'll likely find some rupees lying around, or as a reward in a chest.
Mining Ores can be sold for a huge profit: Amber, Opal, etc.
cheats:
- Infinite Sprinting (Whistle Sprinting): Sprinting while holding B will drain stamina, but pressing down on the D-Pad will make you whistle which is not a stamina consuming action. By tapping B over and over while holding down on the D-Pad, you will regain any missing stamina and keep up a running speed.
- Easy Arrows (Post Patch): To the west of Eventide Island is a small island with a pool in the middle. Use Magnesis to pull up a chest with 10 arrows, then save your game before reloading that save. The chest will respawn, allowing you to get more arrows. Repeat until you have what you need.
sources:
Cruis'n Blast
controls:
LS = steer
A = gas
2x A = wheelie -> wheelie over a jump for a backflip, or into a car to flip over it
B = brake
R (hold while turning) = drift -> grants you a boost at the end of the drif
L = use 1x boost (check the counter in the bottom-left)
Y = change camera
X = change BGM
basics:
- easier initial vechicle: Corvette Stingray
- at the countdown of each race. Rather than rev your engines like all the other competitors, wait for the moment where the word SET disappears from the screen and just before the word GO appears. When done correctly, you will get a nice boost at the start of the race.
- you need to get a gold trophy in each tour to proceed. So choose to restart the race if you get a bad position.
- car stats increase when your car levels up. Other upgrades are purely cosmetic and have no effect on stats.
So you better spend your money in buying extra boosts.
- collect keys in tracks to unlock new vehicles to purchase (each track has 3 keys hidden).
If you collect a key, it is automatically saved so you don’t need to finish the race in order to keep it.
sources:
Fast RMX | FAST Racing Neo
controls:
LS = steer, adjust pitch -> you can use pitching to reach the ground more quickly or extend your airtime as needed.
a = accelerate
b = brake
x = switch Phase color blue|orange -> match boost strips and jump pads to use them. You'll often see multiple boost strips in a row that alternate between orange and blue, so be ready to switch your phase in between them.
R = use boost (req. the gauge on the bottom-right, collect orbs on the track to refill) -> stun opponents by driving into them while boosting
ZL | ZR = lean/strafe left | right
d-pad up = change camera
basics:
- play Championship mode and finish 3rd or better to unlock new tracks and cars.
In Hero Mode your boost meter is also your life bar! Colliding with walls or other drivers will deplete your meter, and if you hit something while it's empty, it's game over! To help compensate for this, all boost strips will fill your meter as you drive over them.
- there are sometimes also physical obstacles on the track that you need to watch out for. These include pillars, crates, moving walls, giant fans, asteroids, death lasers and giant robots! You'll obviously want to avoid these, since you'll crash if you happen to run into any of them.
- begin accelerating when the counter reaches "2" for a boost start.
- Always boost in the air.
sources:
Splatoon 2
controls:
LS = move
RS = aim, move camera
ZL = swim inside ink of the same color of yours, use launchpads and rails
ZR = fire main weapon (req. some ink, swim to refill)
R = fire sub weapon (req. the ink tank full enought)
R3 = activate special weapon (if you have found it, check the icon in the top-right)
B = jump (even while swimming or riding rails)
Y = reset camera
basics:
- for the single player story mode, press "X" on Inkopolis Square and select "Octo Canyon".
Then, you can press "X" again to warp to each unlocked Sector/world.
- go to Tentakeel Outpost and interact with the dustbin to upgrade your gears by spending the gold eggs collected in stages.
- last Sector/world: 5
sources:
Super Mario Odyssey
controls:
LS = walk, run
B | A = jump (press ZR | ZL in midair to ground pound)
X | Y = throw cap (hold to keep Cappy in the air) -> destroy blocks, attack and possess enemies
ZR | ZL (hold on the ground) = crouch (press B|A for a backflip, X|Y to start rolling, LS to crouch walk)
R | L = reset camera
RS = look around
R3 = FPV
- = view map (select a Checkpoint Flag to warp to it)
+ = pause
basics:
- in Assist Mode, you'll have: More HP, 6 to be exact, as opposed to the 3 in Regular mode.
A life regeneration ability, where if you stand still you'll regain your hit points.
Arrows along the ground and one on your head, which will point you along the path to your next objective if you seem to be lost.
A lakitu-esque bubble that'll bring you back up to where you fell if you fall off of the world, rather than it simply causing you to lose coins.
- getting hit will deplete the 3-units circular gauge in the top-left. Collect hearts to refill.
The Life-Up Heart will increase your health gauge to 6 units, until you deplete it to 3.
- as far as the concept of "lives" goes in this game, they don't really exist in this game. Coins are your lives now, in the form of a loss of 10 every time you'd lose a life. This can hurt if you die repeatedly and go bankrupt, but nothing further will happen even if you have 0 coins. You'll just continue respawning at the last saved location.
- collect enought Power Moons in each world/kingdom to powerup the Odyssey airship and unlock the next world/kingdom.
They can be obtained in a wide variety of ways, such as: collecting a key, 5 Moon Shards, a sequence of notes, planting Seeds in pots, bought in shops for 100 regular coins, win the Yoshi's race, find and talk to Captain Toad, go near Goombette/Lady Goomba as a stack of Goombas, cap hold over glowing pegs, ground pound over glowing spots, hit glowing birds, catch the bunny, toss your hat on the scarecrow and complete the Timer Challenge, enter hidden cap doors and complete the challenge.
When collected, Power Moons also refills your health and save your game.
- in addition of the regular gold coins, you will also find kingdom-specific/regional purple coins that can be spent in the Crazy Cap stores.
Purchasing the correct costume will grant you access to a locked door and an extra Power Moon.
- last Chapter/kingdom/world: Moon Kingdom (+ 3 secret)
sources:
Chocobo GP
controls:
LS = steer
A = accelerate
B = brake, reverse
R = jump, midair tricks (hold to drift while steering) -> obtain boost
L = use "Magicite" item (check the icons in the top-left, collect eggs to restock. Pick the same color multiple times to powerup)
ZL | Y = use char-specific ability (req. the blue gauge on the bottom-left full)
X | ZR = rear view -> use to check incoming attacks
main menu:
- Chocobo GP = online MP
- Multiplayer
- Shop (spend earned Tickets here)
- Story = main 1P mode, unlock new chars and tracks here
- Time Attack
- Series Races = 1P/2P GP Mode
- Custom Race
basics:
- easier chars: Chocobo, Ben (has dash ability)
- begin accelerating when the start countdown reaches "2" for a starting boost.
- collect small blue crystals to increase your top speed when you reach 10 (check the counter in the bottom-left).
Collected crystals also grants you Tickets to spend in the Shop.
- when a "!" sign appear on the bottom, move on the side of the track to avoid the incoming attack.
- last Story Chapter: 9
sources:
SMS
controller layout:
(8-way d-pad) (1 Start) (2)
Power Strike | Aleste
controls:
d-pad = move
1 = fire main weapon (straight shot)
2 = fire secondary weapon (lasts for 80s, check the timer in the bottom-right 2nd line)
basics:
- you can powerup your primary weapon up by collecting small yellow "P" chips.
- collect a numbered capsule to switch or upgrade the secondary weapon (check the top number in the bottom-right).
These capsules always come from the top consecutively in order, so you will always have the chance to refill the counter with the same one if you're patient.
If you die you'll revert back to 1, which is unlimited but only stops enemy shots at power level 3.
- best secondary weapons: 8 (wave lasers), 6 (fast bendable wave shot), 5 (slow homing balls), 2 (charge blast).
- last round: 6
cheats:
- Start With 9 Lives: At the title screen, press Down, Right, Down, Down, Left, Right, Up, Right and Button 1.
sources:
Power Strike II
controls:
d-pad = move
1 = fire main+secondary weapons (hold for autofire, release after a few secs for a special burst shot that clears bullets in front of you)
2 = switch speed (4 speeds, you see the current speed number "come out" from the ship)
basics:
- at the start of the game you need to select a weapon, numbered from 0 to 6.
During the game you can switch freely between types by picking up the numbered weapon powerups (check the top number in the bottom-right)
Pick the same number multiple times to increase the weapon level (check the 2nd line counter in the bottom-left).
Carriers always bring special weapons in order, from 0 to 6.
Best weapon: 4 "ABSORPTION" (homing spheres).
One of the main differences from the first Power Strike is that here there’s no limited ammo for any weapon, and
when you die you only lose half your power instead of losing it all.
- collect "P" chip to make your main weapon more powerful.
- there are also colored crystals to collect that spin quickly around the ship and protect it from incoming bullets while providing slight upgrades to the main weapon.
There are 3 different colors and you can equip 2 at a time: red=incr. power, blue=piercing, yellow=wide.
- 1UPs can be obtained from score extends, small ship or smiley face pickups. Besides granting the 1UP the smiley also adds 3 power levels to the special weapon.
- last stage: 8
cheats:
- Cheat Menu: to unlock the Cheat Menu, hold on the Reset button and press Pause 10 times.
- Comfort difficulty: to get an even easier mode, go to the options screen, and set the difficult to RANK1 CRUSH. Then press 1 + Left.
sources:
Psycho Fox
controls:
d-pad left|right = walk (hold to run)
d-pad down = crouch
1 = punch attack, throw birdfly when you have it
2 = jump
Pause = pause the game and show the ITEM screen (press 2 to use an item)
ITEMs (from left to right):
- Psycho Stick (stick of the Shinto Purification) = allows you to transform into other animals.
- Straw Effigy = bomb-like
- Magic Medicine = temp. invincibility
basics:
- movements has an inertia based physics system. Basically, if you're at rest you're going to tend to stay at rest. This means jumps from a dead stop will not go far, at all.
- you cannot punch until you've thrown birdfly. This means enemies right in front of you can be deadly, because birdfly might miss them and you might not get to punch fast enough. So please compensate for this by not allowing enemies anywhere near you.
- items are contained within eggs that have failen along the way, and sometimes appear after you have defeated one of the enemies.
Some the egg may not contain any item or an enemy.
- collect Money Bags to place one bet each at the end of round minigame.
- last stage: 7
sources:
Zillion
controls:
d-pad left|right = walk
d-pad down = crouch (avoid enemy fire), move elevators down
d-pad up = stand up, move elevators up, use computer console
1 = jump, stand up
2 = shoot
Pause = pause and show the status screen, switch char
basics:
- to proceed from room to room, you must crack open capsules and memorize the codes inside.
Then, find a computer terminal, and enter in that code to unlock the next door (in any order).
Every time you want to use a computer terminal, you'll need an ID card.
If you merely enter in the "open door" command, which changes from room to room, you'll get your ID card back.
-
In addition to room codes, there are commands which can be entered into any computer console:
1111 Display map
2222 Disable laser barrier
3333 Disable sensors
4444 Disable moving walkway
5555 Disable turrets
6666 Warp A (teleports you to the first elevator shaft)
7777 Warp B (teleports you to a random location)
8888 Destroy base (only works on the main computer)
9999 Cancel destroy base command
0000 Suicide
If you use one of these codes the terminal will eat your ID card.
Make sure you always save one card on you, else you won't be able to open any more doors!
- you can retreat to your mothership (or warp there directly, by entering 6666) to get restored to full health.
sources:
Fantasy Zone II: The Tears of Opa-Opa
controls:
d-pad = move
1 = fires the beam weapon
2 = fires the ground bomb/missile weapons
basics:
- never stop shooting and keep moving.
- when you die you lose all your powerups. So it is better to buy red/blue bottles instead of extra ships.
- in order to buy items, you must locate the SHOP cloud. At least 1 is located in each round, and can be accessed multiple times.
In some stages there are also hidden SHOP clouds with special deals inside. In order to find them, you must shoot their location enough times before they will appear (listen to the sound of your projectiles hitting something).
A few precious items are also hidden in the same fashion throughout the game like the red/blue bottles, and the clock gives an extra 30 seconds to any temporary weapon that's currently active.
- recommended weapons to buy:
- BEAM: Big Shot + Auto Beam = rapid fire destruction (and permanent, too!)
- BOMB: Twin Big Bomb
- SPEED: Turbo Engine (Rocket can be too fast)
- FIRE BALL = most powerful weapon
- last ROUND: 8
sources:
Alex Kidd in Miracle World
controls:
d-pad = move, run (hold for a while), swim, crouch -> crouch while running to pass under narrow passages
1 = jump
1 (hold when in water) = turbo swim
2 = punch, throw capsules
pause (on console) = pause and open the subscreen (shows the items, money, and lives you have)
items to buy in shops:
RING = a weapon that fires ">" shaped objects across the screen
CAR = a vehicle brought from shops that Alex can drive through the level in
HELICOPTER = a vehicle brought from shops that Alex flies through the level in
CAIN = a magical Cain with mystical attacking powers
WEAPON A = releases powerful Mini Alexes to Kill the emery
WEAPON B = same as Weapon A but more powerful
TALCUM POWDER (BOX "?") = temp. invincibility
basics:
- avoid toching all the enemies, they will kill you instantly unless you have the Magic Capsule B or temp. invincibility.
Also avoid skull blocks.
- grab as many bags of coins as you can. That way you'll be able to buy lots of helpful items at the shop.
- be sure to get the rice ball/hamburger at the end of each level. It'll give you energy. And it's worth 1,000 points.
- last level: Cragg Lake (12th)
sources:
Alex Kidd in Shinobi World
controls:
d-pad = move, climb, squat
2 = jump (combine with d-pad up|down to grab horizontal bars) (press again when touching a wall to side-jump) -> tap quickly to cross any body of water
1 = attack (swing the sword or throw spears)
1 (hold when hanging on a bar) = spin as a fireball -> use to reach higher platforms, break through thick walls, attack enemies above|below
basics:
- getting hit will deplete the small triangles in the top-right health bar.
To refill and increase the health collect hearts from the chests (up to 6 triangles).
When all the triangles fade, you lose 1 life. You get 3 lives in each Level.
- open all the chests you come across, they always contains good powerups, incl. weapon upgrades and refills.
- last ROUND: 4 (each ROUND has 3 stages)
sources:
GG
Sonic Chaos | Sonic & Tails
controls:
d-pad = walk, crouch, enter doors
2 = jump (stand still as Tails and press again in midair to fly)
d-pad down + 1 = charge spin
basics:
- easier player: TAILS (can fly and easily reach higher platforms)
- last stage: Electric Egg Zone
cheats:
- Level Select: Go the the title screen and punch in the code.: Up, Up, Down, Down, Right, Left, Right, Left, Start
sources:
Lucky Dime Caper Starring Donald Duck | Donald Duck no Lucky Dime
controls:
d-pad = walk, crouch, enter doors
2 = jump
1 = weapon attack
basics:
- getting hit will deplete the red squares on the top-left. Collect star items to refill.
- attack most enemies with your current weapin (safer) or by jumping over them (also to reach higher platforms).
- enemies will randomly drop a weapon switch pickup. Try to get the boomerang as it is the best weapon (safely attack from a distance and and can be aimed up)
- last STAGE: 7
cheats:
- Unlimited Lives: Lose all of your lives on purpose and press Down + 1 at the continue screen. You will start on the same level with unlimited lives.
sources:
Deep Duck Trouble Starring Donald Duck | Donald Duck's Four Treasures
sources:
Coca Cola Kid | Sassou Shounen Eiyuuden Coca-Cola Kid
controls:
d-pad = move (hold to run), duck, grab and climb platforms
1 = attack
2 = jump, wall jump when sliding on a wall
d-pad down + 2 = slide -> pass under narrow passages
d-pad down + 1 (hold) = charge slide attack -> use for longer jumps, more powerful attacks
basics:
- getting hit will deplete the red cans in the top-right. Collect drinks found in some destructible objects to refill.
- if the timer in the top-left reaches 9:59, you will lose a life.
- collect coins to buy powerups in the vending machine shown after each boss: CONTINUE (=extra life), LIFE UP (+1 hit point), COKE DISK (temp. attack powerup, lost when hit or when the stage ends).
- in most stages there are multiple paths you can take. Usually the upper paths are easier, but harder to reach.
There is no marker for the stage exit.
- last AREA: DISCO
cheats:
- Level select: at the title screen, before Press Start Button is displayed, press Down, Down, Down, Down, Left, Left, Up, Up, Start.
sources:
Vampire: Master of Darkness
controls:
d-pad = move, duck
d-pad (diagonals) = climb ladders, crawl -> pass under narrow passages
2 = jump
1 = primary weapons attack (unlimited uses)
d-pad up + 2 = secondary weapon attack (limited uses, check the counter in the top-right)
Start = pause and check current score, weapons, and lives
basics:
- getting hit will deplete the red "HP" orbs in the top-left. Find red potions to refill.
- destroy floating white masks to get items inside: small coins (=extra points), primary and secondary weapons, big diamonds (=ista-bomb), etc.
Weapons cannot be powered-up, and secondary weapons need refills after some usage.
- best weapons: axe (most powerful), hammer (higher range), bomb, stake (only in ROUND 4). Avoid the other weapons.
- last ROUND: 5
cheats:
- Debug Menu incl. round select: press 1+2+Up at the Title Screen after pressing Start.
sources:
Castle of Illusion Starring Mickey Mouse
controls:
d-pad = move (hold to run), duck, enter doors
2 = jump (press again in midair to butt stomp)
1 + d-pad (next to an object) = pick up (press again to throw)
basics:
- choose "NORMAL" to play the full game. In "PRACTICE" mode you only play some very short levels without bosses.
- dispose enemies by throwing objects at them (safer), or via the butt stomp attack.
- getting hit will deplete the "POWER" stars in the bottom-left. Collect cakes found inside chests to refill. The stars are also refilled after each stage.
Collect the red Power Star item to increase the max stars.
Collect the Mouse Ears for an extra life (check the "TRIES" counter in the bottom-left).
- to reach high ladders and platforms, you can throw an object near them and use it as a platform, or you can butt attack an enemy and hold the jump button to bounce (more risky).
- gold coins only provide extra points.
- last stage: THE CASTLE
sources:
Land of Illusion Starring Mickey Mouse | Mickey Mouse's Magical Crystal
controls:
d-pad = move (hold to run), duck, enter doors
2 = jump (press again in midair to butt stomp)
1 = pick up objects (press again to throw)
d-pad down + 1 = switch small|big mickey (when unlocked)
basics:
- getting hit will deplete the red points on the POWER gauge on the bottom-left.
Get cakes to refill.
The Star item gives you an extra hit point.
- last stage: PHANTOM'S CASTLE
cheats:
- Level Select: at the Disney/Sega copyright screen, press Up, Up, Down, Down, Left, Left, Right, Right, 1, 2. This will also give Mickey full health and all items.
sources:
Fantasy Zone Gear
controls:
d-pad = move
1 = fire beam
2 = fire bomb/missiles
Start = pause and access equip menu
basics:
- destroy all bases/larger enemies to advance to the stage boss.
- collect coins to buy stuff in the shops. Enter in the shop by touching a red baloon flying from above.
- last ROUND: 7
cheats:
- Cheat Menu: at the title screen, Press Up, Right, Down, Left, 1, 2, 1, 2, Start.
- Invincibility: at the cheat menu, highlight the Mode option. Hold Left and then press 1 and 2 at the same time to get the 'Undead' setting.
sources:
Sonic Drift
controls:
d-pad left|right = turn
2 = accelerate
1 = brake (combine with d-pad left|right to drift corners) -> if held too long will lose control while drifting, tap the button to avoid it
d-pad up = perform the char-specific special move (req. 2 rings, check the counter in the top)
powerups:
- rings = collect them to use the special move
- red monitor = temp. boost
- blue monitor = temp. invicibility
- yellow spring = jump and avoid obstacles, also increasing the speed.
basics:
- rings can be lost by abusing the drift or obstacle collision.
- each GP is comprised of 6 races. The final winner will be calulated depending on the points scored by the final positions.
sources:
Sonic Drift 2
controls:
d-pad left|right = turn
2 = accelerate
1 = brake (combine with d-pad left|right to drift corners) -> if held too long will lose control while drifting, tap the button to avoid it
d-pad up = use current item (if you have some in the top-left) or perform the char's special move (req. 2 rings)
items:
- rings = collect them to use the special move
- red spring, yellow monitor = jump and avoid obstacles, also increasing the speed.
- red monitor = temp. boost
- blue monitor = temp. invicibility
- black monitor = mine
- reverse "R" ball = steering is reversed
- star = stun oppenents
basics:
- the item boxes are not used automatically upon being touched as in the previous game.
Instead, an icon appears on the top of the screen and d-pad up must be pressed to use the item.
Only 1 item can be held at a time. However, the Star and Reverse balls are triggered upon impact and cannot be saved.
The powerups do not respawn in each lap either.
sources:
The GG Shinobi
controls:
d-pad left|right = walk
d-pad down+left|right = walk while crouching -> avoid some projectile attacks
1 = normal attack
2 = jump
d-pad up = enter doors
Start = pause, switch between ninjas and use a special tech attack (check the counter next to the kanji in the menu)
ninjas and suggested stage order:
- red (initial) = normal attack=sword. Tech=break away the cracked blocks.
- pink, Highway = normal attack=bomb angled-throwing. Tech=freeze enemies. Pink also has the useful ability to climb on ceilings by jumping toward the ceiling and holding Button 1 + Up.
- yellow, Harbor = normal attack=energy-ball (can be charged). Tech=temp. invincibility until a certain amount of damage is taken. Yellow's special power is the ability to walk on water, which is extremely useful in the Valley level.
- blue, Valley = normal attack=grapple which can hook onto various pegs throughout the game and has a good range. Tech=transforms him into a tornado which allows him to move over obstacles, reach higher places.
- green, Woodland = normal attack=throw shurikens (does little damage). Tech=bomb-like suicide attack (lose 1 life, avoid it). Green does have the ability to do a double-jump by pressing Button 2 again at the height of his jump. Even more, if you attack while in your second jump you send shurikens flying in 5 different directions.
basics:
sources:
The GG Shinobi Part 2 | Shinobi II: The Silent Fury
controls:
d-pad left|right = walk
d-pad down+left|right = walk while crouching -> avoid some projectile attacks
1 = normal attack
2 = jump
d-pad up = enter doors
Start = pause, switch between ninjas and use a special tech attack (check the counter next to the kanji in the menu)
ninjas and suggested stage order:
- red (initial) = normal attack=sword. Tech=teleports you either to the teleport block (all located near the exit doors) or to the very start of the stage.
- pink, CASTLE = normal attack=bomb angled-throwing. Tech=freeze enemies. Pink also has the useful ability to climb on ceilings by jumping toward the ceiling and holding Button 1 + Up.
- yellow, BUILDING = normal attack=yoyo-like giant shuriken. Tech=temp. invincibility for some time. Yellow's special power is the ability to walk on water.
- blue, CANYON = normal attack=grapple which can hook onto various pegs throughout the game. Tech=transforms him into a tornado which allows him to move over obstacles, reach higher places.
- green, FACTORY = normal attack=throw small shurikens (does little damage). Tech=Earthquake-like bomb, can destroy breakable walls and floors. Green does have the ability to do a double-jump by pressing Button 2 again at the height of his jump. Even more, if you attack while in your second jump you send shurikens flying in 5 different directions.
basics:
- in each of the 4 stages there is one CRYSTAL and one Life Increaser item that can be collected, but each need one or two specific ninjas to reach.
- last stage: Enemy's Base
sources:
GG Aleste
controls:
d-pad = move
2 = fire main+subweapon
basics:
- collect a certain number of small yellow "P chips" to power up your main shot.
- collect large green orbs with a letter to swap and powerup your subweapon.
Easier subweapons are: H = Homing (dispose enemies quickly before they fire at you), "D" = DELTA FORM (barrier+absorb most bullets), "N" = NEO NAPALM GUN (mostly frontal, absorb most bullets).
- collect large red orbs with the letter "P" on them to upgrade your current subweapon.
- in "BONUS STAGES" you play with your main weapon only and you only must defeat waves of enemies to get bonus points and "P" powerups.
- last STAGE: 8
sources:
GG Aleste II | Power Strike II
controls:
d-pad = move
2 = fire main+subweapon
1 = bomb (check the "G" counter in the bottom-right)
basics:
- easier subweapons: "N" = NEO NAPALM GUN (mostly frontal, absorb most bullets), "D" = DELTA FORM (barrier+absorb most bullets).
- last STAGE: 6
sources:
GG Aleste 3 - Aleste Collection
controls:
d-pad = move
2 = fire main+subweapon
basics:
- powerup tha main weapon by collecting small red "P" chips.
20 P chips will provide a 1-hit shield.
- you can switch the secondary weapon by collecting orbs with letters.
Collecting the same letter only provides extra points.
The secondary weapon is poweredup via a green "P" capsule.
- best secondary weapon: C (homing spheres), D (rotating bits, absorb bullets)
- last WAVE/stage: 8
sources:
Devilish
controls:
d-pad = move both paddles
1 = cycles paddles formation
2 = change paddles speed
Start = pause and check SCORE, curr. SPEED and "BALL"=lives left
basics:
- your objective is to guide the ball into the stage goal within the time limit (shown in the top-left). The ball and the paddles are invulnerable to everything.
Once the ball reaches a higher point on screen, it is impossible to go back down. Not catching the ball will cause you to lose a life (check the lives left in the pause screen).
- when a ball hits a treasure box, the contents appear and fall down to the bottom of the screen: time bonus (yellow), 1UP (purple), buster ball (red), bomb (green).
You must catch it with the paddles before it goes out of screen.
- "B"=Bonus blocks only provide extra points, while "C"=Entincing Blocks will destroy all adiacent blocks.
- avoid hitting blocks with an "X" sign over, which will make your paddles shorter.
- last STAGE: 6
cheats:
- Cheat Mode: at the title screen press Left, Right, Left, Left, Right, Left, Right, Right. You will hear a sound upon successful entry. You can then give yourself 99 balls at the options screen, instead of 4. Pause the game and press 1 to skip the current level.
sources:
SMD
controller layout:
( Start )
(8-way d-pad) ( A ) ( B ) ( C )
controller ascii art:
\ __
\/ \
/\__/
|
_________|__________
_,.-'` `'-.,_
_,-' `-._
,-' _______ ,...... `-.
,' _.---._ __/S E G A\__ ( START ) `.
/ ,' .-. `. |G E N E S I S| `'''''' .-. \
/ / __|_|__ \ `````````````` .-. ( C ) \
| | |__(_)__| | .-. ( B ) `-' |
| \ | | / ( A ) `-' |
| `._ '-' _,' `-' |
\ `---' _______________ /
\ _,-' `-._ /
\ ,' `. /
`. / \ ,'
`.____,' `.____,'
Verytex
controls:
d-pad = move
A = shoot
B = bomb (check the icons on the top-right, collect colored "B" items to refill) -> not very powerful. They're mostly good to kill cannon fodder and melt nearby bullets.
C = switch speed (check the roman number on the top-left) -> the burst damages enemies near the back of the ship
basics:
- the starting weapon can be changed or upgraded by taking the colored icons that appear from destroyed little carriers.
Yellow/Orange upgrades the default vulcan shot, which when maxed out fires three spread streams at the front and two at the rear.
Blue creates a forward shot that maxes out to 4 staggering arches that cover a wide area on each side of the ship.
Finally, red enables a straight thin laser.
- besides powerup items you might also come across an "M" (=homing missiles, take a few to max out), a "B" (=3 extra bombs) or a blue "S" (=shield that protects the ship against a few hits).
- each credit starts with five lives in stock with no extends in sight (upon GAME OVER you can still continue from the start screen if you so wish).
- last ACT: 6
sources:
Devilish: The Next Possession | Bad Omen
controls:
d-pad left|right = move both paddles
d-pad up|down = move the upper/offensive/red paddle
A | C = rotate the upper/offensive/red paddle left|right
B = switch paddles speed (3 levels, check the "MACH" value on the bottom-right HUD)
basics:
- the paddles can touch enemies and the scenery without taking damage.
- try to advance quickly in stages to save time (no need to destroy all the blocks).
If the clock on the top-right reaches "00:00" it is game over and you'll have to restart the current stage from the beginning.
- break "B" blocks for bonus points, avoid "X" block that will disable the red paddle for a while.
- after beating the stage boss, you still have to reach the stage goal within the time limit to proceed.
- last STAGE: 7
cheats:
- 99 lives: enter the following code at the Title screen: "A + B + C + Left". Then when you play the game you should have 99 Lives
sources:
Michael Jackson: Moonwalker
controls:
d-pad = walk, crouch, aim attacks, climb ladders
C = jump
B = attack
A = magic attack (consume health)
A (hold) = bomb
A (while on a staircase) = slide down attack (no health consuption)
basics:
- in each stage you must rescue the number of children shown by th bottom-left icons.
Rescuing children restores some health.
Once all children are rescued, Bubbles will mount on Michael's shoulders and point him in the direction of the level's final confrontation.
- last ROUND: 6
cheats:
- 15 Lives: Press Up, Up, Down, Left, Right, A, A, C. Press these at the starting screen.
- Level Select: With controller 2, hold up+left+A and press Start. At the press start title screen use controller 1 and press start. Now, when you choose a game you can select a stage but not the subsection (ex. 1-2, 1-3 etc.)
sources:
Crusader of Centy | Ragnacenty | Soleil
controls:
TODO
sources:
Castle of Illusion Starring Mickey Mouse | I Love Mickey Mouse: Great Mysterious Castle Adventure
controls:
d-pad = move, duck
C = jump (hold to jump higher, can still move in midair. Press again or d-pad down in midair to butt-attack, hit again or hold while landing on enemies to bounce off them), swim underwater
A | B = shoot (check the "ITEMS" counter in the bottom-right. Collect the icon shown or a bag to restock)
basics:
- you can only damage enemies by throwing ITEMS (safer) or by butt-attacking them (deal more damage).
- collect stars to restore your health (check the red spheres in "POWER" gauge on the bottom-left).
Collect mouse ears to get an 1UP (check the "TRIES" counter).
- white diamonds only provide you extra points.
- when you see a rope, jump and touch the bottom of the rope to clutch it, and you will start swinging from left to right on it. While swinging you will kill enemy on contact. Press the jump button again to let go.
- while you are running down a slope, press jump and hold the direction you are running on the d-pad, and you will perform a long jump to clear a huge distance.
- last level: 3 (PRACTICE), 5 (NORMAL and HARD)
cheats:
- Extra Life After Every Level: When you finish a level, when the end-of-level screen (where your bonus points are added up) appears, press Start rapidly until you hear a ringing sound. You now have one more life than before.
game genie codes:
Enable Level Select to the options menu
RGST-A6XN
Walk Faster
AMFA-AABN
ADFA-BAVR
sources:
World of Illusion Starring Mickey Mouse and Donald Duck | Mickey & Donald - The Mysterious Magic Box
controls:
d-pad = move, duck
C = jump (hold to jump higher, can still move in midair), swim underwater
d-pad down + C = crawl -> pass under tunnels
B = attack
A (hold) = run
basics:
- do not touch enemies or jump on top of them, always use the attack button instead.
- the cards at the top-left represent your health. Refill the cards with cakes or candy.
- collect 52 Black Cards for 1UP (check the TRIES counter at the top).
- other collectables include: Magic Deck/Blue and white card=temp. invincibility, Sky Rocket=kill all enemies on screen, Magician Hat=1UP.
- last level: 5 (Magician's Realm)
sources:
Magical Taruruuto-kun
controls:
d-pad = move, duck
B = rod melee attack, grab and throw items (try grabbing every part of the scenery)
C = jump (hold to jump higher)
C (press again in midair) = uncontrollable glide forward -> use to pass under narrow passages and cross long gaps
A = use a magic spell (check the MAGIC counter on the bottom-left, collect magic cards to restock)
Start = pause and switch magic spell
magic spells (from top to bottom):
- temp. invincibility -> very useful against bosses
- Mimora screen-clearing attack
- screen-clearing sword strikes
basics:
- do not jump on enemies, attack them with the rod or by throwing items from a distance.
- the pink flying baddies that carry the takoyaki health pickups are everywhere, and numerous item bags are strewn about to offer up 1ups, life-replenishing jam jars, or magic cards, along with serving as a free projectile as well.
- walk down slopes to run and jump over long gaps, or use the the forward glide.
- last STAGE: 5
cheats:
- Map select: Enter the code at the Sega logo using the second controller. After the code is entered, the map select will be available in the options menu: A, B, C, C, B, A.
sources:
Slap Fight MD
controls:
d-pad = move
B (hold) = autofire
C = normal fire (in NORMAL GAME TYPE), bomb (in SPECIAL GAME TYPE, you lose all your powerups when used)
A = get the current selected powerup on the menu on the right (collect stars from enemies to move the cursor) -> temp. invincibility + put you in the center of the screen
basics:
- select GAME TYPE=SPECIAL in the OPTIONS menu to play the game sequel instead of the original.
- the regular shots will not reach the end of the screen, so proper positioning is necessary.
- the primary and secondary weapons are powered by WING powerups, up to 3 levels. Getting hit will reduce 1 level.
- best secondary weapon: H.MIS (=Homing MISsiles) (has better reach than BOMB and LASER).
- last area: 1-80 (NORMAL GAME TYPE) (2 loops), 1-83 (SPECIAL GAME TYPE) (2 loops)
cheats:
- muteki mode: Pause the game, then push Right, Left, Right, Down, Up, Down, Left. You will hear a sound. Effects: -You will be invincible. -During the game, hold B and push C to select between weapons. -Pause, hold Right and push Start to skip areas. -Pause, hold Down and push Start to lose a life. -Pause, hold Up and hold Start to speed up the game (until you let go of the buttons)
sources:
Whip Rush 2222 AD
controls:
d-pad = move
B = autofire
C + B = options "whip" attack
C + !B = switch options formation horizontal|vertical
A = switch SPEED (check the gauge on the top)
basics:
- upon releasing an item it always cycles in the following order: L (Laser weapon) -> M (missile weapon) -> F (counter-directional Fireball weapon, best one) -> P (Power claw / option) -> L -> etc.
- upgrading any of the 3 weapons is achieved by picking up successive items of the same type (up to 3 levels).
- if you get hit when using one of these weapons you're sent back to the default shot, only dying when hit in that condition.
- up to 2 options can be activated by collecting the P item. Note that they don't possess any defensive capabilities and also don't cause any damage on contact when resting in their native spots.
- the ship glows briefly whenever you pick up an item: at that very moment you're invincible, which means you can get through bullets and walls unharmed.
- last stage: 7
sources:
Rambo III
controls:
d-pad = move, aim
C = autofire machinegun (unlimited)
B = use special weapon (check the ammos on the left, collect "A"=Arrow and "B"=bomb items to restock)
A = switch special weapon (check the icons on the left: knife, arrows, timed bombs)
basics:
- enemy soldiers only release items if killed with the knife: ":)" (1UP, check the counter on the bottom-left), "A"=Arrow and "B"=bomb weapons.
- last mission: 6
sources:
Golden Axe 2
controls:
d-pad = walk
2x d-pad = dash
B = attack (hit repeatedly for diff. attacks which deal more damage), throw stunned enemies (can be combined with a direction)
2x d-pad, B = dash attack -> very useful against bosses that have slower or no dash ability. Avoid with regular enemies: if you dash against a dashing enemy the loser is randomly determined.
C = jump
C, B = jump attack -> will always knock enemies down
C + B = double-side attack -> use when surrounded
2x d-pad, C, B = attack from above -> this will always knock enemies down, but many enemies will dodge it
A = magic attack (hold to use more MAGIC slots in the bottom-left for a more powerful attack, collect books released by wizards to refill)
basics:
- easier char: Gilius Thunderhead (green elf)
- last stage: 6 (castle)
sources:
Golden Axe 3
controls:
d-pad = walk
2x d-pad = dash
B = attack (hit repeatedly for diff. attacks which deal more damage), throw enemies (can be combined with a direction)
B + d-pad opposite (hold) = block
B + d-pad down (tap both at the same time) = low bow -> break guards
2x d-pad, B = dash attack
C = jump (some chars can also double-jump and wall jump)
C, B = jump attack -> knock enemies down
2x d-pad, C, B = alt. jump attack -> very effective
C + B = double-side attack -> very effective, use often, knock enemies down
C + B + d-pad forward = forward strike -> very effective, use often, knock enemies down
C, B + d-pad down = dive attack
d-pad forward, back, forward, C + B (Cronus and Sarah Vane) | d-pad forward, up, back, down, forward, B + C (other chars) = projectile attack
A = magic attack (uses ALL the pots in the top-left, the more you have the more powerful the attack will be, get pots by hitting blue dwarfs to refill) -> save for bosses
basics:
- easier char: Kain Blade (blue guy looking like Ax Battler) (has longer reach)
- getting hit will deplete the yellow health gauge on the top-left. Get food like apples and meat by hitting green dwarfs to refill. Hearts will also increase the health bar.
- quickly dispose enemies by throwing them in pits.
- avoid using beasts as they have fewer attacks and you still lose health when hit while riding them (unlike the prev. games).
- free slaves by beating their captor, or destroy whatever it is holding them, like ropes or chains.
When you free 5 slaves, you'll receive an extra life (check ankh symbols below the magic gauge on the top-left).
- last STAGE: 8 THE CASTLE
sources:
Splatterhouse 2 | Splatterhouse Part 2
controls:
d-pad = walk, crouch, grab weapons
B = attack (diff. attacks while crouching and jumping)
C | A = jump (hold to jump higher)
C | A (hold till the peak) + d-pad diagonal up, d-pad diagonal down + B (while landing) = slide kick -> good move, does double damage
basics:
- getting hit will deplete the hearts on the bottom-left. There are no in-stage refills.
- last STAGE: VIII (8th)
level passwords:
02 EDK - NAI - ZOL - LDL
03 IDO - GEM - IAL - LDL
04 ADE - XOE - ZOL - OME
05 EFH - WEI - RAG - ORD
06 ADE - NAI - WRA - LKA
07 EFH - XOE - IAL - LDL
08 EDK - VEI - IAL - LDL
sources:
Splatterhouse 3 | Splatterhouse Part 3
sources:
Wonder Boy in Monster World | Wonder Boy V: Monster World III
controls:
d-pad left|right = walk
d-pad up = look up, enter doors (must be in the center of them), check signs, talk, climb up
d-pad down = crouch, exit doors (must be in the center of them), climb down
C = jump, swim (combine with d-pad)
B = weapon attack
A (hold) + d-pad left|right = use the ITEM or MAGIC equipped (check the icons in the top-right corner)
Start = pause the game and switch equipment (magic attacks have limited uses, check the blue crystals under the spell's name. Collect blue crystals or rest at an inn to restock)
magic spells:
- FIRE STORM = summons a stream of 7 small, minor-damage fireballs that home in on nearby enemies.
- THUNDER = causes all enemies on screen to be attacked by a bolt of lightning for decent damage.
- SHIELD = causes to be fully protected by a magical shield for a limited amount of time. When Shion is hit, the shield will block any damage, steadily decreasing the shield's time limit.
- QUAKE (aka Explosion) = shakes the earth, doing high damage to all enemies on screen touching the ground. Flying, swimming or jumping enemies will not be affected.
- POWER = doubles weapon attack power for a limited amount of time. Similar to the Shield magic, the Power magic's time limit will decrease more steadily when you cause damage to an opponent.
- RETURN = warp to the inn you last saved your game at. Can only be used once before it needs to be replenished.
basics:
- getting hit will reduce the hearts on the top-left. Collect small hearts dropped by enemies to refill, or use a potion.
- big heart containers are what increase your maximum life. They can only be found in chests.
- you now obtain MAGIC spells from chests rather than gathering individually used items like in prev. games.
These spells have limited stocks, but are expanded as you discover more, and regenerate when you visit an inn.
- visit the INNs in villages to replenish your health and save the game. This will also create a warp point you can later use with the "RETURN" spell.
- visit the Combat Shops to buy new weapons. More powerful weapons can only be obtained this way.
- there are 2 different kind of WEAPONs: swords and spears.
Spears gives a larger attack range than swords. However you cannot equip shields with a spear, but you can still defend with the spin attack by holding d-pad up and tapping B.
- you must equip the Trident as WEAPON to swim underwater (obtained by defeating Gragg & Glagg in the ruins).
- SHIELD protect you from projectiles and some direct frontal attacks. Stand still to use the shield.
- the Item Shops (a vase marked with "?") sell boots, potions and other items.
- BOOTS will increase walking speed and jumping distance.
- Purapril village acts as a central hub in the game. As you reach new areas more doors will be added as shortcuts.
- last area: NIGHTMARE CASTLE
sources:
Monster World IV
controls:
d-pad = walk, enter/exit doors, climb (hold "B" to slide the ropes quickly, tap d-pad up to climb quickly), check signs, talk, interact
d-pad x2 = run
d-pad down = raise shield
C = jump (combine with d-pad down to drop down thin platforms, combine with B and d-pad for midair attacks)
B = weapon attack
A (hold) = call and grab your pet (descend slowly while holding it, press "C" in midair to double jump, press "A" again to throw him and interact with some objects like switches, gaysers, etc.)
Start = pause the game, check the equipment and press "A" to use an item (e.g. bombs near blocked doors)
basics:
- getting hit will deplete the hearts in the top-left. Collect hearts dropped by enemies to refill, or use an Herb or an Elixir.
You can also pray the squid statues to refill your health in the overword, or buy hearts from the vending machines in temples/dungeons.
- collect 10 blue droplets to get an extra heart (check the counter in the top-right).
- there is only a single village in the game, Rapadagna, which as usual acts as the hub for the 4 sub-worlds, which take the form of different temples/dungeons.
You need to find a Medallion to enter each temple, and then enter the house on the far left and use the Medallion on the corresponding portal.
- coins/gold can be spent in the village shops to get better swords, shields and armors, which are equipped automatically after purchase.
Better armors will increase the number of red hearts.
Shields can grant "Magical Defense" that can activate when hit by certain types of attacks such as fire or ice.
Some swords are capable of dealing "Magical Hits", a critical strike that has a 20% chance of occurring when attacking enemies.
- Golden Bars can be sold to the rich lady in the 1st house of the village for extra gold.
- talk to the old man/sage to save your game anytime.
- last temple/dungeon: Underground Fort
cheats:
- Debug Menu: when in-game, hold A + C + START on controller 2, then press B + START on controller 1. A new menu should appear, where you can teleport to any screen/room/door or change the characters position. Press B + START on controller 1 on the selection you want to go to. Press START to exit. Or hold A on controller 2, then press START on controller 1 to see the credits roll.
- Lucky 7,777 Gold: farm gold from enemies, if your gold reaches 777, you will automatically be rewarded with an additional 7000 gold.
- Debug Shop: When you reach Rapadagna, do not talk to the sage at the entrance that lets you save. Go left and talk to one of the two guards to enter the castle courtyard. Head to the top right of the screen to enter a long, apparently empty screen with bushes in the background. Go towards the group of bushes on the right side of the screen; keep pressing up on the left side of them where they begin. You will eventually enter the Debug Shop, where you can buy debug equipment which is the same strength as Legendary equipment but with additional debug features. Every time you talk to him, he'll give you 9999 gold. Stock up on as much gold as you want, and then buy out all the equipment and he will disappear.
sources:
Bio-Hazard Battle | Crying: Asia Seimei Sensou
controls:
d-pad = move
A = fire main + sub-weapon
B | C (hold) = charge a plasma wave (unlimited uses) -> can pass throu objects and hit multiple enemies
basics:
- best ship: Electra (the red one at the top-right) (has homing laser as orange subweapon and homing bubbles as blue subweapon)
- firepower can be upgraded by sticking to the same seed color. After 2 seeds it maxes out, with every death decreasing 1 power level.
- the orb moves in the opposite direction you're pointing at and has the ability to block regular bullets.
- last stage: 8
cheats:
- level select: at the Sega logo screen, hold C and rotate the D-Pad clockwise until a sound is heard. Start the game, and the level select will appear before the character select.
sources:
Atomic Runner | Chelnov
controls (TYPE1-3):
d-pad right = run faster to the right
d-pad left = stop (the screen will continue to scroll to the right and he will start moving again if he touches the edge of the screen)
d-pad down = stop + crouch -> avoid some attacks
B = shoot with current weapon (hold for rapid fire) (can be combined with d-pad up for diagonal shooting)
C = jump -> attack + bounce off enemies
d-pad left|right + A = switch facing direction -> attack enemies coming from behind
basics:
- best weapon: homing missiles.
- weapons are powered up by "P" items, while "J" items increase the jump height.
- any hit will kill you instantly and make you restart at the closest checkpoint without any powerup.
- last stage: 7
cheats:
- invincible: at the Data East logo, hold down Down + C + Start on Control Pad 2, no confirmation is given. Now go to options, and choose sound test 21. While holding Up + A + C on Control Pad 2, press Start on Control Pad 1 to return to the title screen. During play, while holding Up + A + C on Control Pad 2, press Start on Control Pad 1 to pause the game. To turn it off, pause the game again normally.
- level skip: at the Data East logo, hold down Down + C + Start on Control Pad 2, no confirmation is given. Press Start on Control Pad 2 to skip the current level.
sources:
Hellfire
controls:
d-pad = move
A = fire
B = cycle firing direction: forward=pink, rear=yellow, verticals=green, diagonals=blue
C = "Hellfire" laser beam (autorefills over time, cannot restock via items or by dying) -> melts bullets and damages enemies in its path
basics:
- powerups to collect are "P"=main weapon powerup, "S"=speedups (do not collect too many), "B"=bonus points (not bombs!).
- there is a small option that has a mind of its own and attacks enemies at random, sometimes blocking bullets as well.
- there is also a 1-hit shield that makes the ship glow.
- last stage: 6 (2 loops)
cheats (Jap ver. only):
- test mode: pause the game and press C, Up, Down, B, Right, Right, C, A, Up, Left, Down, B, A, B, Left, Start. (ACTIVE=invincibility, SCREEN=stage section, STAGE=warp to stage)
sources:
Sol-Deace | Sol-Feace
controls:
d-pad = move
A | B | C = shoot (hold for autofire)
basics:
- the 1st and main weapon is a blue vulcan that equips the ship with upper and lower turrets. These can can be opened up to almost 45° when you stop firing - once you have the desired firing angle, just shoot and they will stay where they are.
- it's possible to combine the weapons by touching the powerup icon conveniently: if you touch it with the lower turret, only the lower turret will acquire the powerup, while the other ones remain unchanged.
- last stage: 7
cheats:
- 99 lives and level select: to obtain ninety-nine lives and execute level select, press the following sequence at the title screen, A, B, C, A, B, C, B, C, B, A, then start. This will take you to configuration mode, where you can use the cursor to select any level you want. If you move it to mode, push right until "MY99" appears for 99 lives.
sources:
Zero Wing
controls:
d-pad = move
A | C (hold) = autofire
B = use the tractor/prisoner beam, throw captured enemies -> grab small enemies and use them as a shield
basics:
- there are 3 weapons to choose from: the red (vulcan), the blue (laser) and the green (homing, best one). They can be interchanged with the appropriate icons left by destroyed carrier ships.
Sticking 3 times to the same color will upgrade the weapon to its full power.
If your weapon is at level 3 and you collect a different colored powerup, you'll have that shot at level 3 instead of starting anew.
- the first red powerup collected will give you 2 "option" pods that will increase your firing range (automatic spread shot), act as a shield for shots above and below you, and can also be used to damage enemies by direct contact.
Once you've obtained the pods with a red item, you can safely collect other colored powerups to upgrade all 3 weapons.
- a speedup icon appears after each powerup cycle, being occasionally replaced by a sphere that works as a bomb.
The bomb can be carried around as a trapped enemy, but will explode after taking some hits or touching anything.
Avoid collecting more than 2 speedups for easier manoeuvrability in tight spaces.
- last STAGE: 8 (3 loop/ROUNDs)
cheats:
- test mode: Pause the game, then hit C, Up, B, Down, A, Left, Right, B, C, C, Right, Left, Right, A, Down and Start to bring up the Test Mode menu:
- Active = if set to 1, makes you invincible to enemies, auto-destroy some enemies on contact (apparently? TODO), and lets you cross through floors/ceilings/walls unharmed
- Screen = appears to select which of the possible checkpoint locations to continue from after leaving the menu
- Stage = select a stage
- Power = determines the power of your weapons
- Ending = if nonzero, selects one of the game's endings to view
sources:
Steel Empire | Koutetsu Teikoku | Empire of Steel
controls:
d-pad = move
C = shoots right (hold for autofire)
B = shoots left (hold for autofire)
A = lightning bomb (check the "B" counter in the top-right) -> temp. invincibility
basics:
- every time you get hit or scratch an obstacle you lose a portion of the VITAL gauge in the top-right.
Collect the heart items to refill.
- items float in a circular motion before drifting away to the left side of the screen:
bombs (B), score bonuses ($), speedups (S), options (O), extra lives (1UP) and upgrade points (Ex).
For every 3 of these "Ex" items the ship's firepower is increased by 1 level, up to 20 (check the blue "EXP" squares in the top-right and "LV" counter in the top-left).
- you just lose the options you're carrying upon death, with no power loss of any kind.
- last stage: 7
cheats:
- stage select: highlight "Sound Test" in the Options menu. Then press A to listen to the sounds in this order: Sound 1, Sound 1, Sound 9, Sound 2. A stage select option should appear at the bottom of the screen.
sources:
Wings of Wor | Gynoug
controls:
d-pad = move
B (hold) = autofire
A = activate special weapon (check the letters in top-right squares, collect grey scrolls to restock)
C = fire ammo-based special weapons (check the 3 digits counter in the top-right)
basics:
- collect red and blue naked orbs to powerup your main weapon strength and spread level (check the red and blue squares on the top-left).
Collect bigger orbs to switch the main weapon: red=frontal spread, blue=narrow frontal+sides, yellow=frontal and backward fire.
When you die you only lose 1 powerup level and your active special weapon.
- last ROUND/stage: 6 (x2 loops)
cheats:
- level select: highlight the "Control" section on the options screen, then hold A for around ten seconds.
sources:
Gaiares
controls:
d-pad = move
B (hold) = autofire
C = throw your single option on enemies to acquire their weapon ("TOZ") -> you cannot fire and you are still vulnerable while it is active
A = switch speed LOW|MID|MAX
basics:
- ro gain access to the options menu, press and hold A, B and C at the title screen, and press Start.
- easier weapons: S-LASER (homing laser), P-CANNON (spread shot), V-LASER
- each weapon can be poweredup by using the TOZ again on the same enemy (check current level in the top-left colored gauge).
- last MISSION/stage: 8
cheats:
- Cheat mode (Level Select, Pick any Weapon, and Unlimited Weapon Power): Hold A+B+C+Start at the title screen to enter configuration mode. Set the sound test value to 18. Hold A on controller two and exit configuration mode. Enter the following controller actions to activate the following cheats:
- Level select: Press Start at the title screen to display the level selection screen.
- Weapon select: Pause game play. Hold Up and press A to select a weapon.
- Full weapons power: Pause game play. Hold Up and press B(2). Resume game play and fire the TOZ.
- Legendary Power Weapon: Fire the TOZ completely six times, then capture an enemy ship that normally awards a weapon to access the Tektite Blaster (T-Braster).
- Invincibility: During gameplay, Pause, then press and hold... Left, A, and C, then press Start, you will be invincible for the duration of the stage you are on. (Note: There is no sound to confirm code entry.)
- Stage Select: Once in the options menu, select BGM no. 18. Press and hold the ''A'' on the SECOND controller, and exit the options menu. Once back at the title screen, press Start and you'll be able to choose the stage where you begin.
sources:
GleyLancer | Advanced Busterhawk Gley Lancer
controls:
d-pad = move
B (hold) = autofire
C = switch options mode (check current one in the 2nd top-left box)
A = switch speed (check the pink arrows in the 2nd top-right box)
Start = pause (can switch speed safely)
basics:
- best MOVER: SEARCH (auto-aim, tapping C will toggle between aiming at same or different targets)
- best weapons: 5WAY (purple), BOUND (green) in caverns
- weapons are not upgradeable and are lost when you die.
- last stage: 11
cheats:
- debug menu cheat with stage/weapon select: While the game is paused, press B, A, C, A, Down, A, C, A, Right, A, B, Up, Right, Up, B, Up, Right, Up, Down, A.
sources:
Eliminate Down
controls:
d-pad = move
B (hold) = auto-fire current weapon
A | C = switch weapon: (1) a forward spread pattern, (2) a missile launcher that drops bombs above and below the ship and (3) a rear shot
Start = pause the game, switch speed with d-pad left/right
basics:
- for every 5 collected "P" powerup items you upgrade 1 level of all weapons (check the "P" icons in the bottom-right).
There are 2 upgrades in total and whenever you die you lose 1 power level (shown in the bottom-right, over the lives counter as "Lv-1").
- the barrier/shield "(B)" grants the ship with a protection against 2 hits.
- the energy cell "(E)" increases the power of the ship's forward single shot, which remains active regardless of the weapon selected.
In its final upgrade it takes the form of a piercing laser that's capable of hitting enemies through walls.
- last stage: 8
cheats:
- weapon cheat: on the title screen, press A, B, Right, Left, Right, Left, Down, Down, Up, Up on Controller 1. You should hear a confirmation sound. After starting the game, press Button A on Controller 2 to cycle through different weapon types and Button B on Controller 2 to cycle through the powerup levels.
sources:
Streets of Rage | Bare Knuckle
controls:
d-pad = walk, grab
B = attack, pick up, throw
C = jump, counter-move for grabs
C, B = jump kick -> stun opponents
B + C = rear attack -> hit opponents sneaking up from behind
A = bomb-like special attack (check the "S" counter in the top-left) -> best saved for bosses
basics:
- easier char: AXEL
- check the timer in the top center. If it reaches 0 you lose a life.
- last round: 8 (choose "no" to fight the final boss and see the good ending)
cheats:
- level and lives select: go to the main menu. Hold down (A) + (B) + (C) + RIGHT on controller 2 while selecting Options on controller 1 (best if done with two people). You can now select how many lives you start with and which stage to start on.
sources:
Streets of Rage 2 | Bare Knuckle II
controls:
d-pad = walk, grab
B = attack, pick up, throw
B + C = throw weapon, rear attack -> hit opponents sneaking up from behind
C = jump, counter-move for grabs
C, B = jump kick (can be combined with a direction) -> stun opponents
B (hold) + 2x d-pad = blitz/rush attack -> very powerful, use often
A = defensive special attack (drains your life gauge only if it hits)
A + d-pad left|right = offensive/directional special attack (always drains your life gauge)
d-pad up (hold) + C = safe landing when thrown
basics:
- easier char: AXEL (has a powerful uppercut, which brings a lot of damage)
- last stage: 8
cheats:
- level and lives select: go to the main menu. Hold down (A) + (B) on controller 2 while selecting Options. You can now select how many lives you start with (up to 9), choose your starting stage, and play at the Very Easy and Mania difficulty levels.
sources:
Streets of Rage 3 | Bare Knuckle III
controls:
d-pad = walk, grab
2x d-pad left|right = run
2x d-pad up|down = duck & roll -> quick evade
B = attack, pick up, throw
B + C = throw weapon, rear attack -> hit opponents sneaking up from behind
C = jump, counter-move for grabs
C, B = jump kick (can be combined with a direction) -> stun opponents
B (hold) + 2x d-pad = blitz/rush attack -> very powerful, use often
A = defensive special attack (drains your life gauge only if the blue bar at the top-left is not full and flashing "OK")
A + d-pad left|right = offensive/directional special attack (drains your life gauge only if the blue bar at the top-left is not full and flashing "OK")
d-pad up (hold) + C = safe landing when thrown
basics:
- easier char: AXEL
- last round: 7
cheats:
- Extra Lives: go to the options screen and select the "Lives" option. Press and hold UP + (A) + (B) + (C) on Controller 2, and press LEFT or RIGHT on Controller 1 to select the number of lives you can start the game with. You will now be able to select 9 lives, past the default max of 5.
- Stage Select: Hold B and Up, then press Start. The Stage Select will appear on the options screen.
sources:
Super Fantasy Zone
controls:
d-pad = move
B = fire main shot
C = fire bombs/missiles
A = use the SPECIAL weapons (check the icons in the top-right)
basics:
- you must destroy 10 evil enemy generators in each stage so that you can fight the boss (check their locations on the radar at the bottom).
- collect coins dropped by bigger enemies to buy stuff in the shop, which appears at the start of every level in the shape of a balloon.
best stuff to buy: BIG WINGS/JET ENGINE (avoid faster engines), QUARTETS MISSILES (have homing abilities), THUNDER VOLT (best special weapon), SUPER LIGHTS (useful in round 4), RUBBER BOOTS (useful in round 6).
- last round: 8
cheats:
- cheat mode: During gameplay, pause, then on controller 2, hold Down+Left and press Start, B. The word "Pass" will appear on screen to confirm correct entry. The following button commands are now enabled: Controller 1 A: Clean pause screen. B: Toggle between normal mode, no hit mode (invincibility), and free play mode (unlimited lives) C: Skip to the next level. Controller 2 A: Get 99,999,999 gold. B: Remove "Pass" text. C: KiIls all enemies and skips straight to the current stage's boss.
sources:
Road Rash
controls:
d-pad left|right = steer
A = brake
B = accelerate
C = punch the nearest rider
d-pad up (hold) + C = backhand punch the nearest rider
d-pad down (hold) + C = kick the nearest rider
basics:
- don't worry too much about fighting people, just try to win the race.
- be very careful of the cops, if you crash in front of one you will be busted and forced to pay a hefty amount of cash.
- watch out for cars. When going over a hill that you can't see over, stay on the right side of the road.
- you must finish in 4th place or higher in a series of 5 races to advance to the next LEVEL.
On each level, you are given an amount of cash based on how well you placed in the track.
You can spend this cash to buy upgrades and new a bike.
- after each race the password is shown at the bottom of the screen.
- last LEVEL: 5 (shown under the player name)
sources:
M.U.S.H.A. | Musha Aleste
controls:
d-pad = move
C = main shoot (hold for rapid fire)
B = fires the currently active special weapon
A = cycles the options formation (if you have them)
Start = pause (press d-pad left/right to select between 8 available flying speeds - check the triangles at the top)
basics:
- there are 2 types of upgrades: power chips and special weapons.
Chips slowly increase the main firepower while adding extra options that automatically replace the dead ones (3 chips for 1 option, check the counter on the top-right).
Special weapons come in 3 colors: green for lasers, orange for cluster bombs and blue for a rotating shield.
Stick to the same special weapon to increase its power (up to level 4). Getting another weapon will leave the level unchanged (check the current "ARM LEVEL" in the top left).
- the options eventually die by taking too much damage and get instantly crushed when touching walls.
- you lose your current special weapon when hit, but not the powerup level. Death and loss of all power only occurs if the robot gets shot while carrying no special weapon.
- best options formation: FREE, best weapon: orange
- last level: 6
cheats:
- round select: wait for the SEGA logo to appear then press reset, repeat this 9 more times (for a total of 10 times). After the 10th time let the game go to the title screen, enter the Options menu while holding DOWN and LEFT on the control pad. You'll now be able to select rounds in the option mode.
sources:
Thunder Force II MD
controls:
d-pad = move
B (hold) = autofire
A | C = switch weapon
basics:
- each stage contains 2 sub-sections:
The 1st will always be an overhead search-and-destroy scenario in which 4 enemy bases must be located and destroyed.
The 2nd will be a horizontal scrolling scenario which the player must survive, ending with a large boss.
- your ship can't sustain damage: it will be shot down in a single hit, and will explode if it collides with any surface.
- last stage: 2x4+1
sources:
Thunder Force III
controls:
d-pad = move
B (hold) = autofire
C = switch weapon (check the icons on the top)
A = change speed (check the blue ">" on the top-right)
Start = pause -> safely switch weapons
basics:
- easier initial stage: HYDRA.
- you start with 2 basic weapons, the twin shot (forward vulcan) and the back fire (shoots backwards). All other weapons, including enhancements to the basic two, are acquired by hitting a small carrier and taking the released icons.
Weapon items includes:
- red "S": upgrades twin shot with lasers
- "L" (lancer) = upgrades back fire
- "W" (wave)
- "F" (fire) = drops surface-crawling missiles above and below the ship
- "H" (hunter) = weaker bubbles that target everything anywhere on the screen
- dying causes the player to lose the weapon he is currently using (the only ones that will remain, although in their default conditions, is twin shot and back fire).
- last stage: ORN Core (8th)
cheats:
- unlock more options: during the title screen first hold: A+B+C, finally press Start.
- Enable Special Weapons While playing pause and press: up 10 times, B, Down 2 times, then continously tap B until the weapon meter is replenished. Press A for the claw. This secret only works with each new life.
sources:
Thunder Force IV | Lightening Force: Quest for the Darkstar
controls:
d-pad = move
B (hold) = autofire
C = switch weapon (check the icon in the top)
A = change speed (check the "P" "%" meter in the top-right)
Start = pause -> safely switch weapons
weapons:
- B = blade, upgrade for the twin shot
- R = rail gun, upgrade for the back shot
- S = snake
- F = freeway
- H = hunter -> best one, but hard to find
basics:
- to access the options menu, hold B and press Start at the title screen.
- default stage order: Strite, Ruin, Air-Raid, Daser, Vios, Volbados, Desvio, Bio-Base, Wall, Versus.
- when you die your current weapon level down (or disappear if at the 1st level).
- at the end of stage 5 you obtain the Thunder Sword (usable only with satellites).
When you stop shooting the satellites will glow with energy, discharging a potent sword-shaped beam at the press of the fire button.
- last stage: 10
cheats:
- 99 Lives: at the Title Screen, wait for the words "Press Start" to appear. When they do, press A and Start simulanteously. Go to the config screen and set "Stock Ship" to zero. Start the game and you'll now have 99 lives.
- All Weapons: Enter the following code at the Pause Screen: Up - Right - A - Down - Right - A - C - Left - Up - B - Up - Right. When you un-pause the game you should have all of the weapons including the lightning drone
sources:
Sailor Moon, Bishoujo Senshi
controls:
d-pad = move
A = attack, throw (near an enemy)
A (hold) = charge projectile attack -> not very useful
B = jump
B, A = aerial attack
2x d-pad, B, A = charged aerial attack
C = special attack (consumes health) -> use only when surrounded
basics:
- best char: Sailor Jupiter
- last stage: 6
sources:
Sonic The Hedgehog
controls:
d-pad left|right = move
d-pad down = crouch, look down (stationary), turn into a ball and go faster (while running) -> use for higher jumps
d-pad up = look up
A | B | C = jump
basics:
- you can attack enemies by jumping over them or by pressing down while running (Spin Attack).
- rings provide 1-hit protection (check the counter in the top-left). Getting hit you will lose all your rings, so try to recollect them asap.
- collect 100 or 200 rings in one act to earn an extra life.
- items may be found stored in video monitors. Attack them to get the item inside: 10 rings, 1 extra hit shields, sneakers (=always run, avoid if you don't know the stage), invincibility (), and 1UP
- lampposts acts as midstage checkpoints. Some of them are hidden.
- if you have collected 50 rings by Acts 1 or 2 of any zone, a giant, big gold ring will appear at the end of the stage after the sign.
Jump into the ring and you will warp to a rotating maze known as the SPECIAL STAGE, where you will be given the opportunity to collect a Chaos Emerald.
There are 6 Chaos Emeralds to collect, each one lying in a different maze.
The only way out of this stage is to grab the Chaos Emerald or to touch the GOAL.
If you collect 50 rings here, you will earn a continue, and if you manage to accumulate 100 rings, an extra life will be awarded. A continue means, if you lose all of your lives, you will re-start at the start of the act where you lost your last life; however, your score will return to 0.
- last zone: SCRAP BRAIN (collect all 6 Chaos Emeralds for a different ending)
cheats:
- level select: at the title screen, press Up, Down, Left, Right. You should hear a noise like a ring being collected. Then, hold A and press Start for a level select!
sources:
Sonic The Hedgehog 2
basics:
- If the player earns at least 10,000 points in the end of a standard Act, they will earn a Continue.
sources:
Sonic The Hedgehog 3
basics:
- If the player manages to collect 50 Rings in a Special Stage, they will earn a Continue.
sources:
Sonic & Knuckles
sources:
Sonic 3D Blast
controls:
d-pad = move
A | C = jump
B = spin dash (hold while standing still), roll (while running)
basics:
- in all normal acts (except the last one, which is a boss fight)
you need to rescue 5 flickies by defeating enemies, and use them to break dimension rings that block your progress.
There are up to 4 different kinds of enemies in each zone, and each releases a different color flicky when defeated.
The flickies come in the colors blue, green, purple and red; once released from their robot shells, they wander around until you touch them; then they follow you. However, if you get hit, your flickies jump off and have to be recollected.
- the safest way to defeat MOST enemies is by spin dashing into them.
But make sure that behind the enemy you're planning to defeat there isn't something dangerous, or plan on stopping quickly. To stop spinning quickly, jump and hold in the opposite direction.
Rolling through enemies is riskier, even with practice. Jumping on enemies is not recommended either.
- to play a Special Stage you need to find Tails or Knuckles, located in hidden places in the first 2 acts of the first 5 zones.
Collect all 7 Chaos Emeralds in all the Special Stages to fight the true final boss.
- last zone: Panic Puppet
sources:
Comix Zone
controls (3-buttons pad):
d-pad left|right = move
d-pad down = grab item
A = attack (changes when combined with a direction), use selected item
A (hold) = tear the background, make a paper plane and launch it at the enemies and objects in front of him (uses life)
B = jump
C = select item to use (check the icons in the top-right)
basics:
- best items: rat (good at sniffing out hidden powerups, electrify enemies, get into tight spaces where you can not fit), ice tea (2/3 health refill)
- last episode: 3
cheats:
- level select: in the options menu, play the following sounds in order, pressing C at each one: 14, 15, 18, 5, 13, 1, 3, 18, 15, 6. A voice will say "Oh Yeah!" to confirm correct entry. Now select a track from 1 to 6 and press C to warp to the corresponding stage (e.g. selecting track 3 will warp to level 3).
sources:
Tiny Toon Adventures: Buster's Hidden Treasure
controls:
d-pad = walk (hold to run), move some items, crouch, look up
C = jump (hold down for more height)
down + C = drop a level
B (when running at full speed) = slide attack
A = call helper (if the counter under the carrots is >0)
basics:
- wall bounce: Jump against a wall and press against it. Press jump again to bounce off it. You can repeat this to climb high distances.
- collect 50 carrots to get an helper.
- you will receive a password at the end of the game when Buster's lives run out.
- to complete each level, Buster must find Gogo Dodo, who will allow him to enter a portal.
Additionally, Buster can find portals reminiscent of the show's rainbow-coloured logo, that will take Buster into Wackyland in the form of a bonus level. Here, Buster must attempt to collect as many items as he can before touching one of the numerous Dodos that populate the level.
passwords:
Level 24 JJBB TZBW ZGBB TZBW ZLTB
All Levels DPQQ WWQQ WKQW WWQW WGRY
sources:
Elemental Master
controls:
d-pad = move
A = back attack
B = forward attack
A | B (hold until the vertical bar in the HUD flashes) = special attack (unlimited)
C = switch weapon (check the icons in the HUD)
basics:
- press the A and Start buttons simultaneously at the title screen.
The Practice difficulty lets you play a single stage with a full weapon loadout before demoting you back down to your regular power level.
- in this game you do not collect weapon powerups. Instead, after you beat a level, you get a new shot type.
Beating the 5th level will unlock the charge ability for the initial weapon, which is the most powerful attack in the game (very good against bosses).
- last level: 6
sources:
Revenge of Shinobi | The Super Shinobi
controls:
d-pad left|right = walk
d-pad down = crouch -> avoid many projectiles
B = attack
C = jump
2x C (press it again at the peak) = somersault jump, switch layers (outdoor/indoor, or on-the-highway/next-to-it)
2x C, B = 8x shuriken mid-air attack
d-pad down + C = drop down to lower platforms
A = bomb-like ninjitsu technique (only 1 can be used in each level, unless an additional bonus is picked up)
Start = pause and select the ninjitsu technique
basics:
- there are no hostages to save here, each stage finishes with a boss fight.
- powerup boxes are strewn throughout each stage, granting weapon powerups and shuriken refills. Many of them are filled with bombs though.
- last stage: 8
cheats:
- unlimited shurikens: in the options screen, select 00 shurikens and wait awhile. Eventually the 00 will turn into an infinity sign and you will have unlimited shurikens in the game now, although it will say 999 on the counter.
sources:
Shadow Dancer: The Secret of Shinobi
controls:
d-pad left|right = walk
d-pad down = crouch -> avoid many projectiles
B = attack
B (hold) = charge dog attack (release when the dog icon at the bottom is fully charged to send him to the nearest enemy)
C = jump
d-pad up|down + C = jump to higher|lower platforms, switch planes
A = bomb-like magic attack (check the icon in the bottom-left)
basics:
- rescuing the all hostages is a requirement to finish each round and gives you bonus points and powerups.
- your dog can only attack and stall certain enemies like the robot soldiers and gunmen, but if you take too long to kill the enemy your dog is stalling, then it'll turn into a puppy.
He'll also turn into a puppy if it attacks certain enemies like the shield men.
- last round: 5
sources:
Shinobi 3: Return of the Ninja Master
controls:
d-pad left|right = walk
2x d-pad left|right = run
d-pad down = crouch -> avoid many projectiles
d-pad up = grab rope|rail
C = jump (press again when you're at the peak of the jump to double-jump)
B (tap) = throw shuriken (check the counter in the top), sword slash (near enemies)
C, C, B = Shuriken Burst (req. 8 shurikens)
B (hold) = block
B (while running) = Running Sword -> uninterruptible attack, but ends running
C, B + d-pad down = air kick
A = bomb-like magic ninjitsu attack (check the counter in the top-right)
Start = pause and select ninjitsu magic
basics:
- to wall lump: jump at wall, press toward it and then C to jump off wall.
- last round: 7-5
cheats:
- invincibility: choose BMG selection on the options menu, then, press B to select the following songs in order: He runs, Japonesque, shinboi walk, sakura, getufu
- unlimited shurikens: go to option, select the BGM to "Shuriken", select the number of shurikens to be 00, wait a few seconds, and then the 00 will turn turn into an infinity sign.
sources:
Space Harrier 2
controls:
d-pad = move
A | B | C = shoot
basics:
- at the title screen press A to access the options menu where you can turn on RAPID FIRE and change the DIFFICULTY level.
- try to take out enemies as soon as they appear on screen to have less stuff to dodge, including their shots.
- when there are no incoming enemies walk on the ground to see better the incoming scenery.
- hitting small ground obstacles will only stun you, while you'll lose a life with bigger objects.
- some enemy shots like missiles are faster than others and more difficult to dodge.
- bosses are introduced by a lightning bolt and have weak spots that make a different sound when hit.
- every time you score 1,5M points you receive an extra life (check the icons in the bottom-left).
Most of your points are gained through the destruction of bosses and bonus stages.
- last stage: 13
cheats:
- initial stage select: begin the game. At the screen which reads "Stuna area", press left or right to navigate through the game levels.
You can select any of the 12 stages, but you will still play the others in order before the final boss rush.
- unlimited continues: at the Game Over screen, press Up, Up, Right, Right, Down, Down, Left, Left, Right, Right, Left, Left, Down, Down, Up, Up on the control pad.
sources:
Disney's Aladdin
controls:
d-pad = move, look up|down, climb, crouch, purchase items
A = throw an apple
B = slash the sword
C = jump
basics:
- collect gems to buy extra lives and wishes (continues) from the shop.
- collect the Abu token and Genie token for bonus rounds at the end of each level.
cheats:
- cheat menu: at the options menu, press A, C, A, C, A, C, A, C, B(x4). If done correctly, you'll be taken to a screen where a message and a smiley face of David Perry will appear (the co-developer of Virgin Games), and you'll hear Aladdin say "Yeah!" A cheat menu will appear, giving you access to such options as invincibility, level select, and more.
- levelskip: pause the game. Press A, B, B, A, A, B, B, A (ABBA ABBA) to skip to the next level.
sources:
Alex Kidd in the Enchanted Castle
controls:
d-pad = walk (hold to run and jump higher)
d-pad down = crawl
d-pad up = enter doors
A | C = jump (release mid-air for kick attack) -> avoid the kick attack (risky): objects must collide with Alex' foot or it won't register.
B = punch, push some blocks
Start = pause and open item selection screen
items:
- POWER BRACELET = when you punch or jump you throw a crescent weapon (very useful)
- SUKOPAKO MOTORCYCLE = this lets you ram into enemies, killing them instantly (useful on flat terrain)
- PEDICOPTER = hold A or C to take off, and press B to fire. If you hit anything, you crash.
- POGO STICK = Useful for getting items high up above you.
- WIZARD'S CANE = Allows you to walk in air.
- CAPE = Temporarily invincibility except to lava and falling ceilings.
- TOKEN = allow you to read an opponent's mind. Save for the bosses (you must use it before you reach the boss).
basics:
- never touch enemies. Avoid them or punch or throw blocks at them.
- last level: 11
cheats:
- Start with 4 Lives, 500 coins, & 2 of all items: during the intro sequence, when you see the chests hold Down + Right + A until the music stops at the title screen.
sources:
Captain Lang | High Seas Havoc
controls:
d-pad = move, crouch
A | B | C = jump
A | B | C (in midair) = spin attack
A | B | C + down = roll -> not an attack, use to evade some enemies
basics:
- kill most enemies by jumping over them or with the spin attack.
Jump on treasure chests to open them.
- collect 100 diamons to get an extra life.
- last stage: 13
sources:
Time Dominator 1st | Socket
controls:
d-pad = move, duck, enter doors
A | C = jump
B = kick boltz of lightning
basics:
- at the bottom of the screen there is a bar that shows your electricity level.
It goes down when you jump, kick, get hit, or just walk. Reload by getting electric boltz that are around.
- each stage is made up 3 sub-stages:
- High Speed Area = designed for running
- Athletic Area = balanced mixture of running and jumping than the high speed areas
- Labyrinth Area = exploration-oriented: Socket must find an hidder door, leading to a boss.
- last stage: Time Castle
cheats:
- level select: at the main title screen menu, press Up + Right + A + B + C + Start.
sources:
Ranger-X | EX-Ranza
controls (3B):
d-pad left|right = walk
d-pad up = fly with your thrusters (check the overheat circular gauge at the bottom-right) -> use it to fly above incoming shots. Dodging is much easier when you aren't confined to the ground.
d-pad down = crouch, enter EX-UP vehicle (press d-pad up to exit)
A = turn left + fire pulse rifle to the left
C = turn right + fire pulse rifle to the right
B (outside vehicle) = fire special weapon (check the POWER bar at the bottom-right, autorefills as long as you remain exposed to light)
B (inside vehicle) = switch special weapon (check the icon at the bottom-right)
basics:
- your objective in each level is to destroy all targets, special weapons or structures that are important to the enemy's military.
The radar at the top of the screen shows the number of targets left, and points to any that are close by.
- the yellow bar at the bottom-left represents your shields/health. As you take hits, it will turn red. If you get hit when your shields are gone, you die.
There are refilling stations inside most of the levels to convert POWER to shields.
The RANGER-X and EX-UP vehicle have separate shields, which are refilled after each stage with POWER.
- best special weapon: seeker falcon (sticks to enemies until they are destroyed while you can take cover)
- often it's hard to figure out where a boss is vulnerable. Listen for the impact sound, and watch the enemy's health bar. The Indra's auto-targeting can also be useful.
- last stage: 6
cheats:
- levelskip: Enter the following code at the Pause Screen: Up - Down - Up - Down - Up - Down - C - B - A - Right - Left. To skip to the next level just press B.
sources:
Decap Attack | Magical Hat no Buttobi Turbo! Daibouken
controls:
d-pad left|right = walk (hold to run)
d-pad down = crouch
C = jump (hold to increase jump height, or tap repeatedly to slow descent), swim
B = frontal melee/punches attack
A = open the item menu
Start = pause
items:
- red potion/ball = 10s earthquake wiping all enemies on screen
- blue potion/ball = 10s temp. shield
- yellow potion/ball = send a powerful ball of light -> use against bosses only
- green potion/ball = freeze enemies for 10s
- red double fial/"Mi" potion = move faster and jump higher for 10s
- large orange potion/"S" potion = increase reach + strengthen punch -> use against bosses
- red+yellow pill (Jap only) = turns you into an invincible Mecha Monkey -> use against bosses
- red+blue pill (Jap only) = enter in vehicle (select helicopter or submarine)
basics:
- destroy statues with punches to find hidden powerups.
- kill enemies by jumping over them or punching (more effective but more risky).
- the weapon you want to have with you at all times is your throwable item (the egg or the skull, depending on the game). This item has great range, kills just about any enemy with one hit, and returns to you regardless of where you throw it.
If you get hit once, however, the item goes away and you have to find it again.
- in Magical Hat, if any enemy touches you once without your throwable weapon, you're dead.
In Decap Attack, you have a life bar, but enemies are more aggressive.
- in the 3rd level of each world, you have to find a special item hidden in one of the level's breakable statues in order to beat the level.
Even if you've beaten the boss, you still won't be able to progress unless you've found the hidden item.
In Magical Hat, this item is located conveniently in a statue near the exit of the level.
In Decap Attack, however, the item is hidden in a random statue somewhere in the level.
- last round: 7-3
cheats:
- round select: in Options, move the cursor to Exit. Next, press Right, Left, Left, Right, Right, Right, Left, Left, A. The Round Select text appears. Toggle it ON, and when you begin a game, the Round Select menu appears
sources:
Panorama Cotton
controls:
d-pad = move, aim
B = main shoot (for rapid fire, press and hold B for 1-3 seconds, then release and repeat)
C (tap) = use an offensive MAGIC spell (changes according to the blinking colored icon in the bottom-right, collect non-yellow crystals to restock) -> no temp. invincibility while in use
B (hold for 3s to activate the fairy) + C = use a defensive MAGIC spell (changes according to the current magic)
A = toggle SPEED: low, middle, high -> go slow for easier dodging, increase when there are a few enemies on screen to preserve the TIME BONUS
basics:
- the safest place to be at most any time is the center of the screen. If you don't have a particular reason to go off from the center, you probably shouldn't. The center gives the best maneuvering options, and incoming enemies will very rarely collide with you if you are in the center.
- the power of your main shot is determined by a weapon level. You start at level 1, the weakest, and can go as high as 5.
There is an "EXP" meter in the lower-left with the current weapon level next to it.
Every time this meter fills, you go up a level, and with each level the meter empties and grows in size.
The experience needed to fill this meter is gained mostly by destroying enemies. Large chunks of experience can also be made by collecting yellow crystals.
Taking damage reduces your EXP level and eventually levels you down.
- a crystal always first appears as yellow. When you hit a crystal 3 times, it will change color: green, red, blue, green, red, blue, with yellow in between every time. After a crystal goes one color past a full cycle, it will break.
Crystals approach you automatically if you stay put, but if you shoot them they bounce back.
Furthermore, lots of crystals on screen get really troublesome in busy sections because they stand in the way and block you from hitting enemies.
If you can't keep the position until a crystal comes at you, move out quickly to dodge and then return to the same position to collect it.
- running into an inactive object in the environment will do the least amount of damage. Getting hit by an approaching enemy does more, and by an enemy's weapon does more still.
- every 50K points will get you an extra block of health (check the orange blocks at the top-center LIFE gauge).
- last level: 5
sources:
Arrow Flash
controls:
d-pad: = move
B = autofire
C = "ARROW FLASH" special attack (diff. according to current form)
A = switch ship|robot form
basics:
- you can turn on RAPID fire in the OPTIONS and set the "ARROW FLASH" special attack to CHARGE mode.
- the main weapon can be selected among 3 types with the appropriate powerups: (I) = forward blue lasers, (II) = yellow shots (best one) and (III) narrow wave laser that resembles the red shot in R-Type.
They can be upgraded 3 times by taking the same powerup. Other icons include: S (=speedup, do not take too many), E (=3-hit shield), M (=guided missiles, up to 2) and 1UPs.
- score-based 1UPs come for every 150.000 points.
- last stage: 5
cheats:
- invincibility: at the options menu, switch the setting, "Arrow Flash", from "Stock", to "Charge". When the story demo is over, wait for the demo of the gameplay to begin. Then press Start to start the game. Now, when you hold C for five seconds, you'll be invincible for about 10 minutes.
sources:
Assault Suit Leynos | Target Earth
controls:
d-pad: = move, aim
A = fire current weapon (hold for autofire)
B = jump (hold to use the B-PACK if it's in your inventory)
C = quick switch next weapon (check the HUD in the bottom-right)
Start = pause and safely switch weapon
basics:
- when starting a mission, you choose up to 6 weapons to take.
All of the weapons except for the LG-GUN and HG-GUN have limited ammo.
- best weapons: 25-SC (shotgun), MISSILE/M-POD (homing missiles), 150BZ
- there are no powerups or ammo refills to be found during the levels.
However, damage taken is gradually and automatically healed over time; about 1 unit every 3s (check the red gauge in the bottom-left).
- explosions from enemies blowing up can hurt you and other robots.
Therefore you should try to take out enemies from a safe distance
- the more points you get, the more armor and weapons are unlocked for you to use in the next stage.
- last stage: 8
cheats:
- invincibility: durind the game press Start on controller two and you should be invincible.
sources:
Contra: Hard Corps
controls:
d-pad = walk, duck, aim
B = shoot (hold for autofire)
C = jump
d-pad down + C (on the ground) = slide attack -> gives temp. invincibility, use often to avoid enemy fire and bosses melee attacks
A = switch weapon (check the icons at the top-left, "E" is reserved for bombs)
A+B | X | Y | Z = switch aiming mode: SHOT I (default) | SHOT II (free aim)
Start = pause and safely switch weapon and aiming mode
basics:
- best char: BROWNY (robot) (can double jump and slow fall by holding B)
- best BROWNY weapon: "C" (Electromagnetic Yo-Yo)
- best RAY weapon: "D" (Homing)
- when you die you lose the currently-selected weapon only.
- last stage: 6-B (to get the best ending refuse to join and fight the colonel and, beat the alien cell)
sources:
Alien Soldier
controls:
d-pad = run, aim
B = fire (hold for free aiming + rapid fire)
C = jump (press again in midair to hover)
d-pad down + C (even in midair) = "Zero Teleport" dash -> temp. invincibility, use often to avoid enemy attacks. Also perform a special attack when your life meter is maxed out.
d-pad up|down + C = switch platform
2x B = reflect enemy shots -> risky move, use only when necessary
A = open weapon ring to switch weapon (won't pause the game)
d-pad down + A = switch firing mode (move while firing or not)
basics:
- set the "SUPEREASY" LEVEL in the OPTIONS to get unlimited continues and passwords when dying.
- best weapons: HOMING FORCE (regular enemies), FLAME FORCE (bosses)
- collect small diamonds to restore health. The gold orbs restores all life and boosts max life by about 30-40 points.
- pick a weapon item and your current weapon will be replaced by the weapon displayed.
The item cycles through the weapons, so wait for the one you want.
If it matches your current weapon, your ammo will be restored and your max ammo (the "FORCE" meter) will be boosted by 250 points.
- last stage: 25
level passwords:
1985 Level 1
3698 Level 2
0257 Level 3
3745 Level 4
7551 Level 5
8790 Level 6
5196 Level 7
4569 Level 8
8091 Level 9
8316 Level 10
6402 Level 11
9874 Level 12
1930 Level 13
2623 Level 14
6385 Level 15
7749 Level 16
3278 Level 17
1039 Level 18
9002 Level 19
2878 Level 20
3894 Level 21
4913 Level 22
2825 Level 23
7406 Level 24
5289 Level 25
sources:
Castlevania: Bloodlines | Vampire Killer
controls:
d-pad = walk, duck
A = whip attack
B = jump
C = weapon attack (consumes jewels, check the counter in the top-right)
d-pad up + C = special weapon attack (consumes more jewels)
d-pad down (hold) + B = super jump (ERIC LECARDE only) -> temp. invincibility, use often to avoid boss attacks, reach higher platforms, also upward attack
B, d-pad up + A = air diagonal attack (can also attach to ceilings) (JOHN MORRIS only) -> can attach to ceilings
basics:
- easier char: ERIC LECARDE (can jump higher and attack vertically and diagonally -> attack enemies safely from lower platforms)
- best weapon: boomerang (only single candles have them)
- unlike in later Castlevania titles, you won't gain any experience by killing enemies. That means you can ignore any enemies that you think you can get away from.
- if you hit an enemy whilst they are in the air, you will cause them more damage and they will die in a fewer number of hits.
- last stage: 6
level passwords:
Stage 2
Empty Axe Bird Empty
Bird Empty Bird Empty
Jewel Empty bird axe
axe Empty axe axe
Stage 3
axe bird jewel axe
Empty Empty Empty jewel
axe Empty bird Empty
Bird axe axe axe
Stage 4
Empty bird Empty bird
bird Empty bird Empty
axe Empty bird Empty
axe Empty jewel axe
Stage 5
axe axe jewel jewel
Empty Empty Empty jewel
Empty bird bird jewel
bird axe jewel axe
stage 6
axe axe Empty jewel
Empty bird Empty jewel
Empty axe bird jewel
bird axe Empty Empty
sources:
Alisia Dragoon
controls:
d-pad left|right = walk
d-pad down = crouch
C = jump
B = attack (hold to attack continuously until your blue attack meter in the top-left runs out)
B (when the attack meter is flashing) = bomb-like "Rolling Zap" attack (unlimited)
A = switch creature companion (check the icon in the top-right)
creature companions:
- Dragon Frye
- Ball o' Fire
- Thunder Raven (best one, but has slow recharge times)
- Boomerang Lizard (faster alternative to Thunder Raven)
basics:
- collect potions to refill your yellow "HP" meter in the top-left.
Collect meat to refill the companion HP meter in the top-right.
Collect the Thunder Powerup to increase your attack "LEVEL" in the top-left.
- you can only have 1 companion on the screen at a time.
If that companion dies, they can not be used again until you get a rare Revival item (looks like a fetus).
Companions can level up by you getting a blue star item.
As their LEVEL increase, the creatures change color, gain modified attacks, and get more HP.
-
last STAGE: 8
sources:
Trouble Shooter | Battle Mania
controls:
d-pad = move
B = shoot (hold for rapid fire)
C = flip the direction blue-haired CRYSTAL is shooting
A (when the CHARGE bar at the top-right is full and red) = fire the SPECIAL weapon
basics:
- best SPECIAL weapon: LIGHTNING STORM
- the hitbox is in blond-haired MADISON, so you don't need to worry about blue-haired CRYSTAL taking damage or being crushed.
- every hits detracts a life from the counter in the top-right, but you can easily get extra lives for each 60K points and by collecting heart items.
- powerup the main weapon with "F" icons, get faster with "S" icons, get slower with "\/" (down arrow) icons, get (scarce) silver medals for points.
- last STAGE: 6
cheats:
- stage select: use controller 2 to do this cheat. Press Right + C + start at the same time while on the Start and Option screen. A stage select icon appears between the words in the title. Press the same buttons again to change the level number, 1-6 are the levels and 7 is the ending
sources:
Battle Mania Dai Gin Jou | Battlemania Daiginjou
controls:
d-pad = move
B = shoot (hold for rapid fire)
C = flip the direction blue-haired CRYSTAL is shooting
A (when the CHARGE bar at the top-right is full and red) = fire the SPECIAL weapon pod
basics:
- in the OPTIONS set "DIRECTIONS" as "8 WAY" for free-aiming (hold the B button to fix the aiming direction).
- besides hearts for extra health/life, other items you'll come across are "P" (power-up), "S" (speed-up), "\/" (speed-down) and coin (extra points).
The SPECIAL weapon pod is powered up with the regular weaponry, and each of the 4 available types results in a different special attack to be used once the charge gauge is full.
Note that unleashing the attack before the gauge recharges completely results in nothing and also resets the gauge.
- last stage: 9
cheats:
- stage select: in Options, move the cursor to BGM, change the entry to SILENCE, and press the A button 4 times. Then change the entry to NOTHING 13, and press the A button 3 times. Now, start a new game and the Stage Select menu appears.
sources:
Twinkle Tale
controls:
d-pad = move
B = shoot (hold for rapid-fire)
C = switch weapon (check the icons in the top-right)
A = magic attack (if you have it, check the icons in the HUD below the 3 weapons)
basics:
- shot types include the obligatory spread pattern (which fires tiny stars), a straightforward weapon (the most powerful one) and a stream of homing spheres.
All of them are powered up by collecting the small star icon - the current shot is powered up first, but it's not necessary to switch to the others in order to power them up.
- last stage: 8
cheats:
- level select: at the opening storybook scene, hold Up + Left + A + C and press Start.
sources:
Vectorman
controls:
d-pad = move, crouch, look up|down
A | B = shoot
C = jump
C (in midair) = air jump
Start = pause
basics:
- the small spheres in the status area represents the health.
- to access the bonus round, you must destroy the satellite dish.
Before that you must find and destroy the satellite shield generator.
- last day: 16
cheats:
- level select: to access a debug mode, on the options screen press A, B, B, A, Down, A, B, B, A. A menu will be brought up with health, lives, level select, and weapon options.
sources:
Vectorman 2
controls:
d-pad = move, crouch, look up|down
A | B = shoot
C = jump
C (in midair) = air jump -> also works as a downward attack
Start = pause
basics:
- to access bonus stages, you must get a majority on powersacks and photons (about 85% of them in both areas).
- last scene: 22
cheats (ingame hit pause and enter):
- Add life Right, Up, B, A, Down, Up, B, Down, Up, B
- Level Select Up, Right, A, B, A, Down, Left, A, Down
- Location Data B, A, Left, Left
- Refill Energy B, A, B, A, Left, Up, Up
- Weapon Select C, A, Left, Left, Down, A, Down
sources:
Ristar | Ristar the Shooting Star
controls:
d-pad = walk, swim
A | C = jump
B (hold) = grab (release to head-butt) (can be combined with a direction)
basics:
- to kill enemies do not jump on them. Use the the head-butt attack instead.
- destroy chests to find: stars (health refill), gems (extra points), and extra lives.
- if you grab a handhold on a wall or ceiling you can move hand over hand across a series of handholds, and climb walls or cross chasms in this way.
- to use a spinner, grab one and you will start spinning around it.
Hold in the direction you were facing when you grabbed it to rotate faster and faster until a circle of blue stars appears.
Once this appears release the B button (which you must hold all the time you're spinning) and you will fly off like a rocket.
Any enemies unfortunate enough to be in your way will be instantly destroyed!
However, you need impeccable timing on these devices because you usually want to fly off in a certain direction and must time your release perfectly so you are heading in that direction when you let go. You also need to be holding in the direction you want to go as you release; otherwise you won't fly off, just drop back to the ground. Oddly enough, bashing into walls repeatedly actually INCREASES your flying time, so take as much advantage of them as possible!
- each area has a special spinner that will take you to a bonus round for that area. In bonus rounds, you will have 1 minute to get to a treasure chest in a strange and sometimes very difficult mini-level. If you complete the bonus round very quickly (in well under a minute) you will also get a free continue.
- last round/world: 7
cheats:
- level select: type "ILOVEU" as password in the options (US version). For the Japanese version the password "FEEL" also enables invincibility and True Sight.
sources:
Pulseman
controls:
d-pad left|right = move
2x left|right = dash (instantly charges Pulseman) -> use often
C = jump
B = attack (Electric Slash or Slash Arrow if charged)
d-pad up + B|C = flip kick
d-pad down + B = crouching kick
A (while charged) = Voltteccer move (turn into a ball of energy that launches into the air at a 45° angle and bounces off of walls like a pinball)
B (while Voltteccer) = cancels Voltteccer move
basics:
- the gameplay relies heavily on Pulseman's ability to charge his abilities.
Charging is accomplished by either dashing, or running a great enough distance without disruptions (taking damage, running into walls, jumping, ect.)
If Pulseman comes into contact with water, he loses his charge. He cannot move very fast under water, so try to avoid it if you can. Some enemies act like water, which can get frustrating because they can't be killed...
- the amount of health you have left is indicated by the color of the watch in the upper-left hand corner.
- last stage: 7
cheats:
- level select: In Sega logo, press (in joystick 2): A, B, C, C, B and A. After this, enter in Options and use the Map option.
sources:
Rocket Knight Adventures
controls:
d-pad left|right = move
A | C (tap) = attack
A | C (hold) = charge rocket pack, release to Rocket Attack (can be combined with a direction) -> aim diagonally to jump higher, rebounding off of walls
B = jump
basics:
- fruits restore your health, while gems are only worth bonus points and to guide your path.
- last stage: 7
sources:
Sparkster: Rocket Knight Adventures 2
controls:
d-pad = move, duck
down (hold) = look down
down + B = drop down platform
A = attack
B = jump
C [+ direction] = rocket/screw attack (when the energy gauge is full red/white), activate switches
basics:
- rocket/screw attack gives you temp. invincibility.
- when you have collected 10 Blue Gems or a Red Gem (which count as 10 Blue Gems) the Item Roulette starts to play (at the top right-hand corner you can see how many Gems you have collected and watch the Item Roulette spin). Then, once an item has been selected (it's entirely random) the item is dropped from the sky, and you can pick it up like normal. When you receive an item from the roulette they CAN disappear, so pick them up quickly.
- find and grab the hidden Seven Swords to become Gold Sparkster (not possible on the Easy difficulty).
level passwords:
Green Sparkster, Green rocketpack, Yellow Sparkster, Red Gems, Red Sparkster, Green Sparkster, Blue Sparkster, Yellow Sword Level 2
Yellow Sparkster, Green rocketpack, Yellow Sparkster, Red Gems, Red Sparkster, Green Sparkster, Red Sparkster, Yellow Sword Level 3
Blue Sparkster, Green rocketpack, Green Sparkster, Red Gems, Red Sparkster, Green Gems, Green Rocketpack, Yellow Rocketpack Level 4
Red Rocketpack, Green rocketpack, Red Sparkster, Red Gems, Red Sparkster, Green Gems, Green Rocketpack, Yellow Rocketpack Level 5
Green Rocketpack, Green rocketpack, Red Sparkster, Red Gems, Yellow Rocketpack, Green Gems, Red sword, Yellow Rocketpack Final Level
sources:
El Viento
controls:
d-pad left|right = walk
d-pad down = crouch -> avoid projectiles
d-pad up = enter doors
A = throw boomerangs
B = jump (hold for higher jumps)
d-pad down + left|right + B (tap repeadetly) = run
C = magic spell (hold to use a more powerful spell req. more MP, check the icons in the top-right)
basics:
- the score in the top-left also acts as "EXP", which will extend the life/HP meter at certain intervals.
- last level 8: Empire State Building
cheats:
- levelskip: enter the following code at the Pause screen: "Up - Left - Right - Down - B". then when you un-pause the game you should go to the next level
sources:
McDonald's Treasure Land Adventure
controls (default):
d-pad = move, crouch
C = jump
d-pad down + C = drop down some platforms
B = attack
A = use the scarf -> latch onto hooks, hold to keep hanging, press up/down to retreat/extend, release to jump over (not an attack)
basics:
- health is measured in a meter of red gems in the bottom-left of the screen.
- if you collect 2 red flowers or 3 white flowers (rings in the Jap version), you will earn an health gem back. If at full health, they will provide an extra hit.
- collect balloons, activated when you falls into a pit to save you a life.
- collect gold bags to spend in shops (doors with "IN" written over).
- near the end of each world, you will meet another McDonald's character, who will require a few gems before opening the path to the world's boss.
- each boss is fought by dodging their attacks and moving into their gem-stealing beam, attacking them while they are eating it.
- you can get a password in the gameover screen by going to the "PASSWORD" door.
- last world: 4 - Magical Moon
cheats:
- level select: at the title screen, press: LEFT, RIGHT, A, B, and C. You will hear a sound if done correctly. Now press start and you will be able to select your stage and level.
sources:
Gunstar Heroes
controls:
d-pad = walk, crouch
C = jump
B = shoot
B + direction (near enemy) = throw
B + d-pad down = pick up
C + d-pad down (on ground) = slide (can be blocked)
C + d-pad down (on platform) = hanging (automatically enter Fixed Shot mode)
B + C = block
A = switch weapon (check the icons at the top-left)
basics:
- easier weapon: CHASER (green arrow)
- if you're firing when you jump, you won't go as far as you normally would.
- after each stage your health/"VITALITY" in the top-left is refilled and increased.
Collect heart items to refill in stage.
- last stage: 7
sources:
Dynamite Headdy
controls:
d-pad = move, duck
C = jump
B = fires your head (can be combined with a direction) -> besides attacking, you can also use the head to interact with other objects such as boxes and switches, or to grab on to HangMan to pull himself to high places or to bring platforms into reach
A = cancels your current head and go back to normal
basics:
- you can upgrade your head with many temporary Power Up Heads provided by HeadCase.
- best heads: Empty Head (temp. invincibility), Hammer Head (incr. attack)
- collect bananas to restore health (indicated by the color of the spotlight in the top-left).
- grabbing a Liberty Head takes you to the Intermission Bonus Game.
- last scene: 9-3
cheats:
- stage select: when the title screen appears, press START once. Leaving the cursor at Start Game, enter the code: C, A, LEFT, RIGHT, B. If you hear a sound, you've got it! Press START and you'll access the Stage Select! Just choose your level and stage. Then press START to play!
sources:
Beyond Oasis | The Story of Thor
controls:
d-pad = walk
2x d-pad = run
B = attack with the equipped weapon (diff. when combined with a direction or running), talk, pick up
C (tap) = jump
C (hold) = crouch (combine with d-pad to crawl)
A = summon a spirit from the element in front of you, give commands to the spirit (1x tap, 2x taps or hold for 1s)
A + B + C = cancel the summon of any spirit
Start = pause and open up a menu where you can equip WEAPONS, use ITEMS, check your STATUS, MAP, and SAVE
spirits:
- Dytto can be summoned from all types of water. Abilities: bubble (extinguish flames and stun enemies), healing, Water Tornado (bomb-like)
- Efreet can be summoned from any type of fire. Abilities: Fire Breath (lighting fires and scorching foes), Fireball attack (in the direction that you're facing), Rain of Flames (bomb-like)
- Shade can be summoned from any reflective object, whether it be a mirror or an icicle. Abilities: Dark Claw (cross large gaps if they have posts on the other end, grab out-of-reach treasure chests), Doppelganger
- Bow can be summoned from small, moving plants. Abilities: Bite (eat steel gates), Burrow (make Bow move next to you), Toxic Pollen
basics:
- the red HP bar on the top-right can be restored by talking with certain people, or by using recovery items (food).
Max HP is increased by collecting hearts.
- when summoned the spirits will consume the SP=Spirit Points blue bar on the right.
- you have limited uses of the weapons you find.
In the WEAPON menu there is a number under each weapon that tells the number of ammo/uses it will last.
Once you use it up, the weapon disappears from your inventory.
sources:
32X
Zaxxon's Motherbase 2000 | Parasquad | Motherbase
controls:
d-pad = move
A = main shot
B (tap) = jump -> enter/exit a ship (not all ships can be entered)
C = subweapon shot
basics:
- in the OPTIONS menu, select CONTROL=ON BOARD to have Viewpoint-like controls, and SHOT=AUTO for autofire.
- the "Stinger" initial ship is small an maneuverable, but dies in only 1 hit, so try to stay inside other ships.
- the game does not directly indicate how much damage a ship has taken, though couriers visually lose parts as they are damaged.
The status bar flashes red when the ship is about to destruct. Ships cannot be repaired, but you can jump to another vessel.
If the ship is destroyed, you lose a life and must restart the stage from the beginning in the Stinger (with no courier).
- you can earn extra lives at 50k and 100k points and then every 100k points after that.
- last STAGE: 9
sources:
Knuckles' Chaotix
controls:
TODO
sources:
Tempo
controls:
d-pad = move
A = kick attack
B (tap) = jump
B (hold in mid-air) = slowly float downward using his wings
C = shoot musical notes
basics:
- most enemies are killed by kicking or jumping over them.
Kicking an enemy gives you +100 points each time, while jumping on them gives you only +10.
Shooting music notes will only stun enemies.
- health is measured by a bar at the top-left corner of the screen.
You can regain health by collection music notes scattered around the level. Green, red, and orange notes will refill a certain amount of health; the amount decreases with each respective color.
- finding a panel that says "DANCE" on it will cause Katy to appear. Katy will automatically kill enemies if Tempo stuns them with a note. If you find a panel that says "KATY" while Katy is following you, Katy will destroy a nearby obstacle, opening up a secret path. The "DANCE" panel will also kill every enemy on screen at the time.
- in each level there is a set of diamonds blocking an alternate path that will electrocute you when touched. A nearby flower encased in ice will cause the diamonds to turn into music notes when touched.
- in each level there is a series of trophy-like platforms similar to the one shown when Tempo starts the level; standing on these will warp you to a different part of the level. These platforms usually come in pairs, so standing on one will always take you to the other.
- last stage: Top level - Final Performance
passwords:
D, A, F, E, C-1, E, A, Rest Circus level
G, Rest, G, G, E, D, B, R Final level
F, C-1, A, C-1, G, C-1, F, Rest Hi-Fi level
D, D, B, A, G, Rest, B, D Indigestion level
F, C-1, G, C-1, A, C-1, G, C-1 Jungle level
A, Rest, E, Rest, C-1, Rest, G, C Winter level
sources:
SCD
to access the the SCD builtin saves manager:
while the SEGA CD logo is up press the "C" button to bring up the CD player (or boot the console with no CD game inside)
press the "OPTION" button
(some games also have a builtin saves manager)
cheat codes:
Silpheed
controls:
d-pad = move
A | C = fire "LeftShot" and "RightShot" weapons (hold for autofire)
B = fire "Option" weapon (check the counter in the top-left)
basics:
- every time a new stage starts you halt at a weapon selection screen so that you can equip the ship.
It's possible to carry 1 main weapon on each side, so you're always shooting pair combinations of Forward Beam, Wide Beam, Phalanx Beam and Auto-Aiming shot (best one).
These weapons are not instantly available - a new one is added for every 40.000 points you score.
You can also assign one of the following "Option" weapons: Graviton Bomb (blocks bullets), EM Defense System (shield), Photon Torpedo (slight homing ability) and Anti-Matter Bomb (very powerful).
They appear at random with every 50.000 points, and you can't use the same one in 2 consecutive stages.
The use of optional weapons is limited, and its stock is automatically filled the more enemies you kill.
- best weapons: Auto-Aiming, Photon Torpedo (homing)
- to recover health you must take repair items by destroying crystals that come from the top (you also get some health back in between stages). The crystals will also release BONUS points (1.000 to 10.000), extra energy for the optional weapons and items for screen wipe-out and temporary invincibility (rare).
- last stage: 12
cheats:
- 10 Continues: Play a Normal game until you lose and you only have 1 continue left. When the Intro Movie starts, press Right, Up, A, B, C, Lef
- Shield Recharge: During the intro, press: Right, Left, A, Right, Up, C, B, Down, Left, B, A, Up, Start
- Stage Select: During the opening demo, just after the Game Arts logo, enter Down, Down, Up, Up, Right, Left, Right, Left, A,B then START. There will now be Stage Select on the title screen. Stage 01-12 are the stages of the game. 13-22 are the in game cinemas.
sources:
Robo Aleste
controls:
d-pad = move
B (hold) = auto-fire primary + secondary weapons
C = switch speed (check the red triangles under "SPEED" in the top)
A (hold) = charge options attack -> not very useful
basics:
- the robot now comes with 2 fixed options in front of it at all times, which can never be destroyed. The options still absorb enemy bullets and cause damage on contact.
- in order to increase the primary weapon (straight kunais) power and reach you need to collect "P" chips.
secondary weapons are switched and powered with colored orbs: green (spread of shuriken-shaped shots), yellow (attachments rotate and home on nearby enemies/bullets), blue (pulsating lasers) and orange (exploding cluster bombs).
Current secondary weapon level is shown in the HUD as "ARM LEVEL".
- last stage: 11
cheats:
- level select: on the options screen set the following options as such: Sound test to 3A, the difficulty level to hard and the CD-DA number to match the desired starting level. then Press B + Start. Select Continue on the main menu to begin the game on the chosen level.
sources:
Keio's Flying Squadron
controls:
d-pad = move
B (hold) = auto-fire primary + secondary weapons
C = kamikaze special attack (sacrifices 1 helper, stop shooting for 3s to respawn)
A = switch speed SLOW/FAST
basics:
- check your HITBOX position in the OPTIONS.
- the primary weapon is changed or powered up by taking the corresponding icon: straight fireball (default) and a spread pattern fireballs.
Secondary weapons appear as 3 types of missiles: air-to-ground Darius-like bombs, directional explosives and homing baby dragons.
- dying powers you down 1 level and strips you off your helpers and secondary weapon.
- last stage: 7
cheats:
- level select (international ver. only): at the main menu, press Right, Left, Right, Left, Down, Up, Down, Up, Right, Right, Right. The stage number will then appear at the top of the screen. Use Left and Right to select a stage, and start the game to go to the chosen level.
sources:
Android Assault: The Revenge of Bari-Arm | Bari-arm
controls:
d-pad = move
B | C (hold) = auto-fire
A = switch speed (check the lines at the top-right)
basics:
- weapons are available in 4 variations that can be exchanged with the proper icon.
There's the vulcan (yellow), laser (green), homing missiles (red) and straight daggers (blue).
All of them have more powerful blasts that can be activated just by restraining from shooting,
which fills up to 3 levels of the CHARGE meter at the top-left (most powerful bomb-like attack, use against bosses).
- powering up happens by collecting the "Pow" icons or icons of the same color of the current weapon, whereas the gray icon transforms the ship into the robot regardless of the current powerup level.
- starting out as a regular spaceship tripping through a forest planet, soon you will transform into a robot after you acquire the 3rd powerup.
Not only do you get an extra protection (like a shield, for which you revert back to the ship form when hit), but you'll also charge the currently used weapon at a faster rate.
- last stage: 7
cheats:
- access a cheat menu and levelskip: at the title screen press Up, B, A, C, A, Down, B, A, C, A then highlight options and press left twice. While playing you skip levels by holding A and pressing start twice.
sources:
Popful Mail
controls:
d-pad left|right = move
d-pad up = enter doors, talk, read signs, open chests
A = attack (check the ARM bar)
B = jump (hold for higher jumps), swim
C = open the action menu
Start = pause
action menu entries:
- ITEM -> equip/use items
- STATUS
- PLAYER -> switch char (if some joined your party)
- LOAD
- SAVE (you cannot save during boss battles and some key events)
- OPTIONS
- STAGE (only in the map menu) -> return to prev areas
chars:
- Mail = fastest runner
- Tatt = can control most of his attacks
- Gaw = highest jumper
basics:
- collect gold to buy powerups at the shops, or HEAL (1 gold=1 HP recover).
- Mail, Tatt, and Gaw each have their own HP. If one character becomes too weak, switch to another.
- best equipment to buy: ...
sources:
Soulstar | Soul Star
controls:
TODO
basics:
- you can reduce the SFX volume in the OPTIONS menu.
sources:
Sonic CD
controls:
TODO
cheats:
- level select: press Up, Down, Down, Left, Right, B at the title screen. Note that you will be taken back to the title screen upon completion of the selected level or upon attempting time travel
sources:
SS
access the memory manager with a game inserted:
hold L+R shift buttons while the system is booting.
ingame reset:
Start+A+B+C = go back to main menu in most games
cheat codes:
Puyo Puyo Sun
Sega Ages Power Drift
controls (3D Analog):
Analog = steer
R = accelerate
L = brake
A | C = gear low
B = gear high
sources:
Daioh P! - Dezaemon 2
controls (TYPE A):
d-pad = move
L|R = switch speed
A = main weapon
B = sub weapon
C = bomb
R = rapid
Elevator Action ^2 Returns | Elevator Action 2
controls (default, customizable in OPTIONS):
d-pad = move, crouch
2x d-pad = run -> cross small gaps if jumping while running
A = attack
B = jump -> cross short gaps, avoid bullets and damage enemies
A + B = toss bomb (combine with d-pad down to roll a short distance) (check the "B" counter in the top-left) -> destroy Security Boxes
basics:
- easier char: EDIE BURRETT
- getting hit will deplete the yellow gauge on the top-left. Collect food to refill. Fire and explosions won't damage you.
You lose a life by being crushed by an elevator, and if you run out of time.
- entering all red doors is required to progress further in the current stage.
If you're taking a bit too long to get to the next red door, you'll be nagged with a Caution alarm.
- going behind a blue door will trigger a spinning wheel with various items on it. When you hit the shoot button, what it stops on is what you get.
You can obtain new weapons, health refills, or extra points (computer hardware gears).
- last MISSION: 6
cheats:
- Starts the game with 7 credits (continues) instead of 3: Perform at title screen with "Game Start" highlighted: Hold L, R, C, Z and press Start
- Adds adjustable bombs and lives counts to the options screen: Left, Right, Left, Right, A, B, C, B
sources:
Legend Of Oasis | The Story of Thor 2
controls:
TODO
sources:
Planet Joker
controls:
d-pad = move, crouch, aim, climb ladders
A = main shot
B = bomb (check the icons in the bottom-right)
C | R (hold when the vertical bar on the bottom-left is yellow) = shield (needs recharging) -> temp. invincibility
basics:
- taking damage will increase the circular gauge on the bottom-left. When full you will gameover.
- the regular shot can be changed with cycling colors orbs: blue=spread, green=straight and yellow=side missiles.
- last MISSION = 7
sources:
Steam Hearts | Steam-Heart's
controls:
d-pad = move
C (hold) = main + sub weapon autofire
B | Z = bomb (req. active sub weapon, check the icons in the top-left) -> clear enemy shots
L | R = dash -> no temp. invincibility
A = main + sub weapon fire
X = main weapon fire
Y = sub weapon fire
Start = pause, skip cutscenes
basics:
- easier char: Blow (the guy, has spread vulcan when powered-up)
- your ship starts out with 7 energy points (check the blue gauge on the bottom-left).
They can be replenished with the refill items: 2x horizontal white bars = 1 unit, yellow "M" = full refill.
- "V" (=Vulcan) and "L" (=Laser) main weapons are powered up by sticking to the same item.
- sub weapons exist in the form of straight missiles, homing lasers, flame thrower and a lightning sword.
You can also store up to 3 sub weapons and detonate them as necessary (check the icons in the top-left).
- you lose all powerups after each stage, but your health is fully refilled.
- last stage: 7
sources:
Die Hard Arcade | Dynamite Deka
controls:
d-pad = move, grab enemies
A = punch, pick up
B = kick
C = jump -> not very useful
A+B+C = spinning attack (consume heath) -> use only when surrounded
basics:
- most screens have at least a few objects that can be picked up and used to bash enemies (or used to bash you), as well as a handful of guns and other projectile-firing weapons.
- you can collect handgun clips even if you aren't equipped with it, allowing you to store them up whenever you need them.
- you can also arrest enemies, which is slow but immediately removes them from the playing field.
- you no longer traverse levels in a traditional manner, by moving left to right. Instead, upon conquering each screen, your character(s) will take off and automatically move to the next destination. Usually in between these are quicktime-style cutscenes, where you're given a few seconds to hit a certain button to avoid an enemy attack.
- last stage: 5
sources:
Suiko Enbu | Outlaws Of The Lost Dynasty | Dark Legend
controls:
dpad = move, jump, crouch, block
2x d-pad (hold) = run
d-pad down (over a projectile) = step
X = light punch
Y = medium punch
Z = hard punch
A = light kick
B = medium kick
C = hard kick
Z + direction = grab
X + A = taunt
Y + B = fake dizzy
Z + C (only certain chars) = throw weapon and fight bare-handed for the rest of the match
basics:
- the weapon gauge located at the bottom of the screen measures your weapon strength.
It decreases everytime you block with your weapon or if you attack a blocking weapon (more damage to blocker).
When the gauge is empty, your weapon is destroyed in an explosion that leaves you dizzy.
- last opponent: CHAO GAI
sources:
Virtua Fighter Remix
controls (BEGINNER PAD CONTROL):
d-pad left|right = walk
2x d-pad left|right = quick step (hold to dash)
A = Guard
B = Punch
C = Kick
d-pad up (when opponent is floored) + B = quick stomp
X | B + A = grab
Y | C + A = reverse kick
Z | C + B + A = ?
basics:
sources:
Choujikuu Yousai Macross: Ai Oboete Imasu ka
controls:
d-pad = move
A = main weapon fire (hold for rapid fire)
2x A (tap quickly and hold in Gerwalk and Battloid mode) = auto-aim special attack (check the green gauge in the upper right)
A + d-pad (tap and hold) = main weapon fire direction lock
B = micro-missiles (hold to lock-on enemies, release to fire up to 8 each time, check the green slots in the top-right) -> use for enemies in background
C = bomb (check the 4 green dots in the top-left next to "B")
Z = dash, jump in Battloid mode -> use to dodge enemy fire
L | R = transform into Fighter, Gerwalk and Battloid (check the letters at the top-left)
basics:
- best form: Gerwalk (has auto searcher special attack, can hit the ground or ocean without taking damage).
- you have a "SHIELD" gauge in the upper left-hand corner of the screen. Also in many stages a resupply ship will drop off energy capsules that replenish your shield gauge.
- don't let too many enemies pass or the "SDF" counter will reach 0 and you will game over.
- beat the game up to 4 times to unlock extras in the "OPTION PLUS" menu.
- last phase/stage: 11
sources:
Blast Wind | Inazuma Saber
controls:
d-pad = move
A = main shot
B = homing shoot
C = bomb (check the "B" counter in the bottom-left)
basics:
- the shot can be powered-up 4 times by taking the "P" icons.
Everytime you collect a powerup, bolts of lightning erupt from the ship's sides. This lightning damages enemies and grants the player temp. invincibility (good bomb alternative).
When dying you lose 1 weapon level.
- the "S" powerup will add an option shield ball.
- each stage features 1+ switches that activate on contact. Switches can release powerups or trigger events such as shrinking the player's ship, but usually they change the stage path.
- last stage: 6
sources:
Shinobi Legions | Shin Shinobi Den | Shinobi X
controls:
d-pad = walk, crouch
2x d-pad = dash -> use often to avoid enemy attacks
C = jump (press again at the highest point for an higher jump)
B = sword slash (can be combined with a direction), repel enemy shurikens -> risky move, use guard instead
A = throw shuriken (can be combined with a direction) (check the counter in the top-right)
X = Thunder Dragon special attack (if you have the blue icon at the top)
Y | Z = guard in the direction you are facing -> use often when advancing
basics:
- the ninjutsu techniques from earlier Shinobi games have disappeared. Instead, you gain temp. special abilities by picking up various items scattered across each level.
- collect yellow and red orbs to restore your hit points.
- collect 10 blue orbs for an extra life.
- last stage: 9
cheats:
- 99 Lives Highlight ''Game Start'' and press A, Z, B, Y, C, X, Start
- 999 Shurikens In the Options menu, highlight ''Shurikens'', then hold L + R and press C, A, and B
- Level Select Pause game, then press A, B, A, B, C
- One Hit Wonder mode Highlight ''Game Start'' and press A, B, C, B, A Start
- View all FMV scenes During the Intro, press C, X, B, Y, A, Z, Start
sources:
Keio Flying Squadron 2 | Keiou Yuugekitai - Katsugeki-hen
controls:
d-pad = walk (hold to run), climb ladders
C = jump
B = attack
A = pickup a weapon (hammer, umbrella or bow) or object
A + d-pad down = drop current weapon
B + d-pad up = throw current weapon, open umbrella (fall slowly and cross longer pits, offers protection against falling objects)
menu translation:
NEW GAME
CONTINUE
OPTIONS
KEY CONFIG
HOW TO RUN (hold direction)
DIFFICULTY EASY
AUDIO STEREO
SAVE OFF
EXIT
EXTRA (unlocked via points)
basics:
- death happens instantly when you get hit unless you're carrying an object or a weapon.
In that circumstance, after you get hit you let go of whatever you're carrying while being invincible for a very short time.
- collect 100 golden rabbits to win an extra life.
- last chapter: 5
sources:
Hyper Duel
controls:
d-pad = move
A = transform+fighter shot -> smaller and faster but less powerful
B = transform+armor shot -> slower but more powerful, can aim shooting 45 deg
A + B = special attack (slowly depletes the meter in the bottom-left. Filled up by unit inactivity and by collecting "B" items)
R (Saturn mode only) = aim hold
basics:
- easier pilot: BG01-G "Storm Forgel" (wider shots)
- the weaponry of both modes can be upgraded by collecting "P" items which appear from defeating enemies.
The ships can also acquire helper units by collecting either the "T" (=Trace) or "G" (=Gunner) items.
The Tracer unit is similar to the Fighter mode and it shoots forward when closing in on an enemy, while the Gunner unit is similar to the Armor mode and it homes on enemies.
Both units also act as destructible shields.
- the ranking system is based upon how many "P" items have been acquired.
- last stage: 8
sources:
Thunder Force V
controls (Type A):
d-pad = move
B = shoot
C = change weapon
A = activate over weapon (different for each weapon) (consumes energy from a CRAW option) -> no invicibility
Y = switch ship speed (tap for 25% increase or hold for slow increase)
L = toggle HUD
basics:
- best weapons: Hunter (weak), Free Range (more powerful)
- the only weapons you don't lose when you die are the default ones (twin shot and back shot).
All others (wave, free range and hunter) are lost and need to be reactivated with another weapon item.
- Craws are energy spheres that rotate around the ship, increase its firepower and protect it from regular bullets.
You can have a maximum of 3 craws at any given time, but if they're hit while their energy is fully exhausted (by using an overweapon) they will disappear.
Exhausted craws recover energy with time, but can be replenished faster by collecting new craws.
- last stage: 7
cheats:
- unlock all weapons: pause the game during play and press Up, Right, A, Down, Right, A, C, Left, Up, B, Up, Right.
sources:
Shienryu | Steel Dragon
controls:
d-pad = move
B | C = fire
A = bomb (check the icons in the bottom-left)
powerups:
- red "P" = increases firepower (up to 3 times). After the firepower is at maximum, up to additional 3 items can be stored, which are added to the next life firepower.
- blue "S" = speed up (up to 3 times).
- "B" = +1 bomb stock (up to 20).
- flashing red "P" = full power & shield = cause fighter to become invulnerable until being hit once, and increases fighter's firepower and speed to maximum. Under the right circumstances, can explode in an array of pick-ups.
- red sphere = changes weapon to vulcan
- blue sphere = changes weapon to homing laser -> best one
- yellow sphere = changes weapon to homing missiles
basics:
- dying mid-stage will respawn at the closest checkpoint, while dying during boss battles will respawn immediately.
- to keep the rank low, never collect any item that yields points once you reach maximum power, never have more than 3 bombs in stock and never, ever take the ultimate pink powerup.
- last stage: 8
sources:
Skull Fang: Kuuga Gaiden
controls:
d-pad = move
A = shoot (hold for auto fire)
C (when the blue meter at the bottom-left is fully charged) = roll attack or bomb (according to chosen pilot type)
B = speed change (not used with AUTO speed)
basics:
- easier combination: SILPH-II, any BOMBER PILOT, THROTTLEMODE=AUTO
- there are 4 weapons selectable with appropriate items left by harmless carriers: V (vulcan cannon), C (cluster bullets), M (homing missiles) and L (laser gun). Shoot the item to cycle though weapon types and get the desired one, or make it explode into a weak smart bomb by shooting it for a while.
Regular power upgrades are achieved by collecting the "P" item.
- a one-time item in every level, the S-unit endows each jet with a powerful upgrade that completely overrides regular weapons. It will remain active as long as you don't press C.
- last stage: 6 (NORMAL MODE), 7 (EXTRA MODE, unlocks new ships)
sources:
Night Striker S
controls:
TODO
basics:
TODO
cheats:
sources:
Princess Crown
controls:
d-pad left|right = walk
2x d-pad left|right = run
d-pad up = jump
d-pad down = crouch, open treasures, pick up items (if there is space in the USE bag)
d-pad opposite direction of an attack = guard -> not very useful as you still take damage, use evade instead
C (tap) = attack, action, advance dialogues
C + d-pad down = dash + slash attack
C + d-pad up (when knocked down) = Reversal Slash (consume most of your POWER bar)
C (hold) = Rising Slash attack (consume most of your POWER bar. You cannot do it if your POWER bar is totally empty.)
B (hold) = evade (release when the enemy starts to attack to open the Evasion menu) (Your POWER decreases in proportion to the duration for which the B button is being pressed. If you're out of POWER, you can't Evade.)
A = call up the Item Wheel, which lists all the items in your USE bag (the rest are stored in your extra bags) (rotate the wheel with the d-pad, press C to use an item or B to cancel. To drop an item press down+C)
L (when not in battle) = shows the "Extra Window" , where you can transfer items between your bags.
R (when not in battle) = shows a map of the world/dungeon.
items:
- GEMS = single-use magic attacks
- RODS = 3-times-use magic attacks
- scrolls = single use items of attack or enchantment
- food (apples, hamburger, milk, etc.) = restores HP, some provide a POWER boost. Every food item has 3 uses before it is completely consumed. Some needs to be cooked to be edible (corn, meat and eggs).
- potions = temp. stats increase, get wasted if hit while drinking. If you drink more than one potion at the same time, you'll be poisoned and take damage.
- seeds = you can plant a seed only in battle. A seed takes 15s to yield after planting.
- candies = powers up your fairy friend
pub/bartender menu translation (from left to right):
- cook raw food (costs money)
- buy the specialty food
- cancel
basics:
- to start the game, crouch and grab the book on the floor with A and give it to the granny with C.
You can also give her the cat to adjust the options: stereo/monaural sound and message speed (default setting is "fast").
- every action during combat consumes the POWER/stamina gauge on .
- every equipment item has an Endurance rating which can be increased with "E+1" scrolls.
The Endurance is reduced by 1 each time the item is knocked off from you.
When the Endurance is reduced to 0, the item breaks.
No matter how high the endurance, you might still lose a piece of equipment if a goblin comes and snatches it before you can recover the item when it has been knocked off from you.
- you can save your game at the INNs in villages.
Talk to the owner and select the second option to save.
- complete the game and you will be able to play as Edward, and subsequently Portgus and Proserpina. All of them have a mini-adventure to complete, which become available as extra books in the initial game load area, where you direct a young girl to bring a book to her grandmother.
sources:
Game Tengoku: The Game Paradise!
controls:
d-pad = move
A | R (tap) = shoot
A | R (hold) = charge shot
B = bomb (check the "B" icons in the bottom-left) -> temp. invincibility
menu translation:
ARCADE MODE
YOKO TATE
NORMAL MODE
TIME ATTACK
ARRANGE MODE
NORMAL MODE TIME ATTACK
STORY MODE ON PRACTICE
STORY MODE OFF TIME ATTACK 1
TIME ATTACK 2
OPTIONS
SOUND TEST
DATA MODE (infos on old games)
REMINISCENCE MODE (watch story mode cutscenes)
KEY CONFIGURATION
GAME SETTINGS
LIVES 3
DIFFICULTY NORMAL
AUTO BOMB OFF
SUICIDE BULLETS OFF
SOUND STEREO
basics:
- best beginner chars: Z-DYNE, MOMOKO (have homing shots)
- max power is reached after collecting 6 "P" icons.
Upon dying the player loses only 1 powerup level.
- collect eggplants in rapid succession (<1s) to get more points.
- last stage: 6 (Arcade mode), 8 (Arrange mode)
sources:
Cyber Speedway | Gran Chaser
controls (Arcade Racer):
wheel = steer
left|right shift = steering boost
A = brake
B = accelerate
C = fires weapon
X|Y|Z = change view
sources:
Dead or Alive
controls:
d-pad = move
d-pad back (from where the char is facing) = block
B = punch
C = kick
A = hold, counter attacks
A + B = grab and throw
C + d-pad up (when the opponent is grounded) = knee drop
Rising attacks - when down, tap K to rise with a kick. Tap d+K to rise with
a sweep. Tap H when down to roll sideways before rising.
Escaping throws - tap H+P to escape from a H+P throw. To break out of a
multi-part throw, tap H+P+K.
basics:
- easier char: KASUMI
- there are 3 basic attack types: blows, throws and holds.
Blows override throws, throws override holds, and holds override blows.
- to get the extra costumes for each character just finish the game on normal difficulty. Every character has up to six different new costumes.
When selecting characters, push up if they are on the top row, or down if they are on the bottom row to select alternate character outfits.
sources:
Twinkle Star Sprites
controls:
d-pad = move
A | C = shoot
A | C (hold) = charge shot (aka Attack Stopper) -> use when being attacked by your opponent
R = rapid shot
B = bomb -> temp. invincibility
game start menu translation:
- Character mode (azure) = play with a custom char -> best beginner char: Nanja Monja (fluffy colored chars)
- Story mode (green) = play with Load Ran
- VS mode (red)
basics:
- avoid the "ARCADE MODE", it will simulate the slow-downs from the Neo Geo version.
There is a "Shoriochi" option in the Saturn Mode options menu. If you put this on "CUT", it will remove all of the slowdowns.
- to win a match the goal is to knock out all of your opponent's 5 hearts.
- stage enemies come in different colors, which represents their amount of life.
The colors from highest life to lowest life are: Purple-Blue-Green-Yellow-Red.
When you shoot an enemy, it drops to a lower color, and when you shoot a red enemy, it explodes.
This explosion can destroy the surrounding enemies (chain explosion).
Some enemies are surrounded by bubbles that can absorb one explosion or shot.
When the chain of explosions end, a number of fireball are sent to the opponent.
- you can shoot the fireballs that your opponent sends at you, they will be sent back as a flashing fireball.
Charged shots are the best for that (Attack Stopper).
- best strategy: use the normal shot on the stage enemies as much as possible, it is the best way to start chains.
- try set up a chain combo when your opponent is about to launch a massive attack on you.
That way most of the attacks will be sent right back at them.
If you can't set up a chain when a large assault is sent, either dodge it, charge an Attack Stopper, or use a bomb.
- last stage: 7
sources:
Guardian Force
controls (Select 1):
d-pad = move
A = fire frontal+directional weapons at the same time
B = bomb (changes according to the current weapon, check the bullets in the lower-left corner)
L = left turn
R = right turn
basics:
- collect the purple crystals to levelup (check the blue bar in the lower-left corner).
- best directional weapon: green
- last stage: G (defeat the last boss in under 30s to fight the true last boss)
sources:
Touryuu Densetsu Elan Doree | Elan-Doree Legend of Dragon
controls (type E):
d-pad = move
A = fast attack
B = powerful attack
C = jump
X = Special Attack 1 (consumes the D-power meter, check the big number counter in the top-left)
Y = Special Attack 2 (consumes the D-power meter, check the big number counter in the top-left)
Z = Special Attack 3 (consumes the D-power meter, check the big number counter in the top-left)
L | R = dash
basics:
- set the "type E" control method to have Special Attack shortcuts.
- best beginner char: KEYAKI?
- the D-power meter is replenished by using non-dragon attacks.
sources:
Virtua Fighter 2
controls:
d-pad left|right = move
2x d-pad left|right = run
d-pad up = jump
B = punch
C = kick
A = guard
special moves:
Hopping Hammer = up + P
Hop Kick = up + K
Landing Sidekick = up , K
Jumping Hammer = up, right + P
Landing Dropkick = up, right + K
Reverse Dropkick = up, left + K
Jumping kick = right, right + K
Grab + Throw = P + G
basics:
sources:
Magic Knight Rayearth
controls:
d-pad = move, climb, push
A = attack, talk, look for hidden items, interact
A (hold) = charge attack (if you have Aura Weapons)
B = jump
C = magic attack (consumes MP, check the blue bar in the top-left corner)
Z = change Magic
Y = view the map
X = dash (if you have the skill)
L | R = switch char
Start = open menu, skip cutscenes
basics:
- best char to use: Fuu (longest range)
- collect gem stones to buy items (check the counter in the top-right corner).
- if you stand still, your magic points will slowly refill.
sources:
Shinrei Jusatsushi Taroumaru | Psychic Killers Taromaru
controls:
d-pad = move, crouch
2x d-pad = run
B = main attack (hold to charge) (cannot move while firing)
C = jump
C + d-pad down = slide -> not an attack, use it to oppose wind
Z | 2x d-pad down + B = throw up a protective sphere which quickly pushes back enemies and absorbs projectiles -> temp. invincibility, use whenever you're about to get hit.
A = hypnotize certain types of enemies into fighting alongside them (they will become yellowish on success)
options menu translation (from left to right):
Key configuration
Sound test
Audio: Stereo
Number of stocks: 3
Display HP: On
Difficulty: Normal
basics:
sources:
Soukyuu Gurentai | Terra Diver
controls:
d-pad = move
A = shoot
L | R (hold) = rapid shot
A (hold) = locks on to enemies and fires when the button is released
C = switch targetting web
B = use bomb (changes according to current targetting web and locked enemies) (check the "B" icons on the top left corner)
menu translation:
game start
practice mode
start
pilot (ship & weapons) select
round select
high score screen, for each round
exit
options
difficulty select
control setup
audio select
high score viewing
OST/SFX test
Music/Sound Effect balance (left=music)
EXTENDED OPTIONS (must be unlocked)
Extended Control setup
Number of ships you start off with
Number of bombs accessible
Credits you start with
Extra ships
Extra music listening
basics:
- best ship: S.O.Q.-010 (all-around reticle)
- if you play the game on an American or European Saturn with a converter cartridge, some of the text will be in English.
- last stage: 8
sources:
Prikura | PriCla Daisakusen | Princess Clara Daisakusen
controls:
d-pad = move
2x d-pad | Y = dash
A = shoot
A (hold) = rapid fire with free movement
B = melee attack (reflect bullets, can unleash a chain reaction with some enemies)
2x d-pad | Y, B = more powerful melee attack
C = use bomb (if you have it, check the counter on the top-left corner)
menu translation:
Start
Characters Profile
Options
Configs
Difficulty Easy|Normal (default)|Difficult
Lives 3
Time Fast|Normal (default)|Slow
Initial bombs 3
Continues 3
Audio Stereo
Pad settings
Sound test
basics:
- best char: Kilala
- melee attack turn enemies into jewels, shot attack turn them into animals.
Collect more jewels to make your familiar evolve for melee attacks (or vice-versa).
- last stage: 5
sources:
Astra Superstars
controls:
d-pad = move
A = short range weak attack
B = short range normal attack
C = short range strong attack
X = long range weak attack
Y = long range normal attack
Z = long range strong attack
L|R = (can be customized in options)
back = block
2x direction = dash
X+A = Speed Up (can link multiple attacks together including strong basic specials; maneuvers will not bounce the opponent off the wall while this is active; cannot perform Star Specials while this is active; costs one star stock)
Y+B = Star Special 1 (costs 1 star stock)
Z+C = Star Special 2 (costs 1 star stock)
basics:
- best female char: Maron
- in case time runs out with both fighters having some energy, the starrank will be considered, not the remaining health.
sources:
Burning Rangers
controls (3D Control Pad):
d-pad | Analog pad = move
A | C = jump (can be combined with a direction), swim up (underwater)
B = shoot (auto-homing to the closest flames), activate switches, swim down (underwater)
B (hold) = charged shoot (Laser Blast)
R | L = rotate camera 90°
Y + D-Pad|Analog pad = camera move
X | Z = ask help to base
Start = pause
basics:
- crystals provide 1-hit protection like rings in Sonic games.
Red crystals are worth 1, green crystals are worth 5.
- rescuing people also acts like a save spot and crystal bank.
To save a survivor you will need at least 5 crystals.
- some flames and enemies need the Laser Blast to be extinguished
- jumping will charge up your laser faster.
- if you take too long, the area becomes more and more dangerous, as indicated by the "LIMIT X%" counter in the top right.
For every 20 percent that the meter goes up, the surrounding area will be engulfed in flames and explosions for a few seconds.
You can reduce this meter by extinguishing smaller flames present throughout the level.
- last mission: 4
passwords (unlocked after finishing the game once):
G2SHOU2JKY: Play as Shou, Mission 1
3SHOU5GHJK: Play as Shou, Mission 2
GFGF5SHOU5: Play as Shou, Mission 3
NM3TILLIS5: Play as Tillis, Mission 1
B5TILLIS2D: Play as Tillis, Mission 2
STILLIS4KL: Play as Tillis, Mission 3
sources:
Steamgear Mash
controls:
d-pad = walk
B = jump
A (tap) = fire regular weapon
A (hold) = charge regular weapon
C = use special weapon (req. the blue energy bar on the top-right corner, collect bullets to refill)
Z | X = switch special weapon (check the icon on the top-right corner)
Y = quick switch to bomb special weapon (check the icon on the top-right corner)
R (hold) = use special skill (unlimited use)
L = switch special skill (check the blue label at the bottom of the screen)
Start = pause and view the map (flashing white room = your current position, flashing red room = your next destination)
main menu translation:
- LOAD SAVED GAME 1
- LOAD SAVED GAME 2
- LOAD SAVED GAME 3
- LOAD SAVED GAME 4
- START NEW GAME
- CONFIGURE BUTTONS
- SOUND MODE
- EXIT
special skills:
- LOCK = Strafe (shoot in one direction while walking in any direction)
- STOP = Stand still and shoot in any direction
- ROLL = Shoot around yourself in a circle
- BACK = Shoot in the opposite direction from where you're walking
- DASH = Run at twice the speed
- SIGHT = ???
special weapons:
- Bomb = Explodes in a small circle were you throw it
- Stars = Throw 5 stars in front of you
- Punch = Powerful close range attack, destroys green boxes
- Flame Thrower = Shoots flame in front of you, destroys red boxes
- Ice Rock = Freezes some enemies, destroys blue boxes
- Missile = Homing missles, destroys dark gray boxes
- Heal = Makes large hearts appear
basics:
- saving: during the game you will find puple mechanical boxes, stand on them and choose yes then the slot to save.
- warp boxes will send you to fixed stage depending on their color: red=1, blue=2, yellow=4, green=6.
- last stage: 7
sources:
Tryrush Deppy
controls:
d-pad = move
d-pad down = duck, look down
A | C | Y = jump (does not consume gas)
B | X | Z | L | R = dash (attack enemies, bust through walls and other stuff) (consumes gas, cannot dash midair)
B | X | Z | L | R (hold) = charge dash (can be used in midair)
basics:
- the gas on the bottom serves both as energy and time bar (it slowly depletes over time and according to your moves). To get more gas you must pick up containers of it.
- the lower your gas gets the slower you move.
- kill enemies by jumping over them (better, does not consume gas) or dashing (those with spikes).
- red enemies carry gas containers.
- if you touch flames you will burn. Tap the buttons to become normal.
- being dazed drains gas. To become "Un-dazed" simply tap the buttons
- on most stages there is a character you can help. If you do, you'll get an icon (called Drama) on the stats screen at the end of each level. Collect specific icons to unlock different endings. Some icons have precedence over others, for example, if you have the Hat + Heart icons, they will always overrule any other Drama icons you've gotten.
- the Bonus Stars are gotten by entering the bonus stages through a big golden star found on each stage and collecting all the neon stars inside (you can pause and look around with the dpad here).
- the Extra Level icons are trickier to get because the entrance to the extra area is very well hidden, and once inside, you need to find a character/enemy and destroy it to get the icon at the end of the level.
- before a boss fight there it will point out its weak point. Keep in mind this is the only place to hit him. If you hit him anywhere else you will become dazed.
- if you don't have Auto save on it will ask you at the end of every stage if you want to save your game.
- last level: 6 (there are usually 3 stages per level)
sources:
Bulk Slash
controls (Robot Mode):
d-pad up|down = move forward|backward
d-pad left|right = strafe left|right
L|R = turn left|right
B (tap) = regular Shoot
B (hold) = optional Shoot
C = jump
A = transform into Fighter mode
controls (Fighter Mode):
d-pad up|down = dive|pull up (inverted)
d-pad left|right = strafe left|right
L|R = turn left|right
B = regular shoot (homing missiles if charged)
C (tap) = change speed (cycle between 25%, 50%, 75%, and 99%)
C (hold) = change speed (increase slowly)
X,Y, or Z = zooms out minimap (during bossfights auto steers you toward the boss if you have a navigator)
A = transform in Robot mode
map legend:
red dots = ground enemies
yellow dots = air enemies
white dots = bullets
pink circle = MISS
cyan circle = target
stage goals:
Stage 1: Destroy Targets
Stage 2: Destroy Targets
Stage 3: Escort the Ship to safety
Stage 4: Deliver Bombs to Target Points
Stage 5: Aquire the 5 ID Cards and reach the bottom room
Stage 6: Destroy Targets
Stage 7: Reach the bottom room
basics:
- you can NOT save between stages, and must start fresh every time.
- in every stage there is a Navigator (M.I.S.S.) to be found. If you have one join you, she will make big orange guide arrows appear to point you toward your targets (otherwise you need to use the minimap and look for the big circles).
- you the Fighter Mode to cover longer distances and Robot Mode for combat
- total missions: 7
- the MISS you have when finishing the game will be saved for the next playthrus.
- after the ending credits you will get to see your Navigator's personal love ending, assuming you scored enough love-points with her. Basically just pick one Navigator and stick with her till the end. You cannot replay completed stages.
sources:
Hang-On GP | Hang-On GP '95
controls (Arcade Racer wheel):
A = brake
B = accelerate
Z | Y = pulls bike to the left|right
butterrfly shift = shift gears
X = change camera
C = show OSD
cheats:
- enable all course select: start a game, enter the options screen, and choose mode select. Highlight the "Options" selection and press R, R, L, R, then R. A sound will confirm the code has worked. All courses will be available for selection.
sources:
Assault Suit Leynos 2
controls:
D-pad = move suit
R = dash
L (when in manual fire mode) = fix aim
X, Y, Z = use top 3 equipped items
A, B, C = use bottom 3 equipped items
Start = Pause/Config Menu
ingame OSD from left to right:
- energy meter (light blue) (depleted as you use energy weapons or energy shields)
- life meter (green)
-
current weapons/item equipped to buttons X Y Z, A B C
JP/BST = jump/blasters
MSL = missiles
The numbers represent the ammos left in the weapon, and the number of rounds left in the current magazine. So (12) 4 on the SG-V20 means there are 12 magazines left, and 4 shots left in the current one before you need to reload.
"Auto (1)" means you're currently using auto-targeting mode 1 to aim - this can be changed at any time in the pause menu. Some weapons are manual-aim only (a warning will be shown in English in the weapon equip menu). The three different auto-aiming behaviours are:
1) Target whatever's closest
2) Prioritise incoming missiles
3) Prioritise whatever has the lowest health
mission objectives:
- Kill everything
- Survive/Kill everything
- Survive as long as possible
- Protect the convoy
- Kill Everything
- Kill Everything
- Defeat the boss
basics:
- your suit will always automatically repair itself over time.
So when you take damage, take cover and wait.
- last Mission: 7
sources:
Super Tempo
controls:
TODO
basics:
Clockwork Knight
controls:
d-pad left|right = walk
2x d-pad left|right = run -> jump longer distances
d-pad down (hold) = crouch, look down
d-pad up = look up, enter pipes
A | C = jump (hold to jump higher)
B = attack, use the key -> open boxes, etc.
B (hold) = grab stunned enemies and items (release to throw, or d-pad down to release)
basics:
- do not jump on enemies to kill them, only attack them with B.
- the goal is to reach the end of the stage before time or hit points (typically 3, though Gold Keys can increase that maximum) run out.
- wind-up keys will refill health. They come in 3 colors; Bronze Keys refill one point, Silver Keys refill all points, and Gold Keys refill all points and increase the maximum by one
- blue helmet awards an extra life, and the much-rarer red helmets award three extra lives
- there are no checkpoints: dying sends you back to the beginning of a level.
Also the game does not save a player's progress.
- at the end of each stage is a mix of letters rolling on the ground, pay attention to the missing letter Shown jump on it to get bonus Try.
- total areas: 4
cheats:
- level select: at the title screen press Left, Up, Right, Down, Down, Right, Right, Up, R. Press Up or Down to select your starting level.
sources:
Clockwork Knight 2
controls:
d-pad left|right = walk
2x d-pad left|right = run -> jump longer distances
d-pad down (hold) = crouch, look down
d-pad up = look up, enter pipes
A | C = jump (hold to jump higher)
B = attack, use the key -> open boxes, etc.
B (hold) = grab stunned enemies and items (release to throw, or d-pad down to release)
basics:
- getting hit will deplete the gears in the bottom-left. Collect wind-up keys to refill.
- there are 32 cards scattered around the game, 4 per level. Collecting all 4 cards in a level gives players a Gold Key; collecting all 32 gives them a secret code at the end of the game.
- speckled eggs add as objects. Items are often found inside eggs.
- bottle caps with pictures of crowns on them are used in the Soltian Roulette mini-game or to earn a game continue.
- last world: CLOCK TOWER
sources:
Astal
controls:
d-pad left|right = walk
d-pad down = crouch
2x d-pad left/right = run
C = jump
B = attack, grab, throw
d-pad up, B = breath attack
d-pad down, B = ground attack (use with group of enemies, to turn them into crystals)
A = perform current bird action (check the icon at the bottom-right, consumes the purple Karma bar at the bottom)
L, R = scroll bird actions (check the icon at the bottom-right)
X = shortcut: bird search for pickup items (usually a life-restoring fruit) (press A to make him release it) (consumes 4 Karma units)
Y = shortcut: bird context-specific special action (only when the bird icon "!" is shown) (consumes 4 Karma units)
Z = shortcut: bird attack (consumes 4 Karma units)
basics:
- jump on top of enemies to stun them or use them to reach higher places (not killing)
- some enemies have glowing balls orbiting around them. If you jump on or kill these, your Karma increases by one.
- last level: 16
- the game has no save feature
cheats:
- 99 Lives: Highlight the "Lives" option and press Right; you will find that instead of being limited to just five lives you can start the game with as many as 99. In the Option menu press LEFT, RIGHT, LEFT, RIGHT, UP, DOWN, L BUTTON, R BUTTON, START on Controller 2.
- Invincibility: Pause the game and Press: UP, Y, LEFT, A, DOWN, B, RIGHT, and C. Then Unpause.
- Level Select: Enter 99 Lives code. Return to title screen, press UP, DOWN, LEFT, RIGHT, L BUTTON, R BUTTON, A, Y, C, Z, B, X on Controller 1
sources:
Sonic R
controls (same for digital and analog):
d-pad left|right = turn
d-pad up | B (hold) = accelerate
L | R = drift
L + R = brake
X | Y | Z = change view
basics:
- best initial racer: Knuckles
- collect rings to open doors and shortcuts in the tracks.
- to earn an emerald you do not have to JUST collect it, but you have to finish 1st as well.
unlockables:
Collect all 5 Sonic Tokens on Radical City and finish in the top 3, then beat him in the challenge race Puppet Tails
Collect all 5 Sonic Tokens on Reactive Factory and finish in the top 3, then beat him in the challenge race Cyber Knuckles
Collect all 5 Sonic Tokens on Regal Ruins and finish in the top 3, then beat him in the challenge race Egg Robo
Collect all 5 Sonic Tokens on Resort Island and finish in the top 3, then beat him in the challenge race Metal Sonic
Collect all 7 Chaos Emeralds, then press Up on Sonic at the character select screen Super Sonic
Place 1st in the 4 initial courses Radiant Emerald Bonus Course
Place 1st on the Radiant Emerald Course Dr. Robotnik
pro action replay cheat codes:
Always Place First
1600B434 0001
Always have 5 Sonic Coins
1600BD5E 0005
sources:
G Vector | G-Vector
controls:
d-pad = move, aim, lock-on
A = gun
C (hold) = autofire gun
B = fire lasers at all locked-on targets (check the gauge at the bottom-left)
basics:
- in SCORE ATTACK mode you are invulnerable.
- stage progress, scores, and the continue code are automatically saved to the Saturn's internal memory.
- last stage: 6
sources:
NiGHTS into Dreams
controls (3d analog):
Analog Stick = fly, walk
A|B|C (when flying as NiGHTS) = dash -> when you hit enemies instead of losing time, they become a big ball of stuff sent flying around.
L|R (when flying as NiGHTS) = perform acrobatics
A|B|C (when walking as a kid) = jump (press again before landing to double and triple jump -> jump higher and reach some special places)
L|R (when walking as a kid) = change camera
basics:
- at the main menu "dream data" will tell you the high scores for each course, while "select diary" will let you manage your save data.
- to finish each regular course ("Mare") you must collect a certain number of blue chips and bring them to the "Ideya Capture" capsule.
- when you fly a circle in any direction as NiGHTS ("Paralooping"), everything caught in that circle goes in one of two places.
If it's good for you (stars, chips), it's attracted to you. If it is bad for you (enemies), or does nothing for you (Nightopians), it gets teleported to another galaxy, elsewhere. And if it is an object in the landscape (rings, statues, Ideya captures), nothing happens.
- when you get close enough to an enemy as NiGHTS, if you move faster then they are at collision, you grab them.
Then you circle them, trying to get the proper angle.
If the enemy is small enough to get paralooped, it will go bye-bye after one full rotation.
If it's a boss, you keep rotating until you dash. A few bosses are too heavy to rotate.
- last level: Twin Seeds
sources:
Guardian Heroes
controls:
d-pad = move, jump
2x d-pad = run
A = block -> important, use often
A,A = backjump (some chars only)
B = weak attack (can be combined with a direction)
C = strong attack (can be combined with a direction)
Z = magic attack (press d-pad to select and Z again to use, consumes magic power)
A+B = jump (some chars only)
A | C = mid-air recovery
A + dpad circle = un-daze
X = tell the Gold Armor Skeleton Warrior what to do: attack, defend, follow, hold, berserk (press dpad to switch and X again to select)
L|R = jump back|forward plane
Y = cycle 1 playfield level (backwards, unless in back, then to front).
statistic descriptions:
- STR = determines how much damage your regular attacks cause. Differing hits still
cause different amounts of damage, but STR is a baseline addition to this amount.
STR also determines how far enemies are knocked by your hits. Bigger enemies
still don't fly as far as smaller enemies when you have high STR, but they will fly
farther than when you had low STR. This is a very important stat for Han. It is
also important for Genjirou, Serena and Randy, but less so than Han.
- VIT = determines how many HP your character has. The more the better. Everyone
can use a high VIT except Nicore. Her healing spells can substitute for a high VIT.
- INT = determines the effectiveness of your spells. At higher amounts of INT, your
spells become larger and stronger. This is a very important stat for Randy,
Genjirou and Nicore. Serena benefits from high INT also.
- MEN = Determines how many spell points you have, and also how fast you recover them
in regular combat. Randy, Nicore, Genjirou, and Serena all benefit from increased
MEN. You do not need to pump this stat up too high, moderate increases are
usually enough.
- AGL = determines how fast your character moves during physical and magical
attacks. It does not effect the duration of mental attacks, but just the windup and
recovery for them. At high levels of AGL, you will have to change your timing on
your juggle combos to keep them effective. Genjirou and Harn need high levels of
AGL.
- LUC = modifies the amount of damage you give and receive. With high levels of
LUC, large random damage bonuses can happen, and large reductions of damage
from hits can also occur. This effect works for magic as well as regular attacks.
Nicore needs high LUC to get the better types of effects for her spells.
stage flow diagram:
Stage 1
||
||
Stage 2
||
_________________||________________
#3 #2 #1
|| || ||
|| || ||
|| || ||
Stage Stage Stage
3 5 4
______||______ || ______||______
#2 #1 || #2 #1
|| || || || ||
|| || || || ||
|| Stage || Stage ||
|| 6 || 7 ||
|| || || || ||
|| ||_________||_________|| ||
|| || ||
|| ___________||___________ ||
|| #3 #2 #1 ||
|| || || || ||
Stage Stage Stage Stage Stage
8 9 10 11 12
|| || || || ||
||__________||_________||_________||__________||
||
||
_______________________||_______________________
#5 #4 #3 #2 #1
|| || || || ||
Stage Stage Stage Stage Stage
17 16 15 14 13
|| || || || ||
||__________|| || ||__________||
|| || ||
|| || ||
|| ________||________ ||
|| #4 #3 #2 #1 ||
|| || || || || ||
______________||_______||___ || || ___||_______||______________
#3 #2 || #1 || || #3 || #2 #1
|| || || || || || || || || ||
|| || || || || || || || || ||
|| ||_______|| ||_|| ||_|| ||_______|| ||
|| || || || || ||
|| || || || || ||
|| || || || || ||
|| || || || || ||
Stage Stage Stage Stage Stage Stage
23 22 21 20 19 18
|| || || || || ||
|| ||__________|| ||__________|| ||
|| || || ||
______||______ ________||________ ________||________ ______||______
#2 #1 #3 #2 #1 #3 #2 #1 #2 #1
|| || || || || || || || || ||
|| || || || || || || || || ||
||__________||____|| || ||____|| ||______||____|| ||
|| || || || || || ||
|| || || || || || ||
|| ||____________|| || || ||________________||
|| || || || ||
|| || || || ||
|| Stage Stage || ||
|| 27 26 || ||
|| || || || ||
|| || || || ||
Stage Stage Stage Stage Stage
28 30 29 25 24
basics:
- best char all-around: Ginjirou
- the Skeleton Warrior cannot die. Use him to protect you against most physical attacks.
- after each stage the game saves automatically.
- easiest stages path: 1-2-3-8-17-22-27-30.
cheats:
-
stage select and debug mode: go to the Options menu from the main menu. While DIP Switch is highlighted, press and hold X, B, and Z. While holding these, enter the DIP Switch menu by pressing A. As soon as you press the A button, immediately hold Down on the D-pad. If the code is done correctly, you will now be able to turn on Debug at the bottom of the DIP Switch menu. With Debug turned on, these cheats are immediately applied:
Begin Story Mode with characters at level 200.
Select your beginning stage in Story Mode.
Have access to all 45 characters in Versus Mode.
sources:
Magical Night Dreams Cotton 2
controls:
d-pad = move
A = shoot, throw
B = catch enemies (normal or sealed) and their shots
C = magic attack (if you have a crystal in the bottom-left corner)
seal commands (can be assigned to X|Y|Z buttons via the extra options):
<- -> A (straight powerful shot)
-> <- A (3-way spread shot)
V V A (downward little bomb) (defective?)
^ ^ A (upward little bomb) (defective?)
-> ↘ V A (spray of three shots ahead/down) (difficult)
-> ↗ ^ A (spray of three shots ahead/up) (difficult)
colored crystals:
- yellow = gives you points and experience to upgrade fire power (up to "LV5"). All other colors switch the element type that defines your shot while adding a magic spell.
- orange = fireballs
- blue = ice shards
- green = wave shots
- white/gray = thin laser beams, appear only after stage 5
basics:
- your magic strength progresses from "LV1" to "LV5" as you gain experience, and it decreases as damage is taken.
- sealing enemies encases them in a huge, floating orb. They can then be picked up, carried as a shield, and tossed around the screen to destroy other enemies. By keeping this orb on screen and scoring combos, you can eventually rack up high scores. You can also shoot the orb to release health bonuses. The orb behaves differently, floating in various directions, depending on which magic you have equipped.
- besides the TEA TIME, the only other way to recover health is by engaging in pursuits during the levels, but that's a bit more complicated.
- last stage: 7
cheats:
- extra options+stage select: at the title screen, select the option screen menu. Now press and hold ABCXYZ buttons at the same time (press A a split second before the others). You should now be in the option screen with some additional choices.
This will let you select Appli and Cotton as player 1 or 2, access music test, and even has some control options for XYZ buttons, including rapid fire or single button moves!
Back on the main menu there should be a Training menu as well (pause ingame to access the stage select).
sources:
Silhouette Mirage
controls:
d-pad left|right = walk
2x d-pad left|right (hold) = dash -> use to climb curved walls
d-pad down + C = slide -> temp. invincibility, use to get to the other side of enemies safely
2x d-pad down (tap) = crouch (double-tap up to get up again) -> useful to avoid some enemy bullets
C = jump (up to 3 times)
B = auto-aiming attack -> drain health of enemies of different color, or spirit energy if the same color
B + d-pad direction = directional attack
A (hold) = reflector -> reflect enemy shots of the same color, they will be bounced back at them and damage them. Can be used in midair.
A (close to an enemy) = grab (tap repeately to milk coins, does not cause any damage)
d-pad left|right + A (while grabbing an enemy) = throw -> good for isolating a single enemy
X = switch color -> wastes 1/3 of your spirit energy, avoid using it
L + R = bomb -> wastes a whole lot of your energy, avoid using it
rabbit store menu translation:
What?
Buy Sell Quit
basics:
- best strategy for regular enemies:
- same color: reflect attacks with A | grab them and throw on the other side.
- opposite color: attack with B.
- collect coins to buy upgrades and refills in the rabbit store.
- best weapon to buy: SUROSA
- when you die, choose the option on the bottom and you'll be able to continue from the start menu.
- beat the game, and all the stages will be available in the scene select menu.
- last stage: 7
cheats:
- level select: when the Treasure logo appears, hold X + B + Z and press Start. Enable the debug mode to make the level select appear when selecting Start from the main menu.
sources:
Radiant Silvergun
controls:
d-pad = move
A = straight vulcan shot
B = homing shot -> attack in all directions
C = diagonal shot that ends in a damaging cloud -> the most powerful of the weapons (except the sword), but the most awkward to use efficiently.
X | B+C = lock-on lasers -> attack in all directions
Y | A+C = back vulcan shot
Z | A+B = 2x sweeping "sticky" lasers -> use against bosses
R | A+B+C = sword -> do major damage and absorb pink enemy shots + charge a bomb-like "Hyper Sword" attack (check the thin blue gauge at the bottom-left)
basics:
- there are no weapon powerups or bombs, but you have an assortment of 6+1 weapons from start.
Earning more points with different weapons will increase their level (check the "LV A|B|C" counter in the top-left)
- score chain by destroing enemies of the same color.
- Arcade mode (switchable in the options) doesn't save progress, you get 10 lives per credit and every hour gives you a credit, 40-50-etc lives. Should be enough. It's a lot shorter and meant for short games - doesn't save weapon progress.
Saturn mode saves your weapon progress up to level 33 (for all three) - the game will get easier the more you play. You unlock lives and credits with each hour played. You start with 3 lives and 0 extra credits.
- last stage: 6
cheats:
- Unlimited Continues: in arcade mode, press L + R when it says "Insert Coin(s)". Then when you're playing the game and running low on continues just press L + R again and the "Continue?" screen
sources:
Panzer Dragoon
controls:
d-pad = change flying direction, aim
A | B | C (tap) = fire
A | B | C (hold) = lock on targets (up to 8) (fire the homing laser when released)
L | R = rotate view 90°
X = change camera to standard
Y = change camera to close
Z = change camera to distant
basics:
- in easy mode lives are infinite.
- constantly check the radar to see incoming enemies from the back.
- last episode: 7
cheats:
- Infinite continues: Press Start on the title screen, then press Up, X, Right, Y, Down, Z, Left, Y, Up, X
- Invincibility: Press Start on the title screen, then press L, L, R, R, Up, Down, Left, Right
- Stage Select: Press Start on the title screen, then press Up, Up, Down, Down, Left, Right, Left, Right, X, Y, Z
sources:
Panzer Dragoon II Zwei
controls:
d-pad = change flying direction, aim
A | B | C (tap) = fire
A | B | C (hold) = lock on targets (fire the homing laser when released)
X | Y | Z = special attack (consumes the Berserk energy bar)
L | R = rotate view 90°
basics:
- your dragon will "upgrade" once and awhile between levels depending on how many Evolution Points you have acquired.
Evolution points are obtained by: clearing stages (Clear Points), having a Shot Down Ratio >= 80% (Technical Points), and taking higher difficulty routes (Route Points, only in ep. 2,3,4).
- an episode select option will be unlocked in the Pandora's Box menu.
- if you have some options in the Pandora's Box turned on, the game won't let you save anything you do while using it.
- last episode: 7
sources:
Panzer Dragoon Saga
sources:
DC
controller layout:
(Analog Stick) Y
(d-pad) X B
Start A
cheat codes:
Dynamite Cop | Dynamite Deka 2
Project Justice: Rival Schools 2 | Moero! Justice Gakuen
sources:
Dead or Alive 2
sources:
Sega Rally 2
controls:
TODO
basics:
- easier car: Lancia Stratos
sources:
Confidential Mission
controls:
gun = aim
trigger = shoot
shoot outside the screen = reload
basics:
- the "Agent Academy" mode consists of multiple training exercises that test various skills.
- getting hit will deplete the "CMF" badges on the bottom-left.
Shoot C/M/F badges to restock (you need 1 of each for an extra life, check the counters in the bottom-left).
- other special items you can find are:
- ASSAULT RIFLE - this is a rapid-fire gun with 44 bullets
- BODY ARMOUR - it pretty much gives you an extra life. It disappears after one hit. Also, when you get shot with it, the screen turns yellow instead of red.
- briefcase - shoot it for 3k points. 5 floppy disks pop out of the case - shoot them for 5k points each.
- grenades - when you shoot it, it blows up. All the enemies in the immediate area die, and any powerups in the area are magically collected for you.
- "Justice Shot" bonus is earned whenever you disarm someone by shooting the hand that they’re holding their gun with, encouraging you to aim carefully and take foes out with style. “Combo Shots” are done by quickly shooting an enemy in the same spot multiple times without triggering a Justice Shot.
- to unlock Mission Select Mode, complete Arcade Mode once with the good ending.
- to unlock the Another World option, you must complete the mission and complete the first 18 exercises in Agent Academy.
- last MISSION: 3
sources:
The House of the Dead 2
controls:
gun = aim
trigger = shoot (shoot ouside the screen to reload) -> aim at the head of most enemies
basics:
- the main difference between Arcade and Original Mode is that items can be selected from an inventory at the beginning of each game to change up the experience.
More items can be found while playing thought the game and then used on the next playthoung (e.g. inf. continues).
To change the blood colour to red, you must beat the game in the original mode.
- getting hit will deplete the fires on the bottom-left.
Shoot boxes and save humans to get "LIFE" medkits to refill.
- coins and crystals only provides extra points.
- last CHAPTER/stage: 6
sources:
Sonic Adventure
controls:
Analog Stick = walk, run
A = jump
B | X = special attack/ability
Y = context-action: grab, activate switch, talk
L|R = rotate camera
d-pad = FPV
basics:
...
sources:
Sonic Adventure 2
sources:
Ikaruga
controls:
d-pad = move
B = fire (hold for rapid fire)
A = change color -> you're invincible from that same color while being able to deal 2x damage to an enemy of the opposite color.
R | A+B = homing laser (check the blue meter at the bottom-left, absorb enemy shots of the same color to refill)
X = hide/display the CHAIN STATUS (destroy 3+ fighters of the same color in a row for extra points)
menu translation:
GAME START
EASY/NORMAL/HARD (not shown if DIFFICULTY!=USER SELECT in the OPTIONS)
NORMAL GAME (5 STAGES)/TRIAL GAME (not shown if TIME TRIAL=OFF in the OPTIONS)
PRACTICE -> stage select for beaten stages
RANKING
CONFIG
TUTORIAL
APPENDIX -> view unlocked extras
BACKUP -> save on mc
EXIT
basics:
- do not touch enemies of any color, they kill you instantly.
- during boss battles check the timer in the top-right.
- last chapter: 5 (NORMAL GAME), 2 (TRIAL GAME)
sources:
Trizeal
controls:
d-pad = move
A (tap) = shoot
Y (hold) = auto-fire shot
B = change form+weapon (check the colored icons in the bottom-left)
R | X = bomb (check the "Bs" in the bottom-left)
basics:
- your ship can assume 3 different forms that shoot different types of weapons: the vulcan (red), the homing missiles (green) and the laser (blue).
Each one of them can be powered up 5 times with icons released every time a certain number of enemies is destroyed.
When fully powered up each weapon will add to the firepower of the weapons in the other forms.
When you die you lose all your powerups.
- last stage: 6
sources:
Under Defeat
controls:
d-pad = move, aim
A = fire (hold for auto-fire + aim lock. Release until the gauge in the bottom-left is full green, then tap to activate current OPTION weapon)
B = bomb (check the "B" icons in the bottom-left)
basics:
- there are no upgrades available for the main weapon.
What you're allowed to manage is the type of OPTION weapon currently in use: VULCAN (yellow), CANNON (green) and ROCKET (blue).
When a OPTION weapon is deployed it fires automatically until its ammo is depleted, recharging right afterwards provided you stop shooting.
Vulcan is the weakest and recharges faster, rocket is the most powerful and takes longer to recharge.
While rocket is a 1-shot attack, vulcan and cannon will automatically chase the closest enemy around the screen towards the direction of the helicopter once their initial target is destroyed.
- OPTION weapons will initially lock onto the target that's closer to a tiny red crosshair in front of the chopper.
- last stage: 5 (2 loops)
sources:
Chaos Field
controls:
d-pad = move
A (hold) = auto-fire shot
B (tap) = sword attack -> destroy some bullets, can be activated in up to 3 consecutive slashes
X|Y = field shift from ORDER FIELD=easier to CHAOS FIELD=harder and vice-versa (needs some time to recharge)
A+B | custom key (if set up) = "wing-layer" bullet shield (consumes 1 green cell of the gauge on the left)
B+X|Y | custom key (if set up) = lock-on attack (consumes 1 green cell of the gauge on the left)
basics:
- easier char: IFUMI/FLAWED RED (has auto-homing lasers as main weapon)
- purple bullets and homing lasers cannot be neutralized/blocked.
- to chear the bullets onscreen you can use the sword attack or the field shift.
- destroying boss parts with the regular firepower or the lock-on will release meta cubes/sparks that get automatically drawn to the ship if you stop shooting for a split second, refilling the green gauge.
- the purpose of using lock-on and wing-layer attacks is to build up a multiplier combo.
- last stage: 5 (3 bosses on each stage)
sources:
Radirgy | Radio Allergy
controls:
d-pad = move
A (tap) = wide shot
A (hold) = concentrated shot
B = sword melee attack
X (when the blue "ABSNET/BBS" gauge on the bottom-left is full) = activate the deflector shield -> melts bullets, damages enemies and makes you invincible for some seconds
powerups:
- blue triangle poiting up with "ten" kanji = score item (most common)
- yellow triangle pointing down with "den" kanji = signal strength/multiplier goes up (on top-left)
- blue rhombus with "mo" kanji = refills the "ABSNET/BBS" gauge
- orange square with "tate" kanji = shield activated for a short time
- red square with "chikara" kanji = attack power goes up
- orange triangle pointing up with "hai" kanji, yellow "hai" (star) = junk -> only unlock bonus pictures
- pink triangle pointing down with "soku" kanji = speed up (Wi-Fi gauge on top-right goes up)
- green square with "ju" kanji = charge battery/lives
basics:
- best weapon: blue laser (lockon enemies) (press X at the selection screen to disable ingame email messsages)
- if you stop shooting a barrier will appear in front of you and deflect all small incoming bullets.
- everything that's hit by the "ABSNET" or the barrier generates green pills that fill up the multiplier meter in the top-left, which is split into 4 zones (x1, x4, x8 and x16).
- hitting powerups with the sword will either increase their value or change them to another color.
- the "ABSNET/BBS" gauge must be filled with blue pills collected from killed enemies, but sword attacks fill it faster than your regular shot.
- enemies flashing yellow when hit by bullets can only be destroied with the sword.
- when there are a lot of bullets onscreen stay on the bottom and stand still with the shield until the "BBS" bomb is charged.
- last stage: 5
sources:
Karous
controls:
d-pad = move
A = shoot (hold for autofire)
B = sword
Y (WHEN the "DFS" blue gauge on the left of the screen is charged) = bomb
basics:
- each destroyed enemy or bullet generates pills that fill up the experience meters for each weapon (in the top-left), as well as charging the "DFS" blue gauge on the left.
- every time a weapon is leveled up a color-coded circling animation can be noticed around the character: blue for shot, yellow for shield and green for sword.
- powerups appear in the form of a tiny blue triangle that gives you a few bonus points, which when slashed will grow bigger and even change to a completely different item.
Special items can be a temporary auto shield (shield active while shooting/slashing), "DFS" instant recharge, extra level-up experience, partial or full extra life (rare) and a yellow triangle that turns all on-screen bullets into items (very rare).
- last stage: 5
sources:
Triggerheart Exelica | Trigger Heart Exelica
controls:
d-pad = move
A = shoot (hold for autofire)
B = throw anchor -> lockon enemies (when "OVERLOAD"), or keep holding to capture and use them as frontal shield, release to destroy them or rotate to throw them (not an easy move).
L | R = bomb (check the "B" icons in the bottom-left)
basics:
- easier char: TH60 EXELICA (has spread shot)
- when enemies are killed, they drop little bits of gold. As they fall closer to the bottom of the screen, they get bigger, and thus more valuable. When you let go of the fire button, they'll automatically be attracted to your ship, increasing your multiplier.
If player collects more score items, the harder the bosses will be to defeat (V.B.A.S. = Variable Boss Attack System).
- last stage: 5
sources:
Rez
controls:
Analog stick = aim
A (hold) = lock-on laser, release to fire
B = bomb (check the "overdrive" meter on the bottom right, collect red powerups to refill)
basics:
- you can't dodge enemies projectiles, you have to shot them.
- shot blue powerups to refill health (the "evolution" gauge on the bottom left).
collect 8 of these to advance to the next form.
If you get hit you revert to 1 lower form, down to a sphere (another hit taken means death).
- shot white boxes 8x times to warp to the next level.
- almost everything comes in waves that are a square root of 2. For example, most enemies come in waves of 2, 4, or 8.
Try to chain them all together to get the most points.
- in large groups of missiles, look for missiles that are either flashing or are slightly different colored than the normal missiles. These are the ones that can hurt you. The rest are free points (if you hit them).
- last stage: 5 (you only get access to the last stage by achieving a 100% analyzation rate in the previous 4 stages = shooting down all the cubes that separates the layers).
sources:
Street Fighter III: New Generation - Street Fighter III: Double Impact
sources:
Street Fighter III: 2nd Impact - Street Fighter III: Double Impact
sources:
Street Fighter III: 3rd Strike
sources:
Jet Grind Radio | Jet Set Radio
controls:
Stick = move
A = jump (hold to jump higher)
R = dash -> grab cars, avoid attacks when there is the "!" mark
L = spray tag (req. spray cans, check the icons/counter in the bottom-left), center camera
Start = pause and check the map for the next objective tags (red icons)
basics:
- STREET is the main story mode.
Select a location to start a mission.
If you go outside the map the "EXIT" sign will apear and you will abort current mission if you don't reverse.
- getting hit will deplete the orange gauge on the top-left.
Complete tags to refill.
- The main mechanic revolves around spray painting.
Collecting enough spray cans will allow you to tag any area marked with an arrow.
There are numerous spots to tag graffiti on that are indicated by two arrows.
Red Arrows are required to complete a mission, while Green Arrows are not required, but will boost your score.
When near a spot that can be tagged, an icon will appear over the character's head indicating which graffiti type they will put on the spot which can done by pulling the L trigger.
Depending on the tag's size and the size of the arrow indicator next to the tag spot, either small, large or extra large will determine the amount of time needed to spray the area. Small tags take no time at all, but large and extra large tags will initiate a mini game to place on spray patterns. Onscreen arrows will appear requiring the player to tilt the control stick in specific directions. Each indicator links with another and grades overall performance and costs one spraycan on completion of a pattern. By completing all the on screen indicators, this will add to a combo which provides increasingly difficult patterns that provide more points. Tilting the control stick too fast or inputting the wrong direction will automatically lose the spraycan and start from the first pattern motion. The progress of the tag remains the same otherwise.
- Actions in the game add up to the total score. Besides spray painting, performing tricks and maneuvers will net additional points. Some of which require grinding.
Grinding also helps navigate different areas in a stage. During a grind, holding a direction on the control stick allows to sharply turn in that direction.
Successive tricks chain together, however tricks will only chain together during grinds.
- last CHAPTER in story mode: 3
sources:
Rainbow Cotton | Panorama Cotton 2
controls:
Analog stick = move, aim (auto-centers)
a = shoot (hold to autofire and charge fairies attack, release to send them)
b = magic bomb attack (combine with "a" for a defensive bomb) (check the icon in the top-right, collect colored crystals != yellow from gold vases to restock)
basics:
- turn off "FAIRY SE" in the options to disable the annoying fairy speech during gameplay.
- getting hit will deplete the blue gauge on the top-left. Collect hearts to refill (not refilled after each stage), or you will lose a CREDIT and restart the last checkpoint.
- kill enemies to increase your shot level (check the big counter and the circular gauge on the top-left).
- red and blue star orbs only provides extra points.
- last STAGE: 5 - LASHA CASTLE
sources:
Giga Wing
controls:
d-pad = move
A (tap) = shoot
A (hold) = activate shield (Reflect Force) = it reflects all bullets that touch it and renders the ship invincible while it lasts. BUT: (1) has a slight delay. (2) Once deployed the RF bar has to be refilled before it is again available for use.
B = bomb (check the counter in the top-left) -> clear onscreen bullets + temp. invincibility
basics:
- easier ship/pilot: Isha (has seeking missiles)
- the main weapon can be powered up 3 times with the bouncing "P" item,
and extra bombs are also granted in specific points in the game.
- there are no extra lives at all, but the continues are unlimited.
- last stage: 7 (finish with 1 credit to see the good ending)
sources:
Giga Wing 2
controls:
d-pad = move
A (tap) = regular shot
A (hold) = activate shield (Reflect Force or Reflect Laser, check the bar at the bottom-left) -> reflects all bullets that touch it and renders the ship invincible while it lasts. BUT: (1) has a slight delay. (2) Once deployed the RF/RL bar has to reload before it is again available for use.
R (hold) = regular shot autofire
B = bomb (check the "B" counter in the top-left)
basics:
- easier plane: Chery STORK (has homing secondary fire) + Reflect Laser
- the collision box of the planes is about 10 pixels high and is centered on the cockpit area of the plane, which is visible as a small colored strip somewhere on the plane's fuselage.
- there's no damage on enemy collision.
- to unlock the secret plane for a character, use him/her to clear Arcade Mode without continuing or restarting. You can use any difficulty setting you want, so you can set the level to 1 and bump up the player lives and bomb stock to their max.
- if you complete arcade mode you will unlock levels in score attack mode.
- last stage: 7
sources:
Mars Matrix
controls (TYPE A):
d-pad = move
A (tap) = normal shot
A (hold when the auto-refilling "GHB" gauge on the bottom-left is some full) = activate the "Mosquito" function = a black hole that surrounds your ship, sucks in and reflects bullets. Hold until the gauge is empty to activate the GHB=Gravity Hole Bomb
X (hold) = normal shot auto-fire
R (hold) | 2x A (tap) = short-range piercing cannon auto-fire (more powerful than normal weapon)
basics:
- easier ship: mosquito 01
- collect cubes to levelup your main weapon.
- you don't die by colliding with enemies. You can fly over everything, from rocks to bosses, and you only die when hit by a bullet.
- best strategy: release a GHB when the screen is full of enemies, start collecting the cubes while dodging and firing the piercing cannon.
- last stage: 6
sources:
Zero Gunner 2
controls (TYPE A):
d-pad = move
A = fire
B | X (hold) = turn
Y | R | A+B = activate special attack (different for each chopter, check the blue arrows on the left) -> no invincibility!
basics:
- best chopter: HOKUM (has wider main shot)
- each ship will only accept 3 "P" powerups, but if you get more, it will give you extra 1000 points.
- charge the special attack meter by collecting the "E" energy tanks.
Instead of flying over to the tanks, just release your fire button to attract the tanks to you.
- small enemies will not kill you, but some large enemies can.
- last level: 7 (2 loops on difficulty 4=normal or higher)
sources:
Psyvariar 2: The Will to Fabricate
controls:
d-pad = move
A | X | Y = shoot
B = bomb (check the blue icons at the bottom-left)
d-pad left, right (quickly tap) = spin -> narrows your range of fire while making it more powerful, speeds your ship up slightly, and make it easier to BUZZ.
basics:
- easier char: Kei M.D.S MAITREYA
- the hit box is a 1x1 pixel at the centre of the fighter.
- everytime you level up a thunder strikes your ship and you are temp. invincible (check the "shield" ball around the fighter).
During a shield if you ram into an object it will be destroyed or in the case of bosses very heavily damaged.
- last area: 7 (only if the fighter is @ level >348 + last form at the end of area 5), 5 (otherwise)
sources:
Shikigami no Shiro 2 | Castle of Shikigami 2
controls:
d-pad = move
A (tap) = shoot
A (hold) = shikigami attack -> diff. for each char, slows you down
X (hold) = rapid shot
B = bomb (check the green orbs at the bottom-left) -> temp. invincibility
basics:
- easier char: Niigi G.B. (penultimate char from the bottom) + Shiki-1 (absorbs bullets for 4s)
- there are no power upgrades at all. You're fully powered from the get go and there's no power down punishment when you get hit. Getting hit has two consequences besides losing a life: (1) you reset the coin value and (2) gain an extra bomb.
- bombs are independent of life count and have a max number of 5.
- stages only unlock for Practice mode if you're on your 1st credit when you reach them.
- last stage: 5 (NORMAL MODE), 3 (EASY MODE)
sources:
Border Down
controls:
d-pad = move
A (hold) = auto-fire fast forward+focus shots
A (tap) = fire slow homing shots
B = fires the "break laser" (req. the LASER LEVEL gauge, power down your main shot when empty, auto-refills over time, by killing enemies or collecting orange powerups) -> temp. invincibility, absorb bullets, pass through most obstacles, counter enemies laser attacks and create the BREAK LASER SPHERE (an energy field that causes large damage to enemies and can finish most bosses if timed correctly)
X = speed change (3 speed levels, check the pink rectangles in the bottom-left)
basics:
- this game has no lives system but rather uses it's own "BORDER" system.
Each stage has 3 layouts, called GREEN, YELLOW and RED border respectively.
When losing a life, the player is forced to go "down" to the next border.
Reversing this is only possible by clearing a score goal set for the respective stage.
If you lose a life in the red border, the game is over.
- there is only one type of orange powerup in the game, carried by some larger enemies. Each gives you half a level gauge.
- last stage: 6
sources:
Gunbird 2
controls:
d-pad = move
A = shoot
A (hold) = charge shot (uses the gauge up)
R (hold) = rapid-fire shoot
B = bomb
X = melee attack (stronger attack than regular shots)
basics:
- best beginner char: MARION
- keep getting coins when they're flashing (for a split-second only, so be quick!).
After every 600K or 800K points, you are, deservingly, awarded with a brand-new life.
- final stage: 7 (2 loops)
cheats:
- Debug Mode: Start up your Dreamcast and hold Start until you see a Debug/Dip Switch menu. You can now go through a stage select, use invincibility, infinite bombs, listen to the music, and even hear the Japanese intros/endings cut from the US version!
sources:
Soul Calibur | SoulCalibur
controls:
Analog Stick | d-pad = move, crouch
Analog Stick | d-pad up = sidestep
2x Analog Stick | d-pad = run
X = horizontal attack
Y = vertical attack
B = kick
A | L = guard
A | L + direction = repel attack
A+X | A+Y = throw
R | X+Y+B = Soul Charge (charge up the weapon)
basics:
- you block automatically if you are standing stationary. To avoid vertical attacks you need to crouch tough.
sources:
Cyber Troopers Virtual-On Oratorio Tangram
controls:
RT = fire
LT = alt.fire
d-pad = move
Y = jump + lockon
Y, A = quick enemy lock-on (j-cancel)
X | B = left | right dash
A (while running) = slide
thumbstick down = transform (consumes energy)
thumbstick left/right = move view
basics:
- best female char: Fei-Yen
- best strategy: keep the enemy in sight with j-cancels. Alternate RT and LT attacks, take cover or dash to avoid enemy fire.
- last mission: 10
sources:
Crazy Taxi
controls:
Analog Stick | d-pad = steer
RT = accelerate
LT = brake
X = destination reminder
A = shift to reverse gear
B = shift to drive gear
A + B (while turning) = Crazy Drift
game modes:
- Arcade = full city
- Original = smaller city (DC exclusive)
- Crazy Box = complete all the missions to unlock the bike (DC exclusive)
basics:
- easier cab: Gena
- the main objective is to repeat this whole process of picking up customers, driving them to their destinations, and dropping them off (hopefully earning time bonuses) as many times as you can.
When the game time limit reaches zero, it's all over. The amount of money you've earned by then becomes your final score, which receives a rating.
- if you earned a Class S License or better (more than $5,000.00), you'll be treated to the credits.
- the color of a customer indicates the distance you'll need to go to reach his or her destination.
From short to large: red, orange, yellow, light-green, dark-green.
- add money to your final score through skillful driving: passing near other vehicles, jumping over ramps, Crazy Drifting.
sources:
Crazy Taxi 2
controls:
Analog Stick | d-pad = steer
RT = accelerate
LT = brake
X = destination reminder
A = shift to reverse gear
B = shift to drive gear
let off the gas for about 1/2s, A + B + RT (while turning) = Crazy Drift
Y = jump (how high you jump is dependent on how fast you're going) -> use to access shortcuts and avoid traffic
game modes:
- Around Apple = easier city
- Small Apple = harder city
- Crazy Pyramid = unlock stuff by clearing minigames (to get more mini games you must clear the lower rows of the table)
basics:
- easier cab: SLASH
- best customers to pick: Lime Green
- avoid circles with numbers (pick multiple customers at once).
For each person you have in your cab, the tips you get are multiplied by that number (2 customers, x2 tips; 3 customers, x3 tips; etc.)
Picking up multiple customers can be risky, though. If you don't get every single person to their destination before the clock runs out, you won't get any of the fares.
- avoid going to the hospital zone at all times. There is an uneven time-for-area system that is tipped against you when going to this zone.
sources:
Virtua Fighter 3tb
controls:
d-pad left|right = step
2x d-pad left|right = run
d-pad down = crouch
d-pad up = jump
X = punch
Y = kick
A = guard
B = evade
d-pad up+punch (with opponent on the ground) = followup attack
A+X (guard+punch) = grab, counter grab
A+Y (guard+kick) = side kick
L|R = change camera
basics:
- to save select "SAVE" in "VS RECORDS".
- last round: 9
sources:
Power Stone
controls:
Analog Stick = move
A = jump (some chars have double-jump)
X = punch, use grabbed weapon
Y = kick, use grabbed weapon
A, X|Y|B = jump attacks
B = grab (item, weapon or enemy), catch small items thrown to you
B+direction = dodge close attack
when item grabbed (not weapon):
X = thrown on the ground
Y = thrown upward with Y
B = drop
L | R = super attacks called the POWER FUSION (will use all the remaining power gauge?)
basics:
- best female char: Rouge
- collect 3 colored gems (red, blue and yellow) to enable POWER DRIVE
- the health bar is made up of five jewels, each with a vertical yellow bar in it.
As you take damage, the yellow bar will disappear revealing a blue bar.
The blue bar will slowly regenerate if you do not take any damage during this time.
sources:
Power Stone 2
controls:
Analog Stick | d-pad = move
A = jump (some chars have double-jump)
X = punch, use grabbed weapon
Y = kick, grab (item, weapon or enemy), drop item, enter machines
A, X|Y|B = jump attacks
B = use grabbed weapon, catch small items thrown to you
B + direction = dodge close attack
when item grabbed (not weapon):
X = thrown on the ground
Y = thrown upward with Y
B = drop
L | R = super attacks called the POWER FUSION (will use all the remaining power gauge?)
game modes:
- 1-on-1 | basic (like Power Stone 1)
- arcade = last 2 standing (P1 vs 3 enemies)
- original = 4P multiplayer
- adventure = collect gold and items to use at the shop
basics:
- best female char: Rouge
- collect 3 colored gems of any color to enable POWER DRIVE
- beat 1-on-1 or Arcade Mode with seven different characters to open up each of the seven Extra Options.
sources:
Cannon Spike
controls:
long-range:
A = shoot (rapid fire)
X = heavy shot
short-range:
B = weak attack
Y = heavy attack
R (hold) = lock on (auto reset after a while)
L = special attack (if available)
basics:
- best char: Megaman
- best female char: Blue Cammy (press up while selecting)
- keep moving
sources:
Psychic Force 2012
controls:
d-pad = move
X = guard
left, right, X = Avoxidance barrier (consume 50% PSY meter)
d-pad 360°, right, X (hold) = barrier guard (drains PSY meter)
Y = light attack
B = strong attack (leave wide open after, knock your opponent back if it hits)
X + Y (close range) = throw
X + Y + B = PSY meter charge
R1 [no direction] = quick dash toward your opponent + barrier
R1 + direction = normal dash (fixed distance, once you start one, you cannot do anything until you stop)
d-pad right, right, Y | B = special attack 1 (drains your PSY meter)
d-pad left, right, Y | B = special attack 2 (drains your PSY meter)
d-pad 180°, B | Y = special attack 3 (drains your PSY meter)
basics:
- best chars: EMILIO, REGINA
- last stage: 8
sources:
PCE
controller layout:
(d-pad)
Select Run (II) (I)
soft-reset while ingame:
Select (hold) + Run
cheat codes:
Bomberman | Dyna Blaster
sources:
Bloody Wolf | Battle Rangers
sources:
1943 Kai
controls:
d-pad = move
II = fire
I = somersault (if there are no "Rs" in the top-center will drop a bomb instead in exchange of some energy)
2x I = bomb (consume some energy)
basics:
- getting hit will deplete the energy bar on the bottom-left. Collect "Pow" items to refill or it is game over when empty.
Health also slowly decrease over time, and it is refilled and increased after each stage.
- formation of red enemies drop special icons when defeated, and shooting at the same icons again loops through various items, such as "Pow" (=energy refill), special weapons: Shot Gun ("cheerios"), 3-Ways, Super Shells, Lasers, Side Fighters or some special items such as the Double Pill (energy boost).
All special weapons are time-limited, the best one is the grey circle one (spread + can absorb bullets). Collecting the same weapon will increase its usage time (check the counter at the bottom-center).
- the trademark Capcom special items are also scattered throughout the game, such as the cow, the strawberry or the Yashichi (red and white twister/wheel shaped item) which gives you an instant refill of energy.
- last MISSION: XI (11)
cheats (using Sound Test):
- Arcade mode 7, 7, 7, 7, 9, 3, 10
- Fast Mode 1, 6, 0, 10, 5, 2, 10, 3, 8
- Maximum HP 3, 7, 3, 5, 1, 8, 2, 1, 9, 8, 4
- Nine credits 0, 3, 3, 8, 3, 9, 0, 0, 8, 0
- Slow Mode 0, 0, 0, 0, 0
- Unlimited credits 3, 4, 3, 8, 0, 1, 4, 1, 14, 14
cheats (ingame, while paused):
- Infinite Somersaults Up, Up, Down, Down, Right, Right, Left, Left, II
- Invincible Fighter Helpers Up, Right, Down, Left, Down, Right, Up, Left, I, I, II, II, Select
- Weapons Select Down, II, Left, II, Up, I, Right, I. Unpause and press Select.
sources:
Son Son 2 | SonSon II
controls:
d-pad = walk, climb (hold up to enter doors, tapping up is not sufficient)
I = jump (combine with d-pad up to jump higher)
II = attack
I+II = magic attack (req. MAGIC points + a magic item selected. Collect scrolls to refill the magic gauge)
Start = pause and select a magic attack with the d-pad
basics:
- getting hit will deplete the halth meter on the top-left. Get hearts to refill.
Fruit items are worth Zenny which can be spent in shops.
Watch out for skulls which actually remove Zenny from your wallet.
- most stages are non-linear: you need to find a key and enter a locked door to advance.
- last STAGE: 7
sources:
Legendary Axe, The | Makyou Densetsu
controls:
d-pad = walk, crouch
II = attack (after collecting at least 1 powerup is auto-charged when not attacking. Check the long red gauge on the top)
I = jump (hold to jump higher)
basics:
- powerups are released by small blinking totems/idols and big enemies only.
However, it is better not to try evading any enemy as they will follow you around.
- the axe is the only weapon in the game. It is powered up by collecting a gold shield/crown-like item.
With each level of increase a red ball will appear in the golden structure next to your life bar.
Collecting a gold wings item will increase the charging speed.
- getting hit will deplete the red squares on the top-left. Collect red orbs to refill or you will lose a life when it is empty.
When you die, you lose 1 axe powerup and 1 speed powerup, thus you can charge 1 less level and slower.
- blue and purple diamonds only provides extra points.
- each enemy type has a different attack strategy to follow. e.g. some are better attacked crouched, some by charged shots, some by rapid attacks.
- last ZONE: 6
cheats:
- Multiple Continues: At the Game Over screen, set I on turbo and hold down I and Select while pressing Left multiple times.
sources:
Legendary Axe II | Ankoku Densetsu
controls:
d-pad = walk, crouch
II = attack
I = jump (hold to jump higher)
Run = launch a bomb (check the counter top-right next to the orange oval, collect the same icon to restock) -> better used against bosses
Select = pause
basics:
- getting hit will deplete the red "LIFE" gauge on the top-left. Collect the half moon or the sun icon to refill. The star icon will increase the "LIFE" gauge by 1 unit.
- you have 3 weapons to choose from, some are better suited for diff. situations: sword (initial), sickle and chain (higher range), axe (most powerful, but low range).
Picking any weapon icon will always increase the weapon power (check the red "LEVEL" gauge on the top-right).
Thus, if you have a sword at level 2 and get the axe, the axe will be at level 3. Getting the sword again gives you a sword at level 4.
- last ZONE: 7
cheats:
- 99 continues: hold II + Run and repeatedly tap Left after losing your last life to gain 99 continues.
- stage select: at the title screen, enter I, II, I, II, II, I, II, I, I, I
sources:
Alien Crush
controls:
d-pad = left flipper
I = right flipper, hold deploy the plunger
II = nudge or shake the table (can alter the trajectory of the ball), hold deploy the plunger
Run = pause (press Select while paused to view the hiscores)
basics:
- press the Select button on the title screen to choose the speed of the ball and the background music played throughout the game.
- achieve a score of 999,999,900 points and the ending will start.
sources:
Devil's Crush | Devil Crash | Dragon's Fury
Parasol Stars: The Story of Bubble Bobble III
controls:
d-pad = move
I = jump
II (hold near enemies) = grab enemies (release to throw)
II (hold not near enemies) = hold direction+raise umbrella as a shield for projectiles -> use also to attack enemies from below
II (hold in midair) = fall slowly
Run = pause (you can scroll the screen manually with d-pad left|right)
basics:
- kill all enemies in each screen to proceed to the next one.
- droplets falling from the ceiling won't hurt you and can be thrown at enemies.
- last world: 8+2 (collect 3 stars before you reach the final boss to enter the 2 new worlds and get the good ending)
sources:
Gokuraku! Chuuka Taisen | Cloud Master 2
controls:
d-pad = move
II = shoot
I = switch direction
basics:
- press Select on the title screen to access the "SET UP MENU".
- a wave of 5 small vertically-aligned white enemies is responsible for bringing upgrade items if you manage to kill them all.
There's speedup, powerup, invincibility and sometimes special powerups that further enhance the firepower.
The problem is that all these items are represented by kanji, but at least they're large and fairly recognizable.
- midbosses are the source of very precious secondary weapons: defeat them, enter the door and select one of the 4 types available.
These includes flame wheels, multiple directional shots (usually the best), bombs, etc.
You keep the special weapon until you die.
- last ROUND: 6
sources:
Atomic Robo-Kid Special
controls:
d-pad = move
II = fire with current weapon
I = jump (on the ground), switch weapon (in midair, check the icons on the bottom)
basics:
- getting hit will reduce the health bar on the top-left. Enemy collisions deal more damage than bullets.
Collect blue spheres to refill your health.
- in order to extend and upgrade your weapon arsenal you must collect the appropriate capsules, which appear either floating at specific places or by destroying insect-like carriers.
Hit the capsules to change their type/color before picking them up: F (=fission gun), 3 (=3-way shot), M (=directional exploding missile) and 5 (=5-way straight shot with short reach).
Collect the same weapon mutiple times to levelup (the "AP1" in the bottom-right shows the level for the weapon that's currently selected. AP6=max power)
- best weapon: M=missiles (absorb bullets when exploding, can be aimed)
- a golden capsule gives you a speedup and successive blue capsules eventually add a 1-hit shield to the robot (take four of them to acquire one shield).
- extra lives are hidden in the scenery and need to be shot at to appear in the form of a little white robot that flies to the right.
- you must reach a small red+grey door to access the next stage/ACT. Some are guarded by a strong enemy, some are hidden.
- last ACT: 25
sources:
Override | Last Battalion
controls:
d-pad = move
II = fire fontal+secondary weapons (stop firing until your ship is glowing to charge a bomb-like special shot) -> clear bullets onscreen, use whenever possible against bigger enemies
I = switch speed (check the red arrows in the top-left) -> keep the lowest speed in most situations. Also damage enemies near the ship back.
basics:
- collect "P" orbs to powerup the frontal weapon.
- secondary weapons can be switched and upgraded by collecting colored orbs: blue (trailing options, forward laser), purple (fixed options, side shot, avoid), red (fixed options, 45° shot with homing ability at max power), yellow (moving options, directional reverse-shot), green (rotating options, forward wave shot).
The 1st color to emerge is always the next after the one you're currently using, so you have to wait a full cycle if you want to take the same color.
Each weapon is powered up separately and powerups aren't lost when switching (maxes out at 4).
- getting hit won't power down your weapons and will drop 1 red energy cell in the bottom-left. Collect "E" orbs to refill.
- last STAGE: 6 (2 loops)
sources:
Dragon's Curse | Adventure Island | Wonder Boy III: The Dragon's Trap
controls:
d-pad left|right = walk (tap for small steps, hold to run)
d-pad up = enter doors -> always look for hidden doors pressing up
d-pad down = duck
II = attack
I = jump
d-pad down + I = use a weapon item (must be selected in the status screen)
Run = pause and show the status screen, equip items
forms:
- Lizard Man is the initial form, and is actually quite powerful. Rather than wielding a sword, you shoot out fireballs (though you still equip swords for attack power boosts). Though this form lacks a shield, you can use said fireballs to block projectiles. You can also swim harmlessly through lava without the use of the Dragon Armor. He is also the only form that can duck.
- Mouse Man is difficult to use because his sword is so tiny. However, he can fit through small openings and climb on checkerboard bricks.
- Piranha Man lets you swim. Being underwater in most other forms just slows you down.
- Lion Man is the most physically powerful. He swings his sword at an arc, allowing you to attack above and below. He can also break bricks without equipping the Thunder Saber sword.
- Hawk Man can fly. However, he is the most physically fragile, and is actually damaged by water.
basics:
- some items will not appear in the store, they will only appear as a question mark ("?").
If this happens you must get more CP or Charisma Points, to do this you either need to wear nicer armor or be a different form.
- to switch form, you must first unlock them. After that you can switch your current form by going to the next house left to the church.
Look left and break the midair block to get another "?" block. You will get a door. In there you can change forms. Just jump on the platform again if you desire another form.
- you can save at the churches located in towns.
passwords cheats (USA ver):
- Start as Be Hu Man NODEGOSOOOOOOO
- Start with advanced abilites and items 3WSURYXZY763TE
- Start as Hu-Man with 8 hearts, all equipment, all transformations unlocked and only the final dungeon to beat. 3ZHURYNZY726VH
sources:
W Ring: The Double Rings
controls:
d-pad = move
II (hold) = autofire shot
I = switch speed (check the arrows at the top-right)
basics:
- the rings mentioned in the game's title circle the ship and hover around it as you move, theoretically powering your weapons while also serving as a deflector shield for incoming bullets (not very reliable).
- when the powerup carrier is destroyed a floating orb appears, switching colors starting from purple. Once the 3rd orb is collected you reach maximum power and that happens regardless of color, so there's no need to stick to the same color to power up the ship.
Choosing from the weapon types available requires some timing skills because the powerup cycles colors relatively fast. In their maxed out forms you get an 8-way shot (purple), a set of straight lasers (blue), the default shot with two streams of missiles with mild homing ability (yellow), a straight ring-shaped shot (green) and the default shot complemented by four invincible trailing orbs that block bullets (red)
- besides the regular upgrades the game also has 3 types of hidden items, which are uncovered by shooting at corners and tips of the scenery. "B" is a score bonus token, the interrogation mark "?" makes the missiles fly forward instead of downwards/upwards and "EX" sends the ship into an alternate version of the level.
- whenever you've gotten at least 1 powerup you don't die when hit, with the ship reverting back to its default firepower instead.
- last stage: 7 (2 loops)
sources:
Bouken Danshaku Don: The Lost Sunheart | Bouken Danshaken Don San-Heart Hen
controls:
d-pad = move
II = fire primary weapon
I = fire some secondary weapons
Run = pause and select a secondary weapon (obtained at the end of each stage. From top to bottom: ROTATING SHIELDS (good for defense, can absorb shots), HOMING MISSILES (best offensive one), SIDE GUNS (with backward fire), WAVE LASERS (blinking protective barrier) and SIDE MACHINE GUN.)
Select = switch speed (check the arrows in the top-right HUD)
basics:
- if you go to the OPTION menu there's a "GAME MODE" switch whose sole purpose is to turn cutscenes on and off, with no interference in the gameplay whatsoever.
- narrow passages aren't really dangerous because there's no harm in touching walls
- powerups can be collected along the way by destroying special yellow bouncing enemies:
"F" for 2x units health refill, "(F" for full health refill (check the multi-colored gauge at the top-right), "C" to increase the ship's firepower, "H" for a thicker wave shot, "B" for ground bombs.
- life extends are granted every 100, 300 and 500 thousand points (check the big yellow lives counter in the top-left).
- last stage: 5
cheats:
- cheat menu: at the title screen, press I, Right, Left, II, Up, Select, Down. Here you can change the level and use music test. Next, highlight the music option and press Right, Right, Left, Left, Right, Left, Right, Left, Select, Select. This will unlock the invincibility option.
sources:
Final Blaster
controls:
d-pad = move
II (tap) = fire main weapon -> set turbo on this
II (hold until the phoenix appear) = charge the "phoenix" attack (reassign to button III if you can) -> pass thru walls and enemies
I = bomb (sacrifice 1 blue powerup level)
Select = switch speed (4 levels, visually indicated by the number of spiky edges of the ship itself)
basics:
- to increase the firepower destroy the carriers and collect powerups that cycle between 2 colors only:
- red = increase the ship's power ("POW")
- blue = increase the options' power ("OPT")
Combining these items gives you 3x3 weapon setups (2x3 and 3x2 are the bests).
- dying will release a green capsule that gives back all the power you had if you're able to pick it up.
It's easily recoverable only if you die on the center of the screen, but will be irrevocably lost if you die near a side of the screen.
- last ROUND/LEVEL: 7 (next stage is determined by the number of POW, OPS and MISS=deaths you have when you finish a stage)
sources:
Super Star Soldier
controls:
d-pad = move
II (hold) = autofire main and secondary weapons
I (when you have options) = switch options formation between horizontal and vertical
Select = switch speed (check the arrows in the top-left) -> the burst coming out of the engine also damages enemies near the back of your ship
basics:
- you can switch the main weapon with color-coded powerups. Here we have 4: yellow (flamethrower), green (lightning laser, 3-way at max power), blue (expanding rings) and red (vulcan, classic 5-way shot at max power).
Upgrading is accomplished by sticking to the same item color, and once the ship is maxed out in power - after 5 consecutive items - the next one will work as a smart bomb.
- a 3-hit shield is acquired whenever the 3rd power level is achieved with any weapon. It starts blue, and by the last hit it will go red. Regardless of your current firepower level, whenever you get hit the ship will revert back to a power level of 2.
- auxiliary weapons exist in the form of option pods (O) and guided missiles (M), each with 3 upgrade levels each.
Option pods are initially stationary and can have their alignment switched at the press of button I, but the next upgrade will make them rotate.
Option pods do not add to the firepower, but inflict damage and provide protection against regular bullets.
- some powerups can be hit by your weapons; if you avoid shooting at them they will descend cycling through all main and secondary weapon types, but if you hit and keep them in place long enough they'll eventually acquire a blinking nature that explodes into a smart bomb when collected, as well as giving away 5000 points and adding up to a hidden instant respawn counter (otherwise you will restard from the last checkpoint when dying).
- last stage: 8
cheats:
- unlocks a cheat menu where you can mess with all the options for the game like level selection and enemy difficulty: Hold Run+Select before powering on the console, then press Left, II, Up, II, Right, II, Down, II, Left, I, Up, I, Right, I, Down, I, I+II x8, I+Select x8 at the title screen.
sources:
Final Soldier
controls:
d-pad = move
II = shoot
I = bomb (sacrifice an option)
Select = switch speed (check the 3 arrows in the top-left) -> the burst coming out of the engine also damages enemies near the back of your ship
basics:
- best weapons SET-UP (press 3x Select in the main menu): BUBBLE, V-SHOT, FLARE, HOMING
- shot type is determined by the items you pick up from destroyed carriers, which include "V" (vulcan), "L" (laser), "E" (e-beam) and "F" (flamethrower), as well as homing missiles "M" and options that provide extra firepower (a canister-like icon).
- the process of weapon upgrading is very simple: just stick to the same item and collect 2 of them to reach maximum power. Every time you get hit the ship gets downgraded by 1 level, which means you die when shot at a default condition.
- last stage: 7
cheats:
- Level Select: At the title screen, press Left, Left, I, Right, Right, II, Up, Down, Up, Down.
sources:
Soldier Blade
controls:
d-pad = move
II = shpot
I = sacrifice the current weapon for a bomb-like special attack (check the icons at the bottom-right, you can have at most 3) -> temp. invincibility while active, you can track how long it lasts by means of a small gauge that appears in the top-left
Select = switch speed (check LOW or HIGH in the top-left) -> the burst coming out of the engine also damages enemies near the back of your ship
basics:
- there are 3 weapon types that change according to the color of the currently active powerup: 5-way vulcan shot (red), spread laser (blue, best one) and wave shot (green).
- it takes only 2 powerups of equal color to achieve maximum power, with every subsequent item of the same color resulting in a smart bomb that clears the screen of bullets and small enemies.
- once any powerup is collected a single auxiliary invincible shadow ship starts trailing you around, improving your firepower a bit and blocking regular bullets.
Every hit taken degrades firepower by 1 level, while deaths only occur if the ship is at its weakest condition.
- weapons powerups comes often, so always trigger a bomb attack when you have 3 weapons and you see a new one coming. The last one you collect become the active weapon.
- last stage: 7
cheats:
- Level select: At the title screen, Hold Up and press Select, hold Down and press Select, hold Left and press Select, hold Right and press Select, and finally, press Select without holding any buttons.
sources:
Sinistron | Violent Soldier
controls:
d-pad = move
II = shoot
I = cycle the frontal hull/beak opening -> when opened provide less protection and has a lower firing rate, but increase the side reach
II (hold) = charge shot (same for all 3 types of weapons) -> not very useful
basics:
- press Select on the title screen to access the options menu and change the difficulty.
- 3 types of weapons are switchable with the corresponding powerup colors collected from destroyed carriers: red (vulcan), blue (wave laser) and green (homing missiles).
- the shard-looking options act as a shield once you take it, the 1st one hovering above and the 2nd one below the ship. These options can block enemy bullets.
- both the beak and the shards cause damage by contact, but you are always vulnerable to melee and attacks from the back.
- last stage: 6
sources:
Dead Moon
controls:
d-pad = move
II = shoot
I = bomb (check the counter in the top-left)
Run = pause and switch SPEED with left|right
basics:
- you're allowed to move anywhere around the screen because there are absolutely no obstacles besides enemies and bullets.
- main weapon powerups are color-based: yellow (default) is the vulcan spread pattern, red fires a series of rings that also have a spread capability (best one, also fires backward when powered up), blue fires lasers and green results in a wave cannon.
It takes 3 powerups of the same color to reach full power. Once maxed out, a new powerup of the same color will give you an extra bomb.
- ancillary powerups include guided missiles or defense orbs (best one, can absorb enemy bullets). Getting one deactivates the other, and they're also upgraded when new icons of the same type are taken.
- sometimes a blinking item will appear, and its function is to wipe out all on screen enemies.
- every time you get a new icon the ship gets invincible for a split-second, an invaluable help during cluttered situations. On the other hand, every time the ship gets hit it loses 1 power level.
- all the bosses have weak points generally protected by exposed skeletons.
- last stage: 6
cheats:
- hidden menu with stage select: enter Down + Left + I + II at the title screen for a menu containing a Stage Select and Sound Test.
sources:
Hana Taka Daka | Hana Taaka Daka!?
controls:
d-pad = move
II (tap) = normal shoot
II (hold) = charge shoot (check the "POW" gauge at the top, if fully charged will fire the current "POW UP" weapon) -> good to clear out some of the obstacles that block your way
I = drop bomb (check the icon and counter at the top-right)
main menu translation:
PASSWORD START OPTIONS
basics:
- you can expand your hit points up to 3 by grabbing scrolls. Doing so will also increase the size of your character and thus also your hitbox.
- you are allowed to touch walls without taking damage, but you won't be able to cross some ceilings (work as branching paths) and some obstacles will crush you if you don't destroy them.
- many enemies will keep following you along if you don't kill them, so just avoiding and running from enemies doesn't really work in this game.
- you can pick up different icons that change the fully charged shot (check the "POW UP" icon at the top-left). The best one are the white dragon (fires vertically), and the one that fires mini homing tengus (which can be found only in later stages).
Other pickups include different types of bombs (best one: pink bouncing yarn balls), mini-tengu that acts as your options, a shield that is a giant pair of clackers, wings that increase the movement speed and a straw cloak that confers invincibility.
The powerups are tied to the different tengu sizes, and if you are not the correct size when a powerup appears, it will instead turn into money.
- last stage: 6 (to get the good ending you must find an hidden tanuki in each stage. Shooting him will send you to a bonus level that scrolls ad-infinitum, and the only way to get back to the main level is to find and shoot a 2nd object he has shapeshifted to.)
level passwords (Normal Mode):
Effect Password
Level 2 292494
Level 3 381724
Level 4 371844
Level 5 521746
Level 6 361533
sources:
Toy Shop Boys
controls:
d-pad = move
II = shoot with active boy/weapon
I = cycle the boy that shoots/weapon
basics:
- best strategy: use the boomerang/boy with the green cap with most enemies and quickly switch to the sword when about to get hit by a projectile.
- lookout for the blinking enemies because they carry the powerup balloons: increase firepower with "P" (check the "POWER" gauge on the top-left), get a 2-hit shield with "S" (will turn the boys gold), increase speed with the "/\" (up arrow), decrease speed with "\/" (down arrow), and smart-bomb with "*". All surplus Ps and Ss also work as intantaneous smart bombs.
- last stage: 6
sources:
Side Arms: Hyper Dyne
controls:
d-pad = move
I = shoot left
II = shoot right
Run = pause and switch weapon (press left|right to select)
basics:
- shot the powerup icon until you get the item you want: Pow (=speedup, avoid getting these), blue mirrored Pow (=slowdown), BIT (an orange orb), S. G. (Spread Gun), MBL (Mega Bazooka Launcher), 3WAY, and either a star or a yasichi (worth extra points only).
All of the weapons can be upgraded up to 2 or even 3 levels by collecting items of the same type.
Current weapon won't switch when you collect a powerup, you have to do that via the pause menu.
- in addition to the standard powerups, there are 2 special combination powerups shaped like the Greek letters "alpha" and "beta", normally left behind by specific enemies but it can also be found in hidden places.
Grabbing alpha/beta will provide an additional 8-way shot and 1-hit protection.
- best weapon: S. G. (can destroy enemy bullets. Switch to MBL or BIT when fighting bosses)
- last stage: 9 (2 loops)
sources:
Burning Angels
controls:
d-pad = move
I = fire all collected weapons
Select + I|II (when the gauge on the bottom-left is at the blue level) = activate the "burning" special attacks (collect stars to refill) -> best kept for stage bosses
basics:
- best 1P ship : "DRAGON" ( is equipped with a wave shot as its main weapon, with fixed pods and long-range missiles)
- all icons are released by a red carrier: "P" increases the ship's power, "B" activates the auxiliary pods, "M" activates the missiles and "L" refills a bit of the health meter.
After a while stars start appearing: collect them in order to fill the "burning" bar located between both ship's huds. If this bar is at the blue level, press combinations of buttons I or II with SELECT and watch as both ships merge in order to unleash a devastating attack.
Button I + SELECT will turn the ship's firepower into a deadly laser beam (best for bosses), while button II + SELECT will render the ship invincible as it assumes the form of a flaming phoenix.
- every time you get hit you lose a little health and part of your firepower is reduced.
- pods are capable of inflicting damage and absorbing bullets, and represent the best defense against some enemies who shoot only when they get very close to the bottom of the screen.
- last stage: 5
sources:
Download | Down Load
controls:
d-pad = move
II (hold) = autofire main weapon
I = fire sub weapon (check the "WPN" ammos in the top-right)
Select = cycle speed (check the "SPD" arrows in the top-right)
basics:
- upon starting a stage you're given the option to choose between 2 MAIN WEAPONS (BEAM VALCAN and LASER CANNON) and 3 SUB WEAPONS (CHASER, CRUSHER and BARRIER).
- best weapons combo: BEAM VALCAN + CHASER.
- once the "SHD" health bar on the top-left is depleted it's Game Over, so you'll want to keep the health up at all costs, collecting the circular icons to refill.
- the main weapon can be powered up 5 times, and the current power level is shown by the "LVL" counter in the top-left. The icon for this powerup looks like a fly's head or a big blinking pill.
Getting hit will power-down the main weapon 1 level.
- although being limited, the stock for special weapons ("WPN" counter in the top-right) can also be replenished by the icon that cycles with the one that replenishes health (light blue and larger / dark blue and smaller).
There's also an extra pill-shaped icon for temporary invincibility (smaller) or smart bombing (larger).
- walls can be touched and used for blocking at will.
- last stage: 6
cheats:
- debug menu: enter "AVENUEMOEE" as a password, then press Up+Left+II+Run to access the above debug menu, which contains a level select, an invincibility toggle, a sound test, a weapon select, and a speed select (the last option doesn't seem to be changeable).
sources:
Download 2 | Down Load 2
controls:
d-pad = move
II (hold) = autofire current weapon
I = switch weapon (check the icon next to "WPN" in the top HUD)
Select = skip cutscenes
basics:
- all 4 weapons are available from the start: a vulcan pattern (red), a straight laser (blue), a homing shot (purple)(best one) and a powerful close-range electrical field (green).
- it takes only 2 "P" powerups to max out any weapon type.
- besides the "S" speedup you can also take a red square-shaped icon that provides up to 2 side options that hover above and below the ship, block bullets and fire additional homing shots.
The blue square-shaped icon grants a shield that can withstand a good number of hits, going from green (full shield) to orange (weak shield).
Taking an extra red icon when you already have 2 options works as a smart bomb.
- last stage: 9
sources:
Kiki Kaikai
controls:
d-pad = walk
II = throw talismans in the direction you are facing
I = swing wand -> deflect projectiles and incoming enemies
I + II = use crystal (if you have it, check the icon in the bottom-right)
basics:
- talisman powerups are: light blue (=increase the travel length), red (=piercing), yellow (=increase size), blue double (=increase speed).
- collect colored crystals and use them when needed: blue=freeze enemies for 8s, yellow=bomb.
- in order to reach the stage boss, you must find the key laying on the ground somewhere in the stage.
If you reach the boss prior to collecting the key, you will not be able to enter the area and you will have to backtrack in order to find it. Keys are never hidden, they are always visible in plain sight.
- last stage: 7 (after beating the last boss, find 2 colored scrolls hidden the statues to end the game)
sources:
Bonk's Adventure | PC Genjin
controls:
d-pad = move
I = jump, climb (tap repeadetly), swim
II = headbutt attack
I, II = Headbutt Dive
Run = pause and open status screen
basics:
- longer jumps: when in the air, if you repeatedly hit button II, Bonk will spin.
- when an enemy is about to fall on you, get under it and jump, because your head will hurt it or kill it.
- your Headbutt Dive is 2x stronger then your Headbutt.
- you can Headbutt any projectile attacks, from enemy at boss attacks.
- last stage: 5-6 (Moonland)
sources:
Air Zonk | PC Denjin Punkic Cyborg!
controls:
d-pad = move
II = shoot
I (hold) = charge current weapon (keep holding to release a bomb) -> use often against regular enemies and bosses
Select = fires up rear thrusters -> damage enemies behind you
basics:
- difficulty levels (from top to bottom): SWEET MODE=easy, SPICY MODE=default/normal, and BITTER MODE=hard.
- friend selection modes:
- AUTO (default) = the game will randomly assign 1 of the 10 friend to you per stage;
- MANUAL = you pick 1 of the 10 friends every time a stage begins;
- ALONE = no friend is used at all during the whole game.
In any case it's not possible to select the same friend twice, so once it's used it won't appear again for the rest of the game.
- collect 7 smiley-faces, the last of which will appear in giant form with sunglasses, in order to get a friend to join you as an option.
In option mode all the friends will just fire straight shots.
But, if you manage to keep your friend around (if it takes too much damage, it flies off) and collect another 7 smiley-faces, you will merge into a hybrid form, granting a new attack and 20s of invulnerability.
This new attack cannot be charged, and it is different for each friend.
- best friends: SCUD (the missile) (has spread shot), MOO MOO (cow), SPIKE REE, MUMBLES (the mummy), RIP (the dog)
- weapon powerups appear when a specific carrier is destroyed.
The weapons also have the added benefit of allowing you to take an extra hit before you get killed.
- best weapons: cards,deadly gloves, guided missiles. Avoid the shrinking powerup that provides no 1-hit protection and has no charged attack.
- last STAGE: 5
sources:
Neutopia
controls:
d-pad = move, open chests
I = sword attack
II = use current item, skip dialogues
Run = pause and open the status screen
basics:
- getting hit will deplete your "LIFE" gauge on the top. Collect cherries to refill 1 unit, or use the Medicine of Vitality (can be bought from shops).
- other items dropped by enemies include: coins (=GOLD), wings (used to return to the Shrine and save), bombs, and the hourglass (freezes enemies for a while).
- whenever you see something suspicious, bomb it! There are A LOT hidden caves and passages just about everywhere.
- whenever you see a rock, try to push it! Moving rocks can open doors and secret passages.
- use your shield wisely. If a projectile is about to hit you, turn to face it. Your shield can block most projectile attacks.
- in the dungeons, killing all the enemies in many rooms will open doors and unlock blocks.
- you will gain access to a new "Sphere" overworld every 2 medallions found.
- last Sphere: Sky
passwords:
Start with 16 Vitality and 9 Bombs (1 Tool, No Upgrades and Medallions) %p7FqftUKhs2 aSQgTzfwllUC
Save 02 after clearing first Labyrinth (First Medallion obtained), Upgraded to Bronze Armor, and increased Vitality to 6 NMdMA9zTjsff #7fH#Zmn9Ev%
Save 03 before Second Labyrinth Recieving the Flaming Throwing Staff & Increased Vitality to 7 xQecBUiqYDt# ZSrZ4Fjrijef
Save 04 Saved after clearing Second Labyrinth (Second Medallion obtained), Upgraded to Bronze Sword & Increased Vitality to 8 Hq5f3713RImh eIDsyNa5fXcG
Save 05 before third Labyrinth Have Bomb Capcity Upgraded to 12, obtained Moonbean Moss NV%QnTetskyQ 1gdq4FjriL7T
Save 06 after clearing Third Labyrinth (Third Medallion obtained), Upgraded to Bronze Shield & Increased Vitality to 9 jQr4o%4Sobpc zMTILs%JaFnm
Save 07 Saved before Fourth Labyrinth Obtained The Rainbow Drop kkJ#VKmSLSBc BadcvBdwOEZm
Save 08 after clearing Fourth Labyrinth (Fourth Medallion obtained), Upgraded to Steel Armor & Increased Vitality to 10 nInS77KgD14R QuOXxyM96iUC
Save 09 Saved before Fifth Labyrinth Obtained Steel Shield HXKzhDP#pfro mAk#r2ZWm41g
Save 10 After Clearing the Fifth Labyrinth (Fifth Medallion obtained), Obtained Silver Sword & Increased Vitality to 11 ZLzyP5Rsyh4p Kc811F#tn6eE
Save 11 Save before Sixth Labyrinth Obtained Falon Shoes. O71a43y5YDti PrENtGk41art
Save 12 Save after clearing Sixth Labyrinth (Sixth Medallion obtained), Obtained Strongest Armor & Increased Vitality to 12 LuB1MoSXJ1W2 6ZcF$k7puKTq
Save 13 Save before Seventh Labyrinth Have Bomb Capcity Upgraded to 16. %cLDDF1QSskr Vz1zD#o%QW2d
Save 14 after clearing Seventh Labyrinth (Seventh Medallion obtained), Obtained Strongest Shield & Increased Vitality to 13 dg5D2xMqPCOV cWDSBxU#DYu5
Save 15 Before Eigth Labyrinth Increased Vitality to 14. uIGMmXUsPCOV cXCT6tyeM5kA
Save 16 after clearing Eigth Labyrinth (Eighth Final Medallion obtained), Obtained Bell of the Sky & Increased Vitality to 15 qJ85k2WqLSBk JvyE2piRY7%R
Save 17 Before Final Battle Obtained Strongest Sword BvyjCT81t8Bi C1P%qXqXS5oAnw
sources:
Psycho Chaser
controls:
d-pad = move
II = fire
I = switch weapon
weapons:
- Fire Balls
- Multiway
- Side Buster
- Homing Thunder
basics:
cheats:
- Sound test: Press Select seven times then Run on the title screen.
- Level Select: at the Sound Test screen (see separate cheat), select '1F' and enter the code below. You will hear an explosion if it worked.
- Invincibility cheat: after the Level Select cheat, Press I & Run together.
sources:
New Adventure Island
controls:
d-pad = move
I = jump
II = attack
II (hold) = run
basics:
- remember to pick up fruits, they are basically an "add time" item.
- when you have a weapon, continually fire, because you may hit an invisible egg.
To reveal a secret egg, just jump in the area where the weapons bounce off an invisible object.
- best weapon: spear (long range, but cannot break rocks or boulders), Fireball
- last stage: 7
cheats:
- stage select: enter the cheat on the title. After entering the code, use up and down to change the world number. Press Left, Left, I, Right, Right, II, Up, Down, Up, Down
sources:
Momotarou Katsugeki | Peach Boy
controls:
d-pad = move, crouch, enter doors, talk
I = jump
II = attack
Select = pause and show the status screen
Run = open the tool menu
menu translation:
New game
Difficult mode
Normal mode
Easy mode
Continue
tool menu translation:
objects (どうぐ)
rust dumping (さびだんご)
... food -> you can get all these dishes and items by eliminating a carrier oni with a basket on the back or buying them from shops.
eat (たべる) -> increase health
use (つかう) -> ??
nothing (すてる)
special arts (じゆつ) -> obtain them from quizzes and stone-paper-scissors games
ももジャンプ = double-jump?
オナラのもと =
かくれのの = invincibility
...
basics:
- it's possible to use enemies as platforms.
- small villages are also scattered throughout the game world and can be visited to purchase new swords, armors and various healing items.
Some shops even allow the player to save his progress (generate a password).
Finally, old hermits hidden inside large huts will challenge our hero with various short matches - such as quiz, rock-paper-scissors - and award him magic spells.
- last level: 8
passwords (Format is Row #, Column #):
- Start Fully Powered Up (Easy Mode) - 2,11 - 4,1 - 2,7 - 3,2 - 4,1 - 4,4 - 3,11 - 2,11 - 5,2 - 3,5 - 2,7 - 5,6 - 3,7 - 3,4 - 3,3 - 5,2 - 3,13 - 3,4 - 4,9 - 1,5 - 2,1 - 5,1 - 1,1 - 5,5 - 4,1 - 3,4 - 5,5 - 3,4 - 5,2 - 4,1 - 5,8 - 1,2 -
- Start Fully Powered Up Password (Normal Mode) - 2,11 - 4,1 - 1,6 - 3,2 - 4,1 - 4,4 - 3,11 - 2,11 - 5,2 - 3,5 - 2,7 - 5,6 - 3,7 - 3,4 - 3,3 - 5,2 - 3,13 - 3,4 - 4,9 - 1,5 - 2,1 - 5,1 - 1,1 - 5,5 - 4,1 - 3,4 - 5,5 - 3,4 - 5,2 - 4,1 - 5,8 - 2,2 -
sources:
Makai Prince Dorabocchan
controls:
d-pad left|right = walk
2x d-pad left|right = run
d-pad down = crouch -> invincible to most enemy attacks, very useful
I = jump
II = attack
d-pad down + II = toss tomato bombs (unlimited)
basics:
- you can jump over enemies without taking damage and use them as platforms to reach higher places.
- collect red tomato cans to restore your health (the hearts on the bottom-left). Avoid pink tomatoes.
- enemies will randomly drop different colored armor. Each color gives you a different type of extra ability.
The red armor was by far the most useful. It allows the beam that shoots from your wand to shoot further.
The blue armor allows you to jump higher and I'm not to sure what the silver armor did.
There are some other temp. powerups you can find like the cleats that allow you to stomp on enemies, a blue cape that lets you double jump, a syringe that freezes enemies, and a sword that boosts your attack. These items are limited and go away after a minute or two.
- hit the blue flying bats with tiny bells around their necks. They can call weird looking Easter Island head servants who often unlock secret shortcuts and unreachable areas.
- when you get to a boss all the tomatoes you collected will rain down giving you a nice preemptive strike.
- last stage: 5
sources:
Genji Tsuushin Agedama
controls:
d-pad left|right = walk
d-pad down = roll -> temp. invicibility, use often to avoid enemies and their projectiles. It's very quick, so you're at risk of getting hurt as soon as it ends.
I = jump (combine with d-pad up to jump higher)
II = attack (hold for a charged attack, check the colored orbs at the top gauge) (if you have all the 5 orbs, hold until they start flashing to release a bomb)
charged attacks (available after collecting in stages):
- Fire (か) = a series of explosions that shoot out a short distance ahead of Agedama.
- Wind (た) = 5 small tornadoes that spread out and cover most of the screen ahead of Agedama.
- Beam (は) = a series of green crescent shapes shoot out straight ahead.
- Genie (ま) = 3 genies appear behind Agedama, pause briefly, then fly ahead. This hits most of the screen. While those genies are paused, they will repeatedly hit any enemy they overlap. This makes them very useful against bosses who stay along the edge of the screen.
- Lightning (ら) = lightning travels across the screen, usually hitting everything.
basics:
- collect red spirit droplets to refill your health (check the gauge at the top-right).
Various other items are available in the game, such as temporary invincibility (yellow) or flying goblin-options (blue).
- Waparu the rabbit-robot appears in most levels, and will fully replenishing your health.
- last stage: 6
cheats:
-
debug menu: at the title screen, hold I+II and press Select to access a cheat menu. The options translate to the following:
Difficulty Normal
Continue 3
Sound Test 01
Round 1
Exit
sources:
Kaizou Choujin Shubibinman
controls:
d-pad = move
d-pad down = crouch -> avoid some attacks
II = attack (hold to charge if you have purchased the upgrade)
I = jump
map MENU translation:
MOVE (MAP/select stage)
repair (しゅうい)
armor (かいもの)
?? (ヒフト)
basics:
-
when you start the game a map shows the locations of the various areas to visit and you can always go back and take a different path if you wish to.
-
you must reach the enemy's castle at the top-right before the 18th day, or it's game over (check the day counter in the top-left, near the sun).
-
although stages can be optionally skipped, some of them give you a chance to collect unique permament powerup items.
-
enemies drop all kind of items when killed: power-cells, invulnerability stars, super-jump, smart-bombs and so forth (they are temporary and immediately active when collected, check the icon in the top-left).
They also drop gold bars and the accumulated treasure can be later used to purchase new upgrades from Doc's laboratory.
cheats (ingame while paused):
-
Commit Suicide: Right, Select, Left, Select, Select, Run
-
Invincibility: Up, Up, Select, Down, Button 2, Select, Run
-
Skip To The Boss: Left, Right, Select, Right, Left, Select, Select, Run
-
Turn Invincibility Cheat Off: Down, Select, Up, Run.
sources:
ShockMan | Kaizou Choujin Shubibinman 2
controls:
d-pad = move
d-pad down = crouch -> avoid some attacks
I = jump (hold to jump higher)
II = shoot (can be aimed up) (hold for a "ShockBeam" charged attack, release when your body begins to glow)
II (hold for 7s) = bomb (uses one Power Bit)
Run = pause
basics:
- the playable chars are Arnold and Sonya. Both play exactly the same, but have different bomb and combined 2P attacks.
Char with best bomb: Sonya.
- the red bottom-right bar is the life bar of the enemy boss (unused in regular stages).
- bits increases your attack power (some enemies can not be destroyed unless you have these). You can carry a max of 2.
- stay on guard after destroying a boss. You can still be damaged by stray boss shots even after a boss dies.
cheats:
- refill energy: pause the game, then press Left + Select + II
sources:
J.J. & Jeff | Kato-Chan & Ken-Chan | Kato Chan & Ken Chan
controls:
d-pad left|right = walk (hold to run. The faster you run, the higher you will jump)
d-pad up = enter doors
d-pad down = squat and gas attack -> slow, not very useful
II = jump
I (hold) + II = jump higher while standing still
I = kick attack -> interact with environment, activate hidden switches, reveal hidden items
basics:
- regardless of the char you select, the control and gameplay for either char is identical.
- there are 3 ways to defeat enemies: kick them at close range, jump on top of them (usually safer), or gas them by squatting.
A few enemies and most ground objstacles cannot be defeated and must be avoided: dogs, camp fire, sea urchins and Nessy the big lizards in underground levels.
- the kick can also be used on parts of the scenery to release coins (they can later be used in slot machines found inside some doors), food items or to open doors or shortcuts.
- restore VITALITY by collecting fruit or hamburgers which are scattered throughout each stage, by getting certain combinations in the slot machine game, or by finding your partner inside some doors.
Grab the fries to increase the distance that your gas travels.
Try to get 2+ fries in the slot machine to increase your VITALITY meter.
- in order to gain access to the boss at the end of the 4th stage of each area, you will first have to locate and collect the key, hidden somewhere in the 3rd stage.
Without it, you will have to backtrack and repeat stages by jumping on a green spring (avoid it if you have the key already).
- all boss fights are pretty much the same, where you must take on a char much larger than you who tosses boulders and jumps around the stage. You must jump up in order to successfully hit them with your kicks, and you must kick them several times before they are defeated.
- last FIELD: 6-4
cheats:
- continue: when the Game Over screen appears, hold I and II, then press Run.
sources:
Aoi Blink | Blue Blink
controls:
d-pad left|right = move
d-pad down = drop platforms
d-pad up = enter doors -> works as branching paths, cannot go back once entered
I = jump
II = attack (hold for autofire)
Select = switch lead char (each one has a different attack and abilities)
Run = pause (press I to revive Blink, costs 1 life)
basics:
- do not attack enemies by jumping over them, they will knock you back on contact.
- regular blue keys allow you to open treasure chests (check the counter in the bottom-right).
- throughout each TOWN you have to find a RED KEY allowing you access to the BOSS in the last stage. The red key is usually found in the middle of the second-last stage by shooting at blank areas (can be hard to locate at times). Check tips by NPCs to find it.
- collect 100 coins to get an extra heart container (check the counter next to the bag in the bottom-right).
- last town: GUROSU CASTLE
sources:
Hanii in Sky | Honey in the Sky
controls:
d-pad = move
II = fire
I = rotate arm clockwise
Run = pause (press I to access the store and equip items, not available during boss battles)
pause menu translation:
ACCESS SHOP?
YES
BUY
flames = speed levels
trident = 3-way shot (obtained as a reward when completing stage 3, you may save from purchasing it)
red arrows = autofire
red potion = health refill
bubble = temp. invisibility/invincibility
fire circle = temp. homing flame
EQUIP
SPEED
WEAPON
ARMOR
ENABLE/USE ITEMS (potions, bubble and fire circle)
TELEPORT TO STAGE
STAGES 1-8
NO
basics:
- spiritual points are earned each time an enemy is defeated. These points act as currency and can be used to purchase upgrades in the pause menu.
- always buy an homing flame and activate it before each boss fight. Also buy potions to refill your health when needed (check the orange gauge on the bottom-left).
- most WEAPON and ARMOR upgrades are obtained automatically after completing stages. They must be equipped manually in the pause menu.
- later stages have banching paths were you can find unique upgrades (they look like big yellow vases with a "?" sign). If you don't pick the right path you will start the stage from the beginning.
- last stage: 8 (2 loops)
cheats:
- level select: At the title screen, press Run to enter the main menu. In here, press I, II, Right, Left, I, II, Right, Left, I, I, Left, Left, II, II, Right, Right. If done right, the password mode will appear. Press I to enter it.
Format is Row #, Column #. Once entered, you'll start on the last level. To change levels just press Run, then Button 1, say Yes (first option), then select the last option. To select weapons, enter any of the other options.
Stage Select and Full Equipment - 5,7 - 9,8 - 6,4 - 4,7 - 1,3 - - 2,8 - 9,8 - 4,5 - 1,3 - 2,8 - 4,7 - 3,4 - - 2,2 - 10,6 - 10,4 - 5,4 - 8,8 -
sources:
Barunba
controls:
d-pad = move
II = fire with current weapon (hold for autofire)
I = rotate aim clockwise
Run = rotate aim anticlockwise
Select = switch weapon (check the letter in the bottom-left)
basics:
- you have a red energy bar in the bottom-left that can withstand 5 hits, and when it'is gone it's GAME OVER. There's no replenishing between stages, but there are replenishers during the stages themselves (via "LIFE" pickups).
- you're always equipped with 4 different weapons: V (=Vulcan), S (=blue Spheres/Shield, less powerful than the others but: bounce off walls, absorb bullets and can be charged, acting as a shield. Use when there are a lot of weak enemies onscreen), L (=Laser, best one for bosses) and N (=Napalm explosion bombs, good for strong enemies).
They start at the lowest level and can be upgraded multiple times by collecting the same letter icon (the level is showed via the square color in the bottom-left where the current weapon letter is).
All weapons lose their power overtime and need to be regularly upgraded.
- you can touch the scenery without taking damage, but you can still be crushed by the scrolling scenery (not always in the same direction).
- most bosses have a weak spot that gets exposed only during certain moves, so wait for it to attack.
- last stage: 5
sources:
Fushigi no Yune no Alice | Alice in Wonderdream
controls:
d-pad = move
d-pad down = crouch
d-pad up = enter doors
I = jump (hold to jump higher)
II = scream attack (hold to charge the POWER meter and make it stronger, but not too much or she then turns dizzy)
Run = pause (then press I to select a magic spell to use, req. 1+ MAGIC blue orbs in the bottom-left)
magic spell (give temp. abilities):
- red book = reveals items that are hidden throughout the levels -> the most common way to obtain LIFE and MAGIC refills, as enemies rarely drops them. Always try it before entering doors.
- blue book = allows you to jump higher
- green book = releases a switch which triggers an earthquake attack.
- grey book = invulnerability
- orange book = summons a genie to fight enemies
basics:
- you can also attack most enemies by jumping over them (more powerful attack than scream).
- there are four large areas made out of several sub-stages each, all punctuated by a boss battle.
- last stage: NIGHTMARE
cheats (enter at the title screen):
- level select: Down, Left, II, Up, Up, I, Right, Select and press I for the number of stages you would like to skip (up to 10 times). Then press Run to start in the desired stage.
- Start With All Magic Books: Right, Left, Left, II, Select, II, Up, II.
- Continue On The Same Area You Died In: II, Down, Up, Down, I, Up, II, Select.
sources:
Coryoon: Child of Dragon
controls:
d-pad = move
I = shoot
I (leave not pressed for a while) = charged shot -> killed enemies won't release any powerup with this
II = use smart bomb (if you have it)
select = switch flying speed
basics:
- at the title screen press up/down to select "LEVEL" (change difficulty), "STAGE" (initial stage select, only if you have cleared it with the current difficulty).
- be sure to shoot the pink birds carrying an orb.
Let the orb float for a couple of sec. and it will cycle color:
- red = flame, short range
- blue = wave laser, long range
- yellow = lightning bolts, multidirectional
Sticking to the same weapon type will increase its power (up to 3 levels).
Upon switching to a different weapon the power level is preserved, but if you get hit the weapon is lost and you're left with the default basic pea shooter.
These orbs also count as your hit points: as long as you have 1 you can take 1 hit before dying.
- collect card suits released by certain enemies to gain a special power (can only use/activate 1 suit at a time):
- hearts = adds 2 rotating options that lock in vertical position when button I is pressed.
- tiles/diamonds = shrinks baby dragon making it easier to dodge things, but doesn't let him use the charge attack anymore.
- pikes/spades = good old smart bomb, detonated with button I.
- clovers/clubs = works as a fruit magnet as long as you keep button I pressed.
- a last item to be collected appears when you destroy a white chicken. It gives the player a homing little dragon that hovers around the screen shooting and causing random damage. You don't lose it even if you die, but the thing will flee whenever you meet a boss.
- last stage: 8
cheats:
-
to access the cheat mode, press select to highlight the sound option while at the title screen. After this, press run to enter that function. To activate the cheat functions, highlight the indicated number, press II, then repeat for the rest of the numbers. A sound will play if youve entered a code correctly.
06, 04, 08, 06, 04, 08, 06, 04, 08 Four Screen Mode
03, 07, 03, 05, 01, 08, 08, 01, 01, 04 Get Twenty Lives
46 07 12 Invincibility
04 06 04 09 07 09 03 10 Just clicking 04 switches the game to timed mode, and finishing the code changes the screen resolution
08, 08, 01, 01, 08, 02, 04, 07 Level Select
08 04 01 03 07 05 06 04 Powerup Weapons
00, 00, 00, 00, 00, 00 Return to Normal
02, 04, 05, 02, 09, 04 View the ending credits
sources:
Dragon Egg
controls:
d-pad = move
d-pad down = drop platforms
d-pad up = enter doors
I = jump
II = attack
basics:
- enemies will randomly drop coins (which can be used in shops) and
little orbs that are used to evolve your dragon (initially an egg).
- last level: 6
cheats:
- level select: On the title screen push: DOWN, DOWN, UP, UP, LEFT, RIGHT, LEFT, RIGHT, II, I.
sources:
Gekisha Boy | Photo-Boy | The Cameraman
controls:
d-pad = walk left|right + move the cursor for your camera
I = take a picture (req. some film roll in the bottom-right, collect films to restock)
II = jump
Run = pause -> use to check the screen carefully
basics:
- the camera cursor will flash when you are pointing a target worth some points.
- pictures of weirder things will get you more points (and sometimes bonuses).
Plus you can take multiple pictures of them (get double points and bonuses)
- if you get hit you will lose film. Any stage will end when you run out of film, either by taking pictures or getting hit.
So check constantly the films counter in the lower-right corner and keep collecting films in the stages.
- try to jump to avoid most hazards (usually flashing). If you can't avoid a group of hazards you can take a picture of one of them to get rid of that hazard.
- after a stage is over you get 100 points per blank picture you have left in your camera.
- you can clear a stage by reaching a certain target points score.
- the assigned photo target is usually in the 2nd half of each stage.
- last TAKE: 9
assigned photos translations:
TAKE 01 a flying car
TAKE 02 someone dangerous in the ghetto
TAKE 03 a bicycle flying past the moon
TAKE 04 a fish wedding
TAKE 05 a surprised Mona Lisa
TAKE 06 someone running
TAKE 07 a scary ghost
TAKE 08 a shoot out
TAKE 09 (no assigned photo, need to obtain 150K points to pass)
cheats:
- level select: at the title screen, hold I+II+Select and press Run to start the game. During the opening cutscene, press Run again to display the level select.
sources:
Blazing Lazers | Gunhed
controls:
d-pad = move
II = fire (hold for autofire)
I = bomb (check the counter in the bottom-right)
Select = switch speed (5 levels, check the triangles at the top-left)
basics:
- roman numerals correspond to the main weapons: I (photon blasters, 5-way gun), II (disrupt wave, good spread capability when maxed out) (best one), III (field thunder, electric laser beams with amusing visual flair) and IV (ring blaster, regular gun with rotating orbs).
Collect the same type to power it up, or do it slowly by collecting the purple orbs.
- alphabet letters create and upgrade auxiliary weapons: F (full fire, increases the power of the active weapon), M (multi-bodies, creates up to two trailing options), H (homing missiles) and S (shield). Furthermore, taking any icon for an auxiliary weapon is the way to acquire extra bombs, up a maximum of 16.
- for a certain amount of enemies killed special carriers appear bringing cycling powerups that stand still when hit. Hit them enough or let them reach the bottom of the screen to see them turn into a blinking orb.
Now for the catch: there's more to their screen-clearing effect, since each blinking orb taken also gives you an instant respawn after you die, instead of going to the latest checkpoint.
- last area: 9
cheats:
- level select: in the sound test, choose any track besides 01, the press I, II, then Select repeatedly until 01 reappears. Now choose any track from 01 to 09 and press Start to go to the corresponding area (Track 01 for Area 1, etc.).
sources:
Magical Chase
controls:
d-pad = move + move options -> use them as a barrier from enemy shots, but not for melee attacks
II (hold) = autofire
II (hold) + I (tap) = lock and release the options firing direction
I (+ !II) = lock and release the options position
2x II = activate the left-most item in the bottom-right
main menu translation (difficulty selection):
Breeze (easy)
Bumpy (normal)
Rough (hard)
basics:
- the default selected difficulty in the main menu will end the game after stage 3, pick the 2nd o 3rd choice for the full game.
- you only have 1 life but you can take multiple hits (check the small hearts in the "LIFE" meter on the bottom-left). Collect lollipop and sweets to recover hearts.
- destroyed enemies will drop colored gems, which can be spent at the shops for new weapons and single-use items (check the gems counter on the bottom-center).
Shops typically appear once or twice throughout each stage.
- best weapons to buy (permanent): 3WAY, Bound (bouncing circles), WAVE (spread shot), HOMING stars, CRACKER BALL and CYCLONE (options weapons).
- best items to buy (single use): red ball bomb, small heart recovery, potion (full health recovery), heart fruit (incr. health by 1 unit), switch SPEED (choices from top to bottom: SLOW, NORMAL, FAST).
- last stage: 6 (Bumpy=normal and Rough=hard), 3 (Breeze=easy)
cheats:
- Get 60,000 gems: Enter on the difficulty select screen: Left, Down, RIght, Up, Select three times, Left, Right, I
sources:
SGX
Aldynes
controls:
d-pad = move
II = fire current weapon (hold to charge up a frontal shield that protects the front portion of your ship)
I = switch option formations
basics:
- there's a standard blue straight-ahead laser, a green orb spread shot, a white laser that bounces along the walls (comes in handy at various points in the game), and a strange red force field that expands outward from your ship.
Collect the same weapon to increase the weapon level (check the white rects in the bottom-left).
- you can also collect options (up to 4) which you can set up in one of 3 ways: 1.) Formation, where they line up around your ship and fire at enemies along with you. 2.) Rotate, where they rotate around your ship and destroy bullets and small enemies and such. 3.) Free, where they roam around the screen and cause their own carnage by seeking out enemies (somewhat like MUSHA) and firing lightning bolts at them.
- last stage: 7
sources:
PCECD
manage the save RAM:
press Select at the boot menu.
jap menu translation:
DELETE
REINITIALIZE
QUIT
cheat codes:
Tenchi o Kurau | Dynasty Wars
controls:
d-pad = move
?1 = attack left
?2 = attack right
?3 = "tactics" bomb attack (consumes health)
basics:
- completing stages and collecting yellow orbs increase the experience points of the player in order to level-up, where he gains more vitality and use stronger weapons.
- for every 3 blue orbs collected, the player's weapon improves, depending on his current level range.
- ingame treasure increases player score, and food packs replenish vitality.
- last ROUND: 8
sources:
Kaze Kiri Ninja Action
controls:
d-pad = walk, crouch
d-pad diagonals left|right = run (cannot attack while running)
2x d-pad left|right = sliding attack -> difficult to pull, req. precise timing and can be blocked, avoid
II = attack (sword or projectile depending on faced enemy distance)
I = jump
d-pad up|down + I = forward|backward somersault -> use to avoid enemies attacks, can pass over them while their are crouching
d-pad down + II (in midair) = jumping dive kick
d-pad down + II (while holding an enemy) = throw enemies -> deals little damage, not very useful
Select = disappear for a while -> slow to execute, not very useful
basics:
- to finish a stage, you have to kill enemies until the green "ENEMY" gauge at the top-right depletes, and then run to the other end.
Repeat until you meet the boss stage.
- your health refills constantly, but certain moves use it up, such as the projectile attack (check the purple "KAZE" bar in the top-left).
You have 3 lives and no continues (check the head icons in the top-right), but you can go to the OPTIONS menu after a GAME OVER and restart from any STAGE up to the one you died in.
- you cannot block attacks, but your movements are faster than most enemies and you can counter enemy projectiles with your attacks (req. precise timing).
- best strategy: avoid standing still near enemies, take some distance as soon as they are about to attack.
Prefer your sword attack as will stun most enemies and deals more damage.
- last STAGE: 19
sources:
Image Fight II: Operation Deepstriker
controls (TYPE C):
d-pad = move, aim red pods shooting
II = shoot main and pod
I = frontal pods melee attack -> powerful, use often
Select = switch speed (check the numbers in the bottom, "2" or "3" are the best choice in most cases)
basics:
- destroy green+grey carriers to get up to 3 pods around your ship. The pickips are cycling between red and blue (blue=fire forward, red=fire with inverted aiming, best one),
- if you have 3 pods and grab 1 more, it will change all of them to the selected color, rather than just one.
- the 2nd type of powerup is a frontal attachment that gives you extra firepower such as spread patterns, lasers, side shots, missiles, etc..
These attachments are destroyed when hit and can only be replaced for a new one if you get rid of the attachment you're carrying.
- last stage: 10
cheats:
- invincibility: while playing, pause the game and press Left, II, Up, II, Right, II and unpause. A sound will be heard if done right. The code only works on the penalty stages though, not on the normal levels.
sources:
Kaizou Choujin Shubibinman 3: Ikai no Princess | Schbibinman 3
controls:
d-pad = move
d-pad down = crouch -> avoid some attacks
I = jump (hold to jump higher)
II = attack (hold for a "ShockBeam" charged attack, can be aimed sligtly with the d-pad after firing)
Run = pause
basics:
- in the main menu enter OPTION MODE and turn "ACCESS" off in credits to skip the game's VA scenes.
- if you hold the attack button down after firing your charge attack, your movement becomes entirely fixed, and you now control moving your shot around in mid-air.
You will often fire a charged shot, immediately hold down the button to start charging again, and then be confused as to why you're not moving - it's for the above reason. Always make sure your charge shot has hit your target or passed off the screen before you begin charging again.
- collect the red battery to restore 1 unit of health (check the gauge at the top-left).
Collect the light bulb to fully restore health + extend by 1.
- collect 100 brown+blue pillars for an extra life (check the counter in the top-right).
- last stage: 7
cheats:
- extra options incl. stage select: at the boot screen, hold Down + II on Controller 2 and press Run on Controller 1. This adds omake, Stage Select, and visual test options to the options menu.
sources:
controls:
d-pad = move
II (hold) = autofire (release to the let the gauge at the bottom-left to fill and fire a stronger shot)
I (hold) = lock facing direction -> use to strafe and avoid enemy fire
Start = bomb (check the counter in the bottom-left, collect scrolls to restock)
basics:
- best char: mecha (last on the right, has homing shots)
- collect "P" items to increase your weapon level, "S" for speedups, "O" to summon one of the other characters to fight alongside you and shadow your movements.
- last stage: 8
cheats:
- level select: at the title screen, push the following button combination: Hold down + I, press run, run
sources:
Kiaidan 00
controls:
d-pad = move
II (hold) = autofire current weapon (release to charge the gauge at the bottom-left and fire a special attack on the next press -> unlimited and weapon-dependent, use often)
I = switch weapon (check the icons at the bottom-left): forward gun, wave spread, rotating energy ball (best one, can absorb some bullets), fixed energy field and 3-way lightning bolts
basics:
- in the lower HUD everything you need at any moment is displayed, such as health bar, stage progression, weapon selection and boss energy.
- there are no weapon powerups or upgrades and all the weapons are available from the start and never lost.
- there are initially only 3 energy/health cells (check the blue triangles in the bottom-left next to "SHIELD"), meaning you can take 3 hits before the robot goes down
Small green spheres scattered throughout the game replenish 1 cell.
The good news is that the health bar is fully restored at the start of each stage.
- for every million points achieved you activate an extra energy/healt cell.
sources:
Sylphia
controls:
d-pad = move
II = fire
I = bomb (check the "LB" counter in the bottom-right, only refilled after each stage)
Select = switch speed (check the arrows at the top-left)
basics:
- you can take 2 hits in each life, and if you don't take the heart icon that refills health you'll die on the 3rd hit. Then you'll be respawned with the current weapon at its basic power level.
- weapon types are related to the 4 classical elements: fire (red), air (green, best one), water (blue) and earth (yellow).
When you take successive items of the same kind you upgrade the particular aspect of each one of the weapons: fire will start shooting diagonal homing flame shots, air generates slow whirlwinds that develop forwards diagonally, water creates an extra fire stream opposed to the direction you're moving and earth forms a protection barrier that rotates around you.
- in order to powerup the basic weapon attack you must take the small green orbs that fall when the insect item carrier gets hit.
- collect white crystals to fill the red gauge in the bottom-left and get an extra life (check the "SILP" counter=lives left).
- except for white crystals, upon taking any other item you're given a very brief stint of invincibility.
- hold tight to the current life during a boss fight because you regain all your health (2 hearts) when a new stage begins.
- last stage: 8
cheats:
- level select: in the options menu, press Up, Up, Down, Down, Left, Right, Left, Right, II, II.
sources:
God Panic: Shijou Saikyou Gundan
controls:
d-pad = move
II (hold) = autofire
I = bomb (check the blue squares in the bottom-left) -> create a quick forward barrage that disintegrates bullets on contact
basics:
- the only way to open the chests is by getting close to their keyholes, shooting won't do anything.
Don't rush up after opening the chests because you might get the item without seeing what it is: the speedup icon, which looks like a small joystick, is actually the only one to be avoided in my opinion (multiple speed-ups can lead to an uncontrollable avatar).
All other items are of strictly beneficial nature: the green "P" is the shot powerup, the purple "F" recovers 1 health cell, "B" grants an extra bomb and "Lv" increases the health meter by 1 cell.
Whenever you take the 1st green "P" 2 sidekicks will materialize by your side and provide additional firepower. Further powerups will upgrade you until you start firing a couple of very powerful homing shots (it's impossible to power down).
You can have up to 6 health cells and a maximum bomb stock of 5.
- you only lose 1 red cell when hit and won't power down.
- last stage: 5 (2 loops)
sources:
NEXZR | Summer Carnival '93: NEXZR Special
controls:
d-pad = move
II = autofire primary and secondary weapons
basics:
- you can increase the difficulty level in the OPTIONS ("NORMAL" is the lowest one), and choose to restart from any beaten stage.
- you are allowed to fire 2 types of weapons at once, which cannot be powered up.
Main firepower can be a straight shot or a 3-way spread pattern (3-way is weaker but obviously provides better coverage).
Secondary firepower comes in 4 flavors: a homing laser, a pair of self-sentient drones that fly around the screen and home on enemies, 2 piercing lasers that spread outward in 45° and crawling missiles that explode upon contact with the enemy.
- the last item is the ever so important shield, which offers invaluable protection against one hit only.
- last stage: 7
sources:
Choujikuu Yousai Macross 2036
controls:
d-pad = move
I = fire main weapon and missiles
II = fire current special weapon (overheats while in use, check the gauge at the bottom-left)
basics:
- after each stage you can equip special weapons according to your "EXP" points.
- best weapons: homing missiles (4th from the top-left), 360° (4th on the 2nd row)
- during boss fights the control scheme changes, you use I and II to rotate your aim and you cannot fire your special weapon.
sources:
Faussete Amour
controls:
d-pad = move
II = attack with baton (can be combined with a direction)
I = jump (hold to jump higher)
2x I = extend the baton diagonally, grapple onto some horizontal platforms and start swinging (press II to somersault and climb up. -> temp. invulnerability, use often to attack enemies from below)
I, d-pad down + II = cast magic attack (unlimited uses, check the icon in the top-left)
basics:
- you will lose your pink armor when hit and lose a life with another hit.
- there are 3 different magic spells, which are obtained through powerups dropped by little fairies, including a homing lightning attack (green, best one), a straightforward fire attack (red), and an air based attack that shoots straight upward (blue).
- you'll need to collect 3 pink crystals to be able to fight the boss in every level, otherwise you will be teleported back to the beginning of the level and not to the boss fight.
- last level: 7
sources:
Seirei Senshi Spriggan
controls:
d-pad = move
II = shoot
I = bomb (sacrifice the leftmost/newest orb taken)
Select = switch speed
basics:
- the powerup system is based on the combination of up to 4 colored orbs:
Red orbs are focused on fire, which tend to be strong, forward firing shots; blue is for water, which either rotate around your ship or otherwise fire spinning projectiles; yellow is for earth, which sends out multi-way shots; and green is for wind, which sends powerful waves out.
These orbs come from bug-like carriers arriving from the top of the screen at regular intervals and always head straight to the current position of the player, disappearing if uncollected.
You can hold up to 3 orbs at once, and your weapon is determined by the combination of colors.
Since picking up a new orb will simply cause the oldest orb to disappear, this means it's to your advantage to drop a bomb right before you pick up another one.
While you can always stick to the same color so that the defining aspect of the selected weapon is maximized, it's the combination of 2 or 3 different colors that often provide some of the best choices in the game.
- best weapon combination: ??
- the blinking orb has a double purpose: smart bomb + providing a 1-hit shield to the robot (indicated by the energy barrier appearing over its shoulders).
- last stage: 7
cheats:
- level select: at the title screen, highlight option, hold Select, then Up, then I+Start until the options menu loads.
- level skip: while playing, pause the game and press Right, Left, Right, Left, Right, Left, Right, Left, II, II, II, II, II and II. You'll hear a sound if done right. Now, hold Left + I + II and unpause. If done right, you'll skip the stage.
sources:
controls:
d-pad = move
I (hold) = autofire main weapon
2x I = fire current special weapon (check the ammo counter in the bottom-right)
II = flip facing direction
Select = switch weapon (check the HUD in the bottom-right)
Start = pause and safely switch speed (left|right), weapon (Select) and "DEMO MODE" (cutscenes)
basics:
- the large size of the mecha makes it a little hard to dodge bullets. To make up for this, you have a very generous SHIELD, which can absorb quite a bit of damage and recharges relatively quickly, as long as you can avoid getting hit.
- there are not ammo refills ingame.
- take cover behind your alleys when you can.
- last stage: 8
cheats:
- level select: at the title screen, press Up, Up, Down, Down, Down, Down, Down, I, I, Run, highlight options, hold Left and press Run. This will load the options menu, with a level select in place of the sound effect test.
sources:
Gate of Thunder
controls:
d-pad = move
II = fire current weapon
I = change weapon (check the icons at the top-right)
2x II (quick tap) = switch options shooting direction forward/backward
Select = change speed (check the icons in the top-right next to "S")
basics:
- weapons:
- "L" Laser
- "S" Spread
- "E" Explosives -> keep in reserve for tough enemies or bosses
- it takes 2 of the same items to achieve max power for each of these weapons, and it's possible to see their level below the color indication in the HUD.
Taking the same item again will create a bomb-like vertical bar that crosses the screen from left to right, damaging enemies and melting bullets.
- last stage: 7
cheats:
- level select: at the title screen, press I, II, II, I, Select, I, II, I, II, Select, Select to add a level select to the configuration menu.
sources:
Lords of Thunder | Winds of Thunder
controls:
d-pad = move
II = shoot, melee attack (near enemy)
I = bomb (check the blue dots at the top-right)
basics:
- best armor: FIRE ARMOR (spread shot, whipping flames when powered up)
- small blue and gold crystals add to the crystal count in the top-left (5 and 10 points, respectively)
that can be used to buy items and upgrades in the shop before each stage.
Bomb refills, shields and the ELIXIR (extra life) can only be purchased in the shop.
- big blue/red magic gems add to the upgrade gauge above the life meter, thus determining the power of the weapon.
In total there are 2 power levels beyond the default, each one requiring a certain amount of upgrade points to be reached.
- getting hit you lose a portion of health + a full level in the weapon power.
Every once in a while a specific enemy will leave behind a heart that increases the amount of health.
- last stage: 8
sources:
Mugen Senshi Valis: The Legend of a Fantasm Soldier
controls:
d-pad left|right = walk
d-pad down = crouch -> avoid enemies projectiles
I = jump
II = attack
d-pad down + I = slide attack -> use to avoid enemies and pass over long gaps instead of jumps
d-pad up + II = use magic attack (consumes the blue MP bar at the bottom-right)
Select = switch magic attack (check the icon at the HUD center)
powerups:
- small heart = recovers 2 HP
- large heart = recovers all HP
- small star (S Magic) = recovers 2 MP
- large star (B Magic) = recovers 8 MP
- "B" ball = Bullet: fires a simple strong projectile forward. When powered up, it also fires a smaller projectile at an angle upwards.
- "S" ball = Saber: fires energy swords forward. The number of swords fired increases when leveled up.
- "H" ball = Hunter: fires flaming birds that home in on enemies. The number fired increases when leveled up. -> best one
- "C" ball = Cutter: fires a crescent slash forwards. When powered up, she fires a second one straight upwards as well.
- "A" ball = Arc shot: fires green bouncing balls. The number of balls increases when leveled up.
basics:
- getting the same weapon powerups 2+ times will increase its level (check the flashing bar at the bottom-left).
- the magic spells are earned with each jewel you take from the defeated bosses at the end of each stage.
The amount of time you can use them depends on the amount of MPs they consume each time you use them.
- last stage: 7
cheats:
- debug menu cheat (incl. stage select): at the title screen, press Down, Button 2, Left, Left, Down, Button 2, Up, Button 2, Up, Left, Up, Right, Button 2, Right, Down, Button 1, Right, Down, Down, Button 2, Down, Up, Button 1, Up, Button 2, Down, Button 1, Up, Button 2, Button 2, Button 1, Button 1, Left, Up, Button 1, Button 2, Down, Up, Up, Down and Select.
sources:
Valis II
controls:
d-pad left|right = walk
d-pad down = crouch -> avoid enemies projectiles
II = attack
I = jump (hold to jump higher)
d-pad up = use magic spell (check the icon and counter in the top-right, collect same icons to refill or a diff. one to switch)
basics:
- collect small hearts to restore your health (the "YOKO" bar in the top-left).
Big hearts will increase the health bar.
- the main weapon can be switched and powered up via icons dropped by enemies (check the icon and level in the top-left).
best weapon: homing missiles (the icon looks like a missile) = fires a projectile that hits the nearest enemy on the screen.
- collect blue crystals for SCORE points. For every 10000 points you get an extra life (check the head icons in the top-left below "PLAYER").
- last ACT: 6
cheats:
- select any weapon: once this code is entered, you can pause the game and select any item you want with Button I or any weapon you want with Button II. Press and hold Button II then press Run to pause the game. After paused, press Select, I, II, I then Run again.
sources:
Valis III
controls:
d-pad left|right = walk
d-pad down = crouch -> avoid some enemies projectiles
d-pad up = look up
II = attack (check the sword-shaped red gauge in the top-left. The more is filled up the the higher will be the range of the attacks performed. Collect sword powerups to extend this meter.)
I = jump (hold to jump higher, combine with d-pad up while standing still to jump even higher)
d-pad down + Run = slide attack -> temp. invincibility, dive through low ceilings and get onto otherwise unreachable platforms, but also doubles as an emergency getaway attack.
d-pad up + II = use magic spell (req. green MP gauge at the top-left)
Run = switch char (check the icons in the top-right)
Select = pause
chars:
- Yuuko: the main protagonist. She uses the Valis sword wave attack and is a balanced character in respect of attack, defense and speed.
- Cham: she uses a whip to attack. Altough her range isn't affected by the attack bar, she has 1/2 of range from the other characters but has 2x of their attack power and a great speed but lacks from some defense.
- Valna (best one): she uses a magic staff to attack with sparks. She has the greatest range and higher defense but has the less attack power and low speed.
basics:
- the magic spells are switched from colored wands scattered throughout the levels (check the wand icon in the top-right).
They are from 3 elements: red = fire (homing, best offensive one), blue = ice (freeze enemies, req.to pass some sections with big gaps) and white = thunder (bomb-like, ) and varies according to current char.
- the HP, MP, and Magic spell are shared by all 3 chars.
- collect heart to restore HPs, crystals to refill MPs, 2 crossed swords to make your Weapon Power Meter refill faster.
- the "P" white dots under the timer shows how many lives you have remaining.
When all of these are gone, the game is over, but you can save it and continue it later.
- last stage: 10
sources:
Valis IV
controls:
d-pad = move, crouch
I = jump
II = attack
II + d-pad up = magic attack (char-specific, req. the "WP" gauge on the top charged yellow. Will unleash a char)
Run = switch char (not during boss fights)
Select = pause
chars special abilities:
- Lena = press d-pad down + I to slide though narrow passages and skip enemies (best char against bosses).
- Amu = slightly faster than Lena, can double jump in midair. She attacks with a boomerang that flies in strange angles.
- Asfal = slowest and heaviest of the group. He has the greatest attack power, although his attack range is limited to the ground because his projectiles glide along its surface. He has a useful immunity to some traps, such as spikes and lasers.
items:
- heal leaf: Recovers 2 units from the HP bar.
- medical herb: Recovers 8 units from the HP bar.
- blue sphere: Increases the level of the MP bar by one.
- red sphere: Increases the attack/HP level by one.
- star: Gives temporary invulnerability against enemies and traps.
- sandclock: Adds more time to the time counter.
- 1up: Gives the player one extra life.
- Yuuko's SD face: Increases the player's level to the max.
basics:
- getting hit will deplete the "HP" gauge on the top. Collect the heal leaf or the medical herb to refill.
- last ACT: 9-7
sources:
Super Air Zonk: Rockabilly-Paradise | CD Denjin Rockabilly Tengoku
controls:
d-pad = move
II (hold) = autofire, let go to release a bomb when the Zonk icon in the bottom-right is blinking (auto-reloads while shooting) -> very powerful attack, use often to take out enemies behind walls, as well as clear the screen when it gets too crowded
I = switch friend/escort mode: as an option (following you around), bouncing around the screen, as a cyborg (merged with you)
basics:
- suggested initial stages order: SEA, RIVER, FACTORY, TV (from left to right).
- you start the game with the main weapon in the 2nd power level. If you get hit the weapon will degrade to its lowest level (weak lightning), with the next hit meaning a lost life.
Grabbing a meat on a bone will upgrade 1 power level, also giving you 1 more hit to sustain in the case of damage.
Initially there are only 3 power levels, but 2 more are acquired when you defeat the bosses from stages 5 and 6.
The meat on a bone appears when you touch one of those static purple heads.
Also you won't respawn when losing a life, so constantly check the lives counter in the bottom-right.
- all heads contain something useful: yellow heads (the most common) release 1 smiley face, purple heads contain the meat on a bone, green heads generate a quick shower of smiley faces, blue heads release an extra life and blinking heads give way to a baby bottle that turns you into mini-Zonk until a new baby bottle is collected.
Upon shooting at these heads they change their color, so from the initial yellow ones you can always get a meat on a bone. However, if you hit them too much you'll lose their contents as they turn into a small spider.
- collect 100 smiley faces to get an extra life. Big smiley faces are worth 10. The number of current smiley faces collected can be checked by pausing the game.
- the rear burner fires automatically whenever an enemy passes behind you.
- a fixed friend/escort is assigned to each level, so there's no more automatic or manual selection of helpers.
Once activated the cyborgs aren't lost even if you lose a life, so they will remain with you until the boss is defeated.
You can still play the game without them, it's just a matter of not freeing the friend/escorts from their captivity when they appear within the stage.
- last stage: 7
cheats:
- debug menu(jap. ver. only): at the title screen, press I, II, Up, Right, Down, Left, Select seven times.
sources:
Rayxanber II
controls:
d-pad = move
II (tap) = fire
II (hold) = charge shot (release when the triangles at the bottom are yellow) (cause the overheat gauge on the bottom to raise)
I + d-pad = dash (cause the overheat gauge on the bottom to raise) -> use for quick evading
basics:
- single-level enhanced weapon is acquired by taking the colored powerups released by a carrier that looks like a dark shadow of your own craft.
The firing direction of the upgrade is defined by the moving dial inside the icon, thus demanding a little bit of timing from the player.
Blue corresponds to a pattern of thin shards, orange is the flame gun and green activates a lightning bolt.
By holding and releasing the firing button you trigger a charge shot that varies according to the current weapon: 8-way blast (blue), flame shots with homing ability (orange) and a quick circling attack that surrounds the ship (green).
- the lower bar in the HUD serves as a meter both for charging and overheating, and whenever it's in the red zone you have to wait for the engines to cool down. Dashing three times in a row is enough to cause overheating.
- last stage: 6
sources:
RayXanbeR III
controls:
d-pad = move
II (hold) = autofire (release when the lower charge bar gets yellow to shot some missiles. Press the button again and these missiles will explode in a batch of homing missiles -> use often, very useful)
I + d-pad = dash (cause the upper bar in the HUD to raise) -> use for quick evading
basics:
- when the carrier ship is destroyed it releases a weapon item that has a moving dial inside. This dial affects the way the weapon behaves, so according to its orientation the ship will fire in a particular direction/way.
Green activates a bubble shot that's very powerful despite its slow speed, yellow corresponds to a continuous series of laser shots and red generates a couple of thick flame bursts above and below the ship.
- last stage: 6
cheats:
At the title screen, enter the Sound Test and change the following options. Then just start the game to see the changes. The codes need to be entered sequentially. For example, for the 3rd code to work, you need to enter the previous 2.
1) Lives Modifier Set the "Effect" to any number up to 20 (lives modifier). Then, highlight "Music" and press I on the following songs: 1, 2, 3, 6.
2) Change Attack Unit Direction (Press Select Ingame) Set the "Effect" to 1 for On or 2 for Off. Then, highlight "Music" and press I on the following songs: 1, 3, 9, 7.
3) Stage Select Set the "Effect" to to any number up to 6 (stages modifier). Then, highlight "Music" and press I on the following songs: 7, 6, 1, 8.
4) Super Fast Ship Set the "Effect" to 1 for On or 2 for Off. Then, highlight "Music" and press I on the following songs: 9, 8, 4, 1.
5) Invincibility Set the "Effect" to 1 for On or 2 for Off. Then, highlight "Music" and press I on the following songs: 6, 5, 1, 3.
sources:
Space Fantasy Zone
controls:
d-pad = move
II = autofire
I = use subweapon or special item (check the "I" top slot at the top-right, scrolls from top to bottom)
Start = pause
Select = enter shop and skip current stage (debug feat.)
basics:
- you obtain coins automatically from killed enemies. At the end of each stage you can purchase powerups and special items in the shop.
- you have an energy meter at the top-left instead of one-hit-kills. It can only be refilled by purchasing "SHIELD +1" or "FULL" in the shop.
- best powerups to buy: L4 strength (makes enemies and bosses easier to take down), TURBO or JET engine (speedup), COPA^2 (options).
- last stage: 9
sources:
Star Parodier | Star Parodia | Fantasy Star Soldier
controls:
d-pad = move
II = shoot
I = bomb (check the counter in the bottom-right)
Select = switch speed (check NORMAL|SLOW|FAST in the top-left)
basics:
- enable "SOFT RAPID" in the OPTIONS for an even faster firing rate than the default autofire.
- best char: PC ENGINE (has fast homing missiles as yellow weapon and rotating options as "P" aux weapon)
- last stage: 8
sources:
L-Dis
controls:
d-pad = move
II (hold) = autofire
I = bomb (if you have it trailing behind the options)
basics:
- before starting the game you can choose the difficulty and to watch a tutorial by pressing left or right (default to "NO").
Then you must choose one out of 3 weapon configurations (best one: ARMS-B).
- upgrade items are brought by harmless floating yellow balloons.
Since they're only differentiated by kanji characters, it does take a while to know what you're getting.
They cycle in the same order when spawned, with 3 types of items to consider:
- powerup / speed-up
- auxiliary shot, which has 3 forms: a straight type, a bomb/missile type and a special shot that passes through walls.
- bomb / 1-hit shield
- auxiliary shots are fired by trailing options (2 max, no upgrades),
you can carry only 1 bomb (it trails behind the options) and a maximum of 3 shields can be stocked at any given time.
- last stage: 6
cheats:
- level select and debug menu. at the title screen, hold Up and press I. Release Up, then press Right, Left, II, Up, Down, II, I, II, I.
sources:
Akumajou Dracula X: Chi no Rondo | Castlevania: Rondo of Blood
controls:
d-pad = walk
d-pad up = climb up stairs; whilst jumping, hold to land on stairs.
d-pad down = crouch, climb down stairs; hold and press the II Button to drop off stairs.
I = attack
II = jump
d-pad up (hold) + I = use sub-weapon (req. hearts, check the counter on the top-left)
Select = special attack with current sub-weapon (Item Crush) (req. hearts)
basics:
- easier char: Maria Renard (faster, can double jump, slide and has a more powerful main weapon)
To play as Maria, you must retrieve the prison key from a candle in the area that you are chased by the Behemoth in the default Stage 2 (do NOT take the alternate path from Stage 1).
When you reach the end of the castle sewers later in the level, there will be a locked door just beside the stairs. If you did not exchange the key for any throwing items after picking it up, you can use it to open the door and rescue Maria.
Complete the level as normal and the next time you restart the game, the Character Select option will be available on your save file's menu.
- last stage: 8
cheats:
- level select: enter X-X!V''Q as your name at the load screen. You can now select any level you want.
sources:
Ginga Fukei Densetsu Sapphire
controls:
d-pad = move
II = fire main + pods weapon (stop firing to start charging the pods)
I = bomb (check the "B" counter on the bottom-left, refill by beating mid-bosses quickly) -> temp. invicibility, save for bosses
basics:
- best ship: green (3rd, slowest, but has homing green weapon)
- you can only hold one type of shot at any time, but you can get a powerup of a different color and still retain your current weapon's strength.
In order to change weapon from your original red one, you have to move over a pickup of the color you want to get.
The pickups come out of enemies and they cycle through the 3 colors: red, blue, and green.
Getting a pickup of the color that you currently have will increase its level (up to 5).
You can tell when a weapon is at max strength by seeing 5,000 points when getting a pickup of the same color.
- you can get the pods when you go over a weapon pickup if you do not already have them.
The 2 pods on either side of your ship shoot bullets outward, and they block enemy bullets.
If you do not fire your bullets you can charge up the pods (5s for max charge), and then send them out chasing enemies.
The longer you charge them the longer the pods will stay out hunting enemies.
If the pods go after 2 different enemies there is a line of electricity between that damages enemies and blocks bullets.
- you can time-out mini-bosses and bosses.
- last STAGE: 5 (no loops)
sources:
Browning
controls:
d-pad left|right = walk, duck -> avoid some enemy fire
2x d-pad left|right (same direction your are facing) = run
2x d-pad left|right (opposite direction your are facing) = turn
II = fire
I = jump (press again in midair to hover. Overheats after a while, check the "TEMP." gauge in the bottom-left)
basics:
- standing still, or moving without shooting seems to automatically recharge the health ("SHIELD BALANCE" in the bottom-left) as long as it hasn't reach zero.
- there are no weapon powerups, and every stage must be finished within the time limit.
- last stage: 5
sources:
Ranma 1/2
controls:
d-pad = walk, crouch
II = punch (if standing), kick (if crouching or in midair)
I = jump (in midair press d-pad up to somersault, or press d-pad down+II for an heel stomp) (at the peak press I again to double-jump)
Select = Genma bomb-like attack + transform (check the counter in the bottom-right, collect Panda icons to refill)
main menu translation:
START
PASSWORD (obtained when running out of lives)
VS MODE (also useful to practice the moves)
basics:
- as Ranma touch the water to turn into Ranma-chan, which is faster and jump higher, but deals less damage.
- collect bandaids and medkits to restore the health (the hearts at the bottom-left). Collect the meat bun for 1 extra heart.
- last chapter: 8
sources:
Ane-san | Anesan
controls:
d-pad = walk, grab
II = attack, jump kick (in midair) -> enable autofire on this
I = jump
II + I = desperation attack -> drains health, use only when surrounded
main menu translation:
- NEW GAME
- CONTINUE
- MULTIPLAYER MINIGAME
bedroom inter-stage menu translation (from left to right):
- NEXT STAGE
- SHOP
- BGM (change the music played in the bedroom)
- BONUS GAME (minigame offering no reward)
- SAVE
- LOAD
basics:
- easier char: AI (1st one on the left, fastest, hardly countered by enemies)
- collect food to restore your health (the orange bar on the bottom-left).
- items in the shop fall into two categories: ones that help you in battle, and ones that decorate your room.
Jackets give you more health, knuckledusters increase your attack power, ...
- you can change char before each stage. Some beaten bosses also become playable.
Beaten stages have a red "EDEN" flag on the map.
- last stage: 5
sources:
Bakushou Yoshimoto No Shinkigekin
controls:
d-pad = walk
I = jump
basics:
- jump on top of enemies to stun them and reach higher places (no killing in this game).
- you lose a heart if touched by any of the dozens of chars wondering around the game, even if they all look friendly.
- collect food to restore your health. There are also hidden 1UPs.
Some special items give special funny powers for a short time and often clean up everything on screen.
- levels can also be non linear in places and they always end up with a crazy challenge you must win to carry on his journey.
- last level: 6
sources:
FX-Unit Yuki: The Henshin Engine
controls:
TODO
PSX
different analog protocols:
neGcon features:
- 1-axis swivel/twist -> steering
- 2x digital front buttons (A and B)
- 2x analog front buttons (I and II) -> accelerate and brake
- 1x digital trigger (R)
- 1x analog trigger (L)
- no L2, R2 and select buttons
- no rumble
- 4-way digital d-pad
- Start button
Analog Joystick/Flightstick/dual stick features:
- 2x analog joysticks with X, circle, L1 and R1 buttons.
- thumb-operated digital hat switch on the right joystick, corresponding to the traditional D-pad
- regular big digital buttons on the base.
list of games with negcon support:
list of games with Analog Joystick/Twinstick support:
list of games with DualShock support:
RC Revenge
d-pad = steer
X = accelerate
[] = brake, reverse
O = use item, fire weapons (check the icon in the top-center, obtained from spinning blue "?" squares)
/\ = flip vehicle when overturned
R1 = handbrake -> tap around tight corners to turn sharply
L1 reposition
L2 = look backwards
Select = switch camera
basics:
- easier starting car: Canary XL
- last championship track: AKLM Studios
cheats (from the main menu):
- Enable All Tracks L1, L2, R1, R2, Square, Circle
- Enable All Vehicles L1, L2, R1, R2, Circle, Square
- Unlock Next Cup and Vehicles L1, R1, R2, L2
sources:
Micro Machines V3
controls:
d-pad = steer
X = accelerate
[] = brake
/\ = use weapon, horn
sources:
controls:
d-pad = move, jump
X = normal hit
O = dash and fire cannon
[] = hits up
/\ = special move 1
R1 = special move 2
R2 = special move 3
basics:
cheats:
- All Robots in Story Mode: At the title screen press Up, Down, Left, Right, X, Circle
- All Robots in Versus Mode: Enable the All Robots in Story Mode code, then return to the title screen and press Up, Down, Left, Right, Up, Down, Left, Right, Up, Down, Left, Right, X, Circle
- Level Skip: "All Robots in Story Mode" code must be done first prior to performing this cheat. Pressing L2 anytime in Story Mode will instantly jump you to the next level, your score will reset to zero however.
sources:
Pac-Man World
controls:
d-pad = move
X = jump (press again in midair to Butt Bounce -> attack enemies, press switches), swim up, Dolphin Jump (hold in water)
X (hold) = charge Rev Roll (release to start running) -> cross big gaps via trampolines
O = shoot 1 Pac-Dot (check the counter in the bottom-left, hold to charge 10x shot)
/\ = swim down (in water)
L2 = view status
R2 = toggle through camera zooms (in Mazes)
game modes:
- Quest Mode is the main mode of the game, featuring a 3-D platform adventure.
- Classic Mode features the original Pac-Man game, complete with the classic graphics and sound effects.
- Maze Mode is similar to Classic Mode, except that the Mazes are 3-D and host several different obstacles.
Extra Mazes are unlocked in Quest Mode, and you can choose to play any Maze available.
basics:
- getting hit will deplete the PacMan-like yellow gauge on the top-left. Collect yellow pieces to refill.
- last World: Mansion
sources:
Shooter: Space Shot | Simple 1500 Series 35: The Shooting
controls:
d-pad = move + adjust missile aiming range
[] = frontal shoot + lock missile aiming range
X (hold) = missiles lock-on (release to fire)
R1 = evasion boost (req. the gauge on the top, autorefills when not in use, overheats when it reaches its max) -> use to avoid collisions
R2 = "O.V.D." purple laser shot (req. the gauge on the top, autorefills when not in use, overheats when it reaches its max) -> very poverful, use often by tapping to avoid discharge too quickly
basics:
- there are absolutely to items or powerups in the game, which implements a health bar for each life (the gauge on the top-left).
- last STAGE: 5
sources:
Bravo Air Race | Reciproheat 5000
controls:
d-pad = steer
X = accelerate
O = use Nitro Boost (this can only be used three times per race)
[] = air brake (Often you may crash and explode)
triangle = Select view
L1 | R1 = tight left|right straff
sources:
Air Race Championship | AirRace Championship
Mr. Driller
sources:
Rollcage
sources:
Ehrgeiz - God Bless the Ring
sources:
Zanac X Zanac
controls:
LS | d-pad = move
O = fire sub+main weapons simultaneously
[] = fire main gun (straight)
X = fire subweapon
/\ | R1 = fire Charge Shot/Blast Mode (when the gauge on the bottom-left is full)
Start = pause and change options
Start+Select+L1+L2+R1+R2 = abort current game
basics:
- powerup the main weapon by collecting yellow capsules.
- switch and powerup the subweapon by collecting numbered items.
Best subweapon: 3 (defensive barrier, absorb bullets)
- last area/stage: 9
sources:
Time Crisis
controls (GunCon):
gun = aim
gun trigger (when not hiding) = fire (check the BULLETs in the bottom-left. Each clip holds 6 bullets)
pedal = unhide (press to hide again and reload automatically)
basics:
- getting hit by a bullet you lose 1 medkit in the bottom-left. When there are no medkits left you will game over, and you can continue from the beginning of current level (in STORY MODE only).
If the big TIME counter in the bottom runs out you will gameover as well.
- to avoid running out of time, neutralize the enemies as soon as you see them.
- last stage: 3 (STORY GAME)
cheats:
- cheat menu: wait until the main screen with the three target boxes appear. Shoot the hole in the center of the letter "R" in the word "CRISIS" twice, then shoot inside the cross hairs that are next to the word "TIME" twice . A cheat menu with life, credit, and shot options will appear. These options may be used to enable nine lives, unlimited credits, and no reload mode. Note: Your aim must be extremely precise when firing at the screen. Aiming from just off the screen is recommended.
sources:
Punky Skunk | Cooly Skunk
d-pad = move
X = jump (hold to jump higher), open paraglinder
[] = attack
O = trasform (check the icon in the top-right, trasformation icons can be found in stages and used multiple times) -> some like the snowboarder are harder to control, so switch back to the basic form for easier platforming
basics:
- getting hit will deplete the the green orbs on the top-left. Collect the same orbs dropped from enemies to refill.
- hit points can be increased by collecting pieces of tomato. Once you've got a full tomato, you earn an extra hit point (check the pieces in the top-right, next to the hit points).
- you can get extra lives by picking up an 1UP or collecting 100 stars.
- if you find a small candle item in a stage, hit it and will reveal a "W" coin that will warp you to a bonus game.
- the map can be a bit confusing: the only way to tell unbeaten stages/islands is by walking over them and checking the number of hand arrows. Beaten stages will have 2 arrows, unbeaten only 1.
- last island/world: ??
sources:
Nekketsu Oyako
controls:
d-pad = move
[] = attack, grab items and weapons on the ground
X = jump
O = super attack (consume some health)
/\ = drop weapon or enemy
2x d-pad | R1 = dash -> perform more powerful attacks while dashing
d-pad QCF + [] = special attack
basics:
- easier char: Tora
- getting hit will deplete the health gauge on the top-left. Grab food to refill.
- all the weapon have limited uses and must be aimed carefully, but they deal a lot of damage.
- last stage: 5
sources:
Ganbare Goemon: Uchuu Kaizoku Akogingu
controls:
d-pad = move, crouch, climb
X = jump, talk, interact
[] = attack (hold for a charged up projectile attack when selected)
L1 | R1 | L2 | R2 = switch weapon (check the icon in the bottom-left, projectile weapons consume coins)
Select = switch chars
/\ = skip dialogues
Start = pause (the 3 colored spheres do nothing)
controls (Impact robot):
d-pad = aim
X | [] = left|right punch (combine with d-pad down for an uppercut)
/\ = jump
O = bullets (check the counter in the bottom-right)
L1 | R1 = shield attacks
chars special abilities:
- Goemon
Charged Up Projectile Weapon: Flaming Ryo Toss -> goes through barriers, useful for hitting switches or enemies past force fields.
- Ebisumaru (blue fat ninja guy): can grab ropes
Main Weapon: Hook Glove -> used to swing on hooks and reach higher places.
Charged Up Projectile Weapon: Super Ninja Star -> bounces of off walls, useful for hitting switches in hard to reach places.)
- Goruku (barbarian guy with green hair and yellow outfit)
Main Weapon: Punch or Kick -> can break some blocks, walls and rocks.
Charged up Projectile Weapon: Boulder Smash -> can also break blocks, especially below you.
He can push / pull blocks if you make him stand next to the block and push and hold the SQUARE button, and then use the D-pad to move the block.
- Baban (space guy with sunglasses, brown hair, and white outfit): can hover in midair by holding the jump button.
Projectile Weapon: Sparkle Rocket -> Can put out fires.
Jumping, and holding the Jump button (X button) will make him hover for a short time
basics:
- getting hit will deplete the hearts on the bottom-left. Collect food or sleep at inns to refill.
- collect 4 cat fortune dolls hidden in stages to increase the max hearts.
- collect scrolls for experience points. Gradually, they will upgrade your weapons by 3 levels (check the "LV1" and "EXP" counters on the bottom-right).
- visit the inns in villages to save (the buildings with a red tent above the entrance).
Select the 3rd answer to the right and the file you wish to save.
You can also save at the mailboxes found in some places.
sources:
Ganbare Goemon: Kurunara Koi! Ayashige Ikka no Kuroi Kage
sources:
Battle Arena Toshinden
controls:
d-pad left|right = move
2x d-pad left|right = dash, backstep
d-pad up = jump
d-pad down = cruch
2x d-pad down = roll/side-step dodge move -> temp. invincibility
d-pad (opposite to the attack) = defend
/\ = hard weapon attack
/\ (near opponent) = throw
O = weak weapon attack
[] = hard kick attack
X = weak kick attack
L1 | L2 | R1 | R2 = dodge | special moves (only in EASY diff.)
L1 + L2 + R1 + R2 (when your energy bar is flashing red) = Desperation Move (only in EASY diff.)
basics:
- easier char: EIJI
- best strategy: move near the opponent, roll while he is attacking, then attack.
- unlike Desperation moves (DM), Secret moves (SM) and special moves (SP) work at any time. Some secret moves are very tricky to perform
- last opponent: GAIA (NORMAL diff.), SHO (>=HARD diff.)
sources:
Battle Arena Toshinden 2
controls:
d-pad left|right = move
2x d-pad left|right = dash, backstep
d-pad up = jump
d-pad down = cruch
L1 | L2 = roll/side-step dodge move -> no temp. invincibility
d-pad (opposite to the attack) = defend
/\ = hard weapon attack
d-pad opposite + /\ (near opponent) = throw
O = weak weapon attack
[] = hard kick attack
X = weak kick attack
2 soft|hard attacks | R1 | R2 (when your opponent is grounded) = stomp attack
/\ + O + X + [] (when the "OVERDRIVE" bar is full) = OVERDRIVE attack -> very effective, but can be blocked
L1 + L2 + R1 + R2 (when your energy bar is flashing red) = DESPERATION attack
basics:
- easier char: ?
- last opponent: MASTER
sources:
Side by Side Special 2000
controls (DualShock):
Left Stick = steer
X = accelerate
square = brake
triangle = switch camera
basics:
- easier car: MADZA FD3S RX-7 RZ
sources:
Spyro the Dragon
controls (DualShock):
LS = walk, run
X = jump (hold for higher jumps, press again when in the air to glide) -> reach distant places
[] (hold) = charge (melee) attack, run -> use against enemies with a metal shield
O = flame (distant) attack -> use against bigger enemies with weapons and bosses, activate fireworks and cannons
/\ = free look, reset camera behind, stop gliding and fall down
L1 | R1 = roll left|right -> avoid enemies attacks
L2 | R2 = rotate camera left|right
Start = pause, skip cutscenes (quickly exit current stage via "Exit Level")
Select = pause and go straight to the Inventory screen
suggested stages order:
- Artisans world
- Stone Hill
- Dark Hollow
- Town Square
- Toasty (Unlocked when you beat at least 1 level from the Artisans world)
- Sunny Flight (jump on the 5 stones near the waterfall to open the wall to enter)
- Peace Keepers world
- Dry Canyon
- Cliff Town
- Ice Cavern
- Doctor Shemp
- Night Flight (shoot the target down on a platform to enter)
- Magic Crafters world
- Alpine Ridge
- High Caves
- Wizard Peak
- Blowhard
- Crystal Flight
- Beast Makers world
- Terrace Village
- Misty Bog
- Tree Tops
- Metalhead
- Wild Flight
- Dream Weavers world
- Dark Passage
- Lofty Castle
- Haunted Towers
- Jacques
- Icy Flight
- Gnasty's World (collect 6000 Gems and then talk to Amos the Balloonist in the Dream Weavers home world to enter)
- Gnorc Cove
- Twilight Harbor (beat Gnorc Cove to unlock)
- Gnasty Gnorc (beat Twilight Harbor to unlock)
- Gnasty's Loot (complete the game 100% to enter)
- Gnorc Gnexus
basics:
- all abilities are unlocked from the start, and you can visit levels in each world in any order you like. Some levels may be locked by collectables or req. some special action to unlock.
- the dragonfly following you around shows you how many hits you can take before you die. Yellow is full health (4 hits from death), blue is 3 hits left, green is 2, and he will dissapear when you only have 1 hit left.
To regenerate your life, simply kill a sheep or random non-aggressive animal, they will release a butterfly which Sparx, the dragonfly, will then proceed to eat.
Every 10 butterflies he consumes, a blue one will appear, which brings him to full health and gives you an extra life.
- avoid water as it will instantly damage you.
- find Crystal Statues to release dragons which will give you tips and unlock a save spot with a fairy. There are 80 statues in total in the game. You only need 50 to finish the game, though.
- there are 14000 gems in total in the game to collect. You only need 6000 to finish the game, though.
Every time you enter a stage the gems count is reset and added to the dragons' treasure total.
- break purple treasures to get an extra life.
You can also earn extra lives by revisiting stages and collecting 20 silver orbs from enemies you've already defeated (check the circular gauge in the top-right).
- keys and dragon eggs are minor collectables not req. to finish the game.
Keys go to locked chests, which will then yield several gems. Much later in the game, they can also open large locked doors.
To get the dragon egg, either charge into the blue thief or burn him when you are close enough.
- each world has a Balloonist who will take you to the next world when you have met a certain requirement, such as finding a certain amount of gems or saving so many dragons. You can also use them to backtrack to previous worlds.
- slopes with arrows will make run even faster and jump higher (supercharging).
- group of 3 fairies in pits will grab you when you fall and carry you in certain spots of the stage.
- in flight stages you have 30s time limit to collect 8x4 objects (fly through rings and gates, destroy chests, planes, etc.). While flying press L1 to do a 180-flip, and R1 to do a 360-flip.
- the big purple fairy will kiss you and temp. powerup your flame attack (can now destroy metal and armour).
Also, there's a orange fairy which grants you permenant powerflame while you are in the level.
sources:
Spyro 2: Ripto's Rage! | Gateway to Glimmer
controls (DualShock):
LS = walk, run
X = jump (hold for higher jumps, press again when in the air to glide), paddle underwarter (if purchased) -> reach distant places
[] (hold) = charge (melee) attack, run, dive underwater (if purchased)
O = flame (distant) attack, spit objects -> activate switches
/\ = free look, reset camera behind, stop gliding and fall down, talk
[] + /\ = headbash attack (if purchased) -> destroy ... blocks
L1 + R1 = quick reset camera behind
L1 | R1 | L2 | R2 = rotate the camera left|right
Start = pause, skip cutscenes (quickly exit current stage via "Exit Level")
Select = pause and go straight to the Inventory screen
basics:
- use the charge attack against metallic or shielded enemies. Use the flame attack against bigger enemies.
- water is no longer deadly like in the prev game, but you cannot use the flame attack while underwater.
- collect colored Gems to buy new abilities and unlock new areas from Moneybags.
- talk to the NPC at the start of most levels to obtain a mission. Complete the mission to obtain a Talisman (at most 1 for each level, 14 in total).
Once all the talismans have been collected in each world, you will be taken to face the boss.
After defeating the boss, you will be taken to the next homeworld. You can get between homeworlds via portals.
- completing side-missions from NPCs in levels will grant you Orbs. Some Orbs can also be found hidden in secret places.
There are 64 Orbs total in the entire game, but only 40 are required to finish the game.
Collecing Orbs will also unlock new areas.
- many levels feature powerup "gates" which give you temp. abilities to complete certain missions. Powerup gates are at first inactive, but become available once you have defeated a certain number of enemies within the level (check the number shown over the gates).
- the game autosave everytime you enter/exit a stage. But you can also save manually in the pause menu.
cheats (pause the game and enter the following):
- All Abilities: Circle, Circle, Circle, Circle, Square
- Extra Hit Point: Square, Up, Square, Down, Square, Left, Square, Right, Circle
sources:
Crash Bandicoot
controls:
d-pad = move
X = jump (hold when bouncing on arrow boxes and enemies gets you more height)
[] | O = spin attack
/\ = toggle status OSD
Start = pause (press Select to return to map)
basics:
- you enter each level from a map, where the aim is to get to the portal to unlock the next level.
- each level has crates, offering fruit and powerups, and a few checkpoints along the way.
You can also have 1-hit protection from Aku Aku, which you get from crates.
- you defeat enemies by jumping on their heads or spinning.
Spinning is usually better, since you can hit multiple enemies in a row.
- you die with a single hit unlsss you have the mask protection.
- collecting 3 symbols enters you into a Bonus Round. There are 3 different types of symbols, offering different bonus rounds. Tawna allows you to save, Brio allows you to get more lives and fruit and the rare Cortex bonus rounds gets you Keys.
- to earn the Gems you must make it through a level without losing a life and by finding all of the boxes.
- last island: Cortex (3rd)
sources:
Crash Bandicoot 2: Cortex Strikes Back
controls:
d-pad = move
X = jump (hold when bouncing on arrow boxes and enemies gets you more height, or while crouching)
O | R1 = crouch (while standing), slide (while running), body slam (while in midair)
[] = spin attack
/\ = check inventory
Start = pause, check status and change options
basics:
- you die with a single hit unless you have the the Aku Aku mask (up to 2).
Collect a third mask to become invincible for a short period.
These masks can't protect you from things that instantly kill you.
- you will find 1 purple crystal in each stage, collecting all of them is required to access the world boss.
- if you break all of the boxes on a level you will get a Silver Gem.
Gems are not needed to beat the game, but the colored ones
(Which you get in different ways) open up new paths in levels and you get to see a new ending when you finish the game with all of them.
- last Warp Room/world: 5
sources:
Crash Team Racing | CTR
controls:
LS | d-pad = steer (combine with [] for tight turn, or R1 for Power Sliding)
X = accelerate
[] = brake
LS | d-pad down = reverse
R1|L1 = hop/jump
O = use powerup (run into "?" crates to obtain. More powerful when you have 10 Wumpa Fruits)
L2 = toggle view
R2 = rear view
/\ = toggle Map/Speedometer
basics:
- in Adventure Mode, Trophies are obtained by finishing in 1st place in a trophy race.
The next race is hightlighted as a blinking dot on the map in the bottom-right.
Collect all 4 trophies in each area to open up the boss garage for that area.
Boss Keys are obtained by beating the Boss of each area.
After beating the area boss, Relics and CTR Tokens are also unlocked.
- Relic races provide access to an alternate game ending if all 18 are collected.
- Red, Green, Blue and Yellow Tokens are obtained by finishing in 1st place in a token race, much like a trophy race. However, this time the player must also collect the 3 letters 'C', 'T' and 'R' in addition.
The Purple Tokens are awarded for beating the Crystal Bonus Rounds by collecting 20 Crystals within a certain time.
Gem Cups are unlocked after winning four CTR Tokens of the same color. These are played similar to the cups in Arcade mode, where players are awarded points across 4 tracks, with the winner being the one with the most points at the end. Winning a Gem unlocks a character, corresponding to the Gem Color.
- Arcade Mode acts like a GP mode, where you can unlock higher difficulties and extra maps for battle mode.
- collect Wumpa 10 Fruit during each race to make your kart go slightly faster and powerup your weapon/items.
- you can get a speed boost:
- at start: press the accelerator button until the moment right after the 3rd red light illuminates.
- by pressing R1 on the top of a ramp.
The longer the player is in the air, the bigger the speed boost will be when the kart lands.
- by pressing the opposite hop/jump button (R1|L1) after a while of power sliding.
When you enter a drift, several indicators will inform you when you're able to utilise a speed boost. The smoke coming from the exhausts will turn black, the tyres will glow as if red hot, and a meter in the bottom right-hand corner of the screen will fill up.
You can repeat this up to 3 times per power slide.
Power Sliding for too long causes a spin-out.
sources:
Gex
controls:
d-pad left|right = walk
L1 (hold) = run -> use for longer jumps
circle = tail whip attack
square = tongue lash, special attack (if you have collected some powerup) -> snag gold flies, bugs and powerups in mid air
X = jump
d-pad down (hold in midair) = tail bounce -> attack enemies from above, destroy some blocks, breach high platforms when hitting enemies
basics:
- you can disable the annoying voice in the Options.
- wall stick: jump while pressing the d-pad against a wall's surface and you will stick with your suction cup paws.
you can stick & crawl up the sides & faces of walls & buildings.
you can spin attack while sticking with circle.
You can also stick to some BG wall surfaces.
- tailwhip powerballs for 1 health point (the green hearts in the top-right)
or eat them with square for special powerups.
- tailwhip cameras to switch secret tiles on and off.
- pick up 100 golden flies and you'll gain an extra life.
- find a tape in some stages to get a password when you exit. This is the only way to save.
- near the end of each stage you'll find a TV remote on a pedestal to exit.
Don't exit the level if you haven't found any remote or you'll have to repeat the level again to unlock the next one.
Press Select in any world map to use a remote and try to unlock a stage (if you aren't in the right world it won't work).
Locked stages appear as TVs powered off. Incomplete stages have static on them.
- last world: REZOPOLIS (5th) (to go to the Secret World Planet X, find the bonus round in each world and get a PERFECT on each of them)
sources:
70's Robot Anime Geppy-X
controls:
d-pad = move
square = shoot main weapon (hold to charge, getting hit reset the charge)
X = shoot sub weapon (hold to charge, getting hit reset the charge)
circle (+ not firing with other weapons) = switch facing direction
triangle (when the X-Power bar is filled + not firing with other weapons) = bomb-attack
R1|L1 (+ not firing with other weapons) = switch mecha
basics:
sources:
Gaiaseed | Gaia Seed - Project Seed Trap
controls:
d-pad = move
[] | X = shoot
O | /\ (when the red gauge at the bottom-right is "READY") = bomb-like "INTENSE FIRE" attack (diff. for each weapon) -> destroy enemy bullets, but no temp. invincibility
basics:
- each life comes with an energy bar (the blue "SHIELD POWER" gauge on the bottom-left) that can withstand a determined number of hits and gets regenerated automatically as long as you're able to go on unscathed.
- main weapons consist of vulcan (red) and laser (blue), switchable by taking the respective color-coded cycling icon. There are also two auxiliary weapons: green shoots out four slow-moving outward projectiles and yellow sends out two similar alternating projectiles that cause minor explosions upon contact. Both are also switched by taking the respective cycling item.
Main weapons can be upgraded 3 times by sticking to the same color, auxiliary weapons have no upgrades at all. Dying strips the ship off the auxiliary shot and reduces the main weapon power by one level.
- last stage: 7 (to get the good ending let the last 2 bosses timeout)
sources:
Airgrave
controls:
d-pad = move
X = shoot vulkan + ground missiles at fixed distance
[] (if enabled in the options) = toggle lock-on ground targets (disable ground missiles while active and reduce main weapon firing rate)
circle (when 1 slot of the "OD" gauge on the top-right is full) = activate the bomb-like "overdrive" attack (refilled by destroying ground enemies)
basics:
- best char: Randy (slowest, but has the best spread)
- items released by destroying slow-moving shuttles include shot powerup (red), ground chain-up (yellow) and shield energy recovery (blue).
4 red items maximize firepower, the amount of possible ground lock-ons is shown in the "AF" counter in the top-right and the max amount of SHIELD at any given moment is 6. SHIELD depletion means GAME OVER, so don't miss blue items and do your best to keep that meter healthy (note that players recover one health point at the start of every level). These items can also be exploited for survival because there's a short moment of invincibility that comes with the moment they're picked up.
- you can enable auto-aiming mode for ground missiles in the options by setting the "GROUND/AIMING" button (slower than regular shot, only for experienced players).
- last area: 8
sources:
Road Rash 94
controls:
d-pad = steer
X = accelerate
2x X = max throttle | pop wheelies
2x X + d-pad down = nitro (Level 3 bikes only)
square = brake
circle = attack, grab weapon from opponent (when he attacks)
circle (tap) + circle (release) = jab-a quick punch
d-pad down + circle = kick
d-pad down + circle (tap) + circle (release) = quick kick
triangle = cycle weapons (if available)
R2 = look back
L2 = zoom back
L1 | R1 = gradual turn left | right -> not very useful
L1 | R1 + d-pad = super steer left or right -> not very useful
Select = cycle camera view
basics:
- select the "Big Game Mode" in the restroom to play the career mode and save your records.
"Trash mode" = arcade mode
- last level: 3
sources:
Night Raid
controls:
d-pad = move
[] = shoot
X (tap when the WAVE bar at the bottom-left is full) = "HUG-LAUNCHER" = the ship will freeze on place and a doppelganger made of energy will be thrown against the enemies. If it hits an adversary before the bar is depleted, it will start bouncing around -> destroy bullets + temp. invincibility
O = bomb (check the green dots above the the WAVE bar)
basics:
- the hitbox is the tiny circular form radianting at the centre of the ship when the doppelganger roams around, and only bullets can damage you, collisions are unharmful.
- the standard attack can be powered-up 3 times with the orange cubes.
After the 1st powerup holding down the shot button will cause the attack to sweep the screen.
- the hug launcher can be controlled with the joystick.
- last stage: 6
sources:
Gunbare! Game Tengoku - The Game Paradise 2
controls:
d-pad = move
[] = main shot
O = missile shot (lock with the crossair first)
X = bomb (check the "B" icons in the top-right) -> temp. invincibility
R1 = autofire main+missile shot
menu translation:
NORMAL GAME
MAIN GAME
(pick one stage)
SUPPORT MODE: NO -> if yes enable 2P guncon
SHOP -> spend eggplants here to unlock stuff
OMAKE (check unlocked extras)
TIME ATTACK MODE
TRAINING (ultimited time)
TIME ATTACK
HISCORE RANKING
SAVE - LOAD
SAVE
LOAD
OPTIONS
CONTROL SETTING
GAME SETTINGS
DIFFICULTY NORMAL
AUTO BOMB OFF
RETURN? OFF
SOUND MODE STEREO
VIBRATION YES
GUNCON ADJUSTMENT (for 2P)
basics:
- best beginner ship: SELIA (has spread shot)
- collect "P" items to powerup your main weapon (check current level in the top-right bar).
When you die you only lose 1 level.
- once a stage is completed, instead of starting the next you go to a highscore table and the you can pick the next stage.
- last stage: 6
sources:
iS - Internal Section
sources:
RayStorm | Ray Storm | Layer Section 2
controls (MANUAL):
d-pad = move, aim lasers
[] = fire main weapon
X = fire lock-on lasers
/\ = fire special weapon (when the "SPECIAL" gauge on the top-left is full, destroy enemies to refill)
basics:
- in the American release, the default difficulty is 2 steps higher than its Japanese counterpart. Credits are also limited which sucks. You can adjust the difficulty per level and starting lives but anything under normal forces the game into Training Mode which ends after stage four.
- crystals released by red-colored enemies add to the ship's power and lock-on arsenal.
The main shot receives an upgrade for every 3 red crystals or a single yellow crystal collected, whereas each green crystal increases the maximum possible lock-ons by one.
Dying strips you off a single level of both firepower and lock-on
- last stage: 8
sources:
Raycrisis: Series Termination | Layer Section 3
controls:
d-pad = move, aim laser
[] = fire main weapon
X = fire lock-on laser
O = bomb (when the "ROUND DIVIDER" gauge on the bottom-left is full and "USABLE", recharged by destroying enemies)
basics:
- easier ship: WR-03 (has homing regular shots)
- you die with a single hit, 1UP items can be obtained only in Special mode and are not rare.
- killing enemies and collecting powerups will deplete the Encroachment Meter in the upper-right.
If it reaches 100%, the screen will waver and fade, then the Last Boss will come out right away, ending your playthrough.
- powerups dropped from enemies are:
- red pyramid = powers up your shot 1 step.
- green diamond = raises your lock-on capacity by 1 unit.
- blue star = raises shot power 3 steps and adds 3 units to lock-on capacity (different than Raystorm, where it maxed your abilities.)
- last stage: 7
sources:
Wipeout
controls:
d-pad left|right = steer
d-pad up|down = adjust pinch -> press up when airborne, down when going downhill
X = accelerate
circle = fire weapon
triangle = change view
L2|R2 = left|right airbrake
L2+R2 = brake -> not very efficient, use seldom
basics:
- even the slightest impact with the side of the track will bring you to a dead halt, regardless of whether you skimmed it or ploughed straight into it.
As a result of this unforgiving stance on wall impacts, this is easily the most difficult game in the whole series.
- to unlock Rapier class and Firestar track, win Venom championship and Rapier championship without activate any cheat.
sources:
Wipeout 2097 | Wipeout XL
controls (NeGcon):
twist = steer
...
controls (digital):
d-pad left|right = steer
d-pad up|down = adjust pinch -> press up when airborne, down when going downhill
X = accelerate
circle = fire weapon
square = discard weapon
triangle = change view
L2|R2 = left|right airbrake
L2+R2 = brake -> not very efficient, use seldom
basics:
- your craft can only take a certain amount of battering before it will be destroyed.
The purple bar below the thrust indicator shows you the status of your shields.
To recharge your energy, you will need to fly through the red pit lanes.
- to unlock extra tracks, get golds in the first 6 tracks, then win Challenge I and challenge II.
sources:
Rescue Shot
controls (Guncon):
gun = aim
trigger = shoot -> shooting near the feets makes you jump, shooting at the head make you crouch and stop for a while.
A = switch to bomb-like acorn bullets (check the counter in the bottom-left), skip cutscenes
B = pause
basics
- getting hit will deplete the red hearts on the bottom.
Life is restored by eating food (do not shot the food items or you will get points instead).
Avoid eating poisonous food.
- collect 10 round crystals for an extra heart.
- last stage: 4 (10 levels)
sources:
Project: Horned Owl
controls (Guncon):
gun = aim
trigger = shoot (hold for a charge shoot, check the AMMOs left on the bottom-left, shot outside the screen to reload)
A = grenade (limited uses, check the icons in the bottom-left)
B = pause
basics:
- getting hit will deplete the "SHIELD" gauge on the bottom-left.
There are no midstare refills, the SHIELD and GRENADEs are fully refilled after each stage.
- last OPERATION/stage: 5
sources:
Elemental Gearbolt
controls (Guncon):
gun = aim
trigger = shoot
A = switch weapon (check the icon in the bottom-left) -> use the initial Fire weapon most of the time as the other weapons are not very powerful. The Lightning weapon has an homing ability, but it takes too much to kill enemies.
B = pause
basics:
- in the US version the default difficulty "Training" will end the game at stage 3.
- getting hit will deplete the blue crystals on the bottom-left.
Shoot green potions to refill.
If you die yuo must restart the stage from the beginning.
- coins and fairies provides extra points, that can be used to levelup your stats in trade off screen in-between acts.
- last Act/stage: 6
sources:
Castlevania Chronicles | Akumajou Dracula: Castlevania Chronicle
controls (TRIGGER FLIP NORMAL):
d-pad = move
X = jump (can change the direction of the jump on mid-air)
O | [] = whip (can whip downwards while jumping)
d-pad up + circle | square = use current item (req. hearts)
Start = pause
Start + Select = soft-reset game
basics:
- to open the time attack mode, just beat the game on the arrange mode.
- press L1+R1 while selecting the arrange mode to choose the original X68K OST to play during the game (otherwise the new arranged OST will play).
In original mode, it defaults to the FM synthesizer module.
- differences from NES Castlevania:
- no knockbacks in arrange mode (you'd just hop in place when hit)
- you can change the direction of the jump on mid-air
- you can use the whip downwards while jumping
- anytime you run out of lives you are given the option to save, continue, or quit.
- last stage: 24 (block 8)
sources:
Castlevania: Symphony of the Night | Akumajou Dracula X: Gekka no Yasoukyoku
controls:
d-pad left|right = move
2x d-pad left|right = run (Belmont only)
d-pad up|down = move elevators
X = jump (Alucard only can double-jump, Belmont will do a backflip if pressed quickly)
d-pad down, X = slide (Belmont only) (press X again to do a flying kick)
d-pad down, up + X = high jump (Alucard only, must have a special item to perform this)
circle | square = uses whip
circle | square (hold) + d-pad = brandish whip (Belmont only)
d-pad up + circle | square = use current item
triangle = back dash (Alucard only) | item crush (Belmont only)
L1 = transform into Mist (Alucard only, must have the Relic)
R1 = transform into Bat (Alucard only, must have the Relic)
R2 = transform into Wolf (Alucard only, must have the Relic)
Select = show the map screen
Start = pause
basics:
- the easiest way to increase your levels of power is to take down the Guardian monsters.
The best way to handle them, though, is to walk in swinging a sword. Normally the Guardians will put up an invincible shield in front of them.
Walk up with the Alucard's Shield out, and hit their shield in order to engage your invincibility. Then walk on through, plant the Shield in them, and let it eat them up.
- if you want to go back to the normal castle, there are 2 ways to do it. The 1st is to stand on the teleporter behind Dracula's Throne Room, and press Up.
The 2nd is to use a Library Card, which warps you back to the Long Library in the normal castle.
Once you're back in the normal castle, you can only get to the inverted castle by returning to the teleporter behind the throne room.
All of the secrets that were in the normal castle are in the inverted castle.
- to get the best ending beat Count Dracula with more than 196% of the castle cleared.
- visit the Master Librarian with a CLEAR savegame and he'll sell the Duplicator for $500.000, which allows you to use single-use items indefinetly.
sources:
G Darius | G. Darius | G-Darius
controls:
d-pad = move
circle | R2 = shoot main weapon + bombs
square = rapid fire shoot main weapon + bombs
X = fire a CAPTURE BALL (req. 1 purple orb in the bottom-left) -> once captured, the enemy will follow your ship and execute various attacks. If it misses it won't cost you a ball. After taking some damage the captured enemy will disappear.
X (while having an enemy captured) = bomb attack
circle (hold while having an enemy captured) = charge up the Alpha Beam -> use to counter bosses Beta Beam
powerups:
- red orbs = increase your main weapon level (up to 3, with 7 sublevels)
- green orbs = increase your bomb level (up to 3, with 4 sublevels)
- blue orbs = increase your armor level (up to 3, with 6 sublevels)
- purple orbs = add 1 to your stock of Capture Balls (up to 6)
basics:
- each captured enemy will provide different additional attacks and protection from some bullets.
Special enemies to capture are "GUARDIANS" (mid-stage bosses, which must take some damage before they can be captured).
- when you die your weapons keep their current levels, but all sublevels are lost.
In the "Beginner" and "Boss" modes, there is no power down until you continue. Also, in those modes, a new ship starts equipped with the max armor.
- last STAGE: 5 (the higher route is easier, but has lower scoring opportunities)
sources:
Gradius Gaiden
controls:
d-pad = move
triangle = rapid shot+missile
square = powerup (check current powerup in the bottom-left bar, collect red capsules to switch)
X = shot
circle = missile
basics:
- best ship: Falchion Beta (purple, has AIMING top shots) + GUARD shield
- "?" is your shield. There are 4 types of shield, and you select one right after choosing your ship. They are:
- Shield = the basic Gradius shield. 2 large blue barriers attach themselves to the front of your ship. They can take 12 hits before being destroyed, but they only protect the front of your ship.
- Force Field = creates a force field that can protect your entire ship from up to 3 hits.
- Guard (best one) = creates two bumpers that rotate vertically around your ship. They can protect your ship from up to 3 hits from above or below, but its more useful function is the total immunity it grants from geographical features. Note that the bumpers take damage only from enemy fire, no matter how much you try to fly your ship into walls.
- Limit = gives you total invincibility to everything. Enemy fire, enemy collisions, walls, ceilings, floors, etc, but lasts only 3s.
- last STAGE: 9 (2 loops)
cheats:
- Power Up: While paused press Up, Up, Down, Down, Left, Right, Left, Right, X, Circle
- unlock Free Play Mode: Accumulate at least ten hours of play on any difficulty, then save the game.
- unlock Level Select: Beat the game on Normal difficulty without using any continues.
sources:
R-Type Delta
controls:
d-pad = move
O | R2 (hold) = rapid-fire main weapon
[] = fire main weapon (hold to charge, check the "BEAM" meter on the bottom)
X = send the Force pod (tap again to recall and dock in front or the back of your ship) -> the pod will attack enemies automatically
/\ = bomb-like "Delta Weapon" (req. the "DOSE" meter on the bottom-left at 100%. It fills up as you use the Force to destroy enemies)
L1 | L2 = speed up|down
L1 + L2 + R1 + R2 + Start + Select = soft reset
basics:
- best beginner ship: RX + blue homing weapon
- each ship has 3 diff. colored weapons (but without any level powerup).
- there are also "M" orbs for missiles (maxed out after 2 pick-ups) and bits that hover above and below the ship for additional firepower.
- the pod is immune to enemy shots, so don't be afraid to get close to them when the screen is filled.
- last STAGE: 7
cheats:
- invincibility: pause during gameplay, hold L2 and press Right, Right, Left, Right, Left, Left, Right, Left, R2, Up, Up, Down, Down, Up, Down, Up, Down, R2
- Refill Dose Gauge to 99.9%: while paused hold L2 and press Left, Right, Up, Down, Right, Left, Up, Down, Triangle
- unlock Stage Select: Use the Delta Weapon for a total of 10000 times
- unlock Free Play: Spent 6 hours of gameplay
sources:
Einhander | Einhaender
controls:
d-pad = move (despite the camera rotating, you will always be moving on a single plane)
L2 | R2 = switch speed down | up
square = fire main weapon (Arm 1)
X = fire Gunpod (Arm 2) (limited ammos, refill by collecting the same Gunpod) -> whenever your ship finds itself stuck without any gunpods, you can use its manipulator arm to attack and defect small bullets as a last resort, but the arm functions poorly at both of these capabilities.
O = switch Gunpod position -> changes the firing direction
L1|R1 = switch Gunpod (check the letters at the bottom-left)
Select = toggle HUD on/off
Start = pause and check remaining lives
basics:
- best ship: Endymion FRS Mk.II (can carry 3 gunpods)
- getting hit on the main ship will kill you instantly, while hits on the pod will only damage the pod itself (when flashing red a single hit will destroy it).
- in every stage, you can collect up to 3 S.Bonuses by fulfilling specific requirements such as destroying all the neon building signs in the first stage.
Collecting all of the S.Bonuses awards you extra points and some will allow you to travel through new area of the stage
- last stage: 7
sources:
Ray Tracers
controls:
d-pad = steer
X = accelerate
[] = brake
O = use nitro (check the blue gauge on the bottom-right, there are no midstage refills)
/\ = switch camera
R2 = rear view
R1|L1 = switch gear
basics:
- to finish each stage/mission, you must reach the boss within the time limit (check the timer on the top-left).
You get some extra time when you reach the boss for the first time.
- crashing into obstacles won't slow you down and will give you extra points.
- last mission: 7
sources:
Valkyrie no Bouken: Toki no Kagi Densetsu - Namco Anthology 2
controls:
d-pad = move
x = jump
square (tap) = shoot
square (hold until a familiar appear) = use magic (if you have it, check the blue spheres in the bottom-right)
triangle = shield
circle = run (hold), talk, open chests
R2 = crouch
Start = pause and open equipment menu (activate temp. weapon powerups)
basics:
- to pick the game from the main menu, click the icon the top-right.
- weapon powerups are all temporary, open the pause menu to activate them and check the gauge in the top-left.
- forest maze: https://www.youtube.com/watch?v=PAFBMotjVDM
- last stage: 13
sources:
Wolf Fang: Kuuga 2001 | Rohga: Armor Force
controls:
d-pad = move
circle | square = jump
R1 | d-pad down + circle | square = dash
X | triangle = shoot main weapon (hold for fixed aim)
X | triangle (close to an enemy) = melee weapon
R2 (when the CHARGE bar at the top left is full) = use sub-weapon
L1 | L2 (hold) = fix aim
weapons powerps (shot to cycle):
- V = Vulcan = rapid-fire, spread-shot auto-cannon
- C = Cluster = green circulating shots that it spreads the further it travels.
- G = Grenade = slow firing and not wide range, but powerful and has the unique ability to destroy most enemy shots.
- L = Laser = fires in a straight line, not wide range
basics:
- best mecha: TYPE-A
- once you run out of health, your robot will get destroyed, but your pilot will eject and continue the fight.
One hit will kill you in this form, but you can attempt to wage a final stand and perhaps rebuild it.
- last mission: 6 (play the hard missions to see the good ending)
cheats:
- stage select. in the Option Menu, set the Level setting to LESS, then LESS, then VERY FAST. Then, set BGM to 2. This should add a new game mode ending with a +.
sources:
Harmful Park
controls:
d-pad = move
[] = shoot
/\ = bomb-like special shot (diff. according to current weapon, req. an "S" icon in the top-left. Special items appear at fixed locations.)
X | O = cycle prev|next weapon
R1 = quick switch potato weapon
R2 = quick switch ice cream weapon
L1 = quick switch pie weapon
L2 = quick switch Jelly weapon
weapons:
- POTATO = standard rapid fire bullet weapon
- ICE (ice cream) = laser
- PIE = slow, but travels at an arc and can cause great damage if they hit
- JERRY (jelly) = homes in on enemies on the screen, but it's rather weak -> safest one
basics:
- each weapon can be powered-up individually up to 3 times by collecting "P" items.
Getting killed will downgrade your current weapon by 1 level, or remove it.
- all enemies destroyed with the same projectile add to an instantaneous multiplier that can reach x16.
The potato gun is excellent for survival but extremely poor for scoring, whereas ice is the perfect choice to get multipliers from streamlined enemies.
- diamonds only provides extra points.
- last stage: 6
cheats:
- stage select: highlight Exit in the options menu. Then press, R1, R2, L1, L2, R1, L2, followed by Circle to access a Test Mode menu.
sources:
CyberSled | Cyber Sled
controls:
d-pad = move backward, forward, slide
L1 | R1 = turn left | right
X = fire machine guns (they overheat after a while)
square | circle = fire missiles (check the orange icons below the radar)
Select = change camera
basics:
- there are missiles refills on the stage, the number you can carry depends on your sled/char.
- always wait the missile lockon to became red before firing them.
- last round: 11
cheats:
- unlock extra sleds: At the title screen press Up, Left, Down, Right, Up, Triangle, Up, Right, Down, Left, Up, Circle
sources:
The Adventure of Little Ralph | Chippoke Ralph no Daibouken
controls:
d-pad = move, crouch
X = jump
[] = sword attack (combine with d-pad down in midair for a downward strike)
[] (hold) = charge swing attack -> can repel most projectiles, good to use against multiple enemies in series
powerups:
- blue sword = increase range
- red sword = throw a small ball of fire
- shield = protect against 1 hit (add a glowing blue ball around you, can have at most 1)
- white bird-like = companion that throws small projectiles (can have at most 1)
- hearts = collect enough to get an extra life
- Ralph's heads = 1 extra life
basics:
- switch difficulty to Normal to play all the levels. Easy will end on stage 5.
- during many of the boss fights in the latter half, the game turns into a one-on-one 2D fighter with nice, big sprites. Suddenly, your jump button is replaced with a secondary attack, up turns into your jump and back becomes a block, and familiar fighting game motions like the Hadoken and Shoryuken result in similar actions from the not-so-little Ralph.
- complete a level in any rank/difficulty and you will be able to start from it in the title screen.
- last stage: 8-3
sources:
Kahen Soukou Gunbike: Speed Power Gunbike
controls:
d-pad left|right = turn
d-pad up|down = change in and out rally mode
X = accelerate
circle = brake
square = change in and out mecha mode + dash attack
triangle = swing blade (in robot mode), handbrake (other modes)
R1 | L1 = power sliding around corners
Select = show radar (will point you in the direction that you should be headed in) -> pretty useful, you will get lost without this!
Start = pause
basics:
- you must clear a stage by reaching its finish line before your "ANERGY" runs out, and then battling the corresponding boss creature/machine in an individual stage.
- by hitting 2 or more enemies or barriers in a row, you will rack up "Rush" combos. The faster you are going before you switch into Robot mode, the longer and more powerful your Robot Dash Attack (also called a "Gun" attack) will be. To encourage attacking this way, and discourage staying in Robot mode all the time, a player can only accelerate in Robot mode for so long before they are forced to stop from overheating.
- while in Bike mode it is possible to be knocked off either by land mines or enemy fire. After being knocked off, the character will have to run back to his or her Gunbike in order to get back on. There is a countdown (a "Compulsive Restart") that starts at 15s and if the character has not reached his or her bike within that amount of time, s/he will automatically be placed back on the bike.
- when the road is clear stay in bike mode (fastest), when you see some obstacles immediately switch to rally mode. When there's enemies in front of you switch to robot to hit them without stopping. When they are passed immediately switch back to rally.
sources:
Panzer Bandit
controls:
d-pad left/right = move
d-pad left/right (x2) = dash
d-pad up = jump (while in air-jump again)
d-pad down, up = super jump
L1/R1 = switch between foreground and background
X = weak attack
square | L2 = heavy attack
Left/right + square = throw/grab
triangle = attack on both sides (drain some of your special meter)
circle | R2 = special (drain some of your special meter)
(no input) = block
Start = pause
menu translation:
Story Mode
VS Mode
Options
Story Mode
Difficulty(Easy, Normal, Hard)(Default being Normal)
Lives(0-5)(Default is 3)NOTE:You cannot get any more lives in any other way!
Marker(shows sign where you are during Story Mode)
VS Mode
Time Limit(00-80)(Default is 00)
Win Requirement(1-2)(Default being 1)
Marker(shows sign where you are during Story Mode)
Options
Sound (default=stereo)
Key setup
Memory Card
Load
Save
recommended stage order:
??
basics:
- to enable vibration, from the main menu, select Story Mode (first option) and then Record. Once in the Records menu, hold down Start and input: Left, Right, Circle, Square.
- best beginner char: Kou (automatic combos)
- Super Moves can be performed when special meter is glowing yellow (char-specific)
- if you're thrown, you can recover quickly or gain control again by moving the D-pad and hitting the buttons.
- throughout the game there will be boxes. In them can be red or blue crystals or heart capsules.
The red crystal grants you invulnerability for a limited time (glowing red), the blue one automatically fills your special meter.
- last stage: 8
sources:
Rayman
controls:
d-pad = move
X = jump (press again in midair to hover)
[] = punch (hold to charge -> use to break the Electoon cages)
O = run (when you have obtained the power), plant seeds (when you have some)
L1|L2 = crawl left
R1|R2 = crawl right
basics:
- getting hit will deplete the orange orbs in the top-left. Collect "P" capsules to refill.
- collect as many "Tings" (blue orbs) as you can. They not only give you free lives, but also lead the way to hidden cages and powerups.
- at times you may hear a strange noise that means that something special has appeared.
You might not always be able to see this gift immediately, but it won't be far away.
Don't be afraid to retrace your steps because it could be a cage of Electoons.
Each level in the game has 6 cages which fill up a medallion as you find them (also shown in the map).
- to finish a stage you must touch the "!" sign at the end.
- last stage: CANDY CHATEAU - MR. DARK'S DARE (req. all the 102 cages destroyed before it can be accessed)
cheats:
- 99 lives and full Health: withe the game paused, hold in the following order L2, R1, L1, R2 and release in the order L1, L2, R2, R1. Then press and release Circle. Then hold in the following order Left, Circle, Square, Triangle and release in the order Left, Triangle, Square, Circle. Your lives should increase to 99 and health to full.
passwords:
Pink Plant Woods L8W8Z9LW9M
Bongo Hills B0D4?HL29X
Eraser Plains DW44?1!CN7
Gong Heights B04DG13L9K
Mosqutios Nest L044Z9LNHM
Mr Sax's Hullabaloo B0D4?R33HP
Mr Stone's Peaks 49DN?1!!WF
Swamp of Forgetfullness L04JPHLW9M
sources:
Kid Klown no Crazy Chase 2: Love Love Honey Soudatsusen
controls:
d-pad = move
X = jump
[] = dash
[] + direction + X = long jump
Start = pause
basics:
- see the rules of the SNES prequel
now you can proceed to the next stage without all the cards
- last stage: 16
sources:
Umihara Kawase Shun
controls:
d-pad = move, reel in/out
X | Triangle = jump
Square | Circle = throw hook
L1 | L2 | R1 | R2 = throw hook diagonally
practice menu translation (appears when you select a stage):
return
play
load current records (press Circle to confirm)
save current records (press Circle to confirm)
quit to main menu
ingame Replay Menu translation (access by pressing Start, and then Select):
return
save replay
delete replay
quit game (press Circle to confirm)
basics:
- ending fields: 30, 43, 52, 55
- fields you visit in the main story mode becomes available in the practice mode.
However, you can't resume story mode from where you left.
sources:
Jupiter Strike | Zeitgeist
controls:
d-pad = move
[] = shoot
X = activate lock on laser (release to fire)
O = change view
basics:
- getting hit will deplete the circular "SHIELD" gauge on the bottom-right.
- lasts stage: ?
sources:
Ninja Jajamaru-kun: Onigiri Ninpouchou
controls:
d-pad = move, strafe
X = jump
[] = attack
O = bomb-like "Onigiri Ninpo" special attack (check the counter in the bottom-right. Collect scrolls to restock)
R1 | R2 = aim right
L1 | L2 = aim left
basics:
- to finish each stage you must reach the purple exit gate within the time limit.
- you die with a single hit when you have the red vest. Pick the potion to turn green and get 3-hits protection.
- you can obtain temp. invincibility:
- if you pick up a frog scroll when you have no Onigiri Ninpo you will turn into a Giant Frog. As the frog you can just jump on the enemies to kill them.
- pick up the scroll with the two stick figures on it. You will then turn into 3 shadowy figures.
- enemy spirits, gold tablets and the cat icon only give you extra points.
- last level: 12
cheats (input this buttons on title select or main menu):
- Invincibility: Left,Triangle,Square,X,Circle
- Stage Select: Left,Left,Left,Circle
passwords:
Final level DSOL
Level 10 CKOM
Level 11 UIKW
Level 2 EYAB
Level 3 KREH
Level 4 VWAC
Level 5 NNIV
Level 6 LUFG
Level 7 YGUP
Level 8 MTEN
Level 9 PRAK
sources:
Jumping Flash
controls:
d-pad = move
X = jump (press again up to 3 times in midair)
[] = shoot
O = use a special item (check the icons in the top-left slots)
R1 = look around (hold while jumping to keep facing forward)
basics:
- to finish each stage you must collect all the Jetpods (shown on the map as red blinking dots)
and reach the EXIT gate within ths time limit (shown in the top-left).
Collect the hourglass item for some extra time.
- getting hit by enemies will deplete your HP gauge on the bottom.
Use "HP Charge" or "HP Max" items to refill.
- you can kill enemies by shooting or jumping over them (the longer you fall, the more damage).
They respawn after a while, so don't waste your time trying to kill everything you see.
- last World: 6
cheats:
- Level Select: at the main menu press Up, Up, Down, Down, X, X, Left, Right, Left, Right, X, Triangle, X, Triangle
sources:
Jumping Flash 2
sources:
Jumping Flash 3 | Robbit mon Dieu
controls:
d-pad = move
X = jump (press again to double-jump)
square = regular fire
circle = use special item (in you have it in the upper left side of the screen)
R1 = gunsight, look around (standing still)
menu translation:
From the beginning
Continue
Load
Settings
Sound settings
Control settings
back
Credits
mission menu:
view request form -> start mission
view training table
change equipment
special weapon
jump: automatic | manual
A1 mount?
dot cards (view cards collected in stages)
system
save
load
go to title screen
basics:
- when jumping, check your landing point with the shadow
- constantly check the remaning mission time
sources:
RockMan Battle & Chase | Mega Man Battle & Chase
controls:
d-pad = steer
X = accelerate
square = brake
circle = use item (if you have it, check the icon in the top-right box)
R1 = special char action (more powerful if the top-left bar is fully charged)
triangle = yell (only once per lap)
Select = change camera
options menu translation:
- Sound = Choose between Stereo and Mono settings. The default is set for Stereo.
- Play-by-Play = Toggles Reporto & Plum's commentary on or off. The default is On.
- Vs. Mode Difficulty = Sets the course's difficulty settings from 1 to 4 in Versus Mode. The default is level 1.
- Key Configure = Change your button controls.
- Name Change = Rename your saved Memory Card files.
- Grand Prix Records = View the top five speed records achieved on each course in Grand Prix mode. This information is automatically saved as you play.
- Time Attack Records = View the top five speed records achieved on each course in Time Attack mode. This information is automatically saved as you play.
- Option Save = This will save your option settings and automatically reload them when you turn the machine on again.
- Option Load = Choose between several pre-set option settings.
parts list translation:
Body (disabled)
Engine
Wing
Tire
lose menu translation:
Retry
Select new Course (return to course selection screen)
Parts Shop (swap out car parts, then retry the race)
Save
Quit (return to main menu)
basics:
- best beginner char: Megaman
- Deceleration Zones = flashing red floor is something you want to avoid
- hit obstacles and destroy enemies to grab item points. When the counter in the top-right box reaches 0, press Circle to obtain an item.
- you MUST be the 1st to complete 5 laps to beat the course. There is no 2nd prize.
If you win you will be able to take a part from your opponent (not auto-equipped) and save.
Before each course you will taken to the garage when you can swap obtained parts.
sources:
Time Bokan Series: Bokan GoGoGo
controls:
d-pad | Left Analog Stick = Steer
X = accelerate
square = brake
L1 = use item (if you have it)
R1 = cheer
main menu translation:
Start
Story mode
Start
Continue
GP mode
VS mode
Time Attack mode
Records
Option
Controller
Car view
Music view
Movie view
return
Load
...
car stats:
Speed (スピード)
Dash (ダッ シュ)
Grip (グリップ)
pause menu:
Back to game
Retry
Return to select mode
Return to title
sources:
Time Bokan Series: Bokan to Ippatsu! Doronboo
controls:
d-pad = move
circle = shoot
X = load and fire bomb (unlimited, but each must be loaded individually and can be charged before being thrown)
L1 | R1 = roll left/right (not while a bomb is loaded)
Start = pause
menu translation:
Game start
Options
Difficulty 2
Credits 05
Sound test
Key configuration
Exit
Memory card
Save
Load
Exit
basics:
- collect Doronjo emblems to powerup the main weapon up to 4 levels.
- collect 100 skulls to transform into a large mech (invincibile while it lasts).
- last stage: 7
sources:
Time Bokan Series: Bokandesuyo | Bokan Desu Yo
controls:
d-pad = move
circle = fire main weapon
X = bomb (unlimited but with slow reload, if unused will become stronger after a while and slows you down)
triangle = giant robot transformation (collect skulls until the yellow meter at the bottom shows a skull)
menu translation:
Normal game
Special game
Option
Button configuration
Credits
BGM test
Sound test
basics:
- at the start of each level you get to choose between 9 very strange looking vehicles.
Each of these comes equipped with custom weapons and has various strong, but also weak points.
- easier ships: 1st and last rows.
- the main weapon can be powered up to 4 levels.
Besides the regular weapon power up there are also speedup items, shield recharges (refills the green health gauge on the bottom-left), bonus diamonds, skulls and even items which decrease your weapons strength.
- bombs explosion can cause chain reaction combos.
These are easy to pull off when lots of enemies are packed together, but background items and structures can also count towards chains.
- last stage: 5 (Normal game), 6 (Special game)
sources:
Klonoa: Door to Phantomile
controls:
TODO
sources:
Tail Concerto
controls:
d-pad = move
square = fire bubbles (hold to see path of bubble) (capture fleet-footed kittens, destroying breakable items and damaging enemy weapons of all kinds)
X = jump (tap repeatedly to hover)
circle = talk, search, pick up/throw
circle (hold) = spin arms around (destroy breakable items, attack)
L1/L2 = raise/lower viewpoint
R1/R2 = move (save as up/down, not very useful)
- to capture a kitty, first fire a bubble at him. Then go near the bubble and press circle.
- grab bombs, missiles, or even rocks thrown by enemies and throw them back.
- flutter at the right moment when you fall and usually you won't get hurt.
sources:
Silent Bomber
controls:
Analog Stick = move
X = jump (press again to do a mid-air dash)
[] = place a bomb (check the slots in the top-left)
[] (hold) = open the reticule to lock on targets
O = place a special bomb (no lock-on for these)
/\ = explodes all bombs onscreen
L1 | R1 = switches between special bombs (check the icon in the top-left)
special bombs types:
- Napalm = make the fire damage
- Paralysis = make the enemy paralyze temporary
- Gravity = inverts gravity
basics:
- getting hit will deplete "VITALITY" gauge on the top-left. Collect "LIFE +10%" o "LIFE +50%" items to restore.
- this game offers you infinite amount of continues.
When you enter the new door or fight the boss and you dead, you'll continue at that point with full life. The down side is you lost your points in the previous area.
- collect E-Chips to increase your stats at the end of each stage in the "E-UNIT" menu.
- collect DATA CHIPs to unlock a new character in VR Arena.
- complete the game to unlock advanced mode. This mode allows you to select which mission to play, and you can go back through and grab essential Data Chips from the game stages.
- last mission: 14
sources:
Gunner's Heaven | Rapid Reload
controls:
d-pad = move
[] = shoot
/\ = switch weapon
X = jump
O = bomb
d-pad down + X = dash
L2 = lock (aim with dpad without moving)
R2 = hook (not very useful)
basics:
- best char: Axel
- the game won't save your progress if you die and don't continue.
- last stage: 6
cheats:
-
level select (Jap version only): at the title screen hold L1 + L2 + R1 + R2 and press Select. The "Push Start" text will change into "Secret Code" followed by two words. Change these into any of the codes below to ship to that level.
Level 6 HT
Level 2 MA
Level 3 UT
Level 4 RH
Level 5 MK
sources:
Love & Destroy
controls:
Left Analog stick = move your robot by the scenario
Right Analog stick = aim
R2 = weapon attack
R1 = change weapon
L2 = jump, fly
L1 = receive a help message from the Q-Tron
R3 = start the mission (in menu)
Q-Trons:
- Vivi = fastest, weakest weapons
- Lulu = powerful weapons, but slow
- Kiki = most balanced
basics:
- keep moving with the Left Analog stick and jump to avoid projectiles
sources:
Omega Boost
controls:
Analog Stick = move (up/down are reversed)
triangle | circle = boost -> use to avoid enemy fire
triangle | circle + direction = rolling boost
X | square = basic fire
X | square (hold) = lock on enemies (press again to fire homing lasers)
R1 (hold) = lock onto the nearest enemy or enemies
L1 = stops Omega Boosts engines
L2 = switches camera-view (useless)
R2 = fires the viper blaster (only on level XX)
L3 (push down the left analogue stick) = turn a quick 180°
Select = change view to first person mode
basics:
- keep holding down the L1 button to make sure that you are always facing the enemy, unless you want to run away from it.
- pressing Start after a zone will save the flight data to memory for watching in a replay.
- last zone: 9
sources:
Mega Man X4
controls for X:
d-pad = move, climb ladders
square | triangle (tap) = attack with current weapon
square | triangle (hold) = charge attack (release to fire)
L1|R1 = quick switch special weapon
X = jump
2x direction | circle = dash
2x direction | circle, X = dash jump
direction + X = climb wall
R2 = giga attack (if unlocked)
recommended stage order for X:
- Frost Walrus (use X-Buster or Rising Fire)
- Jet Stingray (use Frost Tower)
- Slash Beast (use Ground Hunter)
- Web Spider (use Twin Slasher or X-Buster)
- Split Mushroom (use Lightning Web)
- Cyber Peacock (use Soul Body)
- Storm Owl (use Aiming Laser)
- Magma Dragoon (use Double Cyclone)
basics:
- weapons are recharged if you die. Also energy capsules regenerates.
- there is bad collision detection on things that crush you. You don't even have to be under them for them to kill you; if you are within about ten pixels that's close enough.
sources:
Mega Man X5
controls for X:
d-pad = move, climb ladders
square (tap) = basic attack
square (hold) = charge attack (release to fire)
triangle = special weapon attack
L1|R1 = quick switch special weapon
X = jump
2x direction | circle = dash
2x direction | circle, X = dash jump
R2 = giga attack (if unlocked)
recommended stage order for X:
- Crescent Grizzly (Use Spike Ball or Twin Dream)
- Tidal Makkoeen (Whale) (Use C-Shot or C-Sword)
- Volt Kraken (Use Goo Shaver or F-Splasher)
- Shining Hotarunius (Firefly) (Use Tri-Thunder or E-Blade)
- Dark Necrobat (Use F-Laser or C-Flasher)
- Spiral Pegacion (Pegasus) (Use Dark Hold)
- Burn Dinorex (Use Wing Spiral or W-Shredder)
- Spike Rosered (Use Ground Fire or Quake Blazer)
sources:
Mega Man X6
controls for X:
d-pad = move, climb ladders
square (tap) = basic attack
square (hold) = charge attack (release to fire)
triangle = Z-Saber or special weapon attack
L1|R1 = quick switch special weapon
X = jump
2x direction | circle = dash
2x direction | circle, X = dash jump
X, 2x direction | circle = air dash
select = contact Alia (when "[!]" appears in the lower right corner of the screen)
R2 = giga attack (if unlocked)
recommended stage order for X:
- Commander Yammark (Amazon Area; use Ray Arrow / Rekkoha)
- Ground Scaravich (Central Museum; use Yammar Option)
- Blaze Heatnix (Magma Area; use Ground Dash / Sentsuizan)
- Blizzard Wolfang (North Pole Area; use Magma Blade / Shoenzan)
- Rainy Turtloid (Inami Temple; use the Z-Saber and Ice Burst)
- Metal Shark Player (Recycle Lab; use Meteor Rain / Ensuizan)
- Shield Sheldon (Laser Institute; use Metal Anchor / Rakukojin)
- Infinity Mijinion (Weapon Center; use Guard Shell or Yammar Option)
sources:
Mega Man 8 | Rockman 8
controls:
d-pad = move
triangle = basic attack (hold to charge)
square = special weapon shot (hold to charge)
L1|R1 = quick switch special weapon
circle | X = jump, swim
d-pad down + circle|X = slide
recommended stage order:
- Tengu Man (use Mega Buster or Ice Wave)
- Clown Man (use Tornado Hold)
- Grenade Man (use Thunder Claw)
- Frost Man (use Flash Bomb)
- Aqua Man (use Mega Buster or Astro Crush)
- Sword Man (use Water Balloon)
- Search Man (use Flame Sword)
- Astro Man (use Homing Sniper)
basics:
- Mega Man can fire his Mega Buster even while equipped with a special weapon.
- all weapons are refilled with every life.
- the Tornado Hold weapon can be used for vertical attacks.
source:
Mega Man Legends | Rockman Dash: Hagane no Boukenshin
controls:
d-pad = run
X = jump
[] = fire the regular Buster gun
/\ = fire special weapon (if equipped) or kick
circle (tap) = context action: open doors, chest, or talk)
circle (hold) = walk slowly
L1/R1 = strafes sideways | turns to one side (you can change this in the Options)
R2 = Lock-On (you can't move while locked-on an enemy); when no enemies are nearby, this can be used to looks around
X+L1|R1 = roll to the left|right
basics:
TODO
sources:
Kaisoku Tenshi The Rapid Angel
controls:
d-pad = move
2x d-pad left/right = run
X = jump (press again to double-jump)
square = attack (press while running for a dash attack)
circle = defend (reduce damage, prevent you from getting knocked back or stunned)
triangle = use bomb
menu translation:
1-Player Mode
2-Player Mode
Options
Return to Title
Difficulty: Set the games' difficulty level. Options are Easy, Normal (default) and Hard.
Button Settings
Auto-Zoom: Turn the Auto-Zoom on or off(Default is On). The auto-zoom feature causes the screen to zoom out when your character is running or otherwise moving really quickly in order to give you more reaction time.
Voices: Turn on or turn off the in-game voices (default is On)
Rumble: Turn the Rumble on or off (default is On)
basics:
- best beginner char: Natsumi
- WATCH. YOUR. TIME. The game ends if the clock runs out, and clocks are only found in a few places in the game.
- total areas: 13+
source:
Felony 11-79 | Runabout
controls:
d-pad = steer
X = accelerate
square = brake
circle = reverse
triangle = toggle View
L | R = shift up | down (manual only)
basics:
sources:
Runabout 2
controls:
d-pad | Left Analog Stick = steer
X = accelerate
square = brake
circle = hand brake
R2 = use item
L2 = change view
L1 | R1 = shift down | up
basics:
- once the player has completed a mission, it can be selected in Time Trial.
- last mission: 13
cheats (enter at the car selection screen):
- Unlimited Gas: Press R1, L2, Up, Down, Left, Right
- Unlock all Cars: Hold R2 and press O, Square, X, Triangle, R1
sources:
Kyuin | Kyuiin | Vacuum Kids
controls:
d-pad = move
X = fire
circle = fire the Garbage Cannon (check the counter in the lower left) -> temp. invincibility
square = fire backwards (short range, not very useful)
menu translation (left to right, then top to bottom):
1-player mode
Easy Mode Difficult Mode
Options
2-player mode
Options:
Sound Mode: Stereo | Mono
Sound Test: 02
Lives: 3, 4 or 5
Back to main menu
OSD:
- the small blue balls in the top left corner are the remaining lives
- charged Garbage Cannon counter in the bottom left (as a number)
- currently charging the Garbage Cannon meter on the bottom center (as a meter)
weapons:
- V (Vulcan) = your standard 3-way shot.
- L (Laser) = a blue laser that will follow your craft vertically and continue to fire through enemies it hits.
- H (Homing) = a stream of homing projectiles that fire in a helix pattern normally, but will home in on any nearby enemies (best one).
- R (Rapid) = a constant stream of projectiles coming far faster than the standard gun can produce.
basics:
- collect the same weapon powerup to increase the weapon level up to 3.
- at the front of your ship there is a short hose and standard sucking attachment. If an enemy or projectile that CAN be sucked up touches the attachment, it will be sucked down. Sucking up enemies also recharges the use of your Garbage Cannon.
Getting hit once will destroy your hose and sucking attachment. It also downgrades your weapon to just a basic, weak pea-shooter. If it gets hit again you lose a life.
- you can deal with some enemies by either shooting them, or just sucking them up.
Enemies that can be inhaled will trail little blue sparkles, whereas enemies that can't won't.
- inhaling projectiles will only fill up a tiny amount of the Garbage Cannon's charge meter. Suck up enemies in order to fill it faster.
When you get hit, there will usually be a Repair kit floating by shortly. Collect it to repair your Magic Flying Vacuum Cleaner, or just get a Weapon Power-up if there are any on-screen at the time.
- you get 0 points for anything that gets destroyed by the cannon.
- last stage: 7
cheats:
- stage select: on the title screen, with "Option" (the bottom menu item) highlighted, hold L1 & R1 and press Start. Adds Rapid Fire (On/Off) and Stage Select to the options screen
sources:
Bomberman Fantasy Race
controls:
d-pad left/right = turn
d-pad up = dash, lean forward (accelerate faster, use only in short sections as will make the animal tired -> check the meter in the upper right)
d-pad down = brake
X = accelerate
square = throw a bomb (hold for farther throw, tap to drop behind) -> stun opponents, use current item (if you have one)
circle = jump
triangle = change camera
R1 = switch purchased item in use
L1 = switch radar
basics:
- best initial animal: Green Louie (can buy more in the stable)
- in 1P mode, you need to buy course tickets before you can proceed to the next course. Purchased courses also became available in Time Attack mode.
- finish at least 3rd to earn some money. If you come in 1st place on any race, you will enter the bonus stage (collect extra coins).
- once you've gotten 1st place on a stage, a "TOP" star will show up on where the stage is on the map letting you know you've completed it.
- bomb explosions can provide quick speedups (charge for ~1sec)
- save the game in the options screen.
- Triangle Jump: near a turning corner, jump toward the wall and press Circle when you are about to hit the wall. Your animal will kick the wall and turn.
don't miss the jump pads marked with a "!", they will give you an extra boost of speed.
sources:
Cowboy Bebop
controls:
D-Pad = move plane, aim
X = fire normal weapon
Square (hold) + X = fire special weapon (if the meter in the center is full)
Triangle | L2 | R2 = change special weapon
L1 | R1 = rotate left | right
2x L1 | R1 (double tap) = barrel roll
Start = pause
basics:
- between stages, bonus points earned can be spent to purchase upgrades for the ship (faster speed, more powerful ammo, stronger laser).
- last stage: ??
sources:
Gamera 2000
controls:
d-pad = move ship, aim
X (tap) = fire
X (hold) = lock on enemies (release to fire lasers)
circle (hold) = charge the spinning special attack (disable lockon lasers) (the longer you hold the button to charge, the longer this special attack lasts)
L1|R1 = rotate view 90°
basics:
- check the radar in the top-right corner for incoming enemies (like Panzer Dragoon).
- last stage: 8
sources:
Ridge Racer
controls (digital pad):
d-pad = steer
X = throttle
square = brake
R1 | R2 = shift up (Manual Transmission Only)
L1 | L2 = shift down (Manual Transmission Only)
triangle = change views
controls (NegCon):
twist = steer
...
basics:
- cars with higher traction = less drifting = less slippery
- you can load and save from "Fastest Laps" in the options menu.
sources:
Rage Racer
sources:
R4: Ridge Racer Type 4
sources:
Ape Escape
controls (DualShock):
Left Stick = move, climb
Left Stick (hold) = crouch and crawl -> use to sneak behind monkeys
R1|R2 = jump (pressa again to double-jump)
L2 = look around, Monkey Cam (when using the radar)
L1 = reset camera
d-pad = move camera
Right Stick = use assigned gadgets (check the HUD in the top-right)
X | circle | triangle | square = switch gadgets
Select = pause and reassign gadget buttons
Start = pause and check current status
gadgets:
...
basics:
- you lose 1 Health Cookie with each hit. Toss all your Cookies in the top-left and you'll lose a life.
Knocking over pests, big and small, releases Health Cookies.
Really tough stages might have "bottomless" cookie jars that spill Cookies whenever you club them.
- the solid Gold Chip is worth 1, and the hollow Chip is worth 5. Collect 100 and add a life.
sources:
Soul Blade | Soul Edge
controls (type B):
d-pad = move, sidestep, crouch, jump
2x d-pad left|right = dash (hold to run)
2x d-pad down|up | L1 | L2 = sidewstep
[] = horizontal attack (A)
/\ = vertical attack (B)
O = kick (K)
X | R1 = guard (H), refect attack
X + [] | /\ = throw
d-pad up + []|/\ (when the enemy is grounded down) = ground hit
[] + /\ + O | R2 (when the weapon gauge under the HP has flames) = Critical Edge -> powerful attack, but will reduce the Weapon Gauge by 33%, if blocked by 50%
basics:
- best female char: TAKI
- combine the attacks with a direction to alter the attack.
- each character has a unique command to perform a Critical Finish.
- when both characters' weapons clash, they sometimes will lock. In this situation, you can press any button repeatedly except Guard. Winning or losing depends on the attack you use: a horizontal cut wins over a vertical cut, a kick wins over a horizontal cut, a vertical cut wins over a kick. When both use the same type of attack, both weapons are deflected away; and both players take damage when they use a kick.
- when the weapon gauge reaches 0% your weapon will break.
- last stage: 11
sources:
Dead Or Alive++
controls:
d-pad = move, sidestep, crouch, jump
2x d-pad left|right = dash (hold to run)
2x d-pad down|up | L1 | L2 = sidewstep
[] = block (H) (do not hold, tap only when being hit), reflect (combine with a direction)
X | /\ = punch (P)
O = kick (K)
[] + /\ | L1 | R2 = throw
R1 | H+P+K
L2 | P+K
d-pad up + []|/\ (when the enemy is grounded down) = ground hit
basics:
- easier char: KASUMI
- the "Danger Zone" is the surrounding rim of the fighting ring. When an opponent falls into the Danger Zone it will cause an explosion, inflicting massive damage. The opponent will be thrown off-balance in the explosion, leaving them vulnerable to consecutive strikes. Mid-air combos can follow-up on opponents who fall in the Danger Zone.
If you're thrown in the Danger Zone, you can regain balance by pressing all three buttons before the explosion begins. This maneuver will put you in the "ukemi" position and allow you to easily regain your footing. However, you will still incur damage from the explosion.
- make sure all the options are set to the default settings and then complete Tournament mode to get one extra costume for the character you played with every time you complete it.
- last stage: ?
sources:
Motor Toon Grand Prix
digital controls:
d-pad = steer
X = accelerate
square = brake
circle = use item (check the icon in the bottom-left, collect coins on the track to have them)
triangle = reverse
R2|L2 = camera up | down:
L1 = rear view
negcon controls:
twist = steer
I = accelerate
II = brake
A = use item (check the icon in the bottom-left, collect coins on the track to have them)
B = reverse
R = camera switch
L = rear view
basics:
- best car: Captain Rock
- to turn tight corners more easily hold down the brake whilst still accelerating, causing your machine to skid or slide.
- side collision with walls does not slow down the car.
- driving off course will slow you down.
- after losing speed allow other cars to kick you from the back to quickly regain speed (Shunting).
- positioning your car just behind any other will speed your car up significantly (Slipstreaming).
sources:
Psychic Force
controls:
d-pad = move
/\ = light attack
O = heavy attack -> the long-range attack will knock your opponent back if it hits. The shot can be aimed.
[] = guard
left, right + [] = Evasion barrier
[] + /\ (close combat) = throw
R1 | /\ + O (+ no direction) = "Quick Dash" = dash at high speed toward your opponent -> during a Quick Dash, you have a barrier in front of you which cancels your opponent's Normal Shots.
R1 + any direction = normal dash -> normal Dashes have a set distance and once you start one, you cannot do anything until you stop.
X (hold) = power up the Psycho Meter (used to unleash special attacks)
Special Attacks (change according to chara, drains your Psycho Meter):
-O -O + light
O- -O + heavy
O- -O -O + heavy
basics:
- best female char: Sonia
- last stage: 8
sources:
Rakugaki Showtime
controls:
d-pad = move, aim
X = jump
direction + 2x X = homing jump (jump to the pointed item or smiley ball)
X (while Homing Jump) = cancel jump
square = throw at opponent (DAMAGE 100)
square + direction = throw with Forward Drive (pass thru multiple enemies, DAMAGE 200)
square + opposite direction = throw with Back Drive (slower, easier to avoid, DAMAGE 600)
triangle = throw at object (not very useful)
circle + direction (near enemy) = direct attack (not much damage)
circle (no direction) = block, reflect (exactly before being hit)
L1 | R1 = camera left|right
main menu translation:
Normal Mode Versus Mode
Training Mode Option Mode
Option Mode translation:
User Friendly (ユーザーフレンドリー)
Vibration <on/*off*>
Game Set <*kids*/normal>
Camera Player Up (?) <_on_/*off*>
Field Camera <_90°_/*45°*>
Marker <on/_*off*_/hantoumei(?)>
Game Speed <low/_*middle*_/high/super>
Sound
Mode <*Stereo*/Mono>
Music Volume <default 127>
Effect Volume <default 127>
Demonstration
Sousasetsumei <leads to the tutorial movie>
Movie <*On*/Off>
Staff
Data
Auto Save <on/*off*>
Load
Save
Key Config
Throw at opponent <default S>
Throw at object <default T>
Jump <default X>
Special Attack <default O>
Camera Left <default L1>
No use 1(?) <default L2>
Camera Right <default R1>
No use 2 (?) <default R2
Special
Stage Select (ステージセレクト) -> press up and down on the directional buttons for Level Select (レベルセレクト)
Fun (オタノシミ) (unlocks "Tests" in the other options)
Pause Display (ポーズヒョウジ)
Versus Restart (バーサスリスタート)
basics:
- best beginner char: Yukiwo (male default char)
- best female char: Marina (locked at the beginning)
- to finish a stage you must kill all the enemies that spawns on the screen.
- Super-Smiley-Attack: wait for the Smiley Ball to start flashing, then throw it to an opponent (1000-3000 damage)
- other goods attack items are: Black Holes, Big Rocks (1500 damage), ICBM/huge white missiles (1200 damage), Grenades (800 damage)
- no stages to finish the game: 13
sources:
- https://gamefaqs.gamespot.com/ps/198402-rakugaki-showtime/faqs/7138
Evil Zone
controls:
LS = move
2x LS forward (tap) = dash towards opponent
LS back (tap): Step backward. Hold to keep retreating backwards, and press Attack after the second step for a Retreating Attack.
/\ = attack (melee attack if close, spell attack if far. The 3rd attack makes biggest damage)
[] = guard
LS forward: Step forward
LS down + /\ = grab
LS up, up, /\ = Jumping Attack. Use when next to opponent to jump over them and attack their back.
LS forward + /\ = dashing hit
LS backward + /\ = hit and retreat
LS down + /\ = increase hit
LS up + /\ = lower hit
variations crystal attacks (can be charged by holding the attack button):
DISTANCE ATTACKS
- Triangle + Forward : cast heavy magic
- Triangle x 2 + Forward : double heavy magic (optional)
- Triangle + Backward : cast light magic
- Triangle x 2 + Backward : double light magic (optional)
- Triangle + Up : up attack
- Triangle x 2 + Up : other up attack (optional)
- Triangle + Down : capture
evasive moves:
Forward+Defend (when close): Move behind opponent
Up, Up, Defend: Jump towards opponent
Up: Move into the background. Hold to close in on the opponent in a circle.
Down: Move into the foreground. Hold to close in on the opponent in a circle.
basics:
- best female char: Kakurine, Setsuna
sources:
Rival Schools: United by Fate
controls:
d-pad = move
d-pad oppostite to the opponent = block
2x d-pad forward = run
d-pad down, up = super jump
square = weak punch
triangle = hard punch
X = weak kick
circle = hard kick
R1 = ditch/sidestep
R2 = throw
L1 = Burning Vigor Attack #1 (drains 1 level from your vigor bar)
L2 = Burning Vigor attack #2 (drains 1 level from your vigor bar)
LP+LK | HP+HK = Team Up Technique (TUT) (drains 2 level from your vigor bar)
basics:
- best female char: Kyoko + Edge
- best male chars: Kyosuke, Roberto, and Hideo
sources:
Star Gladiator: Episode:I - Final Crusade
controls:
d-pad = move
2x d-pad = dashm run
square = vertical slash (A)
triangle = horizontal slash (B)
circle = kick (K)
X = guard (G)
square+triangle (A+B) | R1 = throw
up + A|B|K (when enemy is down) = pursuit attack
advanced blocks (last a few sec):
Plasma Reverse: Revenge Press b + AG / BG / L1 / L2
Plasma Reverse: Reflect Press f + AG / BG / L1 / L2
A+B+K | R2 = Plasma Strike (can use once per round, can miss or be blocked)
... (varies for each char) = Plasma Combo
basics:
- best female char: June
- best male char: Saturn
sources:
Tekken
controls:
d-pad left|right = move
2x d-pad left|right = run
d-pad up = jump
d-pad down = crouch
circle = right kick
X = left kick
square = left punch
triangle = right punch
triangle + circle = grab (RP+RK)
up + triangle = attack floored OP
special left punch DF+LP
special right punch DF+RP
special left kick DF+LK
special right kick DF+RK
while running
diving attack LP+RP
slide kick RK some don't have it
sources
Tekken 2
sources
Tekken 3
sources
Strider 2
controls:
d-pad left|right = walk
d-pad up (while hanging) = climb platforms
2x d-pad left/right = run
X = jump (longer while running)
2x X = double jump (can change direction in mid-air)
square = sword attack
triangle | d-pad down+X = slide
circle = boost (consumes 1 boost item)
basics:
- jumping while hanging allows you to climb a wall more quickly.
- if you are hanging on a wall and jump while pressing away from the wall, Strider will use his legs to boost away from the wall, making for a very fast jump that covers a large distance.
- last stage: 5
sources:
Bloody Roar | Beastorizer
controls:
d-pad left|right = walk
d-pad opposite direction = guard
d-pad up = jump
square = punch
X = kick
square + X = throw, throw escape, recovery
circle = beast morph (if charged)
triangle = rave (only if in beast mode)
basics:
sources:
Bloody Roar 2
sources:
Destrega
controls:
Left Stick = move
X = jump (hold for higher jump)
R1 + direction = dash
R1 (no direction) = dash toward the opponent
L1 = guard (only for close range attacks, long-range attacks half damage), deflect magic attacks, mid-air recover
close-range melee attacks:
square = weak attack
triangle = strong attack
circle = sidestep attack (behind the opponent)
long-range magic attacks (the level depends on the color of lower charge gauge, autorefills over time):
square = weak/fast attack
triangle = strong attack
circle = wide attack
square + triangle + circle, R1 = charged dash -> deflect attacks
square + triangle + circle, L1 = charged guard -> deflect attacks
square + triangle + circle, X = charged jump
square, triangle, circle (when the magic gauge is blue & flashing) = special magic attack (most powerful)
basics:
- best female char: Milena
- use long-range attacks when the opponent is on the ground.
- magic attacks beats close-range attacks.
- close-range attacks beats charge dashes.
- charge dashes beats magic attacks.
sources:
Ghost in the Shell
controls:
d-pad | Left Analog Stick up|down = walk forward|backward
d-pad | Left Analog Stick left|right = turn left|right
L1|L2 | R1|R2 = slide left|right
L1|L2 + R1|R2 = prevents the Fuchikoma from sliding left or right, but increases its forward and backward speeds
X = jump, releases fuchikoma when stuck on walls/ceiling
[] (tap) = fire machine guns
[] (hold) = lock-on missiles
O = bomb (check the orange bullets in the bottom-left corner)
select = switch inside|outside view
radar legend:
- large white dots = enemies
- small white dots = enemy projectiles
- red circled dots = enemy targets -> destroy to proceed
- green circled dots = next destination
- small green dots = powerups
basics:
- the Fuchikoma can climb onto most walls and receives no damage no matter how far it falls.
- many enemies are totally incapable of hitting you unless you're on the floor.
- last mission: 12
sources:
PS2
DualShock 2 controller ASCII art:
| |
_,.--.,_ | | _,.--.,_
| _____ | | | | _____ |
|-' `'.___________|_|____________,'` `-|
,' __ `. ,' .,. `.
/ | | \ SONY / (/_\) \
! __ \/ __ | ! ,-. `-' ,-. |
| |__ > < __| !__SELECT START__| ([] ) ( O ) !
! /\ ___`-. ,-' `-' ,-. `-' |
|\ |__| ,' `. \ANALOG/ ,' `. ( X ) /|
| `. / \ | | / \ `-' ,' |
| `-.____,-. \ / |____| \ / ,-.____,-' |
| ,'\ `.___,' / \ `.___,' /`. |
| / `-.___,-' `-.___,-' \ |
\ / \ /
\ / \ /
`.__,-' `-.__,'
progressive scan mode supported games list:
progressive scan mode enable:
hold the /\ (triangle) and X (cross) buttons down after the PlayStation 2 logo appears.
A few games also can be configured via the options menu.
Shadow of Destiny | Shadow of Memories
sources:
Wreckless: The Yakuza Missions
controls:
Left Stick = steer
X = accelerate
[] = brake, reverse
/\ = handbrake
[] + /\ = powerslide, 180° turn
L1 = rocket launch
R1 = adrenaline boost
Right Stick = rotate camera -> use to view your surroundings. Some missions and secret vehicles will be easier to accomplish and obtain with this feature.
select = switch camera
map legend:
- the blue arrow shows your location and direction you are pointing
- red rectangles are enemies
- yellow rectangles are high-priority enemies
- purple rectangles are tanks in mission B-8
- a "?" is a hidden car. Bash into it and complete the mission to unlock the car.
basics:
- your car cannot be destroyed and no amount of damage will affect its performance.
With the exception of mission A-9, bashing into things is almost always a helpful.
- though the setup is simple and arcade-like, the cars react in a very realistic manner.
Brakes respond poorly when you are going over 100 mph. To make quick turns, it's often easier to simply let off the accelerator a few seconds before starting the turn, because breaking alone just won't cut it.
Remember that the gas and brakes are pressure sensitive. You don't have to put on full gas or full brakes when making a turn or dodging an oncoming bus. Releasing the gas (RIGHT TRIGGER) halfway will do wonders for control on turns, zigs, and zags.
- aside from the map, you will also see a large green arrow. This tells you where your end-target is in relation to you. This is a very deceptive arrow and should generally be ignored. Simply knowing that your final goal is to your left won't tell you how to navigate the freeway to get there. Instead, you should follow the guidance of the red arrows.
When you are close to a target, a red, yellow, or green triangle will appear, indicating where they are. When you see a triangle, you can usually ignore all other signals and navigate the streets focusing on the triangle.
- hitting cars head on will stop you dead in your tracks and cost you valuable time. Always try and bash Yakuza cars from the sides and from behind.
- stay on an enemy's bumper and guide them into walls and other cars.
- dead ends are deadly. Learn the roads and remember where those dead spots are so you don't turn into them again.
- shortcuts will lead to nirvana. The city is enormous and there is more than one (or even two or three) ways to get where you need to go. Don't be afraid to take a sudden left and see where you end up.
- the game does not have auto save. Remember to SAVE from the main menu before turning it off.
sources:
Crash Bandicoot: The Wrath of Cortex | Crash Bandicoot 4
controls:
d-pad | LS = move (hold O|R1 to crawl)
X = jump
[] = spin attack
O | R1 (while running) = slide attack
X + O | R1 (in midair) = body slam
X + O | R1 (while standing) = High jump
X + O | R1 (while running) = Super slide high jump
L1 = raise the gun (aim with LS and fire with O) -> safely destroy green explosive boxes from a distance
R2 (hold) = run faster
/\ = Show status panel
basics:
- you die with a single hit unless you have the Aku Aku mask.
Collecting the mask multiple times will give you more hit points.
A 3rd mask will also grant you temp. invincibility.
- collect 100 apples for an extra life.
- last stage: 26
sources:
Crash Twinsanity | Crash Bandicoot 5
sources:
Crash Nitro Kart
controls:
LS | d-pad = steer (combine with [] for a tight turn, or R1 for Power Sliding)
X = accelerate
[] = brake
LS | d-pad down = reverse
R1|L1 = hop/jump
O = use powerup (run into "?" crates to obtain. More powerful when you have 10 Wumpa Fruits)
L2 = rear view
R2 = Team Frenzy (when readys)
/\ = toggle map/speedometer
Select = change view
sources:
Grand Theft Auto 3
sources:
Klonoa 2: Luneatea's Veil
sources:
Katamari Damacy
controls:
LS + RS (same direction) = move
LS + RS (opp. direction) = sharp turn
LS + RS (alternate quickly) = dash
L3 + R3 = quick 180° turn
R1 = fly high in the air and check surrounding area
L1 = FPV
basics:
- the main menu of the game is represented by 3 planets (switch them with L1|R1):
- HOME PLANET = view results and collections, save data and change settings
- EARTH = 1P Mode
- SPACE MUSHROOM = 2P Mode
- "Make A Star" are the main missions in 1P mode, where you must grow the katamari to a specific size in a limited amount of time.
Other missions have more specific collecting rules, such as collecting as many items (swans, crabs, pairs) within a given time, or collecting the greatest item possible (such as a cow or bear).
By beating stages 4, 8, and the Moon quickly enough and with a large enough Katamari, Eternal stages are unlocked. Eternal stages have no time limit, and can be played as long as the player wants.
- bumping into larger objects while going fast or dashing, some objects of the kamari will fly off.
- last stage: Make the Moon
sources:
We Love Katamari | Minna Daisuki Katamari Damacy
controls:
LS + RS (same direction) = move (keep pushing near walls to climb)
LS + RS (opp. direction) = sharp turn
LS + RS (alternate quickly) = dash
L3 + R3 = quick 180° turn
L1 = FPV
R1 = fly high in the air and check surrounding area (use the R2|L2 buttons to zoom in|out)
basics:
- talk to people ("fans") on the "Select Meadow" land to receive a request/mission and enter a stage.
You do not need to actually complete the mission to unlock more fans.
- if you fail to complete a request, your katamari may end up as stardust in the sky.
If you finish a request quickly, the katamari will be turned into a shooting star. Press Start to see a list of your shooting stars.
If you complete a request twice (or more than that) you're given an option as to what to do with the katamari.
If you choose Planet, your old Planet will be replaced with the new one. If you choose Stardust, your old Planet remains intact and stardust is added to the sky.
- interact with the small house in the Select Meadow to save your game.
- inside stages you can find 2 collectables: Cousins (alt. playing char) and Presents (weareable items, access the Birthday Cake to see them).
Both are minor collectables with no side-effect on gameplay.
You can check the ones you have collected in the upper-left hand corner of the screen before selecting yes to play the level.
- last chapter: 10
sources:
Mister Mosquito
controls:
TODO
sources:
Time Crisis 2
controls (GunCon 1/2):
lightgun trigger (when not hiding) = fire (check the BULLETs in the bottom-left. Each clip holds 6 bullets)
pedal = unhide (press to hide again and reload automatically)
basics:
- if you play on very easy mode, if you run out of time, you'll only lose a life.
- fired bullets about to hit you are signaled with a purple/pink glow around the bullet ("Crisis Flash")
One life unit is lost if you are hit by a crisis shot or an obstacle, or if the timer reaches zero.
If a continue is used after all life units are lost, the score resets to 0.
- shoot the strongest soldiers first. In other words, shoot the army guys, or red soldiers, and even the soldiers holding rocket launchers first before you shoot any other soldiers.
- make sure that you don't shoot your partner. You'll lose points.
- everytime you use up all of the Credits in one game, 1 Credit is added for the next game you play. Once the Credits goes past 9, you'll earn Free Play.
- complete "Story" mode multiple times to unlock some extras: Crisis Mission Mode, Automatic Ammo, Infinite Ammo, Wide Ammo.
- last stage: 3 (STORY MODE)
sources:
Time Crisis 3
- yellow enemies provides ammo refills when killed.
sources:
Time Crisis: Crisis Zone
controls (Guncon):
gun = aim
trigger = shoot
Skip Movie - Trigger Button
Shoot weapon, drop shield - Trigger + Thumbcon, A, B or C Button
Reload, raise shield - Trigger (release) + Thumbcon, A, B or C Button
Change weapon during reload - Thumbcon, A, B or C Button (release) + Trigger (while hiding) Button
MEMO: can use p2 "x" button for cover ?
basics:
- unlike its predecessor Time Crisis II, all enemies have lifebars which denotes the amount of endurance they have before they are killed.
- last zone: GEYSER 1 (4th)
sources:
Mega Man X7
sources:
Mega Man X8
sources:
Battle Gear 2 | Tokyo Road Race
controls (Type-A):
Left Stick = steer
X = accelerate
[] = brake -> use for tight turns, avoid when unecessary
/\ | R1 = switch camera
O = look behind
L2|R2 = shift down|up
L1 = battle sign
basics:
- easy cars: Toyota AE86 Trueno GT APEX
- to unlock vehicles, you must finish in 1st place with 3 stars (DIFFICULTY=HARD).
- to unlock new courses....
- last course: 8
sources:
Battle Gear 3
controls:
LS = steer
X = accelerate
[] = brake
Select = switch camera
Start (hold) = quit race
menu translation:
- Arcade Mode
- Single Player
- 2 Player VS
- Car Selection
- Garage (load your garage car here for arcade mode)
- Track Selection
- Regular/Mirror + BGM selection
- ??? + Opponents difficulty selection (stars)
- Battle Gear Mode
- Options
- Garage
- xxxxxxxxxxx
- xxxxxxxxxxx-
- Edit Plates/Change ID
- Exit
- Time Trial
- Regular
- Mirror
- Load Ghost from Memory Card
- Load Ghost from Battle Gear 3 Server (Online connection req)
- No Ghost
- Class Challenge Race
- Proceed to challenge
- Back
- Event Race Mode (Online)
- Network Battle
- Exit/Back to title screen
- Options
- Game Options
- BGM Volume
- SE Volume
- Sound Select: Stereo | Mono
- Display Adjustments: up/down/left/right to move, X-default, O-accept
- Controller Options
- Configuration Type
- Force Feedback/Vibration: on | off
- Default Options
- Exit
- Network Options
basics:
- you'll lose a lot of speed crashing into your opponents and the guardrails,
so constantly check the map on the bottom-left and try to avoid that.
- you can take long easy turns without decelerating.
Hard turns requires decelerating insteead.
sources:
Burnout
controls:
Left Stick = steer
X = accelerate
[] = brake -> use for tight turns, avoid when unnecessary
R1 (hold when the gauge on the bottom-left is filled and blinking) = use boost
/\ = switch camera
L1 = look behind
basics:
- best cars: Sports Coupe (Medium), Roadster (Medium, unlockable), Saloon GT (Hard, unlockable), Muscle (Hard),
- don't drive directly behind opponents. This will block off the entire view and a quick swerve by your enemy may put you right into a car.
- drive in areas no one else can. Crossed off areas, the shoulder, or an empty left turn lane.
- try to use boost on easy straightaways or after you were slowed down by an accident.
- to charge the boost gauge, avoid near misses and driving in on coming traffic lane on purpose, since you'll likely run into accidents.
Safer methods to refill the gauge are: completing a lap with NO accidents, sliding through a turn without taking damage, a "Burnout" = using your entire boost meter without getting in a single accident.
- you must make all the checkpoints to get a place. If you miss a checkpoint, you will receive last place, no matter what place you were in.
- new tracks and new special features are unlocked in Championship mode. New cars are unlocked in "Face Off" mode in Special.
cheats:
- All Racers: type in the following cheat code at the title screen: R2, R2, R2, L1, Triangle, L2, L2, L2, R1, Square
sources:
Burnout 2- Point of Impact
sources:
Poinie's Poin
controls:
Left Stick = move
X = jump (hold while holding a poin ball to slowly descend)
[] = grab, throw "poin" balls -> activate switches, place as midair platforms
/\ = drop "poin" balls
L1 = reset camera
L2 = switch camera
R1 = pause and open menu (save)
R2 = pause and view map
basics:
- throw colored "poin" balls at enemies to change their emotions:
red = angry, blue = sad,yellow = happy
- combining poins: diff. color = 3rd other color, same color=disappear -> use to neutralize enemies emotions
sources:
The Simpsons: Road Rage
controls:
Left Stick = steer
X = gas
O = brake, reverse
[] = handbrake
L2 = look back
/\ = horn
Select = reset vehicle
basics:
- go through Road Rage Mode to earn money to unlock new locations and cars.
sources:
The Simpsons: Hit & Run
sources:
Chain Dive | ChainDive
controls:
d-pad = move, aim
X = jump (hold while holding a poin ball to slowly descend)
[] = freeze attack -> freeze enemies
R2 = grappling hook
/\ = bomb attack (consume health)
basics:
...
cheats:
//Infinite health by eadmaster
2036C6A8 00000064
sources:
Fantasy Zone II DX: The Tears of Opa-Opa
controls:
d-pad = move
X (tap) = fire main weapon
square (hold) = autofire main weapon ("WEAPON 1")
circle = fire bombs ("WEAPON 2")
circle (hold) = charge speacial "WEAPON 3" (check the lower gauge at the top-right)
triangle = insert coin
Start = start
Select = open settings menu
basics:
- there are only 2 sections to each level: a "Bright Side" and "Dark Side" variation.
The warps are found by destroing the bases.
In the Dark Side variations, the enemies are more numerous and aggressive, and the regular shop balloons are replaced with hidden ones that must be found, but you can earn more money from defeating enemies.
- primary shot upgrades now double as an extra hit point, replacing the extendable life bar; should the player be hit by an enemy or bullet while using a primary shot upgrade, they will survive the hit, but will instantly lose the upgrade and revert back to the Twin Shot.
- last round: 8 (to get the good ending go through all the Dark Side zones)
sources:
Silpheed: The Lost Planet
controls (Type A):
d-pad = move
square = left shot
circle = right shot
X = autofire both left and right shot
basics:
- as in previous games you get 2 weapons to place on your ship, 1 on the left and 1 on the right. The 2 weapons can be the same or different.
Halfway through each stage during "REFUEL" you get to change your guns and 4 of your destroyed shields will be repaired.
- if you pass a stage, based on how many points you've earned on that stage, you will unlock 1 or more weapons for use on the following stages.
You get a points multiplier of x2, x4, x8, or 16 the closer you are to an enemy when you kill it and bonus points when you kill all of the characters in a group.
- best weapons: Vvulcan, OpticsLaser and NapalmBomb (the most powerful weapon in the game), PlasmaBall
- blue enemy shots from enemies can be shot, yellow ones cannot, and green not only can't be shot but they also track you.
- last stage: 6
cheats:
- start game with all nine weapons (US Version): at the enter name screen input GLOIRE.
sources:
Shienryu Explosion | Steel Dragon Evolution - Simple 2000 Series Vol. 37: The Shooting: Double Shienryu | Steel Dragon EX
controls:
d-pad = move
triangle = min power shot, wider spread
R1 = mid power shot
circle = max power shot, narrow arc, move slower
square = shoot (power pression sensitive)
X = bomb attack (check the counter in the top-left)
basics:
- easier ship: BD-21VM (fastest, has most spread pattern) + Passer|Viola (has spread bomb)
- collect gold stars for points and get extra lives (check the counter at the top-left).
- last stage: 8
sources:
Castlevania: Lament of Innocence
controls:
Left Analog Stick = walk, run
square = light whip attack, open doors, examine objects
triangle = heavy whip attack, open doors
X = jump (press again in midair to double-jump)
X + triangle = diving kick attack
circle = sub-weapon attack (consume hearts, check the counter in the top-left)
R1|R2 (hold) = guard -> you cannot be damaged, but the guard can break
R1|R2 (hold) + circle = activate|deactivate Relic (check the icon right next to the blue MP Gauge)
R1|R2 (hold) + X = quick step -> evade attacks
R3 | d-pad | Right Analog Stick = bring up the Real Time Window to equip or use items
L1 (hold) = open the Orb Circle Window
L2 (hold) = open the Relic Circle Window
Select = pause and show the map
Start = pause and show the menu
basics:
- collect money to buy Items from Rinaldo's shop.
- situated right under the HP Gauge, the MP Gauge is colored blue and as you use Relics, it'll decrease over time.
The only way to get MP with Leon is to Guard or to use a Mana Prism Item. When an Enemy flashes Purple, use Guard and let them hit you and Leon will flash purple and gain the MP.
- orbs obtained after defeating a boss serve as Items that powerup your Sub-Weapons into much more deadlier Weapons (but they will consume more hearts, so don't always rely on them).
Orbs does not consume MPs.
- Open doors have a blue arrow coming out of them, locked doors have a key on the map, Mini
Boss doors have a skull angel surrounded by blue, and save points have blue doors.
sources:
controls:
d-pad = move, crouch, climb stairs
square = shoot (can be combined with a direction)
X = jump
circle = throw a grenade (no recovery time) (check the BOMB counter in the top-left)
circle (inside some vehicles) = fire heavy ordinance
d-pad down + circle (inside a vehicle) = throw a grenade (check the "BOMB" counter in the top-left)
d-pad down + X (inside a vehicle) = get out
X + square (inside a vehicle, while still have some energy) = frontal attack (will self-destruct on impact)
basics:
- there's no difference between the chars except for looks.
- in most missions/stages, there are forking paths to choose from, each with their own obstacles, and varying length and difficulty. All paths eventually lead to the same boss battle, but the player may have different equipment, and may have rescued different amounts of hostages depending on their choices.
- last mission: 5
sources:
controls:
d-pad = move, crouch, climb stairs
square = shoot (can be combined with a direction)
X = jump
circle = throw a grenade (no recovery time) (check the BOMB counter in the top-left)
circle (inside some vehicles) = fire heavy ordinance
d-pad down + circle (inside a vehicle) = throw a grenade (check the "BOMB" counter in the top-left)
d-pad down + X (inside a vehicle) = get out
triangle | X + square (inside a vehicle, while still have some energy) = frontal attack (will self-destruct on impact)
basics:
- there's no difference between the chars except for looks.
- last mission: 6
sources:
controls:
d-pad = move, crouch, climb stairs
square = shoot (can be combined with a direction)
X = jump
X + d-pad down = slide -> use to avoid attacks
circle = throw a grenade (no recovery time) (check the BOMB counter in the top-left)
circle (inside some vehicles) = fire heavy ordinance
d-pad down + circle (inside a vehicle) = throw a grenade (check the "BOMB" counter in the top-left)
d-pad down + X (inside a vehicle) = get out
triangle | X + square (inside a vehicle, while still have some energy) = frontal attack (will self-destruct on impact)
basics:
- there's no difference between the chars except for looks.
- last mission: 7
sources:
controls (default):
d-pad = move, crouch, climb stairs
square = shoot (can be combined with a direction)
X = jump
circle = switch weapon
R2 | d-pad up + R1 = alternate melee
L1 = toss weapon
L2 = special attack
triangle = throw a grenade (no recovery time) (check the BOMB counter in the top-left)
triangle (inside some vehicles) = fire heavy ordinance
d-pad down + triangle (inside a vehicle) = throw a grenade (check the "BOMB" counter in the top-left)
d-pad down + X (inside a vehicle) = get out
L1 | X + square (inside a vehicle, while still have some energy) = frontal attack (will self-destruct on impact)
basics:
- each and every last char has their unique ability and advantage.
Easier chars: MARCO (default weapon is stronger than normal)
- Weapon Stock System: 2 gun powerups can now be carried at the same time. Players can switch between the two weapons, or simply put them both away in favor of the default weapon. When obtaining a new weapon powerup, it will automatically occupy the inactive slot (or, if both are holstered, replace the less recent weapon of the two). Characters can also throw away one gun powerup's worth of ammunition to give to the other player or simply discard altogether.
- the faster the speed at which enemies are killed, the higher the power, as a meter at the bottom of the screen shows.
When it says "MAX" enemies and destructible objects will drop coins for an extra high score.
- last mission: 5 (HARD MODE), 4 (EASY MODE)
sources:
controls:
Left Analog Stick = move
X = jump
square = shoot with MAIN weapon (check the ammos in the bottom-left)
circle = throw SUB weapon (check the ammos in the bottom-left)
triangle = knife melee attack
L2 (hold) + square | circle = switch MAIN weapon (check the icon in the bottom-left)
R2 (hold) + square | circle = switch SUB weapon (check the icon in the bottom-left)
R1 = lock on target -> use often for easier aiming and dodging
L1 = reset camera behind
R3 = turn 180°
L3 = enter and exit vehicle
d-pad | Right Analog = rotate camera
menu guide:
- MISSION = story mode
- START MISSION = new game
- CONTINUE
- GARAGE
- SOLDIERS
- GET READY = switch curr. char. (check the curr. name in the top-right, default is MARCO)
- POWER UP = powerup current char. Each powerup costs 2000 skill points, obtained at the end of each mission according to your ranking.
- MEDALS = view collected medals. Each medal increase char's abilities other than those were under POWER UP menu. Medals are obtained by getting "S" ranks.
- MAIN WEAPON = view weapons found
- SUB WEAPON = view weapons found
- SLUG CUSTOMIZE (unlocked after MISSION 3) = equip parts to the slug
- LABORATORY (unlocked after MISSION 3) = buy new parts for the slug by speding golds collected in stages
- TUTORIAL
- EXTRAS
- RECORDS
- OPTIONS
basics:
- easier char: MARCO
- best weapons: H = Heavy Machine Gun, S = shootgun (very powerful, but slow fire), C = Enemy Chaser (~homing missiles)
- destroy barrels and boxes and rescue hostages to obtain weapons, ammos and extra lives. Lives are shown as the small red balls next to "LIFE" on the bottom-left.
- never fall into deep water, or you'll have to continue from the last checkpoint.
- when there is a jap text banner in the top-right and a red barrier blocking you, kill all the enemies and tanks in the area to proceed. Use the radar in the bottom-right to easily spot them (the red dots).
- last mission: 11
sources:
Giga Wing Generations | Yoku Shin Giga Wing
controls:
d-pad | Left Analog Stick = move
X (tap) = shoot
X (hold) = charge shield -> reflect bullets. Those bullets, upon contact with the enemy, will turn into medals, which once collected, will increase the multiplier.
square = rapid shot
circle = bomb (check the counter in the top-left)
basics:
- easier plane: blue HAWK (has wide shot)
- the main shot can be poweredup 3 times by taking the "P" icons.
- the hitbox is located at the plane's cockpit, and it is roughly circular in shape.Also, only bullets can hit the planes, like other Takumi titles collisions between vehicles are non-lethal.
- you can enable infinite lives and bombs in the options.
- last stage: 5
sources:
R-Type Final
controls:
d-pad | Left Analog Stick = move
R1 | O = rapid fire main weapon+missiles
[] = fire main weapon+missiles (hold to charge wave cannon (check the "BEAM" gauge of the bottom)
X = detach the Force pod (press again to recall and attach to the front or rear of the ship)
/\ = bomb (when the "DOSE" gauge is FULL at 100, absorb enemy bullets with the Force pod to refill)
L1 | L2 = switch speed up | down
basics:
- best unlockable ships: R-9C, R-9S Strike Bomber (unlocked with 30min flight time with R-9C), R-9O2 Ragnarok II (unlockable)
- the Force pod can damage enemies and absorb enemy attacks.
(Some attacks, such as strong lasers, cannot be absorbed.)
- once the force is attached, you can gain multiple levels of 3 powerups:
(red=straight, blue=twin diagonal lasers, and yellow=vertical shots).
You can also get a "bit" that hovers near your ship and fires an extra shot,
plus you can get a missile attack.
- last stage: 7
cheats (In game, pause and hold L2 while you enter the below codes):
Charge Dose to 99.9% R2, R2, Left, Right, Up, Down, Right, Left, Up, Down, Triangle.
Full Blue Power, Missiles & Bits R2, R2, Left, Right, Up, Down, Right, Left, Up, Down, X.
Full Red Power, Missiles & Bits R2, R2, Left, Right, Up, Down, Right, Left, Up, Down, Square.
Full Yellow Power, Missiles & Bits R2, R2, Left, Right, Up, Down, Right, Left, Up, Down, Circle.
Invincibility (JP Version) Right, Right, Left, Right, Left, Left, Right, Left, R2, Up, Up, Down, Down, Up, Down, Up, Down, R2.
Invincibility (PAL version) Right, Right, Left, Right, Left, Left, Right, Left, R1, Up, Up, Down, Down, Up, Down, Up, Down, R1
Invincibility (US Version) Right, Right, Left, Right, Left, Left, Right, Left, L1, Up, Up, Down, Down, Up, Down, Up, Down, L1.
sources:
ExZeus | Ex Zeus | Ex-Zeus | Counter Force
controls:
Left Analog Stick = move + aim
L1 | R2 | 2x Left Analog Stick left|right = dodge move -> use often to avoid enemy fire
X = fire main weapon (hold when the yellow auto-refilling gauge on the top-left is full to fire the "Megalaser" + temp. invincibility + stop time but not enemies)
square (tap) = lock-on lasers (press X to fire) (consumes the green gauge on the top-left, collect green targets to refill)
circle = bomb (check the counter on the bottom-left) -> very rare, keep them for the latest bosses
triangle = change view
basics:
- easier robot: Sophia
- death can happen in two ways: by allowing the energy bar to deplete completely or by timing out the stage (a message will warn you to hurry up).
The uppermost gauge on the top left is the shield and serves as the primary barrier against damage, whereas the leftmost indicator down below represents the actual player energy, which starts going down only when you have no shield energy left. Both shield and energy have specific refill icons in the item gallery, which also consists of lock-on energy, speed boost, gold (to purchase upgrades/refills between levels) and power-up (increases the firing spread). Most of them are randomly released by destroying enemies. You just need to fly close to the items to pick them up, they will be automatically sucked into the robot when within a certain distance.
- collect gold prism to buy powerups and refills in the shop at the end of each stage.
Nothing is refilled between stages, you have to buy health/lock-on/bomb refills in the shop.
- last episode: 5
sources:
Sky Gunner | SkyGunner
sources:
XII Stag
controls:
d-pad = move
X (tap) = shoot
circle (hold) = rapid-fire shot
triangle | d-pad left, right (quickly tap) = Rapid Side Attack (RSA) (if turned on in the options) -> more powerful than regular shots, increase the score multiplier
2x triangle | d-pad left, right (quickly tap) = stronger Rapid Side Attack (RSA)
square = barrier (check the "B" icons at the top-left) -> temp. invincibility inside the barrier
basics:
- when an enemy is close to the rear of the fighter, it is automatically damaged (back fire attack).
- collect blue orbs to increase the main shot level (up to 5).
When you die you lose all the weapon powerups.
- there's no granting of extra lives, so the whole game must be completed with just 3 ships.
- last stage: 8
sources:
Homura
controls:
d-pad = move
square | circle = shoot (hold for auto-fire -> slows you down)
X | triangle (when you have the green aura) = sword slash -> start a melee "mad-slash" combo if performed near an enemy or reflect bullets, 1s invincibility, needs 5s recovery
square + X | L1 | R1 (tap at the same time) = bomb (check the blue orbs on the bottom-right)
basics:
- all defeated enemies release gold coins for points.
A blue bar in the upper corner is filled as these coins are collected, eventually adding 2 bits of energy and substantially increasing his firepower.
- whenever you die you don't lose the bombs in stock, being awarded an extra bomb instead
- last stage: 5 (beat the first 4 stages with a single credit to see the true final boss)
cheats:
- Obtain extra credits and new images for the Gallery: Finish Stage 1, then get yourself killed or quit the game. Can be repeated 55 times.
sources:
Virtua Fighter 4
controls:
d-pad | Left Stick = walk (double tap down to walk downward)
2x d-pad | Left Stick left|right = dash, run (hold the direction) (combine with down for a crouching dash)
d-pad | Left Stick up|down = evade -> use often to avoid attacks
d-pad | Left Stick down = crouch
d-pad | Left Stick up + X|triangle|circle = jump attack -> not very useful
X | triangle = Punch
circle = Kick
square = Guard, quick change direction when your back is turned to your opponent
L1 = throw, throw escape (Punch + Guard)
L2 = recovery when you are about to fall (Punch + Kick +Guard)
R1 + direction = counter-attack (Punch + Kick)
R2 = Kick + Guard
d-pad | Left Stick up + X|triangle (while opponent is down) = Down Attack
basics:
- beginner chars: Jacky, Sarah, Pai
- in Quest/Kumite mode you will progress your created chars, unlock new clothing colors and unique items, etc.
To rise in rank, simply do well. Once you go on a winning streak or defeat a certain amount of opponents, you will be challenged to a ranking match, where upon winning you will be promoted to the next higher rank.
Quest Mode is made up of a series of Arcades. Every Arcade hosts its own complement of dozens of AI players, whom you'll have to fight as you try to complete a series of objectives in order to move on to the next arcade. The main objective of each arcade is to enter and win that arcade's tournament, which will allow you to move on. The trick is that every Arcade has a different objective that you need to complete in order to be invited to the tournament. One arcade might require that you beat 80% of the AI players, whereas another might require you to defeat a specific character or acquire a certain number of emblems.
- in many stages there are breakable walls. You can eject your opponent through broken walls, or inflict extra damage by hitting them against the wall.
- to wear your 2P costume while playing Quest/Kumite or Arcade, hold down Start when you select your fighter.
- the simplest way to avoid a throw is to just duck immediately when you see it coming at you.
sources:
Bloody Roar 3 | Primal Fury
controls:
TODO
sources:
Bloody Roar 4
controls:
d-pad left|right = walk
2x d-pad left|right = dash
d-pad left|right | L2 = sidestep
2x d-pad left|right | R2 = sidewalk
square = punch
triangle = kick
X | R1 = heavy guard, evade (at the moment of impact)
forward + X = throw
circle (when the blue gauge at the top is part. filled) = beast transform (in human form hold to recharge the blue Beast Gauge at the expense of health)
down + square | triangle | circle (when the oppent is down) = down attack
QCF, QCF + circle (when in Beast form) = Beast Drive special attack (consume your blue Beast Bar)
QCB, QCB + circle (when in Beast form) = alt. Beast Drive special attack (consume your blue Beast Bar)
basics:
- beginner char: Nagi the Spurious
- associate "P+K+B" to L1 to easily excute the Beast Drive special move.
sources:
Tekken Tag Tournament
sources:
Tekken 4
sources:
Tekken 5
controls:
d-pad left|right = move
2x d-pad left|right = run
d-pad up = jump
d-pad down = crouching guard
2x d-pad up|down = sidestep
circle = right kick
X = left kick
square = left punch
triangle = right punch
square + X | triangle + circle = grab (RP+RK | LP+RP)
up + triangle (RP) = attack floored OP
basics:
- beginner char: Feng Wai (keep doing the death palm (x3) times in a row for easy wins.)
- completing Story Battle multiple times with different chars will unlock extra chars.
- last stage: 9 (Story mode)
sources:
Shinobi
controls:
Left Stick = walk, run
Right Stick = rotate camera
circle = jump (press again to double jump)
X = stealth-dash -> good evasive move, can also be used in midair
square = sword attack
Left Stick back + square = thunder kick -> use only to break guards
360° Left Stick + square = roundhouse slash -> most powerful normal attack, but leave vulnerable for a short period of time
triangle (if you have some daggers in the right bar) = throw shuriken -> momentarily paralyze most enemies. Very effective against all aerial foes.
2x X, triangle (if you have 8+ daggers in the right bar) = long-range Shuriken Burst
L2 = use ninjutsu bomb-like special attack (if you have some scrolls in the bottom-left)
d-pad = switch ninjutsu (check the icon next to the scroll in the bottom-left)
L1 = reset camera
R1 = lock-on nearest enemy -> use often
R2 = switch lock-on targets
basics:
- your health gauge is represented by 10 flames in the bottom-left circular gauge.
Collect white "Yang" balls to restore 1 slot.
- collect red "Yin" balls from defeated enemies to restore the inner-circle red Slash Gauge in the bottom-left.
If it gets empty will start sucking your health.
To completely refills the Slash Gauge strike 4+ enemies before the 1st enemy crumbles. A "Tate" will occur and show a small cutscene.
- by killing enemies Akujiki builds up its power. This technique is called Zan. Akujiki's power is reflected by its color: blue, purple and fuchsia.
- to wall run jump jump toward a wall. Some levels limit which walls you can and cannot climb. Usually, walls you can cling to are lighter in color.
- barriers called "kekkais" can be released by destroing the floating stone pillars or killing all the enemies dispersed throughout the area.
Nicely colored kekkais represent those which you still need to dispel.
Black ones form once you pass through certain "checkpoints", and cannot be traversed back.
- check the balls in the top-right corner to see how many enemies are in the current area.
- collect hidden Oboro Clan Coins to unlock stuff in the main menu.
- last stage: 8 (each stage is made of 2 levels)
sources:
Nightshade
controls:
Left Stick = walk, run
square (tap) = slash attack
square (hold) = stealth attack (when locked on, requires at least one bar of chakra)
L1 (if you have some daggers in the right bar) = throw shuriken -> momentarily paralyze most enemies. Very effective against all aerial foes
2x circle, L1 (if you have 8+ daggers in the right bar) = long-range Shuriken Burst
triangle = kick -> deal no damage but breaks an enemy's guard or armor, deflect missiles (when close to you)
circle = jump (press again to double jump)
X = stealth-dash -> good evasive move, can also be used in midair
L2 = use ninjutsu bomb-like special attack (if you have some scrolls in the bottom-left)
d-pad = change ninjutsu
R1 (hold) = lock-on nearest enemy -> use often
R2 = switch lock-on targets
Right Stick = move camera
R3 = camera reset
basics:
- if you attack an enemy in the air, you have one additional jump and one additional stealth dash.
- last stage: 13
sources:
The Red Star
controls:
Left Stick = move
square = melee attack -> refills the blue meter
circle = gun attack -> safer for distant enemies, does not damage shielded enemies, check the meter at the bottom to avoid overheating
d-pad = gun select
triangle (when the blue bar at the top is full) = bomb attack
X = guard -> overheats faster with projectiles than melee attacks
X + direction = backflip
R1|R2 (hold) = strafe, lock-on enemies
R1|R2 (hold) + direction + square = special melee attack (changes according to the direction)
L1|L2 = "pivot" stationary aim
Select = open subscreen, show enemies description
Start = pause
basics:
- you cannot fall off ledges, but enemies can. Take advantage of this to quickly dispose them.
- complete the game to unlock Maya Antares as a playable character and Arena mode.
Get an "A" rank or higher on each Arena level to unlock "Classified" options at the main menu.
- last chapter: 19 Final Judgment
sources:
Devil Kings | Sengoku Basara
controls:
Left Stick = move
[] = normal attack
/\ = strong attack
X = jump (perform diff. attacks in midair)
L1 = guard (hold and tap Left Stick to roll/sidestep to that direction)
O (when the blue gauge on the bottom-left is full, kill enemies to refill) = bomb-like "Fury Drive" attack -> temp. invincibility
R1 + []|/\ = special attack (if unlocked)
RS = move camera
R2|R3 = reset camera
Start = pause, skip cutscenes
basics:
- easier chars: Lady Butterfly (has ranged attack, can attack while moving)
- getting hiy will deplete the "HP" gauge on the bottom-left. Open red chests to get refills.
sources:
Sengoku Basara 2
controls:
Left Stick = move
X = jump
[] = normal attack
/\ = use activated skill attack (unlimited, but slow to execute, diff. for each char)
L1 = switch skill attack
O (when the blue gauge on the bottom-left is full, kill enemies to refill) = unleashes Basara attack
L2 (once the Drive Bar has lit up, every 100 kills) = activates Sengoku Drive Mode -> increase attack and speed
R1 = guard (hold and tap Left Stick to roll/sidestep to that direction)
R2 = reset camera
Select = taunt
Start = pause, skip cutscenes
main menu translation:
ストーリー Story Mode (main game mode, play 5/6 missions with a choosen char and unlock new chars)
天下統一 Unification Mode (unlock alternate costumes here)
自由合戦 Free Battle Mode
大武闘会 Tournament Mode (unlocked after clearing Story Mode)
ギャラリー Gallery
キャラクター紹介 Character Introduction
ムービー Movie
音楽 Song
戦国豆知識 Sengoku Trivia
戦歴 Game History
称号 Title (check all the titles you have acquired from the Unification Mode)
各種設定 Options
Vibration
Camera: NORMAL (| REVERSE)
Guard Button: GUARD (| EVADE)
Life Gauge: ON (| OFF)
Sound: STEREO
BGM volume: 8
SE volume: 8
Voice volume: 8
Save
Load
char stats translation (from top to bottom):
red bar = HP
yellow bar = attack power
green bar = defense power
difficulty selection after choosing a char (from left to right):
ふつう Normal
難しい Hard
究極 Ultimate/Extreme (unlocked after beating hard)
pre-battle menu translation (from left to right):
出陣 Depart -> press circle here to start the battle
装備 Equipment
固有技 Skill
武器 Weapon
防具 Armor
アイテム Item
衣装 Costume (unlocked after obtaining a costume)
買物 Shop
布陣 Formation
basics:
- before each battle you can switch the equipped weapons, skill attack and extra items. You can also buy some items in the shop (the coins and items are shared between diff. chars, but the bonus weapons are not).
- best items to equip: 1-2 increase attack level , 5-1 running speed increases, 5-3 easier defend and recover, 14-3, 14-4 HP slowly auto-refill , 15-1 revive once when KOed, 15-5 vibrates and luminates when hidden chest are near, ... https://gamefaqs.gamespot.com/ps2/931480-sengoku-basara-2/faqs/44911
- the objective of most battles is to take out the final boss, but some have different objectives like taking out all the generals, and some may have a time limit (check the map on the top-right for the next target/boss location).
- taking damage will deplete the bigger gauge on the bottom-left. Destroy red boxes to obtain health and basara refills.
- blue boxes only contains coins. Some scenery like statues and trees also can release coins when hit.
sources:
Gradius V
controls:
d-pad = move
X (hold) = auto fire bullets and missiles
O = powerup
R1 (hold) = multiple control (movement changes according to chosen weapon array)
basics:
- easier weapon array: Type 4 (has rotating options acting like a shield)
- last stage: 8 (2 loops)
sources:
Thunder Force VI
controls:
d-pad = move
X = shoot
circle = activate over weapon (changes according to current weapon, req. 1 blue bar at the bottom-left, press multiple times for greater strength. While in use reduces speed 25% and gives no invincibility)
square | R1 | R2 = switch weapon next|prev (check the icons at the top-left)
triangle | L1 | L2 = speed up|down
basics:
- easier weapon: Hunter (homing balls, last one)
- unlike earlier games in the series, you start the game with all the 5 weapons available, without the need to collect them.
- collect blue energy balls to refill the overweapon gauge. Stop shooting to attract them.
- collect "S" powerups to activate the shield.
- last stage: 6
sources:
Okami
controls:
Left Stick = walk
X = jump (while in contact with a wall, press X to jump again and reach higher places) (press again to double jump if you have the Holy Eagle)
square = headbutt attack
square (hold) = dash -> use in midair to reach slightly further distances
circle = examine, talk, bark
triangle = dig (tap quickly), bite something or someone, grab items, use sub-weapon in combat areas (if equipped)
R1 (hold) = freeze time and use the Celestial Brush on the current viewpoint (move the brush with the Left Stick, move the camera with the Right Stick, press square to paint or triangle for thicker strokes) -> check the remaining ink in the top-left
R2 = dodge incoming attacks (req. Fleetfoot dojo technique learned)
R3 = reset camera
Right Stick = move camera
L2 (hold) = display the map (your next destinations are marked as big red circles. White circles are "Origin Mirrors" save spots)
L1 = tap to change camera distance, hold to switch to 1st-person view
Start = pause and open the Fan menu
Select = pause and open Options Menu
Brush Techniques:
- Rejuvenation = fill in broken or missing objects (you can tell you're coloring in the right space if the ink takes on a different quality, something more like mist than ink. Easier to perform with triangle because it draws thicker lines) -> rarely used, usually works on broken things such as statues and bridges.
- Power Slash = draw a horizontal line through what you want to slash -> slash through enemy's, rocks and other things, although it won't be able to cut through iron or diamond until you earn Power Slash 2 & 3. Use to repel purple balls thrown by plants and stun them.
- Sunrise = draw a circle in the sky -> turns night to day, and can brighten the sun. Sunrise also "moves the sun" to a different spot in the sky and make small mushrooms grow to create new platforms.
- Bloom = draw a circle around the top of the withered tree or flower and release -> make any flower or tree instantly bloom, fill in dead patches of grass. In cambat areas, if you plant a dot on the ground, a tree will sprout, this is mainly used as a defensive move, to give monsters an obstacle between you and them. Dots on the ground can be also used to stun cursed trees.
- Cherry Bomb = draw a circle where you want it to appear, then draw a line from the middle of the circle out toward 2 o' clock. This has to be done in 2 strokes. When the bomb is created, you can roll it until it blows up. Don't worry about taking damage, the Cherry Bomb can't hurt you. -> use to blow holes in weakened structures. Also very useful as an attack against enemies, will explode when they hit them.
- Water Lily = draw a circle in the water -> allows you to cross long distances water without drowning
- Vine = draw a line from the flower to wherever you want to hook the vine to -> used to pull you towards the flower, or to hook onto an object.
- Waterspout
- Crescent
- Galestorm
- Inferno
- Veil of Mist
- Catwalk
- Thunderstorm
- Blizzard
basics:
- getting hit will deplete your Solar Energy (check the sun icons in the top-left)
- use Holy Bones to restore health. Defeated enemies also occasionally drop Spirit Globes that can restore some health.
If you collect 3 Sun Fragment you will gain a new unit of Solar Energy.
- you need to talk to some NPCs multiple times before unlocking some events.
- Praise sort of serves as the "experience points", although it isn't earned in battle, but for doing good deeds: feeding animals (each one has a fav. food. The bigger the animal, the more Praise earned), blooming trees, restoring decayed environments, destroying Devil Gates, etc.
Praise is used to power up your 4 Divine Attributes: Solar Energy=health, ink pots, the Astral Pouch (=1UPs), and the purse (=max amount of money you can hold).
- you can fill the Astral Pouch by collecting various types of food. When the Astral Pouch reaches 200 FP=Food Points, it serves as an "extra life".
You start out with only 1 Astral Pouch, but can obtain more by enhancing the appropriate Divine Attribute.
- lights shining onto the ground indicate where you should dig.
White lights only appear at night and indicate that a treasure chest is below the ground.
Green lights will appear at any time and mean that a Lucky Clover is below. Lucky Clovers need to be restored using the Bloom brush technique.
- if you come into contact with a Demon Scroll, you'll be forced into combat with multiple foes in an arena-like environment.
These battles don't earn you any Praise, only yens and items.
While inside the arena you can escape by finding cracks in the surrounding barrier and breaking them.
It is possible to attack a Demon Scroll with a Celestial Brush technique. The resilience of Demon Scrolls depends on their color: green scrolls are vulnerable to anything, but blue scrolls are resilient to Power Slash and yellow scrolls are the most resilient. The most effective is Inferno since the scroll will momentarily disappear until you leave the area, regardless of its color.
You can also equip the Peace Bell to prevent the Demon scrolls from chasing you.
- after a monster dies, it will temporarily be suspended in the air before dying. While it is in the air, use a Celestial Brush technique on it to extract a Demon Fang.
Demon Fangs can be used to trade with a few special merchants for some nice items.
- Godhood acts as a shield, preventing you from taking damage in battle.
Getting high combo counts or using Traveler's Charms increases Godhood, while running from battles, taking damage, drowning in water, or dying in cursed zones decreases Godhood.
The Godhood symbol appears at the lower-left corner of the screen during combat only.
- Cursed Zones will have various effects on you. The darker ones draining your health must be avoided. Instead find a nearby "Guardian Sapling" tree (a sacred tree with a peculiar curvy top) and use Blossom to free the curse.
- Gold Dust can be used to powerup weapons. It can only be used once on each weapon.
- Mermaid Springs allow you to teleport large distances instantly. A Mermaid Spring is a small body of water with a blueish light coming out. Toss a Mermaid Coin into the spring to make the warp point appear. Mermaid Coins can be bought from merchants for 1000 yen (when unlocked).
Can Skip All Scenes RAW cheat code:
404B2228 00110001
FFFFFFFF 00000000
sources:
Odin Sphere
controls:
d-pad | Left Stick left|right = walk (hold to run)
X = jump (press again to double jump)
square = attack (combine with a direction for a different attack) (consume the "POW" gauge at the top-left. When empty you will be stunned), talk
square (hold) = guard
triangle = pause and select Psypher ability to use (press X to confirm or circle to cancel) (req. 1+ blue Psypher gauge to be filled, check the counter in the top-left)
d-pad | Left Stick down = grab items
circle = pause and open the items menu (press X to use an item, circle to cancel, X+down to drop it, R1|L1 to switch bag)
R1 (hold) = suck up Phozons in the current area
R2 = open all bags (can move items from one bag to another here)
L1 = toggle the map
L2 = show status menu
basics:
- all the actions like using an item, Psypher abilities and even grabbing an item take time to execute and leave you vulnerable for a while. So you better perform them when there are no enemies near you.
- kill all the enemies in each area to proceed to an EXIT. If you have the map, aim for the red "B" area for the final boss.
- when you find seeds, you're able to plant them on the ground. Plants need Phozons to grow, so the best moment to plant them is just after entering a new area with enemies.
Once the plant fully blooms, simply hit the item that you grew off of the tree and pick it up.
- eating food will recover a certain amount of HP, and give you some Exp.
Once you get enough Exp, your HP level will increase, increasing your maximum amount of HPs.
- whenever you run through a battlefield, you may hear a squeaking noise. This indicates that a Mandragora is underneath your feet. In order to get them out, simply jump up and land on the spot they squeaked from and then hit them with your weapon to turn them into an item.
There are different kinds of Mandragoras and they're used for Alchemy.
- once you have a Mandragora you can mix it with a Material to obtain a Potion.
Most useful potions (you need to find the scrolls before you can make them): Antidote (cure for poison, made with Material 0 + 1x Cubsbane), Warmer (prevent freezing, made with Material 0 + 1x Turny), Cooler (protect from flames, made with Material 0 + 1x Habaneristo),
Elixir (restores 1000 HP, made with Material [8] + Carroteer), Painkiller (cuts damage in half and prevents knockback, made with Material [2] + Carroteer), Alchemy Mix U: Unlimited POW (made with Material[4] + Carroteer)
Mix seeds with Material [0] to increase its number. The materials' numbers are multiplied when mixed with another material.
- your next destination on the map is indicated by the flag with the crossed swords.
- when unlocked, from the Old Castle Terrace, go in the Pooka Village and visit the Restaurant and the Cafe. Here you can buy more nutritious food by providing the req. ingredients.
- last chapter: 6 from the 6th book "Armageddon"
sources:
Psyvariar Complete Edition
controls:
d-pad = move
X | /\ = shoot
[] = bomb
L1 | R1 | L2 | R2 (hold) | d-pad left, right (quickly tap) = roll -> the hitbox is much smaller, speed is reduced, firepower is focused into a more powerful stream and buzz count increases faster
basics:
- whenever the ship's hitbox passes closely by a bullet or an enemy a "buzz" is registered, which adds to the buzz counter and also to an experience gauge that measures the ship's current level (destroying enemies also contributes with some exp).
Ascending to a higher level comes with a robotized "LEVEL UP" sound and approximately 2s of invincibility, during which you can buzz more bullets and even collide against them for another subsequent LEVEL UP.
Taking advantage of this brief invincibility window is the secret to level up faster
- go in the options menu by pressing "Select" in the main menu , and set "VIDEO MODE" to 60Hz and change "SCREEN MODE" to 1 for tate/vertical orientation.
- "Replay mode" allows you to practice most stages.
- last stage: 5
sources:
HSX: Hypersonic Xtreme | G-Surfers
controls:
Left Stick | d-pad left|right = steer
X = accelerate
triangle = brake
square = boost (req. the purple vertical bar on the bottom-right, run over red items to refill)
L2|R2 = side thrusters -> use with tight turns
R1 = rear view
L1 = change view
basics:
- an Arcade series consists of 6 sequential races.
You must be in the top 3 scorers at the end of the last race to gain access to the next one.
When racing on difficulty 1 you will have 6 retries. On difficulty 2 you will have 3 and none on difficulty 3.
cheats (enter on the Main Menu):
- All Tracks: Hold L1 and R1 and press Square, Square, Square, X, Triangle, Triangle, Square, X
- Get Every Car: Hold L1 and R1 and press Triangle, X, X, Circle, X, Circle, Triangle, X
sources:
Wipeout Fusion
controls (configuration 4):
Left Analog left|right = steer
Left Analog up|down = adjust pinch -> press up when airborne, down when going downhill
circle = accelerate
triangle | L1 = fire weapon (due to a bug, the flamethrower req. pressure-sensitive buttons to be used)
R1+L1 = fire weapon backward
L2|R2 = left|right airbrake
X = discard weapon
square = change view
R1 = rear cam
Select = switch song
basics:
- best beginner ship: FEISAR
- in AG League mode, race within set leagues to gain points and medals. This is where you gain money and upgrade your craft as well as complete challenges unlocking the other teams.
- to get a faster start than the rest of the racers, don't hit the gas until immediately after the announcer says go. If you hit it too early, you'll get the normal, slow start.
- taking damage during the races will reduce your shield energy (check the inner purple gauge on the bottom-right).
Enter the pit lanes next to the star finish line to recover. Discarding weapons won't work like in later games.
- turn Damage Simulator off in the options to avoid losing control when at low shield.
- new weapons and game modes are unlocked when certain percentages of the game are completed.
Super weapons are unlocked by beating a Challenge set, and they will be available for every other competitor.
- last League: Metis
cheats:
sources:
Sega Rally 2006
controls:
Left Analog left|right = steer
X = accelerate
square = brake
circle = hand brake
triangle = reverse
R1 = change view
L1 = headlight
R2|L2 (in manual mode) = shift up|down
TODO: career mode menu translation
basics:
- easier car: FORD FOCUS AIR FORCE RESERVE RALLY CAR
sources:
Zone Of The Enders
controls:
Left Analog stick = move
triangle|X = ascend|descend
square = fire main weapon
square (near enemies) = saber melee attack
circle = fire sub-weapon (limited use, refill by finding red cubes and defeating enemies, to unlock new ones you must find the appropriate "driver")
circle (near enemies) = throw (hold to grab, then use lock-on to easily aim at an enemy nearby)
L2 = lock-on (press again to switch target, press L1 to cancel lock-on)
L1 = switch camera
R1 = guard
R2 = dash -> use often, perform more powerful attacks while dashing
Left Analog stick = move camera, aim
d-pad = switch sub-weapon (check the name and ammos in the bottom-right)
map legend:
- light blue triangle = you
- red triangle = enemy squad with level number
- "B" = sub-weapon ammo
- "M" = Metatron = full energy recovery item
- "P" = Passcode
- level number + S = special
- level number + * = squad Leader
- yellow line = enemy squad patrol path
- blue cube = Metatron
- red cube = sub-weapon ammo
- green or red tower = Local Server
- white arrows = tunnel
basics:
- the game can only be saved manually from the pause menu in the global stage.
- taking hits will reduce the bigger green energy gauge on the bottom-left.
- last MISSION: 26
cheats:
- Full Health & Sub-Weapon Ammo (Warning: Reduces Experience Level): Pause the game and press L1, L1, L2, L2, L1, R1, L1, R1, R2, R1 to replenish your health and max out the ammunition of all sub-weapons you have currently obtained. Note however that each time this code is entered, your experience will drop by one full level.
sources:
Zone of the Enders: The 2nd Runner
sources:
Contra: Shattered Soldier
sources:
Neo Contra
sources:
Soul Calibur 2
controls:
TODO
sources:
Soul Calibur 3
controls:
TODO
sources:
Twinkle Star Sprites: La Petite Princesse
controls:
d-pad = move
square | circle = shoot (hold down for a charge shot or a boss attack when the "POW" gauge on the bottom-left is at MAX) -> charged attacks are more effective in this sequel
triangle (hold) = rapid fire shot
X = bomb (check the "B" icons in the bottom-right) -> clear all enemies
L1 = toggle HUD
basics:
- get your opponen't heart meter to 0 and you win the match.
- as you fight through waves of enemies, there is a blue ball that appears and if you grab it, you'll go into fever mode. This allows you to move much faster and build up for a boss attack.
- death/Grim Reapers randomly appear and touching them equals instant death to the one who touches it but destroying it kills all onscreen enemies.
- complete the game in STORY MODE to unlock more chars to use in CHARACTER MODE.
- finish CHARACTER MODE with all of the 3 hidden characters (Load Ran, Mikoto, and Really Till) to unlock Twinkle Star Sprites (NeoGeo AES Version).
- last stage in story mode: 6
sources:
Stretch Panic | Hippa Linda | Freak Out
controls:
Left Stick = move Linda
Right Stick = aim the Demon Scarf
R1 = extend the Demon Scarf out, to grab something
R3 = throw small object (once held), make Linda do a Scarf Flip (Once terrain is grappled)
L1 = lock-on to the nearest enemy.
L2|L3 = make Linda look around (use with the Left Analogue Stick).
L3+R3 = Scarf Bomb attack.
basics:
- the most useful attack you can do is the "Snap Attack", which is done by stretching a part of an enemy out then releasing it so it snaps back to cause damage.
The other attack, which you will use far less often is the 'Torpedo Attack'. Which is done by stretching a part of an enemy (or terrain) out so much so that the 'stretch-o-meter' (the eye in the bottom right corner of the screen) goes red, then Linda can use the tension in the scarf to flick back and headbutt the enemy or fly forward.
To fill the 'stretch-o-meter extremely quick, wiggle the Right Analogue Stick back and forth or rotate it after you have grabbed on to an enemy (or terrain).
- the Demon Scarf can also be used to jump, this is done through a 'Scarf Flip'. To do that, grab a bit of the terrain and then press down on the Right Analogue Stick (R3) to fling Linda in the air like a rock in a slingshot. The further you pull back on the terrain the further you will be flipped.
- A certain number of "Points" are needed to open the doors to the Sister Realms.
Points are acquired by causing heavy damage to an enemy in an EX world.
To get Points from these enemies you must snap a region of their body other than their big breasts.
Points also have another use, that use is to initiate a 'Scarf Bomb' attack.
Scarf Bombs cost 5 points each and are done by grabbing on to an enemy and then pushing down on L3 & R3. Scarf Bombs are the only way of exorcising the Demons of Vanity from Linda's sisters.
During a Scarf Bomb, two daughter scarfs will materialize and will grapple onto the targeted enemy while Linda's scarf will pin the enemy down. Then you must wiggle both the Left and Right Analogue Stick to ravage the enemy.
sources:
Pipo Saru 2001 | Ape Escape 2001
controls:
Left Analog stick | D-pad = move
L3 = crouch
X | R1 = jump (press again to double-jump)
square | R2 (hold) = vacuum
square | R2 (tap) = swing attack
Circle = activate MD (if you have it)
L1 = camera reset
menu translation:
TODO
basics:
- to finish each stage you must collect all the monkeys shorts and bring them to the washing machine.
Shorts that stay on the ground for a long period of time will disappear and re-appear with new monkeys that are dropped by Specter.
- Your rank on that stage is determined by the time remaining.
If the timer reaches zero, your health is reduced to red and cannot increase.
sources:
Ape Escape: Million Monkeys
controls:
TODO
Ape Escape 2
sources:
Ape Escape 3
sources:
Ridge Racer V
controls:
Left Stick | d-pad = steer
X = accelerate
square = brake
triangle = change camera
basics:
- unlock extra stuff by winning the GPs (you must place 1st).
- best cars: Kamata Angelus (beat Angel in Duel Mode to unlock)
sources:
Bomberman Kart
controls:
Left Stick | d-pad = steer
X | Right Stick up = accelerate
square | Right Stick down = brake, stop drifting
triangle = reverse
circle | R1 = drift
L1 = use item (can be combined with down)
L2 | R2 = rear view
Select = switch view
menu translation:
Kart World
1 Player
Grand Prix
Time Attack
Speed Race
Battle Race
Challenge Game
Random Challenge
Bomberman
Ranking
Option
Controller
Memory Card
Screen Normal Wide
basics:
- follow your opponents trail to gain speed.
- don't touch your opponents from the back, you'll lose speed unless you have boost
- best drifting tecnique: ???
- clear all 16 Grand Prix Courses to unlock all Kart, Characters, and Stages.
sources:
Sub Rebellion
controls (type A):
Left Stick = steer
R1 = forward
R2 = backward
L1 = ascend
L2 = descend
R3 = rear view
square (hold) = shoot gun, lock on torpedos
triangle = special weapon
X = use the sonar (high visibility)
O (near the top of water) = surface, submerge
Right Stick = camera control
Select = change camera
basics:
- your pay, total treasure percent and the ability to purchase new upgrades will be based on your missions grades.
- total missions: 21
sources:
Gekibo 2 | Gekisha Boy 2 | Polaroid Pete
controls:
d-pad | Left Analog stick = move
X = jump (changes prospective a bit allowing you to see more)
square = dash
R1 = take photo
R2 = finder lock
L1 = flash (if you have it in the bottom left corner of the screen) -> aid in clearing the screen of stray projectiles and illuminating hidden subjects
L2 = zoom in
Start = pause, skip scenes
targets:
- Streets (Page 1 top left):
- main: hostage situation abord the train that bursts through the buildings
- hidden stage unlock: Right after the snow covered volcano jump up and snag a shot of the LEOX sign on the skyscraper in the background.
- Downton (Page 1 Top Right): The three Dancing Robots in the second alley after the Terminator.
- Fair (Page 1 second one down on left):
- main: floating train when it starts to take off with a trail of fire.
- hidden stage unlock #1: the roller coaster located after the ferris wheel and ticket booth.
- hidden stage unlock #2: the elephant trunk that peeks out of the tent. The tent is located under the train. Simply zoom in and snap a shot when the trunk sticks out.
- Circus Hidden (Page 1 second one down on right) = the flying elephant at the end of the stage.
- Roller Coaster Mini Game Hidden (Page 1 bottom left) (no one)
- Graveyard (Page 1 bottom right) = the ghostly face made out of spare parts when it smiles. It appears just after the jumping scarecrows.
- Nighttime Festival (Page 2 Top Left):
- main: near the end of the stage there are three flying objects in the sky.
- hidden stage unlock: the smoke ring that floats out midway through the level.
- Bath House (Page 2 top Right) : About midway through you will see a stack of three buckets. Use them as a step and jump up, you should now be able to see the female bathing section. Simply take a picture of the old woman.
- Sports Gym (Page 2 second one down on the left):
- main : Keep an eye on the basketball match. The ball will bounce off of one rim and go in the other net. The main picture in this stage is the ball going in the second hoop.
- hidden stage unlock: Zoom in on not the last window, but the one before it. It will open to reveal a Japanese flag.
- Track and Field (Page 2 Second one down on the right): At the end of the stage someone in a chariot rides by right in plain site.
- Traditional Japanese Town (Page 2 bottom left): After the two fighting swordsman there will be a row of sliding doors, simply snap shots of each door until you reveal a guy groping the female character. All you have to do is take a picture of her slapping the guy.
- Zoo (Page 2 bottom right): After you pass the charging rhino you will see a cow. Very quickly take a pic of it. A dog will then jump atop it's back. Again, take a pic as quickly as you can. Then a cat will jump atop the dogs back. Once more, take a pic as fast as possible. After that a chicken flies over and lands atop the cat. Wait until the chicken takes out a horn and then snap a shot of him to complete the stage.
basics:
- take as many pics as possible. You only get 50 points for each unused picture. Whereas taking pictures of noneventful things often nets you 100 points. Also, practice your skills, try to center all photos as best as you can.
- whenever you take a "cool" rated pic of an event, it will be added to that stages album.
(Press select when at the level select screen. Choose album from the menu to view it.)
- unlock and beat all the stages to play the final stage.
sources:
Space Harrier - Sega Classics Collection | Sega Ages 2500 Series Vol. 4 Space Harrier
controls :
Left Stick | d-pad = move, aim
square = normal fire
X (hold) = lock targets, release to fire homing missiles
R2 = normal fire (auto)
R1 = smart bomb
circle, triangle, L2, R2 = change camera
basics:
- unlock special continues from the main menu (from stage 6 and 13)
- Flash Bombs destroy powerups, so be careful when using them.
Power-ups are also destroyed when Flash Bombs destroy powerup ships.
- last stage: 21
sources:
Virtua Racing - Sega Classics Collection | Sega Ages 2500 Vol. 8: Virtua Racing -Flat Out-
controls:
Left Stick = steer
X = accelerate
square = brake
circle, triangle, L2, R2 = change camera
basics:
- unlock cars by earning Possession Points in Grand Prix Mode and then completing the current Set. Unlockable cars can't be used in Arcade Mode.
sources:
Monaco GP - Sega Classics Collection | Sega Ages ...
controls:
TODO
basics:
- unlock the beaten rival cars in Grand Prix mode.
sources:
Fantasy Zone - Sega Classics Collection | Sega Ages 2500 Series Vol. 3: Fantasy Zone
controls:
Left Stick | d-pad = move
square | circle = main fire
X = bombs
basics:
- beam powerups are temporary (20s), bombs are single-use (except Inf. Smart), while Twin Bombs and engine upgrades lasts until you lose a life.
- the store accessible from the Challenge mode menu allows players to use Gold collected in Challenge mode to unlock new options, weapons, and stages.
sources:
Sega Ages 2500 Series Vol. 30: Galaxy Force II
controls:
Left Analog = move
Right Analog = throttle speed -> better set as circle (brake)
L1 | circle | square = shoot
R1 | X = shoot lockon missiles
triangle = insert coin
Start = start
Select = open config menu
basics:
- the shield decreases with each collision. When it is destroyed it cannot be fixed!
The energy goes down pretty fast, so fly as fast as possible in order to preserve it.
When the energy is fully depleted the game is over.
Replenishing the initial energy points is accomplished by destroying enemies and accumulating an energy bonus that gets cashed in either when you come out of a tunnel inside the level or after you beat the boss.
- in a few areas reducing speed allows you to lock on to and destroy more enemies
- tap the brake button a few times to make the turns inside the tunnels.
- the game has only a single type of powerup, which increases the number of missiles that can be shoot in a single volley.
- last mission: 6
cheats:
- invincibility: in title screen, Press Pause seven times.
sources:
Tiny Toon Adventures: Defenders of the Universe (beta)
controls:
Left Stick | d-pad = move, aim throws
square = catch, throw (can be combined with a direction -> special throws)
X = jump
2x X (quick tap on the ground) = homing dash (can be combined with a direction)
2x X (quick tap in the air) = homing jump (can be combined with a direction)
circle = guard
circle (exactly before being hit) = counter attack
triangle = special attack (varies according to char) (unlimited)
L1 | R1 = camera left/right
Start = pause
basics:
- best char: Fifi (good special attack) | Shirley (teleport instead of jumping)
- the balls are the most powerful weapons to throw
Heavenly Guardian | Snow Battle Princess Sayuki
controls:
dpad | Left Stick = move, aim
X = shoot
X (hold) = rapid shoot
square = blizzard attack (freeze anything in the direction you are facing) (costs 5 snowballs)
circle = Toto circular attack (good for bosses) (costs 25 snowballs)
R1 = snowball dash -> temp. invincibility, buggy
powerup crystals:
green = homing (bad)
red = bombs (bad)
blue = rapid shot (good)
yellow = spread shot (good)
basics:
- you can collect powerup up to five times for added power.
The current powerup crystals are shown in the upper-left part of the screen.
When you die you lose all your powerups.
- the game will save your score and will offer you a stage select after you've beaten the game once.
sources:
PSP
controls:
d-pad = move, crouch, aim, climb ladders
[] = primary fire
O = grenades | secondary fire (check the counter in the top-left)
X = jump
R = change weapon (check the icons in the bottom-left)
L = special | frontal attack
L + [] = special melee attack
L + O = throw weapon
L + [] + d-pad up = special action
basics:
- easier char: Marco (his pistol does the damage of a Heavy Machine Gun)
- last MISSION: 7
sources:
Sengoku Cannon | Sengoku Ace Episode III
controls:
d-pad = move
triangle (tap) = shoot
square (hold) = autofire shot, slows you down
circle = cannon (more powerful than regular shot, but has a small recovery time) -> killing an enemy with a cannon shot turns all its bullets into coins and extra points, but only if you haven't hit him with a cannon before.
X = bomb (check the icons in the top-right)
basics:
- easier char: Koyori (2nd one) (has spread shot + side homing shots when fully powered)
- best strategy: hold the autofire shot to weaken enemies (check the enemies health bar on the bottom-right), then fire the cannon to finish them and clear their shots from the screen.
- there's no stunning effect when you crash into an enemy, doing this will incur in instant death.
- the only powerups are: "P" = increases the power of rapid/concentrated shots, and "B" = adds one bomb to the stock.
- extra lives/extends are at 400K, 1M and for every million points afterwards.
- last stage: 5
sources:
Dariusburst | Darius Burst
controls:
d-pad = move
triangle | square | circle (hold) = autofire shot + missiles
X (hold) = fire "Burst" laser (check the yellow bar ay the bottom-left, recharges when either destroying enemies or absorbing certain types of fire)
2x X = release "Burst" laser pod (press again to deactivate) (uses less energy than regular laser and can be aimed) -> easier to use against bosses
L | R (Burst Mode only) = switch weapon
basics:
- in addition to the standard Arcade mode, there's also Burst Mode, an extra difficulty mode with only one life and no continues. On the other hand the ships entire arsenal is fully upgraded from the get-go and the player can at any time switch between using missile, laser or wave beam. Burst Mode is unlocked by having completed Arcade mode with at least 3 different paths.
- easier stages path: ABCDH
sources:
Let's Go! Burunyanman Portable
controls:
d-pad = move
triangle (hold) = autofire normal shot
circle (hold) = autofire focused shot
X = bomb (check the bell icons in bottom-left) -> temp. invincibility + clear the shots onscreen
menu translation:
GAME START
EXTRA
PRACTICE/STAGE SELECT
HIGH SCORES
MEDALS/ACHIEVEMENTS
RESET?
OMAKE
TUTORIALS
ALBUM MODE
SCENE REPLAY
???
OPTIONS
...
basics:
- easier char: MAYNYAN (has homing adrenergic shots)
- whenever you get close to an enemy bullet (grazing) the action slows down and firepower gets boosted to new levels: normal shot is upgraded to an "adrenergic" shot and the laser from hold shot is thickened even further.
- last stage: 9
sources:
Hammerin' Hero | GenSan | Ikuze! Gen-San: Yuuyake Daiku Monogatari
controls:
d-pad left|right = walk
d-pad down | L = crouch -> use to avoid some attacks and obstacles
square = vertical smash (normal attack, quick but weak)
triangle = side smash (strong attack but slow) -> throw items in the BG and can iteract with items
X = jump
X, d-pad down + triangle = special attack (3 per stage + collect "SP" items to restock, check the yellow balls in the top-left) -> temp. invincibility
R = eat bento (if you have the bento icon) -> gives powerups and switch job (check the current job icon in the top-left)
basics:
- you die with 1 hit when you don't have any DEF helmet, but not just by touching most enemies.
Check when their weapon is glowing red for an upcoming attack.
- knock away the problems of people in stages (emotion bubbles over their head) to make them help you.
- collect ingredients in stages and visit Kanna before each stage and ask her to make bentos.
- you can switch job in the stage select menu and by eating bento mid-stage. Each job gives you different attacks and abilities.
- best job: Diver (unlocked after the stage 6).
- last stage: 12 - 500 km Above Earth
sources:
KOF: Sky Stage - Neo Geo Heroes: Ultimate Shooting
controls:
d-pad = move
O = shoot (hold for rapid fire) -> point blanking inflicts more damage
X = special move (char-specific. Tap for a level 1 attack, hold to charge up to Lv 3. Has some execution delay and req. the meter at the bottom-left charged)
/\ = bomb (check the "B" icons in the top-left. There are no restock items, only score-based restocks)
[] = enter provocation mode -> clear all screen bullets + incr. fire power, difficulty, and medals value
basics:
- easier char: ATHENA ASAMIYA (has homing side shots + teleport as Lv 1 Super Attack -> warp left and right repeatedly to easily avoid most aimed bullets)
- getting hit will deplete the green gauge on the top-left, repesenting your "LIVES".
There are no refills for this gauge, and when it reaches 0 you will gameover.
- whenever an enemy is destroyed, it releases medals that can be collected for bonus points.
There are 3 kinds of medals: copper, silver, and gold, in increasing order of value.
What kind of medal is released depends on how close the player is to the enemy when it is destroyed.
Getting hit within the level itself resets both the medal counters and the combo meter. Everything from then on (or since the stage start) will be on hold for the end-of-stage bonus.
- bosses have a MAX attack gauge that fills up during the fight and might be unleashed at any random moment for a special attack.
- the 2nd loop of the game (i.e. stages 2-1 to 2-6) can only be accessed if you collect 1 invitation card from each stage and 1CCing the 1st loop.
The invitation cards are generated by shooting the small char that appear in the background in the 2nd half of the stage.
- last stage: 5 (1st loop), 6 (2nd loop)
sources:
Neo Geo Heroes: Ultimate Shooting
controls (horizontal):
d-pad = move
O = shot
X = special move (char. specific, hold to charge, check the yellow gauge on the bottom-left)
/\ = bomb (char. specific, check the "B" icons in the top-left)
[] = enter provocation mode -> clear all screen bullets + incr. fire power, difficulty, and medals value
basics:
- easier char: SYD-III (has temp. invincibility special move)
- every destroyed target releases one or more medals whose value depends on how close you are to the enemy.
The other important component of the scoring system is the chain/combo, a counter that increases if you manage to destroy enemies in succession with no more than approximately 3 seconds between each kill.
- last ROUND/stage: 5
sources:
Mega Man: Powered Up
controls:
d-pad = move
X | circle = jump
square | triangle = shoot
L|R = quick switch special weapon
L+R = quick switch to Mega Buster
Start = pause and open sub-screen
Select = pause and open sub-screen on the save option
recommended stage order:
- Bomb Man (Use Rolling Cutter)
- Ice Man (Use Hyper Bomb)
- Fire Man (Use Ice Slasher)
- Oil Man (Use Fire Storm)
- Cut Man (Use Super Arm or Fire Storm)
- Elec Man (Use Rolling Cutter or Ice Slasher; he's technically weak against Oil Slider, but I find that too difficult to use)
- Time Man (Use Thunder Beam)
- Guts Man (Use Time Slow and Hyper Bomb)
basics:
- visually, super-deformed Mega Man stands barely over a block in height. However, anything below 2 blocks will hit him while he's standing. This means many things that look like they are going to go over his head will kill him even if they just graze the top of his helmet.
- special weapons do not do anywhere near as much damage to the Robot Masters anymore (but, conversely, their weapons don't hurt you nearly as badly either). So it's really not as critical here that you use the "correct" weapon against a particular Robot Master. And this means you're more open to simply doing the stages in whatever order you feel like.
To unlock a Robot Master, you must defeat him using only Mega Man's arm cannon. If you use any special weapons at any time during the fight, even for just one hit, the Robot Master will be destroyed instead of liberated.
- best unlockable chars: Proto Man (complete all 100 Challenges), Mega Man C / Rockman C (complete New Style mode on Normal as any form Mega Man to unlock it)
- you can now exit a stage at any time, even if you haven't completed it.
Your extra lives are refilled to 2 whenever you exit a stage, if you had less than 2. (Equivalent to having the Spare Charger part.)
- your weapons are refilled every time you die.
- you get the benefit of the Energy Balancer in this game without having to obtain it as an actual item.
- your normal shots don't go through walls here (but, conversely, neither do the shots of many enemies). Some special weapons can still go through walls.
- the game doesn't offer for you to save after stages. You have to remember to do it yourself on the stage select screen (go to the options screen).
sources:
Wipeout Pure
sources:
Wipeout Pulse
controls:
Analog stick | d-pad left|right = steer
Analog stick | d-pad up|down = adjust pinch -> press up when airborne, down when going downhill
X = accelerate
square = fire, use pickup
circle = absorb pickup -> recharge energy (check current level in the bottom-right)
triangle = look back
L + R = brake
L | R = left | right airbrake
Analog stick | d-pad left-right-left | right-left-right (quick taps in midair) = barrell roll -> gain boost when landing, drains some energy
basics:
- best beginner ship: AG-SYSTEMS, ASSAGAI
- when you start a race, hit X when "Go" appears and you will start the race with a boost.
sources:
Prinny: Can I Really Be the Hero?
controls:
d-pad = move, duck
X = jump (fixed length) (press again to double-jump)
X + down (in midair) = Hip Pound attack (stun most enemies and activate switches)
square = attack
square (in midair) = Prinny Barrage
triangle = pick, throw (stunned enemies, bombs, etc.)
circle (hold) + direction = release to dash -> temp. invincibility, pass enemies
down (while dashing) = roll attack
basics:
- throwing a stunned enemy that is low on health will cause an explosion that works the same as a bomb.
sources:
Ultimate Ghosts N Goblins | Goku Makai-Mura Kai
controls:
d-pad = move, aim, crouch, climb ladders
2x d-pad left|right = run
d-pad down = use shield (if equipped)
X = jump (press again to double-jump, once unlocked) -> avoid unnecesary jumps: remember that once you jump, you cannot change Arthur's jump curve. Just because there's no enemy in front of you when you jump doesn't mean there won't be one there when you land.
square = attack
circle = use magic (req. an armor + the magic gauge on the bottom-right, collect blue orbs or an armor to refill) -> temp. invincibility + damage all nearby enemies
triangle = quick open Warp Staff sub menu
L = quick open Shield equip sub menu (the number next to each shield shows its remaining strength/hits)
R = quick open Magic equip sub menu
Start = open subscreen menu (check STATUS, equipments, etc.)
Select = open system menu (load a saves game, change options and go back to the menu)
basics:
- best weapon: daggers, SCATTER CROSSBOW, Swallow Blade (aka Homing Anchor), BOOMERANG SCYTHE
- getting hit will deplete the green orbs in the top-left until you get naked and die with a single hit. Collect armors to restock.
- blue and red POWs will upgrade your weapon power, and are found in red chests. If you get hit, you lose the bonus.
- Magic is obtained from items called Magic Crystals which are usually hidden in Blue Chests. They look like bubbles with the magic's image inside.
- transformation magic projectiles (in the form of an orb with purple and blue bubbles revolving around it) and falling into a witch's cauldron will change your form, and disable some of your abilities.
If you get hit, you stay in your new form for quite a while before changing back, or until you get hit.
- 1 Warp Staff is hidden somewhere in each area. Once you find the Warp Staff for an area, you can use Magic Power to warp to that area at any time.
- last Stage: 5 (you need at least 22 Light Rings to access the final boss)
sources:
Saru Get You - Piposaru Racer
controls:
TODO
main menu translation:
New Game
Continue
Grand Prinx
Free race
Time attack
Maritime Play? (マリチプレイ)
Report
Option
Save
Tokobot
controls:
Analog Stick = move
d-pad = open the menu of Karakuri Combinations. When using a Karakuri Combination, with the D-PAD you can deactivate it.
X = jump
O = open doors, activate elevators, check things & places, cancel selections. Also to PULL, PUSH and LIFT some moveable objects.
/\ = switch between the 3 Tokobot FORMATIONS.
R (hold): JOINT. Needed for the Joint Actions. While jointing, you can't fall from platforms.
R (hold for a long period): Calls back any lost Tokobot.
SQUARE: While jointing with R, performs the Joint Action of the current Formation.
L (press): Centers the camera behind Bolt. There are some places where this is not possible.
L (hold): Activates Bolt's point of view. Use the Analog Stick to move it. There are some place where this is not possible.
SELECT: Switch between a close and a far camera angle.
START: Opens the Options Menu.
FORMATIONS and joint actions:
O (Tokobots surrounding you) -> JUMP with X and press SQUARE to STAMP.
It is useful to hit BUTTONs in the ground, to hit enemies from above, and to destroy objects.
V (Tokobots aligned after you) -> joint with R and press SQUARE to THROW.
It is useful to hit high enemies, press BUTTONs on the wall, to destroy objects and also to create ladders and bridges (when hitting a magnet).
U (Tokobots split in two groups, one at each of your sides) -> joint with R and press SQUARE repeatedly to SPIN (slowly first, then faster). Be sure not to collide with anything or you will not reach the fast phase.
In the fast phase, SPIN is useful to activate some gears, to destroy objects and to hit enemies from the side.
basics:
- you can save your game at the shining yellow circles (SAVE POINTS) that you will find at specific places.
You can also save at Canewood Lab.
- You can revisit places where you have been before to collect more parts.
Also, sometimes you will be forced to return somewhere, so you can use a new ability and reach a new zone.
- You can only use the joint actions with a minimum of 4 (four) Tokobots near you.
If not, then you will have to call them back holding the R BUTTON. Note that when you exit a room, all the Tokobots come automatically back.
sources:
PS3
cheat tables for Artemis:
Aquapazza: Aquaplus Dream Match
sources:
After Burner Climax
controls:
LS = move, aim (quickly invert direction for a dodge move)
X = main gun
[] = fire lock-on missiles (limited, check the icons on the bottom-left)
L2|R2 = decelerate|accelerate (check the SPEED)
L1|R1 (hold when the CLIMAX gauge on the bottom-left is full) = enter "Climax Mode" = slowdown time for easier dodging + expand lockon cursor
basics:
- play the "ARCADE" mode to unlock special "EX Options".
You have unlimited lives in TIME ATTACK, but you can get only medals in this mode and EX options aren't effective.
- all the fighter jets have the same specs, so choosing one or another makes no difference.
- getting hit will deplete the "ARMOR" gauge on the bottom-right.
When empty or crashing you will lose a life.
- last stage: 15 (13 if you don't complete all the emergency orders along the way and take down the prototype jet that will appear on stage 13)
sources:
Galaga Legions DX
controls:
LS | d-pad = move
RS = aim + shoot
L1|R1 = switch focused vs multi-directional shot
L2|R2 = fixed frontal shoot -> not very useful
basics:
- always aim at bombs and wave bosses.
sources:
Sega Rally Online Arcade | Sega Rally 3
Ape Escape On the Move | Furi Furi! Saru Get You
sources:
Child of Eden
controls:
LS = aim, lock laser
X = auto lockon laser (hold to lock on targets, release to fire)
[] | R2 = autofire shot -> less powerful than laser, effective against purple targets and enemy bullets
O = bomb-like Euphoria (req. small blue icons on the bottom-left. Collect pink items to restock)
basics:
- getting hit will deplete the blue slots on the bottom-right. Shoot blue orbs to refill.
- beat the same levels multiple times on Normal mode to get stars and unlock more levels.
You get more stars if you score more points.
You get no stars when playing in "Feel Eden" (=God mode) difficulty.
The five star cutoff is rated at 800k points for every archive. The key to hitting these marks is to not simply shoot everything on screen, but to consistently achieve perfect octa-locks. To achieve a perfect octa-lock, you will have to acquire 8 targets and then release it in time with the beat.
The multiplier, which goes up to x8, is the most critical aspect of scoring high. However, the multiplier only activates on an octalock. Firing at less than eight targets will not cause you to lose your multiplier. If you are slightly off-beat and score a "good" rating, your multiplier remains intact. The only way to lose your multiplier is to fire an octalock completely off beat, so if you have eight targets, make sure you fire on time, even if bullets are coming at you.
Lastly, you will get a 100k Euphoria bonus for finishing the level with all 3 euphoria unused.
It is important to learn which enemies drop them (2 per archive) and trying not to use them.
You get 100k for 3, 50k for 2 and only 25k if you have one.
sources:
Sengoku Basara 4 Sumeragi
controls:
Left Stick = move
X = jump
[] = normal attack (hold to charge)
/\ = strong attack (diff. if combined with a direction)
L1 = guard
O (when the blue gauge on the bottom-left is full, kill enemies to refill) = bomb-like Basara attack
R1 = special attack (unlocked by leveling up)
R2 = special skill (unlocked by leveling up)
L2 = partner command
d-pad (customized in the Settings) = switch char.
d-pad (customized in the Settings) = switch special skill
d-pad (customized in the Settings, when the yellow gauge is full) = activate Maximumn Style mode -> slow down enemies
Start = pause, skip cutscenes
main menu translation (from left to right):
- Free Battle
- Gallery
- Settings
- Manual
- Online Basara Shop
- Sengoku Creation: Extreme (story mode)
basics:
- easier chars: Tsuruhime (has ranged attacks)
- getting hit will deplete the yellow gauge on the bottom-left. Collect rice balls from red chests to refill.
- last battle in story mode: 5
sources:
Sonic Unleashed
controls (warewolf):
LS = walk, run
RS = move camera
X = jump (press again to double-jump)
/\ = attack
[] = attack throw
O = grab
L1 = guard
R1 = unleash special
L2|R2 = dash
Start = pause and check status, inventory, skills
Start + Select (multiple times) = skip cutscenes
sources:
Nier Replicant | Nier Gestalt
controls:
LS = move
RS = move camera, aim magic attacks
R3 = reset camera, lockon enemies
X = jump
O = talk, examine -> use near dead animal corpses and blinking lights on the ground to obtain items
[] = quick melee attack (hold to charge)
/\ = strong melee attack
L1|R1 = magic attack (hold to charge/autofire, req. the blue gauge on the top-right, autorefills over time)
L2 = defend
R2 = evasive roll
Start = pause and change equipment/magic attacks, skip cutscenes
d-pad up = item menu
d-pad right = spear menu
d-pad down = single-handed sword menu
d-pad left = two-handed sword menu
basics:
- getting hit will deplete the green gauge on the top-right. Use medicinal herbs to refill.
- your next objective is always pointed in the map with a big red mark.
- use mailboxes to save your progress, marked in the map as blue circles.
sources:
Hard Corps: Uprising
controls:
LS|d-pad = walk, crouch, aim
2x LS|d-pad | L1|R1 = run, midair dash -> cross bigger gaps than regular jumps
X = jump (press again to double jump and reach higher platforms)
[] = shoot with current weapon
/\ = switch weapon (check the icons in the top-left)
O (while running) = special action (if you have an Action Chip equipped)
L2 = strafe -> locks in firing position, useful during driving sequences
R2 (hold) = stationary aim / aim without moving
basics:
- in Raising mode you can buy upgrades at the end of each stage and resume from any beaten stage.
- easier char: Bahamut
- getting hit will deplete the green life bar on the top-left and lose your active weapon. Collect heart items from black boxes to refill, or you will lose a life.
- you can obtain Weapon Items by shooting capsules out of sky:
- Machine Guns (green capsule with letter "M")
- Spread Shot (red capsule with letter "S")
- Chain Laser (blue capsule with letter "L")
- Ripple (light blue capsule with letter "R")
- Heated Plasma (orange capsule with letter "H")
- Crash Gun (yellow capsule with letter "C")
- best weapons: Machine Gun, Spreader, Laser (auto aim)
- you lose your current weapon when hit and when grabbing a new one.
- you always lose health when touching any enemy (check the green gauge in the top-left). Collect...
- best powerups to buy: Rapid Fire, Automatic Fire, Reflect Action Chip.
- the only way to unlock the 2 extra chars is via DLCs.
- last stage: 8
cheats:
- Unlock 30 lives: To unlock 30 lives for purchase, at the title screen press Up, Up, Down, Down, Left, Right, Left, Right, L3, R3. You will be able to purchase 30 lives on the shop menu for 57,300,000 Alternately, when you complete the game this upgrade will become available.
- Unlock 573 Continues: Completely run out of lives and continues a total of 100 times between both arcade mode and rising mode to unlock 573 continues in both modes. Running out of lives and choosing not to continue when you have continues available will not count towards this total.
sources:
Puppeteer
controls:
Left Stick = move, crouch
X = jump
L2 = roll -> avoid most enemies attacks
[] (when unlocked) = scissors attack -> also use to climb over leaves, fabrics, etc.
L1 (when unlocked) = raise shield -> reflect most magic attacks
O (when unlocked) = throw bomb (combine with Left Stick down to drop below)
/\ (when unlocked) = hookshot -> interact with hooks and move objects, also grab enemies
R1 (when unlocked) = grab pegs and pull or push blocks, body slam (in midair)
Right Stick = move the companion
R2 = touch objects with the companion -> use on trembling objects
d-pad left|right = select head
d-pad down = head action -> use with the corresponding head when you see a spotlight in a stage and to unlock minigames and other bonuses
basics:
- the heads at the top-left represent your health.
When you take a hit or fall you loose your current head, but you can recover it immediately if it fails on solid ground.
You can also gain extra heads from enemies and by touching midair vases with your companion.
- last Act: 7
sources:
Ridge Racer 7
controls:
Left Stick = steer
X = accelerate
[] = brake
O = rear view
/\ = change view
R2 = use Nitrous x1 (req. 1x full yellow canisters in the bottom-left, refill while drifting)
L2 = use Nitrous x2
R2 + L2 = use Nitrous x3
R1|L1 = up|down shift (MT only)
basics:
- choose "MILD" cars for tighter handling (easier to handle).
sources:
Wipeout HD
controls:
Left Stick left|right = steer
Left Stick up|down = adjust pinch -> press up when airborne, down when going downhill
X = accelerate
[] = fire/use pickup
O = absorb pickup -> refill shield (check the blue vertical gauge in the top-center)
L1 = flip, EMP
L2 | R2 = left | right airbrake
2x L2 | R2 = sideshift left | right -> use with tight corners
R1 = look back
/\ = change view
L3 = voice chat
Left Stick | d-pad left-right-left | right-left-right (quick taps in midair) = barrell roll -> gain boost when landing, drains a lot of energy
basics:
- best beginner ship: AG-SYSTEMS
- unlock grids in Campaign Mode to obtain new ships and tracks.
- the campaign is set out into a series of grids, with the object to advance through
each grid and earn enough medals to complete them. All of the game modes below
are found in the grids. Each race will have a set of requirements for a bronze,
silver or gold medal, and these medals are worth 1, 2 and 3 points
respectively. Each grid has a points requirement to advance to the next.
Completing a grid cell will unlock all adjacent cells, meaning you do not have
to complete all cells to advance to the next grid.
- for a turbo start, press X the exact moment the announcer says "GO".
- in Zone events, The speed of the craft will increase through "Zones" every 10s.
The shield energy can only be recovered by scoring a Perfect Zone (giving a 10% recovery), so try to be as conservative as possible.
sources:
Dragon's Crown
controls (TYPE A):
Left Stick = move, aim some weapons, crouch
X = jump
[] (tap) = attack (can be combined with a direction)
[] (hold on the ground) = guard with the shield
[] (hold while moving) | 2x Left Stick = dash
R1|R2 = evade -> use often to avoid attacks and break free from grabs
O = special attack (char class-specific, some have recharge time)
/\ = grab weapons and bones on the ground
d-pad left|right = select item (must be equipped before each quest)
d-pad down = use item
Right Stick = point at locked chests and doors, press L1 or the Stick to ask Rannie The Thief to open them
Start = pause end change game options
Select = pause and show the map if in town -> quick warp to locations
basics:
- easier classes: fighter (has auto-block skill, but slow movements), elf (quick movements, can do multiple special attacks from a distance with the arrows. Get Holdout Dagger+Backstab skill for good combo attacks, and Salamander Oil to burn enemies)
- before each quest, visit in order in Town:
- the Temple to revive some spoils and "pray" for something (they are all beneficial, but only effective in the next quest)
- the Inn to form your party fo the next quest
- the Equipment menu to set the new items found
- the witch Morgan's Magic Item Shop to sell unnecessary items, repair those in need, and stock some potions.
- the Guild to spend Skill points and accept new quests.
- while on a quest most of the time you proceeed from left to right, killing enemies until the next exit is unlocked.
There are also some hidden doors that can be found, often leading to high-ranked items.
- during quests: break wooden boxes and open chests to find coins, new weapons and items,
collect bones with /\ that you can later revive at the Temple for new allies.
Food is used immediately once you stop moving or attacking to restore your health (check the gauge on the top-left).
You can also restore your health by using potions.
- when you die you can continue immediately in exchange for some money.
When one of your companions dies you can revive him/her in exchange for some money by pointing and clicking with L1 at his/her icon in the top-left (not very useful at the end of a quest, since you'll find many of them).
- at the end of a stage, don't appraise everything, but only the spoils with higher rank (C or higher). Then sell the others.
- you get a Skill point for completing each quest, which you can use at the Adventurers Guild to obtain new skills/abilities.
- most useful skills to unlock: Evasion, Power Shot, Impact Arrow, and Boots (some are class-specific)
- try to complete secondary quests before the Lost Woods quest. After that you must pay money in the Stables to select which stage you want to go.
- the game automatically saves every time you alter the data in any way, but you can also save manually in the Inn.
- after unlocking rune magic, you can touch the marks found on walls with the Right Stick + the colored rune stones in your possession to perform a rune spell.
Visit Lucain for a list of the available spells and buy more rune stones to carry around (some have limited uses).
Useful spells: DAP = Durability And Potency (=raises attack, needs the A and P from walls), SOD = Sigil Of Death (high chance of instant death, only needs the O from walls), SOL = Salve Of Life (heals, needs the O and L from walls).
- last quest: Lost Woods (2 loops)
sources:
After Burner: Climax
controls (TYPE A):
Left Stick = move, aim, lockon missiles -> use on distant targets
X = fire gun (unlimited) -> use on close targets
square = fire missiles (unlimited, but needs reloading, check the icons in the bottom-left)
R2|L2 = accelerate|decelerate (check the SPEED gauge in the bottom-left)
R1|L1 (when the CLIMAX gauge in the bottom-left is full) = use CLIMAX (destroy enemies to refill) -> slowdown time + unlimited missiles
basics:
- play the game in arcade mode to unlock "EX Options" when you meet certain criteria (play different branches, down rate over 70%, high scores, etc.)
Enabled EX Options only take effect while playing Arcade Mode.
- there's not much of a difference between the planes.
- quickly change turning direction for a barrell roll -> use to avoid incoming missiles
- there are no ingame ARMOR and life extends (check the gauge and the plane icons in the bottom-right).
- last stage: 15 (to get to the final stages in all modes, you must complete at least 3 out of the possible 6 "Emergency Orders")
sources:
Mamorukun Curse! | Mamoru-kun wa Norowarete Shimatta!
controls:
d-pad = move, rotate aim
square | circle = shoot (hold for auto-fire + lock direction, release to attract candies)
X | triangle | R1 = curse shot (hold to charge, check the gauge at the bottom-left, has longer cooldown time depending on the charge) -> absorb bullets
basics:
- easier chars: Kinya (has spread shot), Beniko (has adjustable spread/focus shot), Nowa Kinugawa (homing shots)
- cursing small enemies will kill them instantly.
Cursing a lager enemy will deal constant DOT (Damage Over Time) depending on the charge level of the curse shot. This will cause the cursed enemy to fire "suicide bullets".
By defeating a cursed enemy, your curse gauge will be fully restored and any bullets onscreen will be converted into candies.
- drop a curse circle in an empty space and walk inside to curse yourself and temp. increase the firepower.
When finished will disable curse shot for 5s and you will lose 1 rank of your normal attack power, so avoid using often (good against bosses).
- pick up "P" capsules to increase the main shot power (up to 4 levels).
- getting hit will deplete 1 life. Collect heart containers to restock (check the hearts in the bottom-left).
- last stage: 5 (must beat at least 4 stages before the timer runs out to reach the final boss)
sources:
Tekken 6
sources:
Tekken Tag Tournament 2
sources:
Soul Calibur IV
controls:
Left Stick | d-pad = move, crouch, jump
2x d-pad = run, sidestep
[] = horizontal strike
/\ = vertical strike
[] + /\ = alt. attack
O = kick -> constant guarding can destroy your armor but also diminishes your Soul Gauge (= the colored gem next to the HP), and makes you vulnerable to a Critical Finish . Land hits to regenerate.
X = block/guard
X + /\ | L2 (near opponent) = throw (combine with a direction for alt. throws)
X + [] = jump over opponent
L1 | [] + /\ + O + X (immediately after a Soul Crash) = Critical Finish -> instant defeat
R1 = switch between party members (Story Mode and Tower of Lost Souls only)
R2 | curcle+X = taunt, trigger manual skill (Story Mode and Tower of Lost Souls only)
basics:
- easier chars: KILIK, TAKI
- square+triangle and square+circle combined with directions are easy and effective combos to use with most chars.
- play STORY mode on a low difficulty level to easily unlock new chars, stages and items (only 6 ROUNDS long).
- next to the HP Gauge there is a colored gem that represents the "Soul Gauge".
The gem changes color when the player guards and is attacked.
The color gradually changes from green to blue and or to red and then flashing red when the Soul Gauge is empty.
The player's own Soul Gauge will regenerate if he or she makes an attack and hits the opponent (guarding or otherwise).
When empty, the opponent will get a short chance to perform a powerful Critical Finish move, which will defeat the opponent instantly.
- keep hitting opponent whilst they are guarding or guard impact thier attacks.
When their guard is broken, indicated by the character staggering and red "lightning" surrounding them. This is a soul crush. During soul crush press L1|A+B+K+G to do a critical finish.
- the vertical bar on the left shows the condition of your armor.
- last stage: 6 (Story mode), 8 (Arcade mode)
sources:
Soul Calibur V
controls:
...
basics:
- easier chars: Pyrrha, ...
sources:
Virtua Fighter 5
controls:
Left Stick | d-pad = move
2x Left Stick | d-pad = dash (hold to run)
triangle = Punch
circle = Kick
square = Guard
X = Punch
L1 = Punch+Guard (throw near opponent, throw escape)
L2 = Quick Recovery (Punch+Guard+Kick)
R1 = Punch+Kick
R2 = Kick+Guard
sources:
3D Dot Game Heroes
controls:
Left Stick | d-pad = move
X = primary attack (can rotate the sword while holding down the button), interact
[] (hold) = dash+attack (can change direction while dashing with Left Stick | d-pad)
O = secondary attack|use item (some req. MAGIC, check the icon in the top-right)
R1 = guard with shield
L2|R2 = quick switch secondary attack|item (check the icon in the top-right)
/\ = open items menu, equip
L1 = show the map (...)
Start = pause the game. From the pause menu you can save, load, change the options, etc.
basics:
- for a better view, switch to CAMERA 3 in the SCREEN OPTIONS.
- collect and buy red apples or potions to refill your LIFE/health in the top-left.
- collect and buy green jars or potions to refill your MAGIC meter in the top-left.
- potions req. empty bottles to store in, but can be used at any time.
- collect coins worth "Gol" to buy stuff in shops.
- it is much more effective to position yourself diagonally opposite the enemy, where it cannot easily hit you, and then extend your sword and rotate it in the direction of the enemy, hitting it with the sweep. This is also extremely effective for hitting multiple enemies at once.
- some enemies will have a crown over their head at random. These enemies are faster than their normal counterparts, and often times much more dangerous.
- visit the blacksmith in villages to upgrade your sword.
Note that all upgrades you apply to a sword require you to be at full health to take effect.
- Small Blocks are traded to King Block in area E2 for swords.
- best items to buy: Tent=restores both health and magic fully, and can be used an infinite number of times on the world map. For those annoying unexpected deaths, you can bring along Wonderdust, which will revive you when you die. Finally there are Wind Wings. These teleport you to a location of your choice.
- talk to the sign master in Wardna's House, he'll ask you to explore the world and find his signs. There are 10 in total. When you find them all you'll obtain the Super Key, which can open every locked door.
- last temple: Wind Temple
sources:
PSV
PS4 controller pairing on PSTV:
the first time you use a controller or when you want to use the controller on another system, you must perform device registration (pairing).
Connect your system and the controller with a USB cable when your system is turned on, and then press the PS button.
DS4 menu navigation:
PS button Turn on your system, or display the LiveArea™ screen or home screen.
PS button (press and hold) Turn your system off, or adjust settings for the controller.
Operations that you can perform are displayed. Available operations vary depending on the situation.
Directional buttons/Left stick Select items.
Cross button Confirm the selected item.
Circle button (press and hold) Cancel an operation, or close the LiveArea™ screen.
Share button (left of the touchpad) mapped to Select on the PSV
Options button (right of the touchpad) mapped to Start on the PSV
sources:
Touch My Katamari | Katamari Damacy No-Vita
controls (Classic Controls):
LS + RS (same direction) = move (keep pushing near walls to climb)
LS + RS (opp. direction) = sharp turn
2x LS + RS (cycle outward) = dash
L | 2x LS + RS (cycle inward) = quick 180° turn
R = jump
Select = FPV (use the R|L buttons to zoom in|out)
touchscreen pinch in|out = shrink|stretch the Katamari -> stretching it lengthways in order to roll over more objects or squashing it upwards to fit into tighter areas.
basics:
- talk to the "Fans" on the right of the king head to play stages.
Fans will give you candies when you complete requests.
You can exchange the candy for various items on the left of King's head:
- Fashion Stylist = clothes for the King
- Music Clerk = unlock BGMs
- Mode Clerk (shown when the final request is cleared) = enable "Katamari Drive" (=faster rolling) and "Eternal" mode (=) for each request
- each stage contains special items called "curios" (minor collectables).
- last stage/request: Make It Big 8: Royal
sources:
Gravity Rush | Gravity Daze
controls:
LS = walk, run
RS = move camera, aim
X = jump
R = float (use RS or tilt to aim, then press again while floating to shift gravity and fall towards the blue circle marker. Press R again to stop in midair or press L to drop ro ground. req. the circular blue gauge on the top-left)
L (in midair) = restore normal gravity -> drop to ground
[] = kick (Gravity Kick in midair -> more powerful)
touchscreen swipe in any direction = evade
2 fingers on screen = Gravity Slide (shake VITA to jump while slinding)
/\ (when there is an icon in the gravity gauge) = use special power attack (combine with a LS direction for a diff. attack. Unlocked by discovering Power Trees in the Rift Planes)
O = Stasis Field -> grab objects or people (hold to pick more objects, press again to throw towards the blue circle marker -> use as an attack for shielded enemies. The object will follow you around if you drop to the ground)
Select = brings up the map (the red thunder icon is the next main story mission, green/orange "!" icons are optional side quests. Tap an icon to set the Navi guide)
Start = pause, skip cutscenes
d-pad up = FPS (use RS to look around)
d-pad down = reset camera
special powers:
- Spiraling Claw: The smaller version of your finisher when you use on bosses
- Gravity Typhoon (/\ + LS up): Launch rocks that track enemies -> the best power in the game
- Micro Black Hole (/\ + LS down): Make a black hole that moves around hurting people
basics:
- getting hit will deplete the green gauge in the upper-left. collect green vitality gems to refill.
You take no damage when falling from any height.
- manholes acts as warp points in the overworld (green icons on the map).
- the weak spot of "Nevi" enemies is the eye.
Nevi can also grow protective shells, but these cannot grow back quickly if destroyed. These shells sometimes hide additional eyes.
- collect purple crystals to upgrade your stats in the map menu.
The level cap for all of her powers are tied to the reputation with the locals; the higher her standing is with the public, the higher the level the powers can be upgraded to.
- last episode: 21
sources:
PS4
Gravity Rush 2 | Gravity Daze 2
LS = walk, run
RS = move camera, aim
X = jump
R = float (use RS or tilt to aim, then press again while floating to shift gravity and fall towards the blue circle marker. Press R again to stop in midair or press L to drop ro ground. req. the circular blue gauge on the top-left)
L (in midair) = restore normal gravity -> drop to ground
[] = kick (Gravity Kick in midair -> more powerful)
R2 = evade
L2 = Gravity Slide (consume the gravity gauge)
/\ (when there is an icon in the gravity gauge) = use special power attack (combine with a LS direction for a diff. attack. Unlocked by discovering Power Trees in the Rift Planes)
O = Stasis Field -> grab objects or people (hold to pick more objects, press again to throw towards the blue circle marker -> use as an attack for shielded enemies. The object will follow you around if you drop to the ground)
d-pad right = show map
basics:
- getting hit will deplete the green gauge on the top-left. Collect green Vitality Gems to refill.
- collect purple gems to powerup your skills and attacks in the "Power Up" menu.
Statis Field is extremely useful and much more effective in clearing out mobs compared to gravity kick.
- in this game you raise your health and the gravity gauge only by leveling up.
You levelup automatically after completing story missions and side-quests.
- last Episode: 27
sources:
Wipeout 2048 - WipEout Omega Collection
controls (WIPEOUT):
LS | d-pad = steer, pitch
X = thrust
L2|R2 = left|right airbrake
2x L2|R2 = sideshift
[] = fire/use pickup (check the icon in the bottom-left)
O = absorb pickup -> refill some ship health
/\ = switch camera
RS = look back, spin, EMP
basics:
- if you press Turbo just when the timer reaches GO you will get a boost in speed when you start the race.
sources:
A Certain Magical Virtual-On | Toaru Majutsu no Virtual-On
controls:
Right Stick = move
Left Stick = rotate camera
X = jump (press mid-air to land)
[] = dash (press mid-dash to cancel)
O = lock
/\ = melee attack
R2 = Right Weapon (req. the right blue gauge), skip dialogues during cutscenes
L2 = Left Weapon (req. the left blue gauge)
R2 + L2 = Center Weapon
L1 = alt. Left Weapon
R1 = alt. Right Weapon
L1 + R1 = alt. Center Weapon
touchpad = Voost Weapon
menu translation:
Tutorial
Continous battles
...
Smart (auto lock-on)
Veterano (manual lock-on)
...
sources:
XBOX
progressive scan enable (NTSC only, req. component cables):
open in the MS dashboard, go to Settings -> Video, and enable 480p, 720p and 1080p
trainers IGK key combinations:
IGK, IGK1 (Press both thumb sticks)
IGK2 (LEFT Thumb + down on D-Pad)
IGK3 (RIGHT Thumb + down on D-Pad)
IGK4 (RIGHT Thumb + Up on D-Pad)
https://www.xbmc4xbox.org.uk/wiki/Using_Trainers
Dead or Alive 3
sources:
Ninja Gaiden Black
controls:
Left Stick = move (hold to run)
A = jump, climb walls
X = quick attack (change weapon in the menu), interact, grab walls
Y = strong attack
Y (hold) = charged attack
B = projectile weapon (change weapon in the menu)
Y + B = use equipped Ninpo magic spell (if you have some fireballs under your health bar)
X + A = jump towards the nearest enemy (Wind Run)
X+A, A (near an enemy) = jump on their head and stun them, then land behind them (Wind Path)
LT (hold) = guard
LT + LS direction = roll
RT = centre camera
White = karma display switch
Black = display map
Start = pause and bring up the menu
basics:
- to play in easy difficulty: die 3 times consecutively in Chapter 1. Ayane will ask you, "Do you really give up the way of Shinobi?" Answer yes to begin Ninja Dog Mode.
- collect essences: blue=health, red=Ninpo, yellow=money.
- weapons can be upgraded at the blacksmith in Muramasa shops. Health can be upgraded with the Lives of the Thousand Gods. Ninpo spells can be upgraded with the Jewel of the Demon Seal.
- collect Golden Scarabs and bring them to Muramasa shops to receive powerups.
- beat the game on any difficulty to unlock the Mission Mode. Beat 5 missions to unlock 5 more.
- last chapter: 16
sources:
Double S.T.E.A.L. The Second Clash
controls:
Left Stick = steer
Right Trigger = accelerate
Left Trigger = brake
B (hold) = reverse accelerator, side brake
Y = use boost (check the "DASH" counter at the bottom-left)
Right Stick = rotate camera -> use to view your surroundings. Some missions and secret vehicles will be easier to accomplish and obtain with this feature
d-pad up = toggle between 1st and 3rd person views
white = zoom in
sources:
Murakumo: Renegade Mech Pursuit
sources:
Quantum Redshift
controls:
Left Stick = steer, tilt back|forward
RT = accelerate
LT = brake, slide (tap slightly)
B = fire homing weapon (red)
X = fire non-homing weapon (blue)
Y = activate shield (yellow)
A = use turbo (check the "Turbo" counter in the bottom-right, refilled after each lap)
black = change camera
white = rear view
Back = reset ship on track
basics:
- easier pilot/ship: Jordan Reynolds
- collect colored powerups to restock your weapons (check the slots in the HUD at the top):
red=guided weapon, blue=unguided weapon, yellow=shield.
The star "Mega-up" item is the equivalent of getting 1 red, blue, and yellow powerup all at once.
Try to get the shield when you are in 1st place, and use it as soon as you get an incoming "ATTACK WARNING".
When not in 1st place take the red or blue weapons.
- the "Bonus chip" adds points to your total, which you can convert to cash after races to increase your ship stats (separate for each pilot).
- most tracks have shortcuts, and you won't slow down much by going off track.
- successfully complete Amateur, Expert, or Master modes with any of the 7 original pilots to unlock their nemesis.
Each of these tournaments presents a higher level of difficulty that requires the racer to win more races (with winning only coming by 1st place victories).
cheats (after you type in "CHEAT" as your player profile name, go to the Options Menu and then to the Cheats tab and type in the following):
All Craft Upgrades RICEitup
All Future Pilots Nematode
Bonus Objectives Complete GIMME
Infinte Shields ThinkBat
Unlimited Turbo FishFace
Unlock all Easter Eggs CHOCchoc
Unlock all the Speed Types zoomZOOM
Unlock Every Track headSLAP
sources:
Gunvalkyrie | Gun Valkyrie
controls:
Left Stick = walk, run forward/back, rotate around
Left Stick (click) = boost dash
LT (tap) = jump
LT (hold) = boost jump
Right Stick = twist, change locked target
RT = fire current weapon
Left Stick (click) + Right Stick (click) = bomb attack (req. GV Fuel, obtained by collecting the blue orbs left by enemies or by comboing)
Y = switch to Primary Weapon (changes accrding to char)
X = switch to secondary Weapon (Kelly only)
B = switch to Plasma Hook (only hooks onto the Purple glowing objects in the Indoor Stages). Press RT to use.
white = view the map -> extremely useful during seek and destroy missions
black = view the timer
basics:
- best char: ?
- whatever enemy is closest to the center of the screen will become your weapon's Target (if it's in range).
Your weapon's reticule will turn red once it has a target.
By using the Right stick you can select what enemy you wish to target.
sources:
Panzer Dragoon Orta
controls:
Left Stick = aim, move Dragon
A (tap) = fire Orta's gun
A (hold) = Dragon's homing lasers
B (tap) = slow down
X = accelerate + glide attack (consumes the yellow gauge)
Y = cycle Dragon's 3 morph from (consumes the yellow gauge)
LT | RT = rotate view left|right
white + black (when the aqua gauge in the bottom-left is full and glowing) = Berserk Attack
2x Left Stick left|right (Glide Wing form only) = barrel roll
Start = skip cutscenes
Dragon's morph froms:
- Base Wing = depending on its level, the Base Wing can lock onto as many as 8-12 different targets
- Heavy Wing = although its bio-lasers are incredibly strong, only a maximum of 5 lock-ons are possible at one time. It cannot glide. -> good for boss battles
- Glide Wing = has no lock-on homing lasers, but has a rapid-fire gun instead. This allows missiles and other projectiles to be shot down with little to no trouble at all. Boasting an enlarged targeting reticle, the Glide Wing's lasers will automatically target anything inside. Additionally, its Berserk Attack, though not nearly as damaging as the other two, can restore a small portion of the Dragon's life.
basics:
- constantly check the radar in the top-right and rotate the view to see incoming enemies (red dots) or missiles (yellow dots).
- last episode: 10
sources:
Grabbed by the Ghoulies
controls:
Left Stick = move
Right Stick = aim + attack (hold for combo attacks), use/throw weapon (check the counter in the bottom-right)
A = pick up weapon (check the white glove sign near objects)
B = drop picked weapon
L + R (tap) = center camera behind
L | R = rotate camera
Start = pause, skip cutscenes
basics:
- enter the options screen and enable "Butler's Brew". Now if you die in any room, you will be given an option upon re-starting that room if you want Coffee and Waffles. Press A to select "Yes" and you will have double health.
- doors leading to the wrong path are always blocked, so there is no risk of taking the wrong path.
- some weapons are good for melee attacks, others are single-use throwable. All weapons are lost when you switch room, except for a few permanent guns that will be given by some NPCs (check the fuel meter on the bottom-right, auto-refill when not in use).
- collect cans to restore health (check the hearts counter in the top-right) and get temp. powerups. Avoid cans with a black ghost that will damage you.
- if present, the icon in the top-left indicates the "Challenge" req. for clearing the room you are in (finding a key, defeating a certain number of enemies, etc). Pause and press Y to check the current challenge rules.
If you break a challenge rule the Grim Reaper will appear and try kill you with the touch from his finger. Though it's risky, you can attempt to dodge the deadly finger of the Reaper and hit him (preferably with a weapon). Knock him backwards and you can buy yourself a few extra precious seconds. The Reaper can also be used as a weapon. If a Ghoulie gets in the way, the Reaper will touch them and kill them, after which he'll spend some time playing air guitar. The Reapers kills actually count towards your Challenge completion.
- each Challenge will automatically save your progress at the beginning of a new room.
- collect blue Rare books to unlock "Extra Challenges" in the main menu. There is 1 hidden book in every room.
- enemies cannot be damaged when turning red, and some are always invulnerable to regular attacks (check their heart counter):
- mummies: must be thrown into fire
- hunchback: hit his back with a single strike and then attack his face.
- vampires: wait them to open their coffin
- last chapter: 5
sources:
Blinx: The Time Sweeper
controls:
Left Stick = move
A = jump (press again to double-jump)
X | RT (hold) = sweep trash
X | RT (tap) = shoot (if you have some trash)
B = pause and use time controls (if you have it)
Right Stick = camera (push for "over the ear view")
time crystals combinations:
red heaths = RETRY (your lives)
blue moons = PAUSE
purple squares = REW -> broken objects will reconstruct
yellow stars = SLOW -> slowdown enemies and traps
green diamonds = REC -> a copy of yourself repeat what you just did
orange triangles = FF
basics:
- to kill monsters sweep up trash and shoot at them (monsters cannot be swept up).
Maximize damage by shooting large trash items.
- to finish regular stages you must defeat all time monsters within 10 minutes.
Once you have cleared an area, return to the goal gate as fast as you can and exit.
- collect valid combinations of time crystals to get time controls.
collect 4 of the same to get double time controls.
- collect gold to buy powerups in the shop, accessible from the map.
best sweepers to buy: TS-2000 Flame (can sweep flames), TS-16000 S (Round 7).
- last round 9: Momentopolis
sources:
Blinx 2: Masters of Time & Space
controls (Time Sweepers cats):
Left Stick = move
A = jump (press again to double-jump)
RT (hold) = sweep trash
RT (tap) = shoot (if you have some trash, check the counter in the bottom-right)
LT = target lock-on (press again to switch target)
B = melee attack, context-sensitive actions: pull level, etc.
d-pad left|right = select time control (check the active icons in the bottom)
X = activate selected time control (if you have it)
Y = activate retry (use when prompted after you lose a life. Check the small hearts icons in the top-left. Collect 3 hearts items to restock)
Right Stick = camera (click for first person view)
white = reset camera
black = change team orders
Start = pause and check curr. mission objectives
controls (TomToms):
...
basics:
- check the enemy indicator that appears when enemies are nearby. If it is orange, the enemy knows you are there. If it is yellow, the enemy is not aware of your presence.
- 3 purple bombs are required to destroy some locked doors.
- drink milk carton to restore your health (the green rects in the top-left).
- collect coins to buy new weapons and gears at the Shop in the Time Factory HUB.
sources:
XB360
Xbox 360 wireless controller pairing:
- Make sure the batteries are inserted and charged.
- Turn on your console.
- Press and hold the Guide (big "X") button on the controller until it turns on.
- Press and release the connect button on the console (on the front side, has a ")))" symbol).
- Within 20 seconds, press and release the small connect button on the top of the controller (same symbol ")))").
- The lights around the console's power button will stop flashing once the controller connects to the console.
XBox on XBox 360 backward compatibility list:
XBox on XBox 360 button mapping:
white button = LB
black button = RB
trainer collections:
XBOX 190 in 1 trainer http://www.360haven.com/forums/showthread.php/28520-190-in-1
XBLA_179in1_Trainers http://www.360haven.com/forums/showthread.php/27024-XBLA-Trainers-179-in-1-updated-on-8-19-2014
Multi XYZ Trainer V2.1 http://www.360haven.com/forums/showthread.php/49131-Multi-XYZ-Trainer-V2-1-(Patched-for-2-0-17526-0-2-0-17544-0-2-0-17559-0)
trainers most-common IGK:
Back+Start
Beautiful Katamari
controls:
LS + RS = move
...
basics:
- in order to beat the game you only have to finish the "as large as possible" stages.
The special request stages are basically optional (e.g. Roller Roaster is optional. Sunrise Castle is not).
sources:
Dead or Alive 4
sources:
Ninja Gaiden II
controls:
Left Stick = move (hold to run)
A = jump, climb walls
X = quick MELEE WEAPON attack (switch weapon in the menu anytime)
Y = strong MELEE WEAPON attack
Y (hold) = charge MELEE WEAPON attack + attract essences -> finishing blow for regular enemies, destroy damaged walls, very effective against bosses
X (while running) = running MELEE WEAPON attack
A + X, Y = auto jump to the closest enemy, then execute the "Flying Swallow" attack -> very effective on bosses and regular enemies
B = PROJECTILE WEAPON attack (switch weapon in the menu anytime) -> use to activate wall switches
B (hold) = charged PROJECTILE WEAPON attack
Y + B = use equipped Ninpo magic attack (if you have some fireballs under your health bar, collect red essences to refill, equip different SCROLLs to switch)
B (while hanging) = drop down
A (hold in the surface of water) = dive
RB = interact, open chests, examine dead bodies
LT (hold) = guard
LT (hold) + LS direction (tap) = quick dash -> use to evade when you're taking damage from enemies
RT = centre camera
LB (hold) = first-person view (tap RT to zoom in and out))
d-pad = pause and quick-switch equipment or use items (check the icons in the bottom-left)
Start = pause and switch equipment and use items via a menu
Back = pause and view options and ingame manual
basics:
- easier combat stategy: stay away from enemies and avoid close combat (use dash when they are close), use the Flying swallow attack (A + X, Y) from a distance. Repeat without stopping until all enemies in the current area are dead.
- collect essences from defeated enemies and chests: blue=health, red=Ninpo magic, yellow=money.
- Earth Dragon save statues are blue when used the 1st time and will also restore your health, but you must kill all the enemies nearby before you can use them (same as MURAMASA'S shop).
- visit the MURAMASA'S shop to buy refills and switch to the Blacksmith to levelup your weapons.
- best weapons to levelup: Eclipse Scythe (obtained at the end of ch.6), Falcon's Talons (claws, found in ch.2), Lunar Staff (found in ch.1), Dragon Sword.
- best SCROLL/Ninpo magic to levelup: Art of Inferno (locks on enemies), Phoenix (protective barrier).
- last chapter: 14
cheats
- invincibility: press up on the dpad and go to weapon select. Choose a different weapon but press a+b instead of just a. Now you will be invincible however you can only attack with the guillotine throw.
sources:
Strike Witches: Wings of Silver
controls (default):
Left Stick | d-pad = move
Right Stick = aim + autofire
RT (hold when the leader orange gauge on the top-left is fully charged or she is glowing yellow) = special attack (release to deactivate and start the recharge process)
RB = switch the formation
LB | LT = switch the leader
main menu translation:
STORY MODE
ARCADE MODE (must be unlocked)
PRACTICE MODE (must be unlocked)
EXPLORE THE BASE
HIGH SCORES
ONLINE RANKING
LOCAL RANKING
RESET LOCAL RANKING SCORES
ACHIEVEMENTS
DOWNLOAD CONTENT
OPTIONS
DISPLAY SETTINGS
CONTROLS
SOUND
DEFAULT SETTINGS
basics:
- easier team: last one on the bottom (has homing and spread weapons)
- if the 8 blue health cells on the top-left are gone it's GAME OVER. There are no recovery items, but the health bar is replenished at the start of every stage.
- if all the girls are charged when the special attack is activated, it will give a blue barrier to the leader for a few seconds that absorbs bullets and deflect lasers.
- last stage: 6
sources:
Omega Five | Omega 5
controls:
Left Stick | d-pad = move
Right Stick = shoot
RT = special attack (char-specific) -> unlimited, use often
LT = bomb (check the "Chip Gauge"=gold triangles at the bottom-left, collect pink triangles "chips" to restock)
RB = "dimension field" (consumes health) -> temp. invincibility, use only when necessary
basics:
- best char: Tempest (has auto-aiming special attack)
- 3 weapons are interchangeable with colored powerups (red, blue and green), with 3 power LEVELs activated by taking icons of the same color.
- last stage: 4
sources:
DoDonPachi SaiDaiOuJou | Dodonpachi True Death
controls (default):
Left Stick | d-pad = move
X (hold) | A (tap) = wide "SHOT"
A (hold) = concentrated "LASER" + slower move (cancels the wide shot)
B = bomb (check the "B" icons in the bottom left), activate the HYPER system (check the gauge and the counter in the top-left, collect gold medals and bees, chain and pointblank enemies to refill) -> clears all enemies bullets, temp. attack increase
basics:
- easier ship: Type C / Maria (widest shot, but slower) + laser dress
- the dress determine the most powerful shot: wide SHOT (default), LASER, EXPERT (both strong, but more bullets onscreen).
- the only pickups are bombs, there are no weapon powerups.
- bees must be fired with the laser to became solid and collectable.
- last stage: 5
sources:
Mushihimesama Futari | Bug Princess 2
controls (default):
Left Stick | d-pad = move
RT (hold) | A (tap) = wide "SHOT"
A (hold) = concentrated "LASER" + slower move (cancels the wide shot)
B = bomb (check the icons in the bottom-left, collect "B" items to restock)
basics:
- easier char: Reco/Normal
- "NOVICE" mode in "ARRANGE" has auto-bombing.
- collect "P" items to powerup both your weapons. You won't powerdown when dying, and you will restock your bombs.
- last stage: 5
sources:
Otomedius G: Gorgeous
controls:
Left Stick | d-pad = move
Y | B = shoot + missile
X = power up (check current powerup in the lower-left)
A (Original mode only, when the left-most slot is filled) = bomb
menu translation:
Original mode (based on the arcade game, 4:3 screen)
Game start
Options
Ranking
Replay
Return
Gorgeous mode (XB360 exclusive mode, 16:9 screen)
Single player mode
Multi player mode via Live
Multi player mode via LAN
Options
Controller settings
Screen settings
Sound settings
Return
Ranking
Replay
Return
Shop
Gallery
basics:
- best char: yellow Madoka (has auto-aiming options)
- in Original mode enemies drop elemental medals. As the player picks up the medals, their offense and defense are altered. The characters also have a predetermined elemental affinity, as do the stages.
- beat Original mode to unlock new powerups, also available in Gorgeous mode.
- last stage: 3 (Original mode), 6 (Gorgeous mode)
sources:
Otomedius Excellent | Otomedius X
controls (default):
Left Stick | d-pad = move
A (tap) = shoot + missile
B (hols) = autofire shoot + missile
X = power up (check current powerup in the lower-left)
Y (hold) = charge BURST attack (char-specific, doesn't consume any BURST stocks but has a slight cooldown period) -> use often
Y (tap) = bomb (check the "BURST" counter in the top-left) -> clears enemy shots
basics:
- easier char: Madoka (has auto-aiming options)
- you no longer crash or take damage by running into floors of ceilings.
- last stage: 8 (can only be reached by killing the 7th level boss before it times out)
sources:
Hydro Thunder Hurricane
controls:
Left Stick left|right = steer
RT = accelerate
LT = brake
A (hold) = boost (if the boost gauge is not empty. Collect bottles powerups throughout a course to refill the boost gauge) -> use for quick turns and to change trajectory while in midair
X = jump (req. boost gauge) -> use on ramps and to avoid obstacles and other boats
back = reset on track
Y = change camera
LB = look back
d-pad = change music
Start = pause
basics:
- follow the other boats trail to gain extra speed.
- press Left Stick down for soft landings.
- hidden shortcuts and alternate routes in courses can be found by simply driving towards them or smashing through an obstacle,
while others require the player to drive over green switches powerups which lower gates or raise ramps.
- earn credits by winning trophies in single-player and multi-player modes (even the same multiple times), and unlock new stuff.
Kameo: Elements of Power
controls:
Left Stick = move, aim
A = action (context sensitive, check the label on the top-right), morph back to Kameo
LT | RT | LT+RT = current form-specific attack or ability (check the labels on the bottom, req. the blue Spirit gauge on the top-left for the Warriors, auto-refills over time)
B | X | Y = morph into an Elemental Warrior (check the icons in the top-right, equip in the Wotnot Book, they become disabled while recharging) (hold down for Warrior Wheel)
Right Stick = rotate and pitch camera
d-pad up|down = adjust camera distance
R3 = toggle first-person view
L3 = toggle map in the top-right (the green spot is your next destination)
Start = pause and check the Wotnot Book for tips and to equip Elemental Warriors
Back = pause and access the Options menu
Elemental Warriors:
- Pummel Weed (green plant) = punches with LT|RT, dive underground with LT+RT -> use to pass below grates
- Rubble (rocks) = forward shot with LT, fire a high-angled rock into the air with RT, explode with LT+RT -> use to activate statues
- Ash (red dragon) = hold LT to breath fire (very effective against plant enemies, set bombs), hold RT for a fire ball that will climb walls and activate midair dragon statues (use LS to aim before releasing)
- Major Ruin (armadillo) = hold RT to charge the Rush move and climb ramps (can be charged again in midair to traver further until the Spirit gauge is not empty).
- Deep Blue (blue amphibian) = hold LT to thrust and tao RT to fire topedoes underwater. When outside water hold RT to attack enemies and activate the wheel switches.
- Chilla (white yeti)
- Flex
- 40 Below = grab enemies with RT, fire ice or enemies with LT
- Snare
- Thermite (ant)
basics:
- Kameo moves faster, she can jump over ladders, but only has the backflip attack. Prefer the Elemental Warriors in combat.
- quicky dispose enemies by making them fall off cliffs.
- collect red hearts to refill your health (shared between Kameo and Elemental Warriors, check the red gauge on the top-left).
Drink the Elixir of Life to increase the max health.
- collect red Elemental Fruits to powerup and unlock new abilities for the Elemental Warriors. Open the Wotnot Book and select a warrior to get them.
- collect coins to buy stuff in village shops.
- when you are in Shadow Realm you can only use Kameo and her backflip attack. Use it on a minor walking enemy, touch the released soul, and than aim it to the Shadow Troll's black core and fire with LT|RT. After hitting him 3+ times, the battle will end and you will get a new Elemental Warrior.
- the game autosaves as you progress through it after accomplishing certain tasks, or acquiring eyes, elixirs, fruit, skins. It also saves when purchasing upgrades, or assigning and unassigning eyes.
If you want to manually save you'll need to use the crystal eye assignment feature, or reassign the elemental using the Wotnot book.
sources:
WarTech: Senko no Ronde
controls:
Left Stick | d-pad = move
X = fire main weapon (diff. attack while dashing or shielding)
Y = fire sub weapon (usually more powerful, but with a longer reload time. Often homing)
B = bomb-like barrage attack (also act as a shield, but uses up a lot of the yellow Charge Gauge)
A + direction = dash (press A again to stop)
RT | A (standing still) = Barrier (drains your Charge Gauge when you're hit)
LT = enter "B.O.S.S." mode (req. 1 "B" icon in the bottom-left, req. 1+ slot of the Charge Gauge and lasts until it is exhausted. Refilled after each stage. More powerful when in "Vanish" state)
LT (when your opponent is in BOSS mode) = Anti-Field -> a large shield (drains half your Charge Gauge)
LB (when the OD gauge is green) = enter "OverDrive" mode -> temp. incr. your attack and defense (only 1 use per round, drains your Armor Gauge)
OSD:
- top-left azure Armor Gauge (aka lifebar)
- top-left yellow Charge Gauge
- bottom-left "B" balls = BOSS stock
- Sub Weapon Gauge = the innermost ring surrounding your Rounder displays the ammunition of your sub weapon as well as its name.
- Main Weapon Gauge = the outermost ring surrounding your Rounder displays the ammunition of your main weapon as well as its name.
basics:
- best beginner chars: Mika Mikli, Beak Changpo
- taking hits will deplete the blue Armor Gauge on the top-left.
When the gauge is completely gone, "Vanish!!" is shown, and you'll lose the round with a single hit.
- best strategy:
- alternate long and short range attacks without pauses.
- use the Barrage attack only as an emergency shield. Keep the Charge gauge for a longer BOSS mode.
- when the enemy Armor Gauge is below 30-40%, use BOSS to finish him.
- most aiming is done automatically, but if you enable the Barrier,
you can use the analog stick to aim your shots while you remain in place.
- last stage in Story mode: 7
sources:
Virtual-On Force
controls (Standard A):
Left Stick- Movement
Right Stick- Turning
LT|RT- Left|Right Weapon
LB|RB- boost Left|Right
X = boost Left
B = lockon change (Both Turbo)
Y = Jump
A = Jump Cancel, guard
Right Stick click = Command Issue (Only useful for Human teammate)
Back = Rescue Dash
controls (Standard B):
L-Stick- Movement
R-Stick- Turning, Jump, Guard
LT/RT- Left/Right Weapon
LB/RB- Turbo Left/Right
X- Turbo Left
B- No Use
Y- No Use
A- Lockon change
L-Click- No USe
R-Click- Command Issue (Only useful for Human teammate)
Back- Rescue Dash
menus translation:
Main Menu
Back=Options
X = VR Select
A = Confirm
Press 2p Start to Join
Arcade Mode
Difficulty
Number of Rounds
Time Limit
Leader Selection
Y= EX option
B= Go Back
A= Start Game
Pause
Resume Game
Controls
Quit Game
Mission mode
Mission Select
Host Session
Join Session
After Mission
Redo Previous Mission
Mission Select
Replay data
Exit Mission
Practice Option
Enemy Control
Friend Control
Enemy Damage
Player Damage
Enemy Lockon Setting- Normal, Both, None, Single
Cancelling Options (Displays possible ways to cancel out of certain moves)
Game Speed
CPU Difficulty
Practice mode Pause
Resume Game
Controls
Reset all VRs position to stage center
Practice options
Quit
Options
Settings
BGM Volume
Sound FX Volume
Voice Volume
AutoSave
Brightness Preservation(?)
Graphic Arrange
Seat Allocation
Stage BGM- Default, OMG, OMG(Arrange), OT, Special
Game interface
Camera distance: Default/Near
HUD: on/off
Radar position
Crosshair display: on/off
Distance display: off/on
Lockon alert: on/off
Double Attack indicator: on/off
System Data
Save
Load
Select storage Device
Player Data
Unlocked VRs
Number of Mission Cleared
VRs Defeated
Trophy Acquired
Crystals Collected
Discs Collected
Clear Time (Arcade Best Time)
Total Time Spent in Combat
X= Detailed VR Collection Data
VR Viewer
LS- Move
RS- Rotate
LT/RT- Zoom
LB/RB- Motion Select
Back- Reset
X- VR Select
Y- BG Color
A- Display Toggle
B- Back to Main Menu
mission objectives:
- Operation 1
Mission 1 - Defeat Leader VR. 3 battles, 2 on 2.
Mission 2 - Collect silver discs. 6 battles, avoid killing opponent. 1 on 1.
Mission 3 - Defeat Leader VR. 3 battles, can only use Close Combat.
Mission 4 - Defeat Leader VR, enemy has increased damage, 3 battles, 2 on 1.
Mission 5 - Defeat Leader VR, both enemies target only you, 3 battles, 2 on 2.
Mission 6 - Collect green crystals, they only appear a short while after collecting the first, avoid killing enemy VR. 6 battles, 1 on 1.
Mission 7 - Defeat Leader VR, no HUD, health bar, or lockon signal. 3 battles, 2 on 2.
Mission 8 - Defeat Leader VR, 1 lifebar for 6 battles, 6 battles, 2 on 2.
Mission 9 - Defeat Leader VR, reduced movement speed, 3 battles, 2 on 2.
Mission 10 - Final Mission, Defeat Jaguarandi, 1 battle, 2 on 1.
- Operation 2
Mission 1 Defeat the leader, 6 battles, 2 VS 2
Mission 2 Collect silver coin, avoid killing enemies, 6 battles, 1 VS 2
Mission 3 Defeat the leader-Close Combat DISABLED, 6 battles, 2 VS 2
Mission 4 Survival (1 health bar for 6 battles), 6 battles, 2 VS 2
Mission 5 Defeat the leader, ONLY Close Combat (beware, enemy can still use weapons) 6 battles, 2 VS 2
Mission 6 Boss Battle (Ajim & Guerlain) 1 battle, 2 VS 2
Mission 7 Defeat the leader, LOCK ON DISABLED, 6 battles, 2 VS 2
Mission 8 Collect green crystals, avoid killing enemies, 6 battles, 1 VS 2
Mission 9 Defeat the leader (Shadow VR series, double damage) 6 battles, 2 VS 2
Mission 10 Defeat 2 Jaguarandi, 1 battle, 2 VS 2
basics:
- complete missions to unlock new stuff.
- while you are playing either mode, coloured crystals will randomly appear. You automatically pick them up. Finding these allows you to increase your abilities in the EX Options.
sources:
C64
most used file extensions on PC emulators:
- .wav, .prg, .tap -> Cassettes Tapes
- .d64, .nib -> Floppy Disks
- .prg, .crt, .80, .90, .a0, .b0, .e0, .f0 -> Cartridges (autostart at boot)
run the program on a cassette:
LOAD
RUN
NOTE: some programs requires a special address:
LOAD "",1,1
list the content of the FD:
LOAD "$",8
LIST
run a BASIC program from the FD:
LOAD "filename",8
RUN
run a machine language program from the FD:
LOAD "filename",8,1
RUN
run the first program from the disk (useful if you're not sure of which is the correct one to load):
LOAD "*",8
RUN
sources:
The Great Giana Sisters
controls (joystick in port 2):
stick left|right = run
stick up = jump (hold to jump higher)
fire = throw thunderbolts
space = activate alarm clocks and bombs
basics:
- collect hairdo powerups to turn into a punk.
Now you can destroy stones and find thunderbolt powerups.
There are 3 thunderbolts that appear in order:
- the simple bolt (vanishes with the first contact with a wall)
- the double bolt (the shot is reflected by the walls)
- the strawberry (auto-aiming, last upgrade)
- you can have at most 1 thunderbolt flying on screen. So if it became stuck you cannot fire another one until it goes offscreen.
- after the last thunderbolt upgrade, you can find other items:
- alarm clock = temporarily stops the time and freeze enemies,
- bomb = kills directly all killable monsters onscreen
- water drop = makes immune against fire
The alarm clock and bomb are activated by the space key and are single-use items.
All these items are lost with the next item collected.
- some enemies can only be killed with thunderbolts and some are totally invulnerable (like the bouncing balls).
- coins, diamonds, only provide extra points
- last STAGE: 33
cheats:
- levelskip: Pressing the keys "A R M N" at once.
sources:
Amiga
Turrican
controls:
d-pad = move, up, crouch
button 1 = shoot
button 2 = bomb
button 2 + d-pad down = ball form
MSX
An MSX can execute:
- MSX-BASIC source code files (.BAS, .LDR)
- intermediate language code files (.ASC)
- compiled binary files (.BIN)
most used file extensions on PC emulators:
- .cas, .tap, .wav, .tzx -> Cassettes Tapes
- .dsk, .msx, .ddi, .td0, .cp2, .img -> Floppy Disks
- .rom, .mx1, .mx2 -> Cartridges (autostart at boot)
run MSX-BASIC files saved with CSAVE from a cassette:
CLOAD
RUN
run MSX-BASIC files saved with SAVE from a cassette:
RUN"CAS:"
# LOAD"CAS:",R #alternative
run binary files saved with BSAVE from a cassette:
BLOAD"CAS:",R
list the files on a FD:
FILES
NOTE: "A:" is the 1st floppy disk drive, "B:" is the 2nd, etc.
NOTE: if omitted, "A:" is assumed
run BASIC and intermediate language code files on a FD:
RUN"A:FILENAME.BAS|ASC|LDR"
run binary files on a FD:
BLOAD"A:FILENAME.BIN",R
most common keyboard game keys:
arrows | OPQA = directions
Space = Firebutton A
M | N | Shift | LeftAlt = Firebutton B
F1 - F4 = used in some games for pause
1 = P1 start or choose joystick
2 = P1 choose keyboard
3 = P2 choose joystick
4 = P2 choose keyboard
sources:
"A Guide To MSX-BASIC Version 2.0"
Thexder
controls:
arrows = move
arrow down = switch mecha|ship mode
arrow up (in mecha mode) = jump
Spacebar = shoot
Shift = activate particle barrier (consumes 10% of your available energy)
basics:
- getting hit will deplete the energy counter on the bottom-right.
- last LEVEL: 05
sources:
Gradius 2 | Nemesis 2 | Nemesis '90 Kai
controls (keyboard):
arrows = move
space = fire
M = pick current powerup (check the label on the bottom-right, if it shows "[ ENABLE ]" you already have the curr. powerup maxed out)
F1 = pause
powerups:
- SPEED (do not take too many)
- MISSILE (2 levels)
- DOUBLE (avoid)
- LASER (2 levels) (most powerful weapon)
- OPTIONS (2 levels)
- FORCE FIELD
basics:
- if you beat each boss within a time limit, the boss will freeze with its core turned blue and you can actually enter it for a mini special stage, ending with a extra weapon to acquire (most of them are good).
- in addition to the extra weapons, there are special grey icons that grant you extra abilities for a limited time (check the counter on the bottom-right).
They are: Vector Laser (=vertical barrier that is fired forward), E. Slow (=Enemy Slowdown), Option Warrior (=make the options rotate around your ship), Rotary Drill (temp. invincibility).
- last STAGE: 7 (2 loops, order inverted)
cheats:
- If you put in The Maze of Galious into slot 2, when you die you won't lose your weapons.
- if you put in Q-Bert into slot 2, you can access these cheats while tha game is paused (confirm with Enter and then unpause):
LARS18TH = All Weapons (Konami Code)
NEMESIS = Skip Level
METALION = Invincible to enemy shots, not the terrain
sources:
Gofer no Yabou: Episode 2 | Nemesis 3: The Eve of Destruction (exclusive)
basics:
cheat: Pause the game with the F1 key on your MSX keyboard and type the following passwords, followed by the Return/Enter key.
- FIND = allows you to see where hidden items are located
- GOOD = makes the game easier
- HARD = makes the game harder
- EXTEND (or EXPAND) = shield lasts twice as much
sources:
Parodius
controls (keyboard):
arrows = move
space = fire
M = pick current powerup (check the red square on the bottom-left)
powerups in the bottom-left bar (from left to right):
- Speed
- Missile
- Up Double
- Laser
- Option
- OH! = lose all your weapons & speed, avoid!
- Shield
bell powers:
- Yellow = All minor enemies on the screen will die.
- White = Wrap around horizontally. You can fly of the screen and appear at the other side.
- Green = Wrap around vertically. You can fly of the screen and appear at the other side.
- Cyan = Time Freeze. Stops scrolling & enemies for a few seconds.
- Purple = Mine. Destroys all enemies on the same height.
- Blue = Rotary drill. You are immune to most enemies for some time.
- Dark green = Up Laser. You have Up Laser for some time.
- Red = Vector Laser. You have Vector Laser for some time.
basics:
- the weapon sets are identical amongst all 5 chars, though there are unique graphical changes depending on the char.
- a random powerup is picked up then a feature called Bellpower/Roulette will automatically make the player's power bar skipping powers until the player presses the button used to stop the roulette.
- most bosses have a weak spot.
- last stage: 6
cheats:
The following passwords have an effect. To enter, press to pause the game, type the password, press and to resume the game.
- ZENBU = You get full power up.
- KATAI = increase the Shield durability. It doesn't work with ZENBU, though.
sources:
Yume Tairiku Adventure | Penguin Adventure
controls (keyboard):
arrows = move left|right, speed up|down
space = jump (quick tap to swim up under water or fly up when on the cloud or in space)
M = shoot gun (if you have the gun/pistol item)
basics:
- at the start of the game you need to decide between "LEVEL 1" and "LEVEL 2" which translates into Normal and Hard difficulty with more enemies.
- you need to reach the end of each stage (check the "DISTXXX" counter in the top) before the "TIME" runs out.
- being touched by an enemy or by an obstacle, excluding holes, will kill you instantly.
- grab fish jumping around to buy items in the shops.
- some holes look like regular holes, but are a bit smaller. They will always appear in the same place and will lead you to bonus stages, warp zones and shops.
- best items to buy: feather (midair jumps control), propeller hat (longer and higher jumps), gun/pistol, green shoes (incr. max speed). map (req. to finish stages 12, 18 and 24).
- collect floating hearts for temp. powerups. They change color everytime you jump: blue (fly in a cloud, best one), yellow (invincibility), green (extra time), magenta (extra points).
- the yellow wings are a powerup that will lead you to the bonus stage when caught.
- bosses are killed by breaking the floor around them. Jump on the small pillars 3 times.
- last stage: 24
sources:
Space Manbow
controls (keyboard):
arrows = move
space = fire main weapon
M | N = switch options firing direction
F1 = pause
basics:
- collect red items to increase main weapon fire power (check the big "POWER" gauge at the top).
- "M" (=Missile) and "W" (=Wide) items lets you switch your main weapon.
- "S" items increase your speed.
- blue items are smart bombs. They can't be stocked up but instead they must be used within your next shot.
- last stage: 8
sources:
Aleste 2
controls:
...
Stop = pause the game (press left|right to change your speed)
sources:
controls:
TODO
Yuurei Kun | Mr. Ghost
controls (keyboard):
arrows = move
space | Z | B = fire out a Ochoko ball (unlimited, but needs time to return) -> low power enemies attack
shift | A = butt attack (req. the yellow "ATTACK" gauge on the top-left, autorefills over time) -> more powerful attack, can destroy some blocks, dodge attacks
F1 = pause
basics:
- if an enemy that has been butt-attacked hits another enemy, that enemy will also be blown away. Using this, you can defeat enemies in a straight line in a chain. It is an effective technique especially when enemies are densely packed.
- dropped coins disappear after a few seconds, collect them to buy items (check the yen counter in the top-right).
- items may appear when you break the blocks with a butt attack: 100 yen, items that requires money to collect, and hidden stairs (will lead you to a bonus stage where you have unlimited butt attacks. Grab money until the timer runs out).
Items req. money will cycle their icon with the price: heart (=LIFE recovery), stopwatch (temp. stop enemies movements), butt-attack ghost (refill the ATTACK gauge when empty, can stock up to 2), barrier (extra protection from enemy attacks).
- you can only advance screens from left to right, not backward. So you can't go back to buy items you've previously uncovered.
- take cover from enemy shots behind the scenery and blocks. If you find a safe spot stand still for a while to let the ATTACK gauge refill before moving into the next screen.
- in each stage there is a mid-boss and a final boss with their own LIFE gauge in the top-right.
- LIFE and ATTACK gauges are refilled after each stage.
- last stage: 7
cheats:
- easy mode: boot the game and then do a reset to activate this mode.
RAW memory cheat codes:
Infinite Life
03A6:20
sources:
Kyokugen
controls:
d-pad = move
joypad B = shoot
joypad A = bomb (check the small crystals in the top-right, get "B" items to restock. Also refilled when dying) -> temp. invincibility
main menu translation:
- ADVENTURE (story mode)
- T.ATTACK 3 (3 min. time attack)
- T.ATTACK 5 (5 min. time attack)
- OPTION
- Difficulty 4 (1=highest, 7=lowest)
- Lives 5
- CPU Z80
- Double size OFF (makes all sprites double-sized)
- Sound FM
- Rapid-fire test 00000
- High Score
- Erase High Score (Hold button 3 seconds)
- Pilot Stats
- EXIT
basics:
- best PILOT: CHIKA (has large bending shot and decent speed)
- the hit box is much smaller than the ship itself
- collect Y-shaped white items dropped by enemies for experience points. When the "EX" gauge at upper-right is full, you will level up and your shot becomes more powerful (check the "LV 1" in the top-center).
- "P" orbs also powerup your main shot (up to 4 levels). When you die you lose these powerups, and you go back to the initial power of the current level.
Consecutive hits also powerup your main shot temporarily (check the 5-digits counter on the top-center).
- "S" squares only provide extra points.
- last STAGE: 9 (2 loops)
sources:
Pleasure Hearts
controls:
arrows | joypad = move
Space | Z | joypad A = shoot
N | Shift | joypad B = bomb (check the counter on the bottom-left. Collect "B" items to restock) -> temp. invincibility
main menu translation:
- START
- ITEM (unlocked stuff?)
- STATUS
- HI-SCORE
- INFORMATION
- RESET HI-SCORE
- DISCARD ITEMS
- RESET ALL
- BACK
- CONFIG
- CPU Z80
- WINDOW 1 (change the menu background)
- BACK
- SAVE
basics:
- if you get hit not in the center of the ship you will lose hearts instead of a life (check the life icons and the hearts counter on the top-left).
Collect the orange "M" items to refill these hearts.
- numbered pickups allow you to switch the main weapon: 1 = narrow shot, 2 = wide shot, 3 = waving balls.
- collect orange "P" items to increase the shot power (up to 8, check the "LEVEL" counter on the top-right).
- white square pickups bouncing at the bottom of the screen only provide extra points (the banner on the bottom-left shows the type of material collected).
Extra points can be obtained by grazing bullets and other special actions (check the "GR" counter on the top-right).
- last STAGE: 7
sources:
PC98
most common used keys for gaming:
Arrow keys
Z
X
Space
Left Ctrl
Backspace
Right Shift
Escape
Return
Mouse
Touhou Fuumaroku: the Story of Eastern Wonderland | Touhou 02
controls (keyboard):
arrows = move
Z = shoot
X = bomb (req. the orbs on the bottom-right, collect green "B" items to restock, also refilled after each death) -> clear bullets onscreen but no temp. invincibility
Esc = pause, skip dialogues
OSD translation:
- Hiscore
- Score
- Bomb
- Lives
- Weapon Power
- Easy/Normal/... (game difficulty)
basics:
- after selecting START GAME, you can pick 1 combat style: Type A=Movement Type (on the left, max speed), Type B=Defensive (the default and also the easier one, MAX Power Ability: Auto-targeting shots), Type C=Attack Type (on the right).
- the hit box is quite small in comparison to your on-screen sprite, approximately only 5 pixels by 5 pixels in size. It's not marked on the sprite, but it is possible to approximate its location well by looking at the red ribbon in Reimu's hair.
- collect red "P" squares to increase the main weapon power (check the red "power" gauge on the bottom-right).
The shot gradually becomes more powerful when you reach the Power Levels of 7, 15, 31, 39, 51, 63, and 79 (MAX)
Red "S" squares (Full Power Items) fully restores 1 power level (they are always released on death).
- purple squares with a kanji inside only provide extra points.
- you obtain extra lives upon reaching certain score totals or by collecting 1up items (check the yin-yang symbols on the bottom-right=lives left).
In both the regular game and the Extra Stage, extra lives are awarded at 1, 2, 3, 5, and 8 million points.
- last stage: 5
sources:
Touhou Yumejikuu: Phantasmagoria of Dim. Dream | Touhou 03
controls:
arrows = move
Z = shot (hold to charge a special attack, check the blue gauge on the gauge at the bottom. Kill enemies to increase the max level -> absorb bullets at level 2 or higher. Max level is a boss attack)
X = bomb (check the "B" icon in the bottom-right)
Esc = pause, skip dialogues
basics:
- easier char: ?
- at the beginning of each round, both players have 5 health points, displayed as hearts at the top of their respective fields.
When a player is "hit" by an enemy attack, a certain amount of health points are subtracted, anywhere from 1/2 to 3.
When all 5 health points have been depleted, a life is lost.
- last stage: 9
sources:
Touhou Gensoukyou: Lotus Land Story | Touhou 04
controls:
arrows = move
Z = shoot
X = bomb (check the orbs icons in the right. Collect green "B" items to restock midstage) -> press immediatelg after being hit and it will save you a life ("deathbombing")
Shift = focus shot + slow down movement
Esc = pause
OSD translation:
- HiScore
- Score
- Bomb
- Points items collected
- Dream counter
- Graze Counter
- Power gauge
basics:
- easier char: Reimu Type A (has options with homing shots)
- graze bullets for extra points (check the "Gr." counter in the bottom-left)
- collect blue "dream" items to increase the the purple point pickups value.
Check the "dream" counter on the bottom-left (incr. at 1K steps).
- last stage: 5 (easy)
sources:
Touhou Kaikidan: Mystic Square | Touhou 05
controls:
arrows = move
Z = shoot
X = bomb (check the orbs icons in the right. Collect green "B" items to restock midstage) -> press immediatelg after being hit and it will save you a life ("deathbombing")
Shift = focus shot + slow down movement
Esc = pause, skip dialogues
OSD translation:
- HiScore
- Score
- Enemy (boss health)
- Bombs
- Lives
- Total point items collected (purple items)
- Current stage point items collected
- Graze Counter
- Dream gauge (incr. by collecting blue dream items. Descr. when losing a life or bombing)
- Weapon Power gauge (incr. by collecing red "P" items)
- Difficulty (set in the options menu)
basics:
- easier char: Reimu (has homing options, no need to use slow button as she's already the slowest)
- once the game has been completed without continuing on any difficulty, an optional Extra Stage is unlocked, available for play with any character that has accomplished that feat.
- last stage: 6 (any diff.)
sources:
Rusty
controls (keyboard):
numpad = walk, crouch, climb (tap 8 to grab a rope in midair)
upward diagonals = run, walk uphills
X = whip attack (combine with numpad to aim)
Z = jump (longer jump while running, shorte jump while crouching)
Z + X = use special weapon (limited uses, check the icon and the 2-digit "Mind Power" counter in the bottom-left. Collect yellow/green spheres to refill)
basics:
- getting hit will deplete the red bars on the bottom-left. Collect heart icons to refill.
- destroying goddess statues will drop some items like: key (needed to open doors), a special weapon, money bag, heart, clock/goldfish=extra time, 1UP.
- last stage: 10
sources:
PCDOS
SideLine | Side Line
controls:
arrows = move
Left Control = shoot (hold for autofire)
Left Alt = change the options formation
Left Shift = bomb (check te "B" icons in the bottom-left. Restock are frequent)
Esc = pause and adjust optionp
basics:
- you die with a single hit unless you have the barrier.
- shootable orbs appear in 3 flavours with a different colour marking in the middle:
Red ones carry a randomly cycling primary weapon, green ones carry a randomly cycling secondary weapon, and orange ones contain bombs. The bombs found in an orange item carrier will be replaced by a gunpod item if you've died and don't currently have two gunpods. Enemies that drop bombs when destroyed appear to follow the same rule, dropping gunpods instead if you have less than 2.
To power up a primary or secondary weapon, pick up the same colour/letter continuously. You know you're maxed out when picking it up again gives you bonus points. Switching weapons to another type does not increase current power level.
Best weapons: grey (auto-aiming) + H=Homing missiles
- bones and food items only provides extra points
- last stage: 8
sources:
Commander Keen in Invasion of the Vorticons
controls (keyboard):
arrow key left|right or numpad 4|6 = walk left|right
Ctrl = jump
Ctrl+Alt = shoot Raygun
Alt = toggle pogo stick -> jump higher
Space = pause and show status screen
F1 = show help
F5 = save game (at the level select screen only)
basics:
TODO
cheats (ingame):
- Free ammo Durning game play press T, A, and B
- Gain all items Durning normal game play press C, T, and Spacebar
- Invincibility Durning game play press G, O, and D
- Level skip While on the world map hold Shift and Tab to walk through to the next level
sources:
Commander Keen in Keen Dreams
controls (keyboard):
TODO
basics:
TODO
cheats (press both keys shown at once during gameplay to activate the cheat:):
- Free Items. F10 + I
- God mode. F10 + G
- Jump higher. F10 + J
- Slow gameplay. F10 + S
- Warp to next level. F10 + W
sources:
Commander Keen in Goodbye, Galaxy
controls (keyboard):
arrow key left|right = walk left|right
Ctrl = jump
Ctrl+Alt = shoot Raygun
Alt = toggle pogo stick, push button, pull lever
Spacebar = pause and show status screen
F1 = show help
F5 = save game
basics:
TODO
ingame cheat codes:
press A+2+Enter to activate cheat mode then press F10 and any one of the following codes:
3000 points, 99 ammo I
Add 0-8 VLB's V
Disable Memory usage M
Flying Jump J
Freezes\Pauses game P
Game Over Z
God Mode G
Level Select W
Level Skip E
No Clipping N
Record Demo D
Show Active and Inactive Object Numbers in Levels C
Show Hidden Areas Y
Skip to the game ending D, E, N
Slow Motion S
sources:
Commander Keen in Aliens Ate My Babysitter
sources:
Wolfenstein 3D
Rise of the Triad
Doom
controls (keyboard):
arrows = move, turn
Shift (hold) = run
Alt + arrows left|right = strafe
Ctrl = fire (check the AMMO counter for the current weapon in the bottom-left, collect refills in stages)
1-7 = switch weapon (check the available ones in the "ARMS" table on the bottom-left)
Space = activate switches, open doors, etc.
Enter = shows the last message that appeared in the top left corner in the screen
Tab = view the map (only explored areas unless you find a COMPUTER AREA MAP) -> does not pause the game!
Esc = pause and view the menu
basics:
- getting hit will deplete the "HEALTH" % on the bottom-left. Collect "HEALTH BONUS" blue potions (+1%), STIMPACK (+10%), MEDKIT (+25%), "SUPERCHARGE" blue soul sphere (+100%) to refill.
- you must find colored KEYCARDs to open some locked doors (check the 3 small icons on the bottom-right).
- other pickups includes:
- ARMOR (varius types)
- "ARMOR BONUS" helmet (+1% armor)
- RADIATION SHIELDING SUIT (=protects agains green radiactive floors for 60s)
- "BACKPACK FULL OF AMMOS" (=ammo refill + doubles ammo capacity)
- COMPUTER AREA MAP (=shows all the areas on the map, except the secret ones)
- LIGHT AMPLIFICATION VISOR / googles (good to see in the dark)
- PARTIAL INVISIBILITY red+blue sphere (=reduce enemies aiming accurancy for 60s)
- "BERSERK" black box (refill health to 100%, x10 damage to the first weapon)
- INVULNERABILITY green sphere (=temp. invincibility + inverted B&W screen for 30s)
- last stage: DIS (INFERNO EPISODE)
cheats:
while ingame, type with the keyboard:
- IDDQD = toggle god mode.
- IDCLIP = "NO CLIPPING" mode, which allows you to walk through walls and climb ledges that are normally too high for the player.
- IDKFA = "VERY HAPPY AMMO" - gives you all of the weapons (including the chainsaw), full ammo, and all six keys.
- IDCLEV = Warps you to the map specified. Type two numbers after the cheat to tell the game which level to go to - the first number is the episode, the second is the level. For example, IDCLEV15 would take you to Episode 1, Level 5.
sources:
Doom II: Hell on Earth
sources:
Heretic
Hexen
Descent
controls (keyboard):
....
cheats (Type gabbagabbahey to enable cheat mode, then enter):
All Weapons and Max Ammo bigred
All Weapons and Super Max Ammo porgys
Creates Powerups Leading to Level Exit flash
Extra Life bruin
Get All 3 Keys mitzi
Ghosty Mode astral
Level Meltdown-- Starts Countdown poboys
Level Warp farmerjoe
Max Ammo for Most Weapons scourge
Restore Shields to 100 twilight
Restore Textures pletch999
Robots Move Fast, Fire Seldom lunacy
Texture Changing Weapons pletch### (Enter a number from 000 to 998)
Toggle Invulnerability racerx
Toggle Robot Firing ahisma
Toggle Temporary Cloak guile
Turbo Mode buggin
Use in Map View Screen for Full Map Alt+F
sources:
Quake
Duke Nukem 3D
Blood
Shadow Warrior
SuperKarts
One Must Fall 2097
secret options menu:
At the Main Menu, hold down the keys 2097 and a secret advanced options menu will become available.
sources:
Jill of the Jungle
controls (keyboard):
arrow keys left|right = move
arrow keys up|down = look up|down, climb vines, move elevators, toggle a switches
Shift = jump
Alt = throw weapon (if you have it)
N = toggle sound
S = save
R = restore
T = toggle turtle (slow) mode
Q = quit
forms:
- Phoenix = pressing Shift will flap your wings, while pressing alt will flap and shoot flames. You can control the direction of the flame slightly with your arrow keys. Be careful not to touch water. Even a waterfall will kill Jill in this form.
- Frog = constantly bounce a little over 2 tiles high. Hitting either action key will cause you to jump about 5 and 2/3 tiles high, getting height, normal Jill cannot.
- Fish = can travel through water. The Shift key is useless, as pushing the up direction is far faster, and Alt shoots odd eyeball things that can kill only Evil Fish or Jellyfish.
basics:
- when distance jumping from ledges, a running start has no effect on how far she can reach.
- collect apples to restore health ().
- collect jumping powerups (Jumping Arrow) to increase her reach by 2 tiles with each one collected.
- collect Keygems (bright purple shining gems) to open gates (that resemble grey squares with a blue slot in them) to access new levels. Gems left over after completing a level are carried into the Jungle Map.
- last level: 14
cheats:
- invincibility from enemies: during a level, press "x" 3 times, or hold down X for a few seconds on some keyboards.
sources:
Jazz Jackrabbit
controls (keyboard):
arrows keys left|right = move left|right (run faster after a while)
arrows key up (hold) = look up
arrows key down = duck, look down. You can shoot while ducking.
Alt = jump
space = shoot
Ctrl = cycle through weapons -> save your good ammo for bosses and tight situations.
P = pause.
Esc = bring up the options menu
T = make the game move at half its normal speed
basics:
- when you are running you can jump higher. Use this to find hidden areas.
- even though the manual says to run as fast as you can, I wouldn't recommend this. It's best to take it slow in some areas.
- shoot everything, from enemies to item containers to signs.
Try to shoot walls that you think are suspicious. They may lead to a secret area.
ingame cheat codes:
press backspace & P and enter one of the following:
Become invincable BOUF
Gives all weapons and refills your ammo GUNHED
Gives you an airboard STRIKE
Gives you an escort bird BAD
Gives you harder enemies DOOM
Gives you the speed shoes effect SABLE
Go to the bonus level HOOKER
Kills you MARK
Skips to the next level LAMER
Teleports you HOCUS
sources:
Highway Hunter | Highway Fighter
controls (keyboard):
arrows keys = move
spacebar = fire the current weapon
P = pause
Enter = skip cutscenes
ESC = quits the game
basics:
- don't keep shooting because your ammo will be gone after a while.
- don't miss any shields on the road because they're very usefull.
- try to stick on the bottom of the road, never fly at the top.
- always drive in the middle of the road.
- always shoot the hard enemies first.
- last stage: 15
cheats:
sources:
Mutant Space Bats of Doom, Invasion of the
Tyrian
controls (keyboard):
todo
sources:
PC
Xbox 360 Controller ASCII art:
_.-'` `-._ _,-' `'-._
,-' `-.,____________,.-' .-. `-.
/ .---. ___ ( Y ) \
/ ,' ,-. `. __ / X \ __ .-. `-` .-. \
/ | | | | (__) | / \ | (__) ( X ) ( B ) \
/ `. `-' ,' __ \___/ `-` ,-. `-` \
| `---` ,-` `-. .---. ( A ) |
| / -' `- \ ,' . `. `-` |
| | | | - - | |
! \ -. ,- / `. ' ,' |
| `-.__,-' `---` |
| ________________ |
| _,-'` ``-._ |
| ,-' `-. |
\ ,' `. /
`.__,-' `-.__,'
Dead or Alive 5
sources:
Soul Calibur VI
sources:
The House of the Dead 3
controls (mouse+keyboard):
mouse = aim
click = shoot (autoreload) -> aim at the head of most enemies
Enter = pause
basics:
- getting hit will deplete the red flames on the bottom-left.
- barrels and other objects can be destroyed to reveal bonus items, which will either increase the score or award extra lives.
- instead of civilians, there are "partner rescue" sequences where one player character will be isolated and trapped by creatures, requiring the other to save them. The most dangerous creatures are highlighted in red before the event begins. Success results in a bonus life; failure does not, although there is no life penalty if a trapped partner is attacked or accidentally shot.
- boss battles now have a smaller meter beneath their health bars. This meter must be emptied via repeated shots to boss weak points so that their attacks are disrupted.
- last chapter/stage: "5. Wheel of Fate"
sources:
Lego City Undercover
controls (on foot):
LS = walk, run
A = jump (press again to double-jump)
X = attack
Y = enter vehicle (when prompted), hold to quick switch disguise, counter-attack (when prompted) -> most effective move to ground and arrest bad guys
B = interact (when prompted), use bricks laying on the ground to build (when prompted), use curr. disguise special abilities near specific objects (check the icon), grab an enemy
LB | RB = cycle disguises
d-pad up = FPV
d-pad down = answer calls
d-pad right = use scanner -> find criminals hiding, listen conversations
LT = use police whistle -> stop vehicles
Back = open the city map (does not pause the game)
controls (in car):
LS = steer
A | RT = accelerate
X | LT = brake
B = boost (check the gauge on the top-left)
Y = exit or switch vehicle
RB = clacson
LB = jump
disguise special abilities:
- policeman: can use scanner for ground traces, use the grappling hook to climb and pull objects
- robber: can crack safe locks and doors, use color gun (hold to aim, use red/green color to turn appliances off/on)
- miner: can break down grey rocks, use dynamite (usually obtained from soda machines)
- astronaut: can use warp pads, color crate, machinery with space sign
- farmer: water vases to make plants grow. Press A again in midair to glider with a chicken.
- fireman: use fire existinguisher, break doors with the axe
- construction worker: fix electric applinces, hold X to dig the pneumatic drill
- Rex Fury: can grab big blocks
basics:
- getting hit will deplete the hearts in the top-left. If you die you just restart at the current area (you have unlimited lives).
- interact with the terminal on train stations to use the train and warp quickly between map locaitons
- last chapter: 15
sources:
Streets Of Rage 4
controls:
LS|d-pad = move, grab enemies
A = jump
X = attack (hold to charge)
LS|d-pad backward + X | RT | A+X = back attack
2x LS|d-pad, X = dash attack (performed even if the char does not dash)
B = pickup weapons and items, thrown
Y = special (no direction = defensive, with direction/in midair = offensive) -> drains health unless after executing the move you keep landing successful hits on enemies without being hit yourself
RB | B+Y = star move (req. 1+ star in the top-left, collect stars to restock)
basics:
- easier char: CHERRY (can dash)
- getting hit will deplete the gauge on the top-left. Collect apples or chickens found in destructible objects to refill.
- if an object looks like it's not part of the background, HIT IT.
They can take the form of phone boxes, barrels, bikes, suits of armor, and can even lead to hidden areas.
These will contain health items, weapons, money, and even star items.
- briefcases of cash and money sacks exist purely to boost your score.
- extra lives are earned via score extends at 8k, 16k and 24k points.
- last stage: 12
sources:
Crazy Taxi 3: High Roller
basics:
- beat the levels in Crazy X Mode to unlock more stuff.
sources:
Nier Automata
controls (Type A):
LS = move, run
A = jump (press again to doube-jump)
X = light melee attack
Y = heavy melee attack
B = context action, grab items from the ground (yellow glow), push, pull
RT = evade, dash in midair
RB = pod ranged attack -> safest, but less powerful than melee and some enemies are bulletproof
LB = pod special attack (slow reload)
LT = Lock on enemies
d-pad left|right = swich pod
d-pad down = use item
d-pad up = switch weapon
RS = move camera
R3 = reset camera
Start = pause and check the map and inventory
Back = pause quick use items, send pod commands
map legend:
- orange square = next objective
- orange circle = quicksave + map
- white rhombus = manual marker
basics:
- getting hit will deplete the the gauge on the top-left. Use a Recovery item ro refill mid-combat.
Also refilled when you levelup or enter a save station.
- when you die you can continue at the nearest checkpoint without your current equipment.
In order to recover your equipment, you will need to return to your place of death.
The body is marked with a special icon on the ma, but will disappear after a while.
Get close to it and select "Retrieve" to recover your equipment.
Avoid "Repair" = will enable the body to follow the "new" character for some time and help in combat.
- the games does not autosave. You can save when you are near active Access Points machines ("Saving Possible" message shown in the top-right).
Most of them must be "unlocked" by defeating the nearby enemies.
They also acts as warp points and provide the map of the nearest area, so always unlock them.
- you can buy additional weapons from traders, and find some of them in the game world (they are usually well hidden).
- chips are passive skills that can be installed in the SKILLS menu.
You can buy upgrades to increase the default storage limit and add new slots. To do this, you must visit the Maintenance Shop Owner that resides in the Resistance Camp.
They will continuously stock items from the Storage group and each of these will permanently increase your operating system storage.
- last mission: 10
sources:
Bloodstained: Ritual of the Night
controls:
LS = move, crouch
LS up = search, interact, talk
A = jump (hold to jump higher, press again for midair jumping, combine with LS down to slide and drop down from thin floors)
X = attack
Y = Shard attack (req. MPs, check the blue gauge on the top-left. Auto-refills over time and by collecting Rose Mana from candles. Eating some foods will help you recover MP faster)
RS = aim Directional Shard (press RT to use it, req. MPs) -> interact with glowing objects
RB = Manipulative Shard (req. MPs) -> grab and move heavy objects
LB = backstep
LT (hold) = quick switch equipment preset ("Shortcuts" in the menu)
LS Down, Up + X (when unlocked) = use Invert skill shard
Start = pause and view the map (red rooms=save points, green rooms=warp zones)
Select = pause and check status and equipment
minimal walkthrought:
- Galleon Minerva: Boss
- Entrance: Boss
- Dian Cecht Cathedral: Craftwork (Boss's shards)
- Livre EX Machine: Double Jump (Boss's shards)
- Towers of Twin Dragons: Get Silver Bromide (item in Boss's zone)
- Arvantville: Get photograph
- Livre EX Machina: Talk to OD
- Bridge of Evil: Boss
- Underground Sorcery Lab: Reflector Ray (Boss's shards)
- Dian Cecht Cathedral: Blood Steal (Boss's shards)
- Entrance: Use Blood Steal in "Blood pool"
- Forbidden Underground Waterway / Aquastream
- Hidden Desert: Deep Sinker (shards in Boss's zone)
- Secret Sorcery Lab
- Inferno Cave: Invert (Boss's shards)
- Towers of Twin Dragons: Get Aegis Plate
- Oriental Sorcery Lab: Get Zangetsuto (Boss's Katana)
- Hall of Termination: Bad end or Attack Red Moon
- Garden of Silence: Attack Red Moon
- Den of Behemoths: Boss
- Glacial Tomb: Good end
basics:
- getting hit will deplete the red gauge on the top-left.
All HP and MP can be restored by visiting a Save Room with absolutely no cost. It will also clear of any poison status.
Food can be consumed to restore HP or MP. Consuming them for the first time also adds a permanent bonus to stats. They can be prepared by speaking to Johannes and using the required ingredients.
- gun weapons have limited bullets, replaced with weaker bullets when finished.
- talk to Johannes in Arvantville to rank up your shards, craft equipment and cook food.
sources:
Shantae and the Seven Sirens
controls:
LS | d-pad = move, crouch, enter doors, climb vines
A = jump
X = hair attack
B = magic attack (req. the green gauge on the top-left, collect jars to refill), talk
Y (hold) = dance (tap the direction shown after a while to use a special ability)
Fusions (instant transformations):
- Dash Newt: dash in the air to cover greater distances as well as wall climb by dashing into a wall.
- Gastro Drill: drill through soft surfaces like sand by pressing LS down.
- Bonker Tortoise: jump and bash straight down by using the left trigger. You can also hold your attack button to charge up to turn into a tortoise on its back and spin around the room, breaking more stones that may be in front of you.
- Sea Frog: swim underwater. You will constantly be moving but by holding X, you will slow down significantly.
- Jet Octo: triple jump and reach great heights
dance abilities:
- Seer Dance = allow you to see otherwise invisible objects
- REFRESH DANCE = heal you as well as grow plants you find around the world
- SPARK DANCE = activate machinery, or shock metal
- Quake Dance = damage all enemies on the screen as well as shake the world around you. This can potentially be used to find some hidden items. This will also get rid of all the sand you can dig through that is on the screen at the time of dancing.
basics:
- getting hit will deplete the hearts on the top-left. Collect hearts or use potions or the REFRESH DANCE to refill.
- Monster cards act as power ups. You can collect most of these by defeating monsters, they'll drop at a random rate. Some can be purchased from townspeople with Nuggets. Each card has its own unique ability & will require collecting a set amount of each card in order to activate the power up.
- collected crystals can be spent in shops to buy magic attacks, powerups, and potions.
- last area: Flying Fortress
sources:
Spidersaurs
controls:
LS = move, crouch
A = jump
X = shoot
RT = hold position + aim with d-pad
LB | RB = switch weapon (check the icons in the top-left)
LT (when unlocked) = vertical grappling hook -> attach to ceilings
Y (when unlocked) = ground pound (in midair -> break weak floors, while standing still -> send a wave in both directions, catapult yourself up if you're stuck on a web.)
B (when unlocked) = dash -> break enemies barrier
basics:
- every time you start a Mission (excluding Mission 0), you'll have the option to select from one of the three different types of Pods. These are basically free power ups that can help you during your journey, though their location in each Mission is randomized. To release the effect, all you have to do is shoot one.
The effects are as follows:
The Fireworks Pod is what it sounds like. You shoot it, and it'll spread explosions like fireworks for a few seconds, damaging any enemy in the radius, though the AoE is rather limited.
The Rain Pod lets loose large projectiles raining from the sky for a few seconds, providing that ceiling or platform isn't blocking it.
The Flash Pod releases a large blast that damages any enemy on the screen. While it only lasts about a second, its sheer power makes up for it.
- getting hit will deplete the green medkits in the top-left. Collect food to refill.
You respawn immediately when losing a life, but you have to restart the mission if you lose all your lives.
- collect the same weapon multiple tiles to upgrade it.
You lose the current weapon when hit.
- last mission: 5
sources:
Blazing Chrome
controls:
d-pad | LS = move, aim, crouch
A = jump (combine with d-pad down to roll), enter mecha
d-pad down + A = roll -> pass under narrow passages
X = shoot, melee attack near enemies (more powerful)
RB (hold) = fix position + aim with d-pad
LT|RT = switch weapon (check the icons in the top-left)
basics:
- getting hit will lose a life and current weapon.
- last MISSION: 6
sources:
Andro Dunos 2
controls:
d-pad = move
A = shot
B = HYPER SHOT (diff. for each weapon, unlimited uses, but has some recharge time)
LB | RB = switch curent weapon+missiles+options set (check the icons in the top-left)
basics:
- pick up "S" items to powerup your current weapon, "M" for the missiles and "U" for the shield/options.
Missile and shield powerups are shared, while the weapon powerups are not.
When you die your current weapon lose 1 level.
- collect blue orbs to buy more powerups at the end of each stage (10 orbs = 1 levelup. check the icons at the bottom-left).
- last stage: 8
sources:
Pocky & Rocky Reshrined | Kiki Kaikai: Kuro Manto no Nazo
controls:
d-pad = move
X = shoot projectiles (stop shooting for a while and tap the button for a special "Attack Augmentation" shot, enabled after Stage 3)
A = melee attack (hold to charge "Purification Charge" attack, enabled after Stage 3) -> deflect projectiles
B = slide
Y = bomb (req. the green orbs in the bottom-left, collect green thunderballs to restock)
basics:
- getting hit will deplete the hearts in the bottom-left and drop 1 power level, which can be grabbed again. Collect food to refill health.
There are 2 powerups that offer hit protection: the red amulet and the Komainu lion-dog (=temp. invincibility).
- weapon powerups that can be found in baskets are: blue+white paper = multiple wide attack, red = higher firing rate, green = homing.
Collecting multiples of the same powerup results in a temporary "Max" mode.
- enemies drop coins that can be exchanged for randomized items from NPCs hidden in stages.
- last stage: 8
cheats:
- unlock Extra easy in story mode: Collect 3 000 coins
- unlock Free mode: Complete the story mode once or collect 10 000 coins
- unlock Hotaru Gozen / Ikazuchi selectable in free mode: Complete the story mode a 2nd time
sources:
Sonic Forces
controls:
Left Stick = move
A = jump (press again to jump in midair, press B to stomp)
B = crouch -> pass under narrow passages
X (when 3d sonic) = use boost (req the blue gauge on the bottom-left, collect white Wisp capsulse to refill)
Y (when using avatar or 3d sonic) = Jet Wisp -> tap multiple times to reach higher places
RT (when using avatar) = Wisp special attack
RB | LB = quick step left|right
basics:
- rewards and best times are not recorded when playing in NORMAL mode (default).
In Normal mode you only lose 20 rings when hit, unlike Hard mode where you lose all of them like in classic Sonic games.
Normal caps out your rings at 100 while you only drop 20 rings when you get hit, and hard mode has no ring cap but you lose all your rings when you get hit.
In short, just play on hard mode, since normal mode also disables scores and ranks and almost nothing changes between difficulty levels.
- the game features 3 playable characters: 2 variants of Sonic the Hedgehog ("Classic" and "Modern") and the "Avatar" (the player's custom character).
Each has unique abilities and attributes: Classic Sonic is restricted to side-scrolling gameplay reminiscent of the Sega Genesis Sonic games and can perform a spin dash on the ground and a drop dash in mid-air to gain speed.
Modern Sonic's gameplay follows a similar style to Sonic Unleashed and Sonic Colors: he can double jump, perform a homing attack on enemies, springs, and grappling hooks, and a speed boost by collecting White Wisps.
The Avatar is created from a base of seven animal types, which each possess a unique ability; they also wield a grappling hook and can equip weapons known as Wispons, including flamethrowers, whips, and hammers. Depending on the Wispon, Avatars can use temporary abilities by collecting a corresponding Wisp type.
- last stage: 30
sources:
Sonic Mania
controls:
d-pad = move, crouch, look up|down
A | B | X = jump (tap in midair as Tails to fly)
d-pad down + A | B | X (tap repeately) = charge spin dash
d-pad up + A | B | X = call Tails as Sonic (then jump to his arms and tap jump repeately)
Y = switch char (Encore mode only)
zones list:
- Green Hill
- Chemical Plant
- Studiopolis
- Flying Battery
- Press Garden
- Stardust Speedway
- Hydrocity
- Mirage Saloon
- Oil Ocean
- Lava Reef
- Metallic Madness
- Titanic Monarch
- Egg Reverie
basics:
- the only option available to you as you start the game for the very first time will be Mania Mode, which is how you play the game's main story.
- easier char: Tails (can fly to higher platforms, easily skip sections)
- the game auto-saves only at the beginning/end of each zone (not single acts).
- there is a maximum time limit of 10 minutes per act.
cheats:
- Level Select: first unlock Debug Mode by collecting any 16 Silver or Gold Medals from the Blue Sphere special stages. Turn on Debug Mode by highlighting the "No Save" option on the file select screen, and pressing the key assigned to "Alt" to access to Secrets Menu. With Debug Mode turned on, highlight "No Save", hold the key assigned to Delete, and press the key assigned to Jump. Continue holding Delete until the Zone Select Screen appears.
sources:
Bloodstained: Curse of the Moon
controls (XB360 controller):
d-pad = move, crouch, read signs, climb ladders
A = jump
B = attack
Y = use sub-weapon (req. the "WEAPON" counter on the top-right, collect blue jars to refill)
LB | RB = switch char (check the icons on the top-left. each own has its own health bar)
char:
- Zangetsu (init) = has the most health, but not many useful moves
- Miriam (female) = has higher jump and long range whip. Can slide under narrow passages by pressing A+down.
- Alfred (magician) = has short range attack, ad the lowest amount of health. But has powerful spell subweapons, good against strong enemies.
- Gebel = very useful vertical bats attack. He can only use 1 subweapon: bat transformation -> useful to skip platforming sections and reach higher places.
If Gebel destroys a blue lantern, a large magic pot will always fall out.
basics:
- getting hit will deplete the red gauge on the top-left. Collect hearts to refill midstage, or switch char
- blue lanterns contains subweapons, yellow ones can contain hearts or bag of money.
- last stage: 9
sources:
Bloodstained: Curse of the Moon 2
controls:
d-pad = walk, crouch, climb ladders
X = attack
A = jump
Y = subweapon (req. weapon points, check the counter in the top-left. Destroy lanters to get blue jars refill)
B (only as Ultimate Zangetsu) = dash
LB|RB = switch char (check the icons on the top-left)
char special abilities:
- ZANGETSU (red): more health. special subweapon: Soul Domination (powers up all chars sub-weapons)
- DOMINIQUE (blue): higher jump, vertical strike (X + dpad up), hopping strike (press d-pad down in midair, can bounce off certain objects), glowing lamp provides single-use "Resurrection Anthem" that revive all dead allies.
- ROBERT (green): less health, long range sniper shot, crawl under narrow passages, cling and jump on walls
- HACHI (dog+robot): powerful punch attack, can hover in midair by holding the jump button. Downward attack (X + d-pad down in midair) can break some platforms. Can walk over icy floors without sliding. Has a fixed special weapon: invincibility (walk over spikes, etc.). All blue lanterns drop MP refills with him.
basics:
- getting hit will deplete the red gauge on the top-left. Get hearts to refill.
If the health reaches 0 your current allies dies, and you restart from the lastest candle checkpoint with the remaining ones.
When the last ally dies you lose a life, and they are all brought back to life.
- the shortest path in each stage is pointed by skeletons, but it is not always accessible.
- you can find blinking "KEY ITEMS" in stages to upgrade your stats (HPs, MPs, ATTACK, and DEFENSE).
- last stage: 8 (all episodes)
sources:
Koumajou Remilia: Scarlet Symphony | Touhou castlevania
controls:
d-pad = move, crouch
X = whip attack
A = jump (press again in midair to fly in all directions. Unlimited usage, but you can only use the Ofuda attack in midair, cannot change face direction, and will fall if hit)
Y | d-pad down+A = slide
B | d-pad up+X = Ofuda card shoot (check the Souls counter in the top-left, kill enemies to restock) -> longer range but less powerful than whip attack
RB = partner attack (req. 10 Souls for each use)
LB = switch partner (check the icons in the top-left)
basics:
- getting hit will deplete the red gauge on the top-left. Collect food from vases to refill.
- last stage: 8
sources:
Miss Kobayashi's Dragon Maid Burst Forth!! Choro-gon Breath
controls:
LS | d-pad = move
LB = shoot primary + secondary weapons (diff. for each char)
A = "Striking Blow" melee attack (hold to charge) -> homein to nearest enemy, avoid if the are bullets near the enemy
LB = backstep/straight downward dash
B = "Choro-gon Breath" bomb (req. the gauge on the bottom-left)
X|Y = switch ally left|right
chars abilities:
- Tohru = focus shot, deals most damage.
- Kanna = fires small homing beams that automatically target enemies.
Also fires off some feathers from her body that can destroy enemy projectiles it comes in contact with.
Tohru's beam lets off slower, smaller homing beams that are weaker than Kanna's.
Kanna recovers some HP after using Bomb.
- Elma fires a 7-way spread shot that's good for covering a wide angle.
Each tap of the shoot button will randomly create some blue reticles onscreen that higly damage.
Elma has the best Striking Blow.
basics:
- Director's Cut in the options features illustrations of stage bosses specially drawn by original author Coolkyousinnjya, and adjusted difficulty for each stage.
- set Risk Rate to 1. If you get hitted, you take less damage.
- increase your HP to 200% and D Gauge to 5 in Game Settings.
- getting hit will deplete the HP gauge on the top-left. Each char has his own health meter which also refills when not in use. So always switch char when hit.
There are Mid-Boss that drops HP in Sugar Sports and Monster Crisis Stage. It gives full heal.
- the Dragon's Jewel is an icon at the top-right of the screen underneath your score, indicating the level and potency of your 3 chars' attacks.
The maximum level cap for the Dragon's Jewel is level 7, and it's shared between all 3 chars so swapping between them won't reset levels.
The Dragon's Jewel is charged by inflicting damage on enemies and bosses, as well as defeating them.
- last stage: 6 (5 if you don't keep all of your dragons alive)
sources:
Nightmare trip
controls (keyboard):
arrows = move
Z = wide shoot (combine with Left Shift to focus shoot + slow move)
X = bomb (req. 1+ stars on the bottom-right)
Esc = pause
menu translation:
GAME START
EXTRA MODE (unlocked when you beat the main game)
TIME ATTACK
REPLAY
HIGH SCORES
GUIDE
OPTIONS
EXIT
basics:
- easier chars: Miyasaka Yukino & Yamabuki Mizuki (have homing shots)
- getting hit will deplete the hearts on the bottom-right.
- last stage: 5
sources:
CosmoDreamer | Cosmo Dreamer
controls (CONSUMER MODE):
LS = move
B = wide shot
RB (hold) = focus shot + slow move
X = bomb (req. 1+ "DREAM Lv" star on the bottom-right, collect bubbles from enemies or "DREAM UP" items to restock)
basics:
- easier equipment: C: Homing Fairy, B: Lock-on Jewels, A: Supernova, A: Shield Enhance
- the Dream Level on the bottom-right provides both hit protection and bombs.
Getting hit will auto-bomb and drop your Dream Level to 0 (only -1 level, if you have the Shield Enhance equipped).
You will lose 1 "LIFE" heart if your DREAM Lv is 0 already.
Hearts can be refilled via score-based extends and "LIFE UP" items.
- last stage: 8 (+1 hidden)
sources:
Like Dreamer
controls (CONSUMER MODE):
LS | d-pad = move
B | A = wide rapid shot
RB (hold) = slow move + focus shot -> use against stronger enemies
X = bomb (req. 1+ "DREAM Lv" star on the bottom-right, collect bubbles from enemies or "DREAM UP" items to restock), manual activate "Buzz Fever" mode (req. the Buzz gauge on the bottom-right full, collect hearts to refill) -> incr. attack power
basics:
- easier char: Vanilla Alice (has homing main weapon)
- collect stars the increase the Metal Gauge around the player. When full, you will get a Mental level up, which provides both hit protection and a bomb.
You get more stars for point-blanking enemies.
- collect hearts to increase the red Buzz gauge. When full, enter Fever mode (automatically by default, or via the bomb button if set).
- last stage: 8 (+1 hidden)
sources:
NeverAwake | Never Awake
controls:
LS = move
RS = aim and shoot
RB | RT = special attack (limited uses, check the counter in the bottom-left)
LB | LT + LS = dash -> temp. invincibility
basics:
- getting hit will deplete the small shield icon in the bottom-left.
There are no continues; if you bite it, you need to start the level over from scratch.
(You can choose "OVERBURST" to retry the level in an enhanced state)
- when you destroy enemies (or shoot a large pink crystal that moves through the levels with you),
multicolored Souls show up. You need to collect them until your soul gauge hits 100%, at which point the level will end.
Instead of having levels typical of a shmup, each level loops. The longer it takes you to collect all the necessary souls, the more loops you'll have to contend with. Levels grow in difficulty with each additional loop.
Same with the bosses, you don't have to completely defeat them.
- collected Souls will also provide Money that can be spent in a shop ("MAIN MENU" section).
You can buy diff. weapons and powerups, but you can equip a limited number of them.
- last world: 7
sources:
Sisters Royale: Five Sisters Under Fire
controls (keyboard):
WASD = move
A = shoot (more powerful when grazing bullets and enemies)
B = summon attack (char-specific)
X = bomb (check the blue icons on the bottom-left) -> temp invincility
J = skip story
basics:
- easier char: NUR (has autohoming main weapon)
- getting hit will deplete 1 LIFE slot on the bottom-left.
- "Tension Bonus System": the amount of points acquired and coins dropped depends on the distance between the player, enemies, and enemy bullets.
Additionally, "Secret Fairies" that doubles the increase rate of the TBS for a limited amount of time are hidden throughout each stage.
- last stage: 5
sources:
Cotton Rock 'n' Roll: Superlative Night Dreams | Cotton Fantasy
controls (Cotton):
LS = move
B = auto shoot
X = shoot (hold to charge a magic attack, check the icons in the bottom-left, collect non-jellow crystals to restock)
Y = bomb/special attack (will sacrifice 1 fairy, restock from white crystals)
basics:
- collect colored crystals to switch and powerup the main weapon:
red = wide, blue = focus, green = homing.
- collect yellow crystals to raise EXP and levelup your main weapon (check the "EXP" gauge on the top-left).
- last stage/chapter: 9
sources:
Dezatopia | Momoiro Underground
controls:
d-pad = move
Y = shoot up
A = shoot down -> weater down plants to make them grow
X = shoot left
B = shoot right
RB = bomb () -> temp. invincibility, Hop over walls or obtain treasures buried inside them
LB = switch FREE/FIXED mode (fixed=toggle autofire for each weapon, free=hold to fire)
basics:
- you always have 4 directional weapons available, but they are more powerful when fully charged (check the colored gauges on the bottom-left).
- a shop will appear when you have collected enought MONEY.
The border of the shop blocks some bullets and damage enemies on contact.
Simply mode your ship over the item you want to get, if you don't the Shop will disappear after 8s.
- getting hit will will deplete the hearts in the bottom-left. Buy LIFE items from the shop to refill.
- autobomb: when all weapons are not in use and bomb gauge is not empty, a bomb will be automatically used upon hit.
- last stage: 5th (diff. fear each route)
sources:
Graze Counter GM
controls:
d-pad = move
A = shoot main weapon
B = focus attack (req. the "GRAZE COUNTER" gauge on the bottom-left, autorefills by grazing bullets)
X = enter Break Mode (req. the "BREAK" gauge on the bottom-right full, autorefills by killing enemies) -> temp. increase firepower
RB (hold) = slow movement
basics:
- getting hit won't kill you instantly if you have the SHIELD (auto refills over time if you don't get hit).
- enmies drop a cycling powerup item: SHIELD, GAUGE (refills both gauges),
basics:
sources:
Drainus
controls:
d-pad = move
A = shot main weapon+missiles
B (hold) = "Reflector" guard+absorb energy shots (check the green gauge "GUARD" on the bottom-left, release to counter-attack)
X = bomb (req. the blue slots on the bottom-right, restock by collecting blue orbs)
Start = pause and enter upgrade/equip menu (collect blue orbs to powerup and enable the equipped weapons, check the "POWER UP" HUD on the top)
R1 = switch speed
basics:
- getting hit will deplete the "POWER UP" gauge on the top, until you reach level 1 and die with one hit. Collect blue orbs to refill.
- last stage: DEMISE (2 loops)
sources:
Devil Engine
controls:
d-pad = move
A = shoot
X | RT = burst (check the circular bar in the top-left, auto-refills over time) -> absorb bullets nearby, cycle weapon powerups
B | RB = bomb (check the "BOMBS" counter in the top-left, auto-refills over time)
Y | LB = switch speed (check the bars in the top-left)
basics:
- collect pickups to switch the main weapon and bomb type: S = wide vulcan, L = laser, H = homing.
Collect the same pickup to powerup.
- last stage: 7
sources:
REVOLVER360 RE:Actor
controls:
d-pad | LS = move
X = fire main weapon + homing missiles to background targets
A = laser (req. the big polys around the ship, autorefill over time) -> clear yellow bullets only, damages ships near you, even behind
Y = bomb-like "EMP" (hold for Overdrive, req. the red gauge around the ship, restores over time) -> cancels all bullets into items and weakens enemies so that they die from a few normal shots. It cannot destroy enemies by itself.
RB|LB = rotate right|left -> avoid enemies and obstacles, use to find containers in the BG with items inside, check the big red arrows for incoming targets
main menu explanation:
- RE:ACTOR = arcade mode
- SECTOR:DIVE = time attack
- CHALLENGE = mission mode
basics:
- getting hit will deplete the LIFE counter in the top-left. When it reaches 0 it is game over and you cannot continue.
- destroy containers in the background to get items: green=REPAIR, blue=LASER, red=OVERDRIVE refills.
There are no weapon powerups except the temp. Overdrive mode.
- when the red "WARNING" appears you must destroy an incoming big obstacle to avoid taking damage.
- last SECTOR: 4
sources:
Shantae: Half-Genie Hero
controls (XB360 controller):
d-pad | Left Stick = walk, crouch, climb ladders
A = jump
X = hair whip attack, talk -> use to move boxes too
B = use current magic (req. magic power, check the green vertical bar in the top-left, switch in the subscreen)
LB | RB = quick switch magic (check the icon in the top-left)
Y = start dancing (press d-pad at the right time to switch form. When transformed tap again to turn back to normal)
RT (if purchased) = backdash
Start = pause and open the subscreen (use items and switch magic)
transformations/dances:
- monkey = jump higher and stick to walls, pass under narrow passages. If you have Monkey Bullet: while sticking from a wall, press away from the wall and X to fly.
- craw - walk underwater, pass under narrow passages
- elephant = X to dash and break obstacles. Stomp small blue flowers to get items.
- siren = swim freely underwater
- bat = hover in midair
- tinkerbat = can attack with sword, double jump and hover in midair -> good for difficult platforming sections
- mouse = enter small mazes entrances (sparkling)
- spider = double jump to grapple to ceilings
- Harpy = fly by tapping A
- warp = warp to the next area section
basics:
- getting hit will deplete the hearts in the top-left. Collect hearts, use fruits or Mega Potions in the pause screen to refill.
- collect hidden Monster Eggs and trade them with the thin woman in town for Heart Holders. You can also find Heart Holders in hidden chests.
- collect gems to buy stuff at the Item Shop. Best powerups to get: Fireball magic (safely attack distant enemies), Shampoos (=incr. attack power) ,..
- visit the BATH HOUSE LADY to get hints on the next objective.
- visit Sky Archery to travel to different worlds.
- last world: Risky's Hideout
sources:
RollingGunner | Rolling Gunner + Over Power
controls:
d-pad = move (the pod moves in the inverted direction)
Y = main shot (hold for focus shot + pod lock)
RT = main shot autofire
LT = bomb (check the "B" icons in the top-left, collect the same icons to restock), activate Power-Up mode and Limiter Release (when the counter in the bottom-left is 1000. collect medals dropped by enemies to refill) -> destroy onscreen bullets + temp. incr. attack power. Press again when the limit gauge is over 10% unlocks to activate the Limiter Release. (they both raises the rank)
Start = pause
Back = insta-quit to main menu (no warning!)
controls (Over Power ver):
Left Stick = move
Right Stick = aim+shoot -> the options absorb incoming shots
LB (hold) = quick switch attack/defese mode
LT (tap) = toggle attack/defese mode
RB = fire bust (when charged, if "AUTO ..." is disabled in the options) -> absorb bullets
RT = activate Power-Up mode and Limiter Release (when the counter in the bottom-left is 1000. collect medals dropped by enemies to refill) -> destroy onscreen bullets + temp. incr. attack power. Press again when the limit gauge is over 10% unlocks to activate the Limiter Release.
basics:
- easier ship: RF-42RA Attack STORK (trades off movement speed for a wider attack range and a bit of extra power)
- last MISSION: 6
sources:
Q-YO Blaster
controls:
d-pad = move
X = shoot (hold to call the "assistant" when the small gauge on the bottom-left is full)
A = bomb (needs 1 slot on the POW gauge on the bottom-left, collect gems from enemies to refill)
B = use "PULSE" (req. the "PULSE" battery gauge on the top-left, collect "P" items to refill) -> turn bullets into gems, does not damage enemies
Back = pause
basics:
- easier char: ?
- collect "B" = BULLSTORM, "C" = CURTSHOOT (wide shoot if you tap the fire button), "H" = HOMING MISSILE or "L" = LASER items to temp. increase the firepower (bullets counter on the top-left).
There are no permament weapon powerups in this game.
If you clear a stage with a weapon you'll start the next stage with your default shots regardless of how much ammo you had left.
- getting hit you will lose 1 heart (=1 life) on the top-left.
- last STAGE: 8 (10 in Arcade Extreme mode only)
sources:
Street Fighter X Mega Man
controls (keyboard):
WADS = move, climb ladders
K = fire weapon
L = jump (combine with D=down to slide)
I = weapon change (right)
O = weapon change (left)
Enter = start, pause and enter submenu to switch weapon and use Energy
suggested stages order:
- CHUN LI
- C. VIPER
- DHALSIM
- BLANKA
- ROSE
- ROLENTO
- URIEN
- RYU
sources:
Ninja Gaiden 3: Razor's Edge
controls:
LS = walk, run
A = jump (press again near walls to wall-jump)
X = quick attack
Y = strong attack (hold to charge), "Obliteration Technique" = finish an injured enemy, "Steel on Bone" counter-attack after dodging, Surprise Attack (while gliding after jumping from certain high locations or sneaking behind enemies) -> always use when your arm is glowing red
B = projectile attack (unlimited, but only stun most enemies), examine, open doors
Y + B = Ninpo attack (when the blue Ki gauge in the top-left is full) -> hitting enemies with Ninpo attacks will heal you
LT (hold) = block (tap LS to slide and dodge attacks, also used to pass under narrow passages)
RT = auto-aim and shoot with the bow (even in midair) -> very effective for distant enemies
LB = aim bow (aim with RS, then tap RT to shoot)
RS = move camera
R3 (hold) = turn and face the next objective/correct path -> in most sections you must kill all the enemies to proceed. Sometimes they get stuck in the scenery, so use R3 to find them easily.
RB = center camera
LB + RB (press simultaneously after jumping toward certain walls) = start "Kunai Climb" (then alternate LB and RB to climb the wall)
d-pad up = quick switch Melee Weapons and Ninpo
d-pad down = check current weapons moves
back = pause and open the Ninja Skills Screen (spend Karma points to get new moves, weapons, and Ninpos, or to levelup current stats)
basics:
- "HERO" PLAY STYLE is a cheat mode pretty much, you cannot die except for falling down in pits.
- getting hit will deplete the health gauge on on the top-left. Collect blue essences to refill.
- interact with the falcon to save your game and refill your health midstage.
- defeating enemies will grant you Karma points, that can be spent to get new moves, upgrade weapons, etc.
A single Golden Scarab will give you a total of 5K Karma Points.
- collecting a Crystal Skull will also give you 5K Karma Points, and upon interaction with them, it will teleport you to a battle arena called "Tests of Valor".
In the Tests of Valor battle arena, you will have to go through 3 waves of enemies and a final boss battle.
After the Test of Valor battle, you will be teleported back to the location from where you picked up the Crystal Skull. Your health bar will also be fully recharged.
- last day: 8
sources:
Battle Fantasia -Revised Edition-
controls (XB360 controller):
d-pad = move, jump, crouch
2x d-pad = dash
X = light punch (A)
A = light kick (B)
Y = heavy punch (C), weapon attack (for some chars)
B = heavy kick (D), alt. weapon attack (for some chars)
RB = parry (gachi)
RT = appeal
X+A | LB = throw
LT | X+Y | A+B (when the blue counter at the bottom >=1) = enter heatup mode -> incr. attack power
basics:
- easier chars: Face, Coyori
- Each character's story mode has a completion %. You will have to play through at least twice as there is the main story and an alternate story, to see the alternate story you have to do a special event during a certain fight during story mode. An important thing to remember is that you must lose every fight at least once in ALL of the characters storys for some completion %. Several characters have special events to be done in story mode, not all characters have them. When you get to 50% and 90% completion you will unlock a new costume and when you get to 100% completion for all characters you will unlock several items for the Gallery and "The End of Deathbringer".
- last STAGE: 9 (ARCADE)
sources:
Kaikan
controls (XB360 controller):
arrows = move
A = shoot (release to attract the medals onscreen)
X (hold) = focus shoot + show the hitbox
B = bomb (if you have a "B" pod following you, if not fired manually will provide 1-hit protection with no explosion)
Y = pause
basics:
- easier ship: TYPE-B
- item rank is visually displayed by the colored bars that sit on the sides of the screen and indicated by letter on the left side of the screen.
Collecting Enemy Medals will increase item rank and add to your total Count number visible on the right side of the screen.
- hidden yellow flags on the ground provides EXTENDs=extra lives.
- last STAGE: 5
sources:
Battle Crust
controls (keyboard):
arrows = move
Z = shot
X (when having the pods) = charge beam (check the bar in the bottom-left)
Esc = pause
Enter = switch screen
basics:
- best CHARGE SYSTEM: BLAST CHARGE
- after the first powerup orb is taken and the pods are generated, any further one will be fully active according to its color:
- blue = straight lasers with rear shot capability;
- brown = powerful soft forward shot;
- red = wave shot with two spreading side shots;
- yellow = a spread of impact shots;
- green = needle-shaped gun with two homing side shots.
Taking the same powerup multiple times does not powerup the weapon.
- last stage: 6
sources:
Battle Traverse
controls (XB360 controller):
d-pad = move
A (tap) = shot (point blanking is more powerful and gives more items)
A | X (hold) = lock+focus shot + slow down
Y = autofire shot
B = bomb (check the BOMB counter in the top-left. Collect blue "B" icons to restock)
Start = pause
F1 = soft-reset game
Esc = instant quit game
basics:
- in the Key config there's a separate lock-on button you can map. It focuses movement instantly and makes lock-shot come out significantly faster than holding 'Shot'. In general you want to swap between lock-on and rapid fire instead of using the 'Shot' button.
- easier char: Albert T Neider (wider shot)
- green "P" items increase the shot power.
- the yellow Bullet point item is only for scoring purposes: it acts as a multiplier for bullet cancels. Minimum value is 100, max is 1000 (check the counter in the bottom-left).
- last stage: 5 (2 loops on hard mode)
sources:
WITCH-BOT MEGLILO
controls (XB360 controller):
A = shot
B (hold) = time freeze + warp (req. the "WARP" gauge on the right) -> temp. invincibility
basics:
- collect "S" squares to get some "SHIELD" (up to 3 levels, check the slots on the right HUD).
Getting hit with no SHIELD left will result in a life loss. After all lives are lost there are no continues.
- subweapons can be switched via pickups. Some are better for certain situations, while others require a riskier style of play to get the full effect.
- instant bombs are carried periodically by a ship with a danger sign on it.
- last stage: 6 (last boss can timeout, and you can't retry)
sources:
Raiden V Director's Cut
controls (XB360 controller):
d-pad = move
A = shot (stop shooting to attract onscreen medals for extra points)
B = bomb (check the "B" icons in the bottom-left)
X (when the "CHEER CALL" gauge on the bottom-right is filled) = cheer attack -> no temp. invicibility, breaks on the 1st hit
Y = cheer (req. online connectivity)
LT = switch HUD
RT = log change
basics:
- best ship and weapon: AZUMA, Homing Plasma
- there are no lives, taking hits will deplete the "SHIELD" gauge in the bottom-left.
The "SHIELD" is only refilled during bonus stages and slightly after beating bosses.
- the 3 chosen weapons can be switched and powered up via a color-switching orb released by an orange ship (up to LEVEL 10, check the HUD on the left).
- you can quit and continue the STORY MODE from the current stage anytime you want. You also have unlimited continues.
- last stage: 8
sources:
The Hurricane of the Varstray -Collateral hazard-
controls (XB360 controller):
d-pad = move
A = fire current weapon
X = switch pri/sub weapons
Y = switch the subweapon in use (chech the "Subweapon Unit" labels in the top-left, you can found more weapons hidden in stage scenery)
B (when the green gauge on the right is at 100%) = activate "Baryon Laser" weapon (destroy enemies to refill) -> not temp. invicibility, aborted when hit. Press "A" to fire until the green gauge is empty, in the meanwhile collect gold spiky stars to fill the red "Grabuster" gauge. When finished you will get temp. invicibility until this second gauge lasts and can damage enemies by contact (use against bosses and big enemies)
RT (hold) = slow movement
basics:
- easier char: PUSHPA M. VALLAMPATI (has the longest range)
- the hitbox is the orange sphere in the center of the ship.
- "P" = POWER UP items appear by destroying ground objects with the same symbol. By collecting them, you can make the shots more powerful (3 levels).
- destroy enemies to fill the green gauge on the right. When it is filled >50% it shows "Baryon Shield OK", providing 1-hit protection.
When it is full you can unleash the "Baryon Laser".
- best secondary weapon: H. LASER (found in stage 1)
- last stage: 12 (2 loops in arcade mode)
sources:
Lilian Fourhand ~Nuclear soeur Fighters~
controls (keyboard):
W = aim diagonally
S = crouch
A = stop moving
D = move forward faster
N = shoot backward + lasers (hold to lock-on the lasers in MANUAL mode, stop firing to lock-on in AUTO mode)
, = shoot forward + lasers (hold to lock-on the lasers in MANUAL mode, stop firing to lock-on in AUTO mode)
M = jump (press again to double-jump)
. | 2x A|D = dash (even in midair) -> temp. invicibility
- = pause
Esc = quit game
basics:
- best chars: Rei Hasekura + Yoshino Shimazu (has homing shots) + select "AUTO" for automatic laser locking)
- getting hit will deplete the bigger blue gauge on the top-left. Collect "RECOVER" items to refill (also refilled after each stage).
- if you or your companion fall into a pit you won't be able to fire the lasers until she comes back and you touch it.
- the game screen is split between foreground and background planes.
Enemies in the foreground can be hit with the main shot attack or jumped on.
Enemies in the back can only be hit with the lockon laser attack.
- items will be dropped around the place, mostly notably from red birds if they are shot down. These items are:
- SHOT = increases the power of the main shot. Lasts until power gauge is drained.
- LASER = increases the number of maximum lock-ons for the laser shot. Lasts for a set period of time.
- INVISIBLE = grants immunity to attacks. Lasts until invisibility gauge is drained.
- RECOVER = health refill
- BONUS, food and stars = extra points
- last stage: 6
infinite continues EXE hack (search and replace with an hex editor):
A3285C4700
->
9090909090
sources:
Paro Paro
controls (keyboard):
arrows = move
Z = shoot (hold to charge) -> charged shots are very effective against big enemies
X = get powerup (check the HUD in the bottom-left)
C (only some chars) = bit shot (press again to recall)
Enter = switch fullscreen
basics:
- easier char: brown seal (has homing MISSILEs, r-type like bit and bouncing B.LASER)
- last stage: 9
sources:
Kero Blaster
controls (XB360 controller):
d-pad = move, aim up, climb ladders
A = jump (press again to double jump when you have the Jetpack)
B = fire (hold for autofire + hold direction)
basics:
- best weapons to level up: Fan / Wide / Quad / Ninja (green)
- last stage: 7
infinite hearts EXE hack (search and replace with an hex editor):
66294660
->
90909090
sources:
Flying Red Barrel - Diary of a Little Aviator
controls:
Left Stick = move
A = primary shot (hold to move slowly, release to attract coins)
B = rockets (check the stock in the bottom-left) (hold to load a Big Rocket, req. 2+ stock but lasts longer)
basics:
- the hitbox is where the cockpit is located. You can set "Show Hitbox=Always" in the Game Options.
- collect Big Coins (golden) to get rockets and extra lives ("EXTEND!").
More rockets you have, the more are required + they slow down your movement.
- collect Mini Coins (silver) for points only.
- there are no ingame weapon powerups.
- last stage: 5
sources:
QP Shooting - Dangerous!!
controls:
Left Stick = move
A = shoot
X (when CHARGE >= 100%) = activate Hyper Mode (collect green stars to refill) -> destroy nearby bullets, incr. attack power, 1-hit protection
RT (hold) = slow move+show hitbox
B = switch formation (may also alter movement speed and released pickups)
LB | RB | Y (if Formation Mode is set) = quick-switch formation
basics:
- getting hit will remove 1 heart from the LIFE in the top-left.
When there are no hearts left is game over. You can get score-based extends.
- stars will appear when you destroy bullets (green stars = refill the Hyper) or enemies (yellow stars = extra points).
- there are 2 main types of bullets: energy and physical.
Physical bullets (like missiles) can be shot. They grant a certain number of green stars upon defeating them. Killing the source of a physical bullet does not make the bullet disappear. Activating Hyper Mode does not get rid of those bullets.
Energy bullets (like lasers) cannot be shot. Defeating the source of these bullets will transform every one of them into green stars.
Activating Hyper Mode will transform every energy bullets around you, and every newly converted bullets (until the end of Hyper) into yellow stars.
If you gets hit while not being in Hyper Mode, every current energy bullets on the screen turn into grey stars (grey star doesn't grant any points).
- the higher your score is for a stage, the more R-POINTS you'll get.
You can spend those R-POINTS in the "Rbit-ROOM" to purchase new formations.
- last stage: 5
sources:
Eschatos
controls:
Left Stick | d-pad = move
X = focus+long shot
A = wide+short shot
X+A | B = shield (check the circular gauge on the bottom-left, autorefill when not used) -> absorb bullets from the nose of the ship, can also damage enemies by direct contact
LB = switch SPEED (check the arrows on the bottom-left)
basics:
- destroy orange item carriers to get blue "F" (=Flash) crystals that acts as an insta-bomb (=clear all bullets and damage enemies onscreen).
- in "ADVANCED" mode you can also get "P" orbs (=shot powerup), and yellow "F" (=Flash) crystals that acts like the blue one + bonus points.
While in "ORIGINAL" mode you start already at max powerup.
- last AREA: 26
sources:
Bullet Soul -Infinite Burst-
controls:
Left Stick | d-pad = move
A = normal shot
X = focus shot
B = bomb (in NORMAL MODE, check the icons in the bottom-left) | activate Burst Mode (in BURST MODE, req. the large vertical bar on the left full and orange, destroy enemies to refill) -> damage boost. If you press burst again while it's activated you will force the burst to end in exchange for a screen clearing bomb. If you are hit while in burst status you will lose life and burst will end.
basics:
- in BURST MODE enemies drop coins, there are no bombs, no powerups (you start fully powered), no lives.
Gettig hit will deplete the green vertical bars on the left. Bullets deal less damage than enemy collisions.
When the health bar is empty the game is over, but you have unlimited continues.
Collect "R" green cubes to refill.
- in NORMAL MODE you can also get "P" items (=weapon powerups, 4 needed to max out) and "B" items to restock bombs.
- easier char: Yun (has lockon lasers)
- last stage: 5
sources:
Caladrius Blaze
controls (XB360 controller):
Left Stick | d-pad = move
A = normal shot (hold for autofire)
X = focus magic attack (req. the circle gauge on the bottom-left) (hold for autofire)
Y = spread/options magic attack (req. the rhombus gauge on the bottom-left) (hold for autofire)
B = defensive magic attack (req. the pentagon gauge on the bottom-left) (hold for autofire) -> destroy some enemy shots, and damage them on contact
LT | X+B+Y (when all element gauges are >= 50%) = special burst attack (consumes all the gauges on the bottom-left) -> no invincibility
RT = bomb (check the "B" counter in the top-left)
basics:
- easier char: Sophia Fulcanelli/Howl Loreley (defensive magic protects from any shot, Raiden-like tooth-laser)
- elemental shots are used to increase the score multiplier and (2) adding upgrade points – a.k.a. ether chips – to be distributed in between stages.
Elemental shots are also responsible for filling the skill point meter faster (to the left of the HUD): whenever the meter is filled you receive an ether chip to level up any of the three elemental shots after you beat the boss.
- your main shot will also become more powerful between stages, but this is automatic and is not affected by the experience bar.
- extra bombs are obtained simply by scoring or by dying (every death gives you 1). Bombs provide instant escape from danger and contribute little to the end-of-stage bonus, so use them whenever needed.
- throughout the stages secret mana recharge towers can be revealed by shooting them. They look like floating green/gold diamonds after being revealed. The quicker you collect them after revealing them the more MP you recharge.
- each stage has a single hidden Sol Tower somewhere within it. These look like small silver/grey diamonds. If you hover over them for a few seconds they will rise out of the earth and you can destroy them for a score bonus.
- last stage: 6
sources:
Suguri
controls (keyboard):
arrows = move
Z = fire weaponA
X = fire weaponB
C = dash (incr. the "Heat" percent) -> use often to avoid attacks
V = hyper attack with weaponA (req. 1 gauge of Hyper meter, check the big counter in the top-left) -> temp. invincibility
V + X = hyper attack with weaponB (req. 1 gauge of Hyper meter, check the big counter in the top-left) -> temp. invincibility
A = lock on nearest enemy
S = lock on farthest enemy
P = pause
basics:
- "STAGE SELECT" is actually the story mode.
- you take 2 weapons into every stage. Every weapon has its own special attributes and functions.
You start with 3 selectable weapons and unlock more as you play the game.
- best weapons: Beam rifle, Beam Bazooka (can be charged), Force Edge.
- the Hyper gauge charges when bullets go through your "dash rings" and when you deal damage to enemies.
- dashing right after using a weapon allows "dash cancelling". Use it to get out of harm's way and attack more frequently. Some weapons can be cancelled sooner than others.
Some Weapons have dash attacks as well.
- last stage: 7
invincibility cheat (steam edition only):
Enter the Konami Code at any point in the menu: Up, Up, Down, Down, Left, Right, Left, Right, Secondary weapon, Main Weapon
Instantly regenerates all received damage in the game. Lasts until you return to the main menu.
sources:
Sora
controls (keyboard):
arrows = move
Z = fire main weapon
X = fire sub weapon
A = fire special weapon
V = dash, cancel the weapon attack in progress (incr. the "Heat" percent) -> use often to avoid attacks
C = bomb-like hyper attack (req. 1 gauge of Hyper meter, check the big counter in the top-left) -> temp. invincibility
S = lock switch, skip text
2x S = cancel lock
Esc = pause
basics:
- you take 3 weapons into every stage. They can be of 3 types: beam, live ammo and special.
- best weapons: Bazooka, Zapper, Pulsegun
- dashing makes you immune to Beam ammunition. Live ammunition can harm you, even when dashing. Beam ammunition destroys Live ammunition to give you more room for dashing - and beam shots penetrate live ammo to cause further damage.
In short: when the enemy uses beam attacks, dash. When he uses live ammo, use beam shots.
When there aren't any live ammo shots in your line of fire and the enemy doesn't move, try using live ammo since it's usually more damaging than beam shots.
- the Hyper gauge charges when bullets go through your "dash rings" and when you deal damage to enemies.
- repairing: whenever you receive damage your health gauge gets a red portion: its length is equivalent to roughly 50% of the damage received. This red health can be repaired by dashing near bullets. Some beam attacks don't refill your health, though.
- last stage: 7
sources:
Acceleration of Suguri
controls (keyboard):
arrows = move
Z = fire weaponA (hold to charge)
X = fire weaponB (hold to charge)
C = dash (incr. the "HEAT" percent in the top-left) -> use often to avoid attacks, alt. attacks while charging
A (hold) + Z|X = special attack with weaponA|B -> usually a melee attack, very effective, use often
S = shield (req. the circular gauge on the top-left)
V = hyper attack (req. 1 stock counter on the top-left)
T = pause
Esc = Exit
basics:
- easier char: SUGURI
- last opponent: HIME (6th)
sources:
Acceleration of Suguri 2
sources:
Sine Mora EX
controls (keyboard):
arrows = move
S (hold) = autofire primary weapon
A = fire secondary weapon (stock limited, check the green gauge on the top-right) -> use against strong enemies
D (hold) = slow down time (limited use, check the blue "SPEED UP" gauge on the top-right) -> use to dodge shots
basics:
- collect red items to powerup the main weapon (check the red gauge on the top-right).
- last stage: 7
sources:
Armed Seven | Armed 7
controls (keyboard):
arrows = move, rotate aim up|down
Z = fire primary + sub weapon (hold to autofire + lock aiming)
X|C (when the CHARGE gauge on the bottom-right is full and you blink) = fire the -like "CHARGE" weapon (unlimited uses, auto-refills over time)
Alt+Tab = pause
R = back to title screen
basics:
- best weapons combination: SRI-T9 RIOT GUN (spread), TB-02 ROCKET LAUNCHER, A0-06 MISSILE POD (homing)
- check the incoming small yellow ships in the BG layer for SHIELD and SHOT poweups.
- last stage: 7
sources:
Strania: The Stella Machina
controls (keyboard):
arrows = move
Z = auto-fire weapons
X = switch weapon
C (when the green gauge at the top-left is full) = "O/D" bomb
basics:
- your mech controls 2 weapons simultaneously with his left and right arms while storing a 3rd weapon in his reserve.
- best weapons: MISSILE (homing), REFLECT, ROCKET
- collecting 2 of the same weapon type with a specific arm will level-up weapons making incredibly effective combinations. Dieing will not reset weapon slot.
- the hitbox is the yellow dot in the center of the mecha.
- last mission: 6
sources:
Trouble Witches Origin
controls (keyboard):
arrows = move
X = shoot (hold for rapid fire, release to suck items before they fell offscreen)
Z = activate magic circle (press again to deactivate) (consume MPs and slows you down while active, check the green gauge at the top-left) -> summon a barrier to slow down enemy shots (not blue and spiky) and convert them into gold by destroying the enemy that originally fired them. However, if the enemies flees from the screen, the bullets will turn yellow and home-in on the player. Use the circle again to neutralize them.
C = use spell card (check the icon in the top-left) = give a special weapon for a limited time. Enemies destroyed will release Star Coins worth extra points. Getting hit will knock the card out of you but saves you from losing a life.
basics:
- easier initial char: Pril (has a 4-way spread shot and is faster than Aqua)
- in the latest releases "Practice Mode" can be selected in Challenge Mode.
- the hitbox is the star on the chest.
- stand still to autorecover MPs faster.
- the GOLD collected can be used at the Pumpkin Sisters' shop (which usually appears twice during each stage) to get Magic Cards (up to 3, always fill the stock if you can) and other goods such as 1-Ups and MP-boosting potions.
- last stage: 6
sources:
Cloudphobia
controls (keyboard):
arrows = move
Z = shoot (hold for autofire)
X = fire MISSILES (check the 8 blue dots in the top-left)
C = toggle boosters -> use when there are no enemies onscreen, don't let too many big ones to pass or the MOTHERSHIP will be destroyed and you GAME OVER
A = pause
basics:
- easier mecha: PLG-90 Laser Ignition Rifle
- check the TIME counter on the bottom, you must reach the end of the level before it runs out.
- health and MISSILES are partially refilled at the end of each stage.
- last stage: 5
sources:
Ether Vapor Remaster
controls (keyboard):
arrows = move
Z = fire concentrated frontal shot (hold to charge)
X = fire wide spread shot (hold to charge a shield, not very effective)
C = fire auto-locking missiles + weak frontal shot (hold to autofire) -> use to hit enemies in the background and behind you
V = switch bits orientation, switch target + faster locking
basics:
- enable "Hitbox display" in the Game Settings.
- your lives are shown by the SHIELD gauge at the bottom-left.
- some enemies have resistances/weaknesses to certain weapons. When hit with a weapon they have a resistance to, they'll glow blue. If hit with a weapon that's super-effective, they'll glow red.
- last scene: 7
sources:
AirRade -Air-
controls (keyboard):
arrows = move
Z = fire main weapon (hold for autofire+slows you down)
X = straight punch (req. the rainbow gauge at the top-left) -> perform combos
right, X = power straight punch
C = uppercut punch (req. the rainbow gauge at the top-left) -> perform combos
S (when the "AIR" gauge at the top-left is filled) = "AIR Dash" special attack (it is possible to aim the direction you fly in by holding down that direction before you shoot off)
P = pause menu
Esc = quit
options translation:
Game Rank Easy Normal Hard
Button Config
Main Shot 01
straight punch 02
uppercut punch 03
AIR special 05
pause 04
Player ?? display
BGM volume
audio volume
SFX volume
Simplified char select
EXIT
basics:
- easier initial char: Kano (the blue haired one with the yellow ribbon)
- collect balloons to refill the "AIR" gauge at the top-left.
- last stage/day: 7
sources:
Bike Banditz
controls (keyboard):
arrows = move
Z (tap) | V (hold) = fire main weapon + option free aiming
Z (hold) = autofire main weapon + keep option direction
X = fire missiles (hold to fire more than 2, req. some gauge at the top-left)
C = bomb (when the gauge at the top-left is blue) -> clears onscreen bullets
B = pause
Esc = quit
main menu translation:
START
TRAINING
REPLAY
RANKINGS
CONFIGURATION
DIFFICULTY EASY NORMAL DIFFICULT
LIVES
KEY SETTINGS
A = fire main
B = fire subweapon
C = bomb
D = autofire
QUIT
basics:
- easier initial char: HIKARU (has wide shot) + auto-homing missiles (2nd choice) + manual missiles (1st choice)
- enemies coming in contact with the option are damaged, but not their shots.
- killing an enemy makes them drop a small golden item. After picking up a specified amount of these items, the item rank is increased and the gold items change and become worth more points.
Getting hit or failing to collect a gold items decreases the item rank.
Any bullets that are close to an enemy when the enemy is destroyed is converted into fruit bonus items. These have a given point value and is not affected by or affects item rank.
An item does not have to be touched to be collected, it is enough to fly close to an item to auto-collect it.
- last stage: 5
sources:
Deathsmiles
controls:
d-pad = move
A | B = left|right shot (hold for concentrated shot + slow movement) -> regular shots cannot pass thru most obstacles
A + B | X (hold) = "Targeting Magic" auto-lock attack (req. the big counter at the bottom-left, collect skulls and silver crowns to refill) -> the familiar performs a lock-on attack and homes on enemies
A + B | LB (tap when the big counter at the bottom-left is 1000) = enters "POWERUP" mode -> clear bullets (prefer to bombs when possible), temp. invincibility, attack increase, more items released
Y = bomb (check the "B" icons in the top-left)
basics:
- "Arcade" and "MBL Arcade" are mostly like the original 2007 and 2008 "Mega Black Label" (rebalanced) versions.
"Normal" and "MBL Normal" are similar, but have higher resolution assets and a few other tweaks (such as being able to pick the same difficulty level for all stages). 1.1 and MBL 1.1 are further rebalanced versions of both games; the big thing about the 1.1 versions is being able to control each character's animal options to a greater degree.
- easier char: Windia (has a familiar with homing shots), Rosa (if unlocked, has the strongest firepower).
- getting hit will deplete the gauge on the top-left. It's refillable only with score-based extends.
- always choose Rank 1 for the easiest run.
- the hitbox is the glowing and pulsating heart. When colliding with an enemy you'll lose only half a life, while incoming shots will take a full green life cell in th top-left.
- last chapter: 4
sources:
Deathsmiles II X
controls (default):
d-pad = move
A | B = left|right concentrated shot + slow move + option alternative shot (varies according to char)
A + B | X (hold) = activate Magic Field = the familiar performs a lock-on attack -> clear blue suicide bullets + attack enemies in the BG
A + B | X (tap when the big counter at the bottom-left is 1000, or when the circular gauge around you is full) = enters "powerup" mode -> clear onscren bullets (prefer to bombs when possible), temp. invincibility (except for bosses), attack increase, more items released
Y = bomb (check the "B" icons at the top) -> temp. invincibility, clear bullets onscreen
LT | RT = autofire left|right shot
Back = pause menu
basics:
- Arcade Deathsmiles II is simpler, has less rings/gems, less stages, less characters (Follett and Rosa are exclusive to X mode) and lacks the famous rank selection at the start of the level that was one of the most distinct trademarks of Deathsmiles.
- easier char: Windia (has a familiar with homing shots)
- getting hit will deplete the gauge on the top-left. It's refillable only with score-based extends.
- collect rings to increase the big counter at the bottom-left. Blue rings will increase the multiplier at the bottom instead.
The lock shot is only effective as long as that circular aura around the character doesn't close at the top, a resource that must be constantly refilled by continuously collecting more rings.
- last stage/Chapter: 7 (-1 optional)
sources:
Akai Katana Shin | Red Sword
controls (type A):
d-pad = move
RT (hold) = defense mode autofire shot (stop firing to enter defense)
A (hold) = attack mode autofire shot + slow move
X = toggle Phantom mode (req. the green Energy gauge in the top-left is filled, collect "E" items to refill. When is partially filled only repel enemy shots near you) -> incr. attack power, repel enemy shots while in defense mode only, bullet cancels in attack mode only
B = bomb (check the "B" icons in the top-left, restock by collecing rare "B" items) -> temp. invincibility, clears enemy shots onscreen
game modes:
- Akai Katana Arcade / Origin (blue BG) (original arcade game, in 4:3)
- Akai Katana Shin / Slash (red BG) (home exclusive ver with 16:9 support, new game features such as Hagane and Katana)
- Akai Katana Zetsu / Climax (purple BG) (closer to the arcade game than Shin / Slash, with 16:9)
basics:
- easier char: BOTAN (has auto-aiming options in attack firing mode)
- the gold bar at the top-left represents the number of lives the player has remaining.
The green bar to the right is the Energy Gauge.
If you lose a life, you will lose a segment of the gold bar, but in turn extends the green Energy Gauge.
Collecting "E" items will cause this gauge to fill, allowing you to transform into Phantom Mode.
In Phantom mode you are invincibile as long as you stay in defense mode. In attack mode you fire a very powerful laser, but you are vulnerable.
- killing enemies in attack mode will make them release "E" items, if the options are close to the enemy.
Options will attract these items that will float near them. Here they can absorb some enemy shots and became bigger
Switch to defense mode to suck them in.
- easier survival strategy: hold both RT and A to stay in attack mode when possible.
Release A when you need to need to move faster and to absorb "E" refills.
When crossing bullets barrages, release A and switch to Phantom+defense mode, and quickly switch back when done.
- last stage: 6
sources:
Gundemonium Recollection - Gundemonium Collection
controls (keyboard):
arrows = move
Z (tap) = shoot -> you can overheat Eryth guns and they will be unusable for a time.
Z (hold) = autofire shoot + move slower (Eryth guns won't overheat this way)
X = use mana ability (some needs to hold the button, consumes the blue MANA bar at the top-left)
C = bomb (check the icons in the bottom-left) (to counter-bomb, hit the bomb button as soon as you are hit)
X + C = DEMONIC SHIFT (consumes 1 life/heart and requires at least 33% Mana) -> destroy all bullets on screen + fixes your PHASE LEVEL at 11 for as long as you have MANA
A = pause menu
basics:
- easier char: EARL TYPES - RIG 111 (has spread shot + slow down time mana ability to easily dodge bullets)
- the hitbox is located over the chest (the red pendant), and will be visible as a heart icon in some situations.
- most enemies do not damage you even if you fly over them, so all you have to worry about are the bullets.
- the higher your current PHASE LEVEL, the more difficult the game will become, but scoring will be higher. PHASE LEVEL increases if you overheat your Guns as Eryth, kill a boss or attain Friction Break, and lowers when you bomb or obtain an extra life.
- by placing your hitbox close to a bullet, you gain FRICTION.
Friction Break occurs when you obtain a certain amount of friction. This cancels all bullets onscreen into gems, and increases PHASE LEVEL.
- collect green and blue rhombus to recover MANA, hearts for extra lives.
Green triangles only provide points.
- last chapter: 5 (to see the true ending play in UNLIMITED or DEMONIC mode)
sources:
GundeadliGnen - Gundemonium Collection
controls (keyboard):
arrows = move
Z (tap slowly) = shoot
Z (tap quickly) = alt. shoot
Z (hold) = concentrated shoot + move slower (Eryth guns won't overheat this way)
X = use mana ability (some needs to hold the button, consumes the blue MANA bar at the top-left)
S = change direction (consumes a bit of blue MANA bar at the top-left)
C (when the lower gauge at the top-left is fully charged) = bomb
X + C = DEMONIC SHIFT (consumes 1 life/heart and requires at least 33% Mana) -> destroy all bullets on screen + fixes your PHASE LEVEL at 11 for as long as you have MANA
A = pause menu
basics:
- easier char: ELIXIREL (has spread shot + slow down time mana ability to easily dodge bullets)
- the hit box is the character's chest, it is marked by a heart each time you die for reference.
- you can fly over enemies without being harmed. Only bullets (Or flame laser things) will damage you.
- last stage: 5
sources:
Hitogata Happa - Gundemonium Collection
controls (keyboard):
arrows = move
Z = shoot (hold for autofire, move slower with some dolls)
Z = use special ability of current doll (consume the MANA bar, collect green gems to refill)
C = switch doll (check at the bottom)
A = pause menu
basics:
- when your FLOW gauge is full run into an enemy and your doll will explode and create a magic circle. This circle is powerful and will also draw gems towards it.
Iy you get hit by a enemy shot you lose your current doll and FLOW charge.
- at the end of every stage you can use the gems accumulated to buy dolls (up to 12 for each type, works like extra lifes).
- best dools to buy: Earl (has Raiden-like locking laser+slow time special), Assam (has homing missiles)
- last stage: 5
sources:
Jade Penetrate Black Package - eXceed Collection
controls (keyboard):
arrows = move
Z = shoot (hold for focus fire + slow move + homing fire from the options)
V (hold) = slow move
C (when the squares gauge on the bottom-left is full) = fire special attack (graze enemies' bullets and collect "P" medals to charge it)
X = bomb (check the counter in the bottom-left) -> temp. invincibility, clear shots onscreen
V = pause
Ctrl = go back to title screen
basics:
- collect "D" metals to get dragon options, "B" metals to restock bombs.
- last stage: 5
sources:
Strider (2014)
controls (keyboard):
arrows = move
Space = jump (press again to double jump if unlocked)
arrow down + space (on the ground) = slide -> enter narrow passages, avoid enemies
arrow down|up + space (on thin platforms) = pass thru
S = primary attack, horizontal slash (can be combined with a direction)
S (hold) = charge strike (2x damage) -> destroy enemy shields
D | S + arrow up = secondary arrack, vertical slash -> sends enemies flying upwards
D (in midair) = down strike -> primarily used to break specific floor grates, recognized by their black color and blinking red lights
A | Right Ctrl = throw kunai (can be aimed with a direction) (check the red "Plasma Energy" bar in the top-left, auto-refills)
L Shift (hold, aim and release) = quick dash ("Plasma Catapult") (if unlocked) -> used to pass through traps like laser grids, or to perform a swift evasive dash. It can also be used to traverse through warps. When unlocked, a small circular blue meter appears next to the Charge Strike Meter, which depletes after each use and refills automaticall
R = release grip from walls
L Ctrl (hold) + S|D = deploy options/support robots
1|2|3|4 = plasma select
Backspace = show map and status
map legend:
- blue disk markers = save terminals room
- blue rotated triangle = next objective
- yellow rects = narrow passages -> use slide to enter them
- yellow marker = powerup item (new ability, HP increase, etc.)
- green rects = big health refills
- orange markers = switch machine -> use charged strike to activate
- red|blue rects = locked doors (sometimes activated by a switch or by killing all the enemies in current room)
- red marker = breakable floor grate with the down strike
- blue rects = traps -> use the quick dash to pass them, or kunais to activate switches on the other side
basics:
- left of both bars in the top-left there is a red circular gauge marked with "Hi" kanji, known as the Charge Strike Meter; this gauge fills up as Hiryu hits enemies and decreases when he's hit himself, and when filled up Hiryu goes into Charge Mode: he starts glowing and his attack and range are increased for a short period of time.
- health is restored by destroing green capsules and by visiting save points for the 1st time.
sources:
Tembo The Badass Elephant
controls (XB360 controller):
Left Stick = move, aim
A = jump (hold in midair to hover, but not during a dashing jump)
X = dash -> melee attack, destroy blocks (avoid the ones with a fire sign)
X + Left Stick up = uppercut attack -> destroy blocks above
Left Stick down (while dashing) = slide kick -> pass under narrow passages
Left Stick down (in midair) = down stomp -> destroy blocks below, stun enemies
X (in midair) = dive spin -> bounce off, difficult to control, avoid
RB (hold) = spray water (can be combined with a direction, check the blue meter in the top-left, touch a water dispenser or collect bottles to refill) -> turn off fire, stun enemies
basics:
- always avoid touching objects and enemies on fire, spray them with water instead.
- break boxes with tomates to refill your health (check the heart meter in the top-left).
- for every 300 peanuts you collect, you get an extra life (a "PB" bottle, check the counter in the top-left). This is the only way to get extra lives.
- to unlock new stages you must gain enough purple PHANTOM Points by killing purple enemies and rescuing civilians in hidden capsules.
- find and break the big statue to finish regular stages.
- last zone: 4
sources:
EXZEAL
controls (keyboard):
arrows = move
C = rapid shoot
Z (tap) = shoot
Z (hold) = charged shoot (only TYPE-1 and 2)
N | arrows left,right (quick) = rapid side-attack (only TYPE-4)
X = bomb (check the "B" icons in the bottom-left)
S = pause
basics:
- best ship: UNIT-4 (has side-attack that can destroy some enemy shots)
- last stage: 6
sources:
Kamui
controls (keyboard):
arrows = move
Z = fire (hold for autofire)
Z + X (hold) = straight laser fire (consumes the LIGHTNING bar on the bottom-left, auto-refills) -> destroy any enemy shots in his path, use often for defense
X (tap) = lighting attack locked enemies (the higher the LIGHTNING bar on the bottom-left, the more lock-on shots will be released)
A = pause
basics:
sources:
RefleX
controls (keyboard):
arrows = move
Z = fire (hold for autofire, more powerful as the "Shield" gauge is filled)
X (hold) = activate shield (consumes the the "Shield" gauge on the bottom-left, release to auto-refill) -> can reflect most _blue_ enemy shots, will only absorb the other colors. Only missiles cannot be absorbed.
A = pause
basics:
- stopping from fire will auto-refill the "Shield" gauge faster.
- the "State"/"Durability" honeycomb gauge at the bottom-right shows the remaining lives,
while the "Souls" counter in the pause menu the continues left.
- last area: 7
sources:
ALLTYNEX Second
controls (keyboard):
arrows = move
Z = main shot + draw ENERGY chips
X = blade attack + auto-aim big enemies + slow move -> more powerful than main shot + destroy most enemy bullets
C (in fighter mode) | Z (hold) + X = homing lasers attack (consumes the ENERGY gauge on the bottom-left)
C (in mecha mode) | X (hold) + Z = straight laser attack (consumes the ENERGY gauge on the bottom-left)
Space = pause
Ctrl = fast forward cutscenes
basics:
- there are no powerup items that affects the power of your attacks and the power of your fighter's frontal shot is tied to your ENERGY LEVEL gauge.
- there are 3 ways to replenish the ENERGY gauge:
- it auto-recharges over time
- collecting large energy chips from destroying an enemy
- collecting small energy chips from destroying enemy bullets
- as you take hits check the "Defense Field" light on the bottom-left. When it is red you are about to be destroyed and lose the current life.
- last area: 5
sources:
Stella Vanity | StellaVanity: Prelude to the Destined Calamity
controls (Type-C) (keyboard):
arrows = move
Z = shoot (combine with "F" for focus shot + slow move)
X (tap when the gauge on the top-left is filled >=4) = straight burst shot -> absorb bullets
Space = bomb (check the green icons on the bottom-left) (if auto-guard is set to ON, will auto-fire when hit with no explosion) -> temp. invicibility (auto-bomb when hit)
Enter = pause
basics:
- in "STORY MODE" you will only play a subset of stages.
"STRICT MODE" is like arcade mode = play all the stages without interruptions.
- easier char: Lemulene Raygraph [Type-C]
- extra lives can be found hidden in stages (check the purple orbs on the top-left).
- collect coins in stages to buy stuff in the SHOP. The most important things to buy are the extra continues.
- after each play, the char you played as gains Experience Points and can level up, which increases their starting stats in Story Mode.
You can also purchase accessories to use, up to 2 of which can be equipped in a particular playthrough.
Rule Mode downplays this by locking your starting level at a difficulty-dependent point (10 for Easy and Normal, 15 for Arcade, 20 for Hard, 30 for Nightmare, and 40 for Pandemonium), but lets you use accessories. Strict Rule Mode does the same but disables accessories, averting this trope in the process.
- last AREA: 6
sources:
RefRain: prism memories
controls (keyboard):
arrows = move
Z (tap) = wide shot
Z (hold) = laser shot + options lock-on shot + slow movement
Shift (hold) = slow movement
X (when the big counter at the bottom-left is >=1) = "M.E.F.A2" special attack (tap multiple times for an higher level attack, at level >=3 will also clear enemy bullets) (shot enemies to refill the big gauge at the bottom-left to restock)
C (when you have >1 yellow dots above the "CONCEPT REACTOR" gauge on the bottom-left) = "CONCEPT REACTOR" special attack (collect medals to refill) (fire when "M.E.F.A2" special attack hit its target for a more powerful attack) -> 1s temp. invincibility, transform some enemy bullets into destructible bullets
Esc = pause
basics:
- easier DRIVER: MIRIA (wide shot)
- enemies denoted with an "ABSOLUTE DEFENDER" label when shot can only be destroyed with the M.E.F.A2. Also, enemies that deflect shots cannot be destroyed. Both types of enemies are indicated by a high-pitched metallic sound when shot.
- attacking targets from a closer proximity charges the M.E.F.A2 Gauge up faster. Also, the higher the level of the M.E.F.A2, the harder it is to raise.
- last stage: 5 (2nd loop "DIVE 2 M.R.S." unlocked after beating the 1st)
sources:
Crimzon Clover WORLD IGNITION
controls (keyboard):
arrows = move
Z = wide shot (hold for rapid fire)
X (hold) = focus shot + lock-on enemies (check the "LOCK" gauge at the bottom-left, release to fire)
C = bomb + enter "BREAK" mode if the gauge at the top-right is full (refills by hitting enemies) -> temp. invincibility, clear shots onscreen + increased fire power in BURST mode (can be activated a 2nd time for 2x increase)
V = pause
basics:
- easier ship: TYPE-1 (has wide shot)
- there are no weapon powerups, use the BREAK mode to increase the firepower when necessary.
- Item Points collected on each playthrough can be spent at the LIMITTER SHOP accessed from the title screen.
- last stage: 5
sources:
Raiden III: Digital Edition
controls (keyboard):
arrows = move
Z = fire main + sub weapon (hold for autofire)
X = bomb (check the "B" icons at the bottom-left)
Enter = pause
basics:
- all weapons have a power level, which increases by collecting different individual powerups:
- main weapons: the red vulcan, the blue laser, the green proton laser (a replacement for the characteristic "toothpaste" plasma laser, but not auto-aiming like in prev titles).
- sub weapons: Nuclear missile, Homing missile, Radar missile.
- last stage: 7
sources:
Raiden IV: OverKill
controls:
arrows = move
Z = fire main + missile weapons (hold for autofire)
X = bomb (check the "B" icons at the bottom-left)
Enter = pause
basics:
- best laser weapon: PLASMA LASER (lock-in enemies)
- best weapons: purple (homing laser), H=Homing missiles
- last level: 5 (LIGHT=1 loop, ORIGINAL=2 loops)
sources:
Mushihimesama | Bug Princess
controls:
d-pad = move
Z (tap) = shoot
Z (hold) = concentrated shot, show your hitbox, and slows you down
C | D | F (hold) = rapid-fire shot
X = bomb (check the green icons at the bottom-left)
basics:
- in ORIGINAL you choose one of 3 weapons (red=wide, green=medium, blue=concentrated) that are powered up by icons throughout the game and can be switched by these same icons.
- up to 4 options may be carried at once. When an option is released it will have a small timer beside it, when the timer expires it changes type between Trace and Formation movement.
- bullet-cancelling enemies: explosion of larger enemies turns all onscreen bullets into golden jewels.
- last stage: 5
sources:
Dodonpachi Resurrection | DoDonPachi DaiFukkatsu
controls (keyboard):
arrows = move
Z (tap) = wide shot
Z (hold) = laser/focus shot
C = autofire wide shot
X = manual bomb, CHANGE (switch Normal and Boost mode with Power-style ship)
V (when the yellow gauge in top-left is full) = activate the "Hyper Counter" -> 2s invincibility, incr. attack power, faster bullets, regular shot destroy enemies bullets
Enter = pause
basics:
- easier ship: type-C (blue) (has wide shot), BOMB or STRONG STYLE (has strongest wide and laser shots)
- Counter-Laser system: Players can "counter" or "hold" enemy lasers by hitting the laser with their own.
There are two types of lasers. The 1st type of laser is a weak thin pink laser which can be countered by any style's laser beam, while the 2nd type, a strong wide purple laser, can only be countered by the Power Style's Boost Mode Laser, or the Strong Style's Laser.
- auto bomb: if you get hit with at least one bomb in stock, you automatically release a bomb instead of dying, although this is less powerful than a manual bomb.
- you can perform an aura attack by flying close to an enemy while firing your laser. This does additional damage on top of the laser and fills up your Hyper gauge quickly. It's possible in some spots to do this to multiple enemies at once.
- the only collectable powerups are the "B" bombs restock. Weapons have fixed strength throughout the game.
- last stage: 5 (optional 2nd loop)
sources:
Blue Wish Resurrection Plus
controls (keyboard):
arrows = move
C (hold) = autofire shot
Z (tap) = shoot
Z (hold) = focus shot + slow down + show your hitbox
X = bomb (check the "B" icons in the top-left)
basics:
- easier ship: BLUE WISH (has larger spread shot), (has homing focus shot)
- lave AUTO GUARD ON in the options for auto bomb.
- last stage: 5
sources:
Eden's Aegis
controls (keyboard):
arrows = move
Z = shot (hold to focus shot + slow movement)
C (when the gauge on the bottom-left is at MAXIMUM) = special attack
X = bomb (check the blue orbs on the bottom-left, restock via hidden items on the ground) (auto-guard when hit with no explosion can be turned off)
S = pause -> pausing denies replay saves and goes as far as not allowing you to write your initials in the high score board
basics:
- "Wait" is initially also set to ON and means that you'll always have slowdown whenever bullet count reaches a certain threshold (set it to OFF if you'd like to experience a much harder game overall).
- easier char: Nanathy at Heaven
- larger enemies have an health bar and their death explosions will turn every nearby bullet into gems.
- last stage: 5
hidden chars and stage practice unlock:
create an empty .txt file named "yutori" to unlock the two hidden characters (Eve and Ridmie) immediately, as well as give yourself access to stage practice for all difficulty modes.
sources:
A.R.E.S. Extinction Agenda
controls (XB360 controller):
Left Stick = move, crouch
A = jump (press again to midair jump)
Left Stick down + A = roll -> go under narrow passages
X | RS = fire current weapon
RB | LB = cycle current weapon
RT (tap) = fire current grenade -> use red HE grenades to destroy TNT obstacles, and azure EMP grenades to paralyze enemies and stop fan obstacles
B = cycle current grenade
RT (hold) + LS direction = boost jump (req. 1 grenade) -> reach higher places (up), fly over long pits (left|right), ground breaker (down)
Y = use a repair kit (check the counter in the top-left)
LT = bomb-like attack (if the VALKYL azure bar in the top-left is full)
Back = open recycle menu
Start = open system menu
basics:
- collect parts from destroyed enemies and buy stuff from the recycle menu.
- collect red datacubes to unlock new abilities. Azure datacubes unlock nothing useful.
- last stage: 5
sources:
Astebreed Definitive Edition
controls (arrange mode) (XB360 controller):
Left Stick = move
RT = shoot -> can destroy purple bullets only
Right Stick direction = narrow/directional lock on (release for homing shots)
Right Stick press = spherical/circular lock in (release for homing shots) -> slower filling than directional
RB (tap) = blade melee attack -> more powerful than regular shots, can destroy most enemy shots + replenish the EX gauge
RB (hold) = blade melee attack combo -> risky, leave opened for attacks at the end
LB + Left Stick direction = blade dash attack -> temp. invincibility
LT (when the circular yellow gauge is full) = EX attack (can be combined with direction) -> most powerful attack
B (hold) = skip cutscenes
controls (original mode) (XB360 controller):
X = scatter shot
B = focus shot
A = blade attack
RT = EX attack
basics:
- best strategy for Arrange mode: remap the sword button to LT.
Keep holding LT + RT most of the time. When necessary, release LT and dash to a safe spot.
- you can combine regular shot and sword attacks.
- the blue semicircle gauge that's below represents health, and if it gets depleted it's GAME OVER.
Luckily if you refrain from taking further damage it will automatically repair itself.
- last chapter: 6
sources:
ExZeus 2
controls (flying sections):
LS = move + aim
LT | RT | 2x LS left|right = dodge move -> use often to avoid enemy fire
A (tap) = fire main weapon
B (tap) = lock-on lasers (press A to fire) (req. the green "LOCK" gauge on the top-left, collect green targets to refill)
X = bomb "special attack" (not shown on OSD?) -> very rare restocks, save them for the bosses
basics:
- getting hit will deplete the blue SHIELD gauge first, then the red LIFE. Collect shields and hearts items to refill.
- When you die you can continue from the main menu from the last checkpoint with half the SHIELD and LIFE gauges,
- gollect GOLD to buy refills and powerups in the shop at the end of each stage.
- when riding the motorbike do not run into enemies, try yo avoid them (press A brakes and jumping with B will comsume your shield energy).
- last stage: ?
sources:
Hell Yeah! Wrath of the Dead Rabbit
controls (XB360 controller):
Left Stick = move
A = jump (press again to double jump)
RT (hold) = drill -> dig some terrains, req. to damage some monsters
Right Stick = aim (press RT to fire with current weapon)
LT = dash
LB = quick switch next weapon
d-pad = switch weapon (check the icons in the bottom-right)
RB = pause and zoom out -> use to check incoming attacks, also works as an attack for a few monsters
Y = show curr. objective
X = use nearby object, action
back = pause and check the full map and other menus
basics:
- the BLOOD gauge on the left is you health, touch Ms. Fountain in stages to refill (medkit icon in the map).
- collect gold skulls scattered through the stages to buy stuff in SHOPs ("$" icon in the map).
- in order to complete this game, you have to find and kill 101 different monsters (constantly check the radar and the map).
Some will require you to simply shoot or drill them.
Others require you find a way to use your environment around you to kill them.
All but a few will have a short mini-game at the end to complete the kill, excluding bosses.
There's far less mini-games then there are monsters.
- last area: Museum.
sources:
Bleed
controls (XB360 controller):
d-pad = move
RT = jump (press again up to 3 times for midair jump and dashing)
Right Stick = directional fire with current weapon
LT = slowmo (req. the yellow TIME gauge on the top-left, autorefill when not used) -> use to avoid fast-moving enemies and bullets
RB | LB = quick switch weapon (check the name in the top-right, equip in the pause menu)
Start = pause and select equipped weapons
basics:
- there are no in-stage LIFE refills. Health is only restored when you die or complete a stage.
- destroyed enemies gives you POINTS that you can spend after each mission in the SHOP to buy new weapons and upgrades (check the counter in the top-right).
Best items to buy: ENERGY UP (=TIME extend), LIFE UP, REVOLVER (bounce off walls, good to use in tight spaces).
- last MISSION: the idiot!! (7th)
sources:
Bleed 2
d-pad | LS = move
RS = fire + aim
RS (tap) | RB = KATANA attack -> repeal purple shots and charging enemies (avoid orange)
X | LB = switch next|prev weapon
RT = jump (press again for midair jumps) -> use often to avoid attacks
LT (hold) = slowtime (req. the orange gauge on the top-left)
A = taunt
Start = pause (choose LOADOUT to change equipped weapons)
basics:
- there are no ingame health refills, but you have unlimited continues.
- last stage: EPILOGUE
sources:
Binary Domain
controls (keyboard):
WASD = move, strafe
mouse = aim
mouse button left = shoot weapon
mouse button right = aim zoom
mouse button middle (tap) = reload
mouse button middle (with weapon 1 only, hold until the gauge is full) = shock burst (needs refilling, check the azure gauge and the counter of available shots in the top-right)
space (while moving) = evade, dash
space (near an object) = hide
space + W (near an low object) = climb over
E = melee attack -> slow move, use only when necessary
F = examine, pick up
F (when immobilized) = use first aid kit to recover
Q (when the icon is on) = look at current event
backspace = toggle member info
tab = display voice commands
1,2,3,4 = quick switch weapon
basics:
- taking cover is important but it doesn't save you from attacks.
- your aiming gets disrupted when you get hit.
- you earn "CR" credits by defeating enemies. Breaking more parts on the enemy earns you more credits.
You spend these credits in vending machines.
Upgrade your weapons damage at every possible vending machine if possible. The next important upgrades are accuracy, range and clip size, in that order.
- trust is an important thing in this game. Your team members will act more effectively, will freely try to revive you and follow your orders with more success. To increase it, you need to either answer the correct things during dialogues (mostly agreeing is sufficient and not running away) or do some heroic deeds like headshots, smashkills, multi, etc.
Don't shoot your team-mate, it drops their trust level.
Also make sure to equip as soon as you get it, the trust amplifier nanomech, since this will increase the trust earned significantly!
- aim either for the head or the legs at humanoid target.
The head is obvious, BUT it also will destroy the sensory receptors and they will start attacking their own people, sowing destruction and confusion in their ranks.
As for the legs, they are most of the time weakly armored and as soon as you destroy one of them, they fall over and are only able to crawl. Perfect slow targets! The legs are a special tip against hollow children.
- last chapter: 6
sources:
Hydro Thunder
controls (keyboard):
mouse = steer
S = accelerate
D = brake, reverse
V = boost (if you have some boost fuel, check the boost gauge in the top-left)
S,D,V = hydro-jump
F = switch camera
Enter = pause
F1 = show config menu
F7 = switch to fullscreen sw rendering
basics:
- avoid hitting anything unless it's a ramp. If it's a ramp with arrows going up it, try to hit only one side of it while following the arrows to get the speed increase. The longer and flatter the ramp, the more speed increase it gives.
- for cornering try to take a longer, wider path along the turns and avoid sharp turns if you can. The less the boat turns at faster speeds, the less the speed you loose because of that turn.
- hydro-jumping: Jump into the air, then brake and max out your speed using boosts. As soon as you are at maximum speed, let go of the boost and you will continue at that speed until you land or hit something.
sources:
Outrun 2006: Coast 2 Coast, Outrun 2SP
controls (FXT xb360 pad):
Left Stick left|right = steer
RT = accelerate
LT = brake
Y = change camera angle
A = gear up (manual mode only)
B = gear down (manual mode only)
basics:
- follow the other cars trail to enter "Slipstream" mode (boost).
- to drift brake while steering and then accelerate again.
Use drifting only with tight corners.
Just slowdown with mild corners.
special license cheat names:
100% Completion ENTIRETY
1000000 OutRun miles MILESANDMILES
sources:
Rocket Knight
controls (XB360 controller):
Left Stick | d-pad left|right = move
Left Stick | d-pad down = crouch
A = jump
A (while falling) = hover (Burst Assist) (deplete the yellow Burst Meter in the top-left)
X = melee sword attack
Y = projectile attack (Ranged Attack) (deplete the yellow Burst Meter in the top-left) -> less powerful than other attacks
B | RB + direction = Rocket Burst (deplete the yellow Burst Meter in the top-left) -> attack enemies and bounce off walls
2x B | RB + direction = Burst Drill (deplete the yellow Burst Meter in the top-left) -> like Rocket Burst but double the damage, can also break cracked walls
B | RB + no direction = Burst Vortex (deplete the yellow Burst Meter in the top-left) -> temp. invincibility
B | RB + no direction (while hanging from a rail) = Rail Spin (deplete the yellow Burst Meter in the top-left) -> attacks above and below him, press A while spinning to jump extra high and reach certain high places.
Start = pause
basics:
- when an enemy projectile is close press Attack or perform a Burst Vortex in order to knock it back at an enemy or destructible object.
- collect all the jewels in a stage to get an extra live.
- complete the Arcade Mode on Hard difficulty to unlock the Axel Gear and Gold Sparkster.
- last stage: 4-4 Return to Zephyrus - General Sweinhart
sources:
Re-Volt | ReVolt
controls (RVGL xb360 pad):
Left Stick left|right = steer
RT = accelerate (not default)
LT = brake (not default)
A = fire
B = flip car
X = reposition
guide = horn
back = rear view
F1 = change camera
Y = pause
basics:
- try to keep your straight line as much as you can.
- turn by tapping the left/right button very quickly instead of keeping it pressed like in other racing games.
- to avoid spinning out:
- change the race mode from Arcade to Console
- turn off powerups
- do not touch a wall or another car at high speed
- don't adjust the wheels during a leap until after the vehicle is on solid ground again.
- avoid jumping obstacles, crashing walls, or taking silly 'shortcuts' just because they look fun.
- heavier cars tend to spin out less than lighter cars, and cars with wheels which stick out from their bodies are also more likely to lose control.
- unlike the chapionship mode which is won by placing 1st, 2nd, or 3rd, the single mode requires a 1st place finish to complete the race.
cheating names:
All cars CARNIVAL
All tracks TRACKER
Change cars mid-race CHANGELING
enables in-game editors makeitgood
Flying UFO URCO
select weapons in game with right shift sadist
Tiny cars DRINKME
Use identical cars in Multi-Player mode (Does Not Work On 1.2 Version) JOKER
View Select (F5/F6 change view) TVTIME
sources:
Shikigami no Shiro | Castle of Shikigami
controls (keyboard):
arrows = move
X = rapid shot
Z (tap) = single shot
Z (hold) = summon shikigami (slows you down while in use)
C = use a bomb (check the green spheres on the bottom-left) -> temp. invicibility
basics:
- easier char: Kuga Kohtaro
- collecting coins is the only way to powerup the shikigami attack, which goes through 4 levels until it maxes out.
If you get hit you lose exactly 360 coins and one power level.
- the core aspect for scoring is the tension bonus system (aka TBS), a gimmick that applies multipliers from x2 to x8 to whatever you kill, based on how close you are to a bullet or an enemy.
Additionally, grazing bullets will add an awesome boost to your firepower.
- last stage: 5-3 (each stage is divided in 3 sections)
sources:
Shikigami no Shiro 3 | Castle of Shikigami 3
controls (keyboard):
arrows keys = move
C (hold) = rapid shot
Z (tap) = shoot (with some chars is different from rapid shot)
Z (hold) = summon shikigami (slows you down)
X = bomb (check the green rectangles at the bottom-left, auto-refills over time)
S = activate Hi-Tension Max (req. 1 bomb) -> causes the multiplier to stay at 8x, enemies to drop 1.5x coins
Left Ctrl = start, open pause menu
Enter = confirm menu choice
basics:
- easier chars: Emilio Stanburke (2nd from the top-left) (has homing shot), Nagino Ise (last from the top-left) (has spread shot+reflective shield)
- last stage: 5
sources:
Shovel Knight
controls (XB360 controller):
d-pad = walk
d-pad up = talk, check signs, climb ladders
d-pad down (in midair) = shovel drop attack -> bounces off enemies and some objects, use as a safe attack and to reach higher places
A = jump
X | B | Y = dig slash attack
d-pad up + B = use current Relic/subweapon (cost magic to use, check the blue counter under "-ITEM-")
Back = open sub screen (switch Relic/subweapon and read about their functions)
LB | RB = quick switch Relic/subweapon (must be turned on in Options)
block types:
- sandstone = light yellow in color and can be destroyed from the side with a Shovel swing. Attacking from the top with a shovel drop will go right through the block without bouncing.
- dirt/ice = yellow/orange or light blue in color. Can be destroyed from the Side or the top in the same manner as Sandstone, but you will short bounce off them if hit from above.
- rock = light gray, functions the same as dirt but takes two hits to destroy or one charged swing.
- bubble = found primarily in Iron Whale. Can be destroyed with attacks, but also dissolve quickly by standing on them. You don't bounce if you shovel drop on these, you just land.
- chain-exploding = dark gray with red. If you strike any one of them, they'll all be destroyed along a line until the end.
suggested stage order:
- Section 1 - Plains, Village, Pridemoor Keep (King Knight), The Lich Yard (Spectre Knight), Troupple Pond, Forest of Phasing
- Section 2 - Explodatorium (Plague Knight), Iron Whale (Treasure Knight), Lost City (Mole Knight), Armor Outpost, Knuckler's Quarry
- Section 3 - Clockwork Tower (Tinker Knight), Stranded Ship (Polar Knight), Flying Machine (Propeller Knight), Frigid Flight
- Section 4 - Tower of Fate: Entrance, Tower of Fate: Ascent, Tower of Fate: ????
basics:
- collect gold and gems to buy relics and upgrades.
Most valuable gems colors: pink, red, yellow, green.
- best relics to buy: TROUPPLE CHALICE, FLARE WAND, PHASE LOCKET, PROPELLER DAGGER.
4 of the relics can be purchased in the Village. The other 8 can be found and purchased from CHESTER in a blue chest in each Order of No Quarter Knight stage.
- health can be upgraded up to 10 by bringing MEAL TICKETS to the GASTRONOMER in the VILLAGE.
3 tickets are purchased in the Village from the Goatitian, 3 are awarded after completing each "set" of Boss Knights.
- collect floating pages with a musical note symbol on and bring them to the BARD in the VILLAGE.
Each page you turn in will reward you with $500 and allow you to listen to the music track from the Bard's menu.
- when you die, you drop 1/4 of your wealth where he fell. You can try to recover this lost treasure by returning to where you were defeated.
- you can destroy checkpoints for extra money, but if you die they won't make you respawn.
cheats (special names):
- Start with All Relics, Unlimited and Enchanced: HAAYHJZY
- Propeller Blade + Infinite Magic: CVPYHAON
- Super Jump: J&2JMP!
- Invulnerable to enemies, objects, and spikes (pits still kill): IN&NBLE
- Invulnerable to pits, enemies, objects, and spikes. Plus a super high jump: IN&NBLJ
sources:
Max Payne 2
controls (mouse+keyboard):
W, A, S, D = move
space = jump
left shift + move = shoot-dodge
C = crouch
E = interact, use
Tab = use a Painkiller = restores health (if you have them, see the counter next to the hourglass)
Left Mouse button = fire
Right Mouse button (hold) = Bullet Time (slowdown time, consumes the hourglass)
scroll mouse wheel = primary weapon menu
R = reload
E (hold) | Enter = sniper zoom
F = secondary attack, melee attack
1 = cycle secondary attack
2 = quick switch to Handguns
3 = quick switch to Shotguns
4 = quick switch to Submachine Guns
5 = quick switch to Assaulted Rifles
6 = quick switch to Sniper Rifles
G = quick switch to best weapon
F9 = Quick Load
F5 = Quick Save
Esc = game menu
basics:
- enter bullet time before you open doors or round corners to avoid getting hit. New rooms often contain enemies and you will often be surprised by a foe after rounding a corner.
- you can only carry 8 painkillers at a time, so if you are currently holding 8, have suffered some damage, and discover a medical crate with a few more bottles of pain killers, don't pass them up. Instead, use some of your painkillers in your inventory to make room for the bottles you just found.
- headshots inflict more damage. Aim for the head in every battle to dispatch enemies quickly.
- enemies won't necessary perish in a single shot. Watch their hands for a sign on whether or not the enemy has been eliminated. If the enemy drops their weapon, you can shift your target crosshair to another foe.
- last chapter: Part III - Chapter 8
sources:
controls (XB360 controller):
Left Stick left|right = steer
RT = accelerate
LT = brake, drift while turning, reverse -> gives extra boost for long drifts
A = use current item (check the icon in the top-right) (combine with Left Stick down to drop back)
Right Stick (in midair or when on the plane) = barrel roll -> gives extra boost
X = rear view
basics:
- in order to get the best possible start, press and hold the accelerator a moment after the announcer says "Get Ready" and a moment before the screen flashes.
- win all 5 GRAND PRIX cups in any difficulty to unlock the MIRRORED CUPS. Win them all to unlock the EXPERT difficulty.
Most extra chars are unlocked via WORLD TOUR Mode.
sources:
Team Sonic Racing
controls (XB360 controller):
Left Stick = steer
RT = accelereate
LT = brake, drift
A = use item, horn
B = request/offer item transfer to your teammates
Y (when prompted) = activate Team Ultimate (req. the gauge on the bottom of your car full, perform team actions to refill: skimboost, slingshot, item trasfers, crash rivals)
X = rear view
basics:
- best chars:
- Speed chars for races
- Technique chars are best at ring collection since they have increased ring collection radius.
- Daredevil challenges are best done with technique characters with speed mods.
- you can select a BONUS BOX item in the char select screen by pressing Y.
- to perform a boost start, you need to press the accelerator as each number is shouted out during the countdown.
So press the accelerator when the announcer is about to say 3, 2, and then 1. Each time you successfully press the accelerator you should see boost charge up at the back of your vehicle, and it will change colour with each additional charge.
For the best boost start you want to successfully gather three charges of boost, but even just one or two charges is better than nothing.
- you'll unlock each set of characters by working your way through the "TEAM ADVENTURE" story mode.
By Chapter 3, you'll have unlocked them all. By earning Stars by completing events, chars will be sequentially unlocked for you.
- spend collected credits in the MOD PODS section to obtain car parts and equip them in the GARAGE.
- last chapter in TEAM ADVENTURE"/story mode: 7
sources:
Grip
controls (XB360 controller):
LS = steer (more sensitive when moving slower)
RT = accelerate -> let go when airboune to use air control
LT = brake -> reduce knockback from missiles
Y (hold) = boost (check the green bar on the bottom-right, auto charges over time based on race position)
A = jump (hold to charge) -> from ceiling to floor, to avoid obstacles
X = handbrake -> tap for tight turns
B = switch weapon items target
LB | RB = use left|right items (check the icons in the bottom-left, collect green pickups to restock)
Back (hold) = reposition on track
Right Stick = look around
basics:
- boosted start: accelerate exactly when "GO!" appears.
- avoid ramps and going airbourne when possible to avoid bad falls.
sources:
Blur
controls (XB360 controller):
Left Stick left|right = steer
RT = accelerate
LT = brake, reverse
B = handbrake -> use to drift and make sharp corners
A = use selected powerup (check the icon below the car) (combine with Left Stick up|down = fire forward|backward)
X | LB = switch powerup
Y = drop powerup -> free 1 slot
RB = toggle camera
Right Stick = move camera
Right Stick Click = map zoom
basics:
- start the singleplayer on easy to learn the events and to win all the lights (7), then go back setting the difficulty on hard.
- for Race events: Use the fastest car you've got (especially on hard),
- for Checkpoint and Destruction events: Use cars with lots of grip.
- check you car's conditions/health.
Use REPAIR kits to restore health and avoid losing time to respawn.
-
last event: Show down
sources:
Mega Man 11
controls:
d-pad | LS = move, climb ladders
A = jump (use Pile Diver weapon to dash in midair)
X = shoot (hold to charge, special weapons req. the green gauge on the top-left, collect green capsules to refill)
d-pad | LS down + A = slide -> pass under narrow passages
Y = call Rush Coil -> jump and reach higher places
B = call Rush Jet (if unlocked) -> fly over difficult sections
RB = toggle Speed Gear (req. the gauge in the top-left) -> temp. slow down time for easier dodging
LB = toggle Power Gear (req. the gauge in the top-left) -> temp. incr. damage
RB + LB = toggle Double Gear
Right Stick | LT | RT = quick switch weapon
recommended stage order:
- Block Man (use C.Blast or M.Buster)
- Acid Man (use B.Dropper)
- Impact Man (use A.Barrier)
- Bounce Man (use P.Driver)
- Fuse Man (use B.Ball)
- Tundra Man (use S.Thunder)
- Torch Man (use T.Storm)
- Blast Man (use B.Torch)
basics:
- getting hit will deplete the white gauge on the top-left. Collect energy capsules to refill.
- collect gears in stages to buy items from Dr.Light's Lab (accessed from the Stage Select screen by pressing LB).
- the game does not autosave, remember to save manually in the stage select screen.
sources:
Phantom Breaker: Battle Grounds
controls (XB360 controller):
d-pad | LS = move, crouch, jump
2x d-pad | LS direction = dash
LB = plane switch
X = weak/quick attack -> use often
Y = medium attack
B = strong attack
B + direction (near opponent) = throw
A + down | A + right|left = SP attack (different for each char) -> use often
A (before getting hit) = reflect attacks -> use often
d-pad down + no button = crouching block
A + back = backstep
RB | Y+B = "outrange attack" homing missiles (more powerful if the burst gauge >100%) (consumes burst gauge)
RT | X+Y = overdrive (if unlocked) -> temporary incr. attack power (uses all the burst gauge)
LT | B+A = Phantom Break (if unlocked) (req. 200% burst gauge)
basics:
- best initial char: Yuzuha
- best unlockable char: Nagi (finish the game at normal difficulty to unlock)
- red gems are exp points, collect as many as possible.
- in story mode, you get to skill up after each stage or when you die.
Put all points into ATTACK and any left over into SPEED. You don't need any other abilities at the moment while you're grinding.
Skills to beat the boss are critical burst and overdrive.
- last stage: 7
sources:
Melty Blood Act Cadenza
controls:
d-pad left|right = walk
2x d-pad left|right = dash
d-pad up = jump
d-pad back = guard
A = weak attacks
B = medium-strength attacks
C = strong attacks. Most specials done with C will be EX variants and will cost meter.
D = shielding (more powerful than guard, consumes magic)
Q = used as macro button for various actions
Q | A+D = Throws
A+B+C = activate special mode (regenerate health, etc.)
A | B | C | D (tap at the point of impact) = Damage Reduction
basics:
- the special/Magic Circuit Gauge (on the bottom) allows you to perform:
EX Moves, Arc-Drives, Last Arcs, HEAT Mode, and BLOOD HEAT Mode
- best char: Len
sources:
Sonic Lost World
controls (XB360 controller):
Left Stick = move
A | B = Jump
ZR = run
ZL = Spin Dash (consumes energy)
X = Roll
Y = Kick
Wisp powers:
- Laser: You'll shoot in a straight line, if you hit a crystal it'll throw you on a set path and extend the duration
- Drill: Boost with the spindash button, move around, that's all you can do.
- Rocket: "magnetizes" any rings you blast near.
- Eagle: You just fly. You can do a spin move, but I don't know its purpose besides cutting down your flight time.
- Asteroid: The more terrain you break, the higher you can jump. Power-up duration doesn't go down in secret rooms; there's a red ring in Windy Hill Zone 4 that requires you to break quite a bit of terrain before entering the secret room to be able to jump high enough to actually get it.
- Bomb: Not necessary at all. It just blows up, you can kill things without it just fine.
- Hover: hold jump to float upwards. Spindash at the beginning of a trail of rings to follow the trail (pretty slow, but your powerup meter wont' go down while doing this).
worlds list:
Windy Hill
Desert Ruins
Tropical Coast
Frozen Factory
Silent Forest
Sky Road
Lava Mountain
sources:
The Messenger
controls (XB360 controller):
d-pad = walk, crouch, chack, talk, enter portals
A = jump, double jump
X = attack -> can destroy most enemy projectiles
Y = throw shuriken (check the blue rhombus in the top-left) -> safely attack distant enemies, activate pink switches
B = grapple (rings, enemies, walls) (if unlocked) -> skip gaps, propel in the air, move faster
A (hold after double-jumping) = glide in the air (req. the Wingsuit)
X (while gliding) = attack downwards (req. Aerobatics Warrior)
A (while knocked back) = air recovery jump (req. Second Wind)
X (while swimming underwater) = boost attack (req. Currents Master)
RT (hold) = walk over lava, water and spikes without getting damage (dont stop moving or release the button) (req. Lightfoot Tabi)
LB = open the map
basics:
- after hitting anything you can jump again (cloudstepping).
- collect gold "Time Shards" and enter portals above the checkpoints to reach a shop where you can buy new abilities.
- enter circular portals or hit blue butterflies to warp between past and present. The past has 8-bit-style GFX and BGM, while the present has 16-bit-style.
-
linear stages list:
- Ninja Village
- Autumn Hills
- Forlorn Temple
- Catacombs
- Bamboo Creek
- Howling Grotto
- Quillshroom Marsh
- Searing Crag
- Glacial Peak
- Tower of Time
- Cloud Ruins
- Underworld
- non-linear stages guide:
Key of Hope
This Key is found in Autumn Hills.
Key of Strength
This requires a trip to the Ninja Village to speak with the Ninja Master for the Astral Seed.
Afterwards, we need to head to the boss room in the Searing Crag.
Key of Love
This Key first requires a trip to Quillshroom Marsh to find the Sacred Seashell.
We then need to find the hidden underwater maze in Howling Grotto and make our way through it to reach a new area - the Sunken Shrine.
The Key is found at the end of the Sunken Shrine. You'll also receive the Lightfoot Tabi in this area which allows you to run across the surface of liquids.
Key of Chaos
You'll need to have the Lightfoot Tabi from the Sunken Shrine before attempting this one. It requires a trip to the Underworld.
Key of Symbiosis
This Key is the hardest and by far the longest to obtain. To get it, we'll need to first go to the boss room of the Searing Crags and harvest the Tea Leaves.
Then we need to return to the Ninja Village to speak with the Ninja Master.
We'll then next visit the Catacombs and locate the entrance to the Dark Cave.
Traverse the Dark Cave to reach the Riviere Turquoise area.
At the end of the Riviere Turquoise area, you'll find the Magic Butterfly.
Take the Magic Butterfly to the boss room in Quillshroom Marsh.
Return to the Tower of Time HQ and speak with the Prophet.
Climb Glacial Peak to Manfred's location and free him.
Explore the new Elemental Skylands area and fight Boss: Clockwork Concierge at the end of it. Defeat him for the Key.
Key of Courage
Find the Phobekins
Forlorn Temple
Corrupted Future
sources:
Spark The Electric Jester
controls (XB360 controller):
d-pad = move, duck
2x d-pad left|right | B | RB | RT (tap) = dash (even in midair) -> short invulnerability
A = jump
X (tap) = attack
X (hold) = charged attack (can be combined with a direction) (more powerful if the blue bar is full)
Y | LB | RT = switch current POWER with the one in STOCK (check the icon in the bottom-left)
? = discard current POWER
Start = pause (shows the special moves for the current ability), skip cutscenes
basics:
- new POWERs are acquired by touching items found in big glasses containers.
When you collect a new ability, the stored one will be lost.
- to do multiple wall jumps, just press the A button repeatedly (do not change your direction)
- best POWERs: WIND (can midair jump and easily reach higher places), COOL, MAGE, BAT
- last stage: 16
sources:
Rabi Ribi | Rabi-Ribi
controls (XB360 controller):
d-pad = move
A = jump
d-pad down = enter doors, warp
d-pad up = talk
d-pad left|right + A = wall jump (if collected) -> reach higher places
d-pad down + A = slide -> enter narrow passages, avoid bullets, inflict damage
d-pad down + A, Y = bunny slide attack
d-pad down + A (in midair) = quick drop down
d-pad up + A (in midair) = air dask attack
Y | LT = hammer attack
Y + d-pad up = hammer up attack
A, Y + d-pad down = hammer down attack
Y + d-pad down (standing still) = carrot bomb -> destroy some blocks
Y + d-pad down (hold standing still) = super carrot attack (if collected)
Y (hold while moving) = slow movement
X (tap) = fairy rapid shoot
X (pressed) = fairy charged shoot
LB, RB = change fairy attack type
B (when boost meter is at least 50% full) = activate boost (temp. increase speed, attack, recovery, etc.)
B + down | RT (when 1 light blue balls on the bottom-left is charged) = activate bunny amulet -> temp. invinvibility
back = quick item use
start = pause, skip dialogues
map legend:
white "S" (rotating cubes) = save points (also restores heath)
white "T" (light spheres) = warp location (can choose destination), teleports (some are 1-way only)
green glowing "+" = heal zone
white bunny face = collected easter egg (gives 1500 En)
red dot = collected HP up potion
blue dot = collected mana up potion
purple dot = collected ATK up
orange dot = collected ability or key item
white dot = collected badge
green dot = collected regen potion
yellow dot = collected pack points potion
basics:
- all hammer attacks consumes SP, all fairy attacks consumes blue MP.
You can't attack when these gauges are empty, so alternate attacks often.
- check the map to see the next destination and missions.
- collect En money by killing enemies and spend them in the bakery shop in Rabi Rabi Town.
Items raising stats can also be found hidden in stages.
- certain blocks can be destroyed by carrot bombs, some by the hammer, some only by the fairy.
- to go to the next chapter beat enough bosses, go back to Rabi Ribi Town and talk to Rumi.
- last chapter: 5 + 3
sources:
Shantae: Risky's Revenge - Director's Cut
controls (XB360 gamepad):
d-pad = move, duck, crawl
d-pad up = enter doors
A = jump
X = attack
RB = use item or magic (consumes the green magic meter in the top-left)
Y (hold) = stop timeflow and dance -> transform (different form according to the last dance move)
Y (tap when transformed) = return to normal form
LB = backdash -> turn back and tap repeately to run (faster than regular walking)
B = talk, iteract
start = inventory (check the MAP, switch magic spell, use healing potions), skip dialogues
back = pause
forms:
- monkey (stop during 1st dance move) = it is a small, fast form that allows her to climb walls and perform wall jumps, and move quickly through narrow passages. When the monkey touches a wall while in mid-air, she can be made to climb it by pressing up or down, or wall jump off of it (A).
Monkey Bullet move = while clinging on a wall press the opposite direction + attack.
- elephant (stop during 2nd dance move) = it is large, slow moving, and can barely jump, but her charge can instantly destroy certain rocks, walls, and creatures.
Elephant Stomp move = when in air, press down. -> destroy grey rocks on the floor
- mermaid (stop during 3rd dance move) = she can swim in this form and submerge below the surface, allowing her to discover new areas that she can't even begin to reach in her normal form.
Mermaid Bubble = press attack to shoot bubbles -> destroy enemies and blockades underwater
basics:
- there is only 1 town in this game where you can buy stuff (check the gems counter in the upper-right).
Your first purchase should be the Sequin Land Map. Basic fire and lighting "Puff" magic spells are also required to beat the game and destroy some blocks.
Silky Creme (fastest hair-whipping), Pike Balls (good for flying enemies), and Magic Fill are also good purchases.
Some items req. Magic Jams (red vases) to buy in addition to gems, which can be found in hidden chests through the game.
- warp squids are enabled automatically once you visit and wake up them.
- you can use the monkey to jump over and skip most enemies.
- there are no lives or checkpoints. If you die, you will be taken back to the last time you saved.
But: when you save in dungeons the enemies will respawn and the puzzles will reset.
sources:
Copy Kitty
controls (XB360 gamepad):
d-pad = move, crouch
A = jump (press again to double jump)
X = shoot active weapon (hold to aim with the d-pad and stand still)
B = super shoot (req. 2 weapons, combine them)
X (tap near a weapon) = grab -> manually pick a weapon if all 3 slots in the top-left are full
RT | LT = pause and open weapon switch menu
RB = kick -> melee attack, destroys some walls and platforms
RB + d-pad down = kick drill / ground pound attack
d-pad down + A | LB = dodge roll
back = drop current weapon
basics:
- kill all red target enemies in each stage to proceed (check the colored arrows at the sides of the screen to find them).
Sometimes you are blocked by green barries requiring a key enemy to be destroyed to proceed.
- collect blinking items dropped by enemies to collect diff. weapon and refill the one you have currently (check the gauges on the top-left).
- collect hearts to refill your health (check the red gauge on the top-left and the big counter next to it).
If you lose all your health you must restart the current mission/stage from the beginning.
- last mission: 11-10 The Snake Pit
sources:
Mighty No. 9
controls:
d-pad | Right Stick = walk, climb ladders, grab ledges
A = jump, climb ledges
A + down = fall throu floor
X = shoot with current weapon (alt weapons consumes the orange bar in the top-left, auto-refill over time)
RB (better reconfigured to B) | 2x d-pad left|right = dash + absorb Xels from weakened enemies ("AcXelerate") -> get combo points by chaining and temp. bonuses based on their colors
RB + d-pad down = dash under narrow passages
LB | LT = switch weapon (check the icon at the top-left)
Y = switch to selected weapon
B = quick-switch weapon (configurable in menu)
RT + X = back-jump shot
RT + A = back-jump
Back = recover some health (if you have a blue icon in the top-left)
Xel colors:
- blue = health recover
- red = arm cannon can fire at an faster rate and his arm cannon shots will pierce and fly through enemies and walls.
- yellow = defense boost
- green = speed boost
recommended stage order:
- Mighty No. 5 (Battalion)
- Mighty No. 4 (Seismic)
- Mighty No. 7 (Brandish)
- Mighty No. 3 (Dynatron)
- Mighty No. 8 (Countershade)
- Mighty No. 6 (Aviator)
- Mighty No. 1 (Pyrogen)
- Mighty No. 2 (Cryosphere)
basics:
- each boss has a health bar that is split into segments. You decrease a segment by shooting the boss, then you must try absorbing the boss to permanently erase that segment of health (and potentially continue a combo). If you don't do this within a certain period, the boss will regenerate the entire segment. T
- Battle Colosseum is the final stage and becomes accessible after clearing the Prison and the Robot Factory.
sources:
Shadow Complex Remastered
controls (XB360 controller):
Left Stick = walk, swim, crouch
A = jump (hold to jump higher, press again to double-jump if you have the CLD Thrust Pack)
X = run (activate hyperspeed after 5s if you have the FRICTION DAMPENER), slide ladders, swim faster, jump further
B = melee attack, activate, interact
Y = reload
Right Stick = aim
RT = fire
RB = throw grenades, missiles, hookshoot (hold LT to drop them on the ground)
d-pad left|right = switch seconday weapon (check the icons in the bottom-left)
A, d-pad down (if you have the armor suit) = ground slam
LT = crouch, ground pound in midair if you have the OMEGA ARMOR
LB = flashlight -> highlight descructible objects with a specific color:
destructible items colors:
- orange = regular fire
- green = grenades
- blue = run over with FRICTION DAMPENER
- purple = Foam
- red = use missilse
map legend:
- ! = next objective
- . = hidden upgrade item
- star = save point
- white rects = unlocked doors
- colored rects = locked doors, use specific weapon to unlock
basics:
- getting hit will deplete the HEALTH gauge in the bottom-right. Collect medkits ro refill.
- at every difficulty except insane you can skip most enemies, either running past them or jumping over them. They don't do much damage and you'll find medkits before you die.
- last part: 10
sources:
A Hat in Time
controls:
Left Stick = walk, run
A = jump (press again to double jump)
X = attack, throw items
X (in midair) = homing attack, hook rings (if the "Hookshot Badge" is equipped)
B = interact, pickup items
RT (standing still) = crouch, crawl in narrow passages, drop items
RT (moving or in midair) = dive/dash (press A to cancel) -> longer jumps
LT = use current hat ability
LB = quick swap hats via menu (select with the Left Stick and confirm with A)
d-pad left|right = quick swap hats
d-pad up = taunt
d-pad down = blow kiss
Y (hold) + Left Stick = look around
RB = center camera
Right Stick = move camera
hat abilities:
- Kid's Hat = hold LT to point to the next target
- Sprint Hat = hold LT to sprint
- Brewing Hat = LT throw explosive vials. The explosion deals damage to enemies and can also destroy yellow-glowing objects.
- Ice Hat = hold LT to do a ground pound. Reach special areas by ground pounding on the blue overhanging trapdoors marked with a snow crystal.
- Dweller's Mask = hold LT to see objects that appear as green holograms. Will also make purple items disappear.
- Time Stop Hat = press to slow down time
basics:
- follow the trail of green crystals when unsure where to go.
Collected green crystals can be used to buy powerup Badges from the merchant. Equip them in the pause menu.
- collect Yarns to make new hats in the "EQUIPMENT" menu.
- hidden Relics and Rift Tokens (looking like star coins) are minor collectables you can use to get prizes in the Token Machine.
- despite the numeric order of chapters and acts, you don't have to finish them in order. A lot of them will unlock before you finish the chapter you're playing.
- last Chapter: 6
builin cheats:
you first need to activate the Developer Console in Game Settings.
Then restart the game.
After restarting you can activate the command prompt with ~ or tab
Type in enablecheats and enter.
Now you can enter in any of the commands from the list to activate them.
Press ~ or tab again to exit out of the command prompt.
Command List:
enablecheats (necessary to use the commands)
god - Toggles God Mode, making Hat Kid lose no health when attacked or damaged
stat fps - Toggles display of frames per second
Summon HatinTimeGameContent.Hat_Collectible_RouletteToken - Creates a rift token (warning, be careful using this command if you haven't done any time rifts; your game will softlock)
fly - Similar to ghost, but the player is able to collide with geometry (interestingly, touching a tightrope disables flying)
ghost - Puts the player into a ‘ghostly' state where they can fly, pass through geometry, and are not affected by damage
walk - Disables fly/ghost Mode
changesize [number] - 1 is default, changes the size of Hat Kid
slomo [number] - 1 is default, modifies the games speed (seems to reset when )
teleport - Teleports the player to the surface they are looking at
setspeed [number] - Modifies Hat Kids ground speed and water speed (only seems to work in water)
setgravity [number] - Changes the gravity (default is -750 - Jammy)
open [mapname] - Loads the inputted map (check C:\Program Files (x86)\A Hat in Time\HatinTimeGame\CookedPC\Maps) for maps.
setjumpz [number] - Changes your jump height
killparticles - Deactivates particle systems and destroys all particles
FOV [number] - Changes FOV to given number (max 170, min 1, default 90)
suicide - Kills Hat Kid
showdebug - Toggles the overall display of properties of the player's current ViewTarget
restartlevel - Restarts the level
invertmouse - Inverts the mouse vertically
invertturn - Inverts the mouse horizontally
freezeframe [number] - Forces the game to pause for the specified delay time (when tested escape immediately resumes the game)
stat unit - Toggles display of overall frame time as well as the game thread, rendering thread, and GPU times
stat levels - Toggles display of a list of currently active levels and displays their status through colour coding (See here [docs.unrealengine.com] for colour codes)
show particles - Toggles display of particle geometry
show rigidbody - Does something (I have no idea what this does, if you know leave a comment so I can change this - Jammy)
show collision - Toggle display of collision primitives
show postprocess - Toggle display of post process effects
show staticmeshes - Toggle display of static mesh geometry
show skelmeshes - Toggles skeletal mesh rendering
show paths - Toggles display of paths or navigation meshes
show volumes - Toggles display of volumes
show depthoffield - Toggles the depth of field
show fog - Toggles rendering of fog
viewmode unlit - Renders scene with flat shading, i.e., no lighting
viewmode wireframe - Renders scene in a wireframe view
viewmode brushwireframe - Renders scene in a wireframe view showing brush edges
viewmode lightingonly - Renders scene using only the lighting information on the geometry
viewmode lightcomplexity - Renders scene using a special shader that displays the complexity of the lighting on (number of dynamic lights affecting) each surface using specific colors to denote the number of lights
viewmode texturedensity - Renders scene using a special shader that displays the density of texels for the diffuse channel on each surface using specific colors to indicate the density
viewmode shadercomplexity - Renders scene using a special shader that displays the complexity of the material being used by each surface using specific colors to denote ranges of shader instructions
viewmode litlightmapdensity - Renders scene fully lit using a special shader that displays the density of texels for the lightmap on each surface.
viewmode - Returns render mode to normal
SCALE SET bAllowPostProcessing false - Disables all post processing effects e.g. depth of field, motion blur, etc.
SCALE SET bAllowPostProcessing true - Enables all post processing effects
listconsoleevents - Displays a list of all console events on the HUD
Notes
enablecheats does not disable achievements.
Console commands are not case sensitive.
Cheats disable themselves upon death or loading, you will have to type enablecheats again to use these commands.
Completing a time rift after collecting all the roulette items can cause the game to softlock, however you can escape this by exiting to the hub via the pause menu.
sources:
Freedom Planet
controls (XB360 controller):
d-pad left|right = move
d-pad up = look up, climb ladders
d-pad down = crouch, climb ladders
A = jump
B = attack
X + direction (when the blue bar at the top-left is full) = special attack
Y = pause
A, A = mid-air spin attack (LILIAC ONLY) (consumes the blue bar)
basics:
- CASUAL is the easiest difficulty, heart petals auto-refills.
- collect CRYSTAL SHARDS (blue gemstones) to quickly refill your blue special meter.
Also, when the counter in the upper left reaches 0 you get an extra life.
- last stage: 14
sources:
Senko no Ronde 2
controls:
Left Analog | d-pad = move
A = main weapon, M-Melee attack
B = sub weapon, S-Melee attack (usually more powerful and with auto-homing, but with a longer reload time (check the inner circle around your mecha)
Y | A + B = M+S Melee attack (aka bullet canceller) (DOES NOT uses up your Charge Gauge, destroy bullets, but it is risky, leave you exposed after it ends)
X [+ left, right | 360° rotation ] = Barrage attack (also act as a shield, uses 1 unit of your Charge Gauge)
RT (hold while standing still) = shield (uses up the green Charge Gauge when hit, auto-refill over time, not effective against napalm)
RT + direction = dash (Press again to cancel)
LB | B+X = use your ability (if the icon is lit in the bottom-left)
LT = B.O.S.S. mode (check the blue counter on the bottom-left. lasts until the Charge Gauge is exhausted)
Rounder Abilities:
- Attack units = Sends 12 untis to attack at all directions
- ECM = Stop enemy rounders using abilities and B.O.S.S. modes for 5 seconds
- Regenerator = Will recover Armor in a field for 15 seconds but enemy rounders can use it as will
- Defense Units = 6 units will be in front of your rounder for 20 seconds unless destroyed
- Armor Drain = Every hit you give armor comes back and auto-charge orbs
- Explosion = Big AOE that damage and destroy bullets can be only use on a enemy B.O.S.S. mode
- Naplam = A rounder will fire 3 burst small AOE bullets
- Super Charger = Charge gauge build up faster for 5 seconds
- Hyper Beam = Need little time to start up and can be stop by a hard attack can be only use once on a enemy
- Anti Field = Destory any bullets and push rounders away
- Bomb Strike = Half of the screen gets targat by small AOE bombs
- OverDrive = Faster sub weapon reload time and charge gauge recovery faster
basics:
- best beginner Rounders: Citronette ST
- taking damage will deplete the blue Armor Gauge on the top-left.
When the timer reaches 20 the gauge will starts to deplete itselt.
When it reaches 0 you'll enter VANISH mode, where you die with a single hit.
- melee combat is risky, it is safer to use ranged attacks.
You can use melee attacks only if your opponent is inside the weapon ring.
- a percentage of the health your BOSS has left by the end of BOSS mode will be added back to your main health
- last stage: ? (Arcade mode)
sources:
Touhou Koumakyou: The Embodiment of Scarlet Devil | Touhou 06
controls (keyboard):
arrows = move
Z = shoot ("ShotSlow=Off" in Key Config for autofire wide shot)
X = bomb (check the green stars on the top-right. Collect green "B" items to restock)
Shift (hold) = focus shoot + slow movement
Esc = pause
basics:
- easier char: Reimu Hakurei (has homing shots)
- you die with a single hit (check the red star icons on the top-right), unless you press the bomb button within a small window of time ("deathbombing").
- enemies releases these pickups: red "P"=weapon powerups, blue=bonus points, green "B"=extra bomb (rare), purple 1UPs.
When at maximum shot power ("Power=128"), you can move to the top of the screen, to collect all onscreen items (aka PoC=point of collection, or "Item Get Border Line").
- when a boss uses a Spell Card, its name will appear in the top-right, the BG will change, and the boss will start using a specific bullet pattern.
If you manage to clear the gauge within the time limit, without getting hit or using a bomb, you will earn a Spell Card bonus.
Collected Spell Cards can be seen in the Hiscore menu.
- last stage: 5 (Easy), 6 (Normal or higher)
sources:
R-Type Final 2
controls:
LS | d-pad = move
X = shot (hold to charge the "BEAM shot", check the gauge on the bottom, has 2 levels)
RT | B = rapid fire shot
A = detach Force pod (press again to recall)
Y = bomb-like special attack (req. the the "DOSE" gauge on the bottom-left full, touch enemies and bullets with the Force pod to refill)
LB|LT = speed level up|down (check the counter in the bottom-left)
RB = slow move
basics:
- easier initial ship: R-9F-D-SB (3rd, has homing Force pod)
- touching the scenery won't damge your ship, while enemies and bullets will kill you instantly and send you back to the latest checkpoint.
- there are only 3 weapon powerups: red, blue and yellow (diff. for each ship).
Collect the same color multiple times to powerup.
- new ships are crafted using Solonium, Etherium, and Bydogen, much like in the Tactics entries.
These elements are earned through normal gameplay (higher difficulty comes with more rewards), though they can also be purchased in the in-game shop (albeit being limited quantities) using currency also earned from playing.
Some ships require passwords and gameplay progression to unlock as well.
- more continues are unlocked with hours of gameplay. 7 hours will unlock Free Play/Infinite Continues.
- last stage: 7
sources:
Rayman Origins
controls (XB360 controller):
Right Stick left|right = move
A = jump (hold to glide in the air)
X | B (tap) = hit, kick -> can also be used to collect lums
X | B (hold) = charged attack
Right Stick down + X | B (in midair) = stomp attack -> destroy cracked platforms, jump higher from bouncy platforms
RT (hold) = run (even over inclined walls if unlocked)
basics:
- in order to progress the story, you need to free Electoons (purple smiley faces).
The most common way to get Electoons is to free them from cages; there is 1 at the end of each level, with more to be found in hidden areas (listen for their voices calling help nearby).
Some of them are guarded by several enemies that collectively use a forcefield to protect the cage.
The cage can only be damaged on the side which has a green padlock.
- collect 150+ Lums (yellow fireflies) within a level to get more Electoons at the end of each stage.
- hearts will protect you from one hit.
- last regular world: Moody Clouds
sources:
Rayman Legends
controls (XB360 controller):
Right Stick left|right = move
A = jump, wall-jump (hold to glide in the air)
X (tap) = hit, kick (can attack below you) -> can also be used to collect lums
X (hold) = charged attack
Right Stick down + X | B (in midair) = stomp attack -> destroy cracked platforms, jump higher from bouncy platforms
RT (hold) = run (even over inclined walls)
Y | LB | RB (in some sections) = ally context action -> move platforms, stun enemies, etc.
basics:
- all unlockable chars have the same abilities, but due to different coloring they have a different visibility in stages.
- collect imprisoned blue Teensies to unlock new painting/stages in the Main Gallery (some are hidden).
- stomp/attack down to pull plants off the ground, then use them to attack nearby enemies. Some also hides Teensies.
- to unlock the "Back to Origins" (=remastered Rayman Origins) levels, you must scratch the lucky tickets by pressing "Y" and accessing the suitcase in the main HUB.
- last regular world: Olympus Maximus
sources:
Bayonetta
controls:
Left Stick = walk, run
Right Stick = move camera
Right Stick (press) = reset camera
A = jump (press again to double jump)
Y = light attack, hand weapon attack
B = heavy attack, feet weapon attack
Y + B (when shown on screen) = torture attack (consumes the magic spheres in the top-right)
A, B = stomp attack
X = grab enemies weapons (usually slow and powerful), open doors, interact, fire guns -> don't do that much damage, but they can keep a combo going when you're not close enough yourself and they are useful against a few enemies.
RB = lock on
RT = dodge an attack -> temp. invincibility (do right at the last moment to stop time ("Witch Time"))
2x RT = transform into a beast
Left Stick (press during Witch Time) = gravity reset -> fall back to the ground
LB = taunt
LT = change weapon sets
back = show inventory, equip weapons, items, etc.
d-pad (hold direction) = use item
beasts abilities (unlocked after ch.5, some of them must be purchased):
- panther (2x RT while on the ground to transform) = run faster and can make long jumps
- crow (2x RT while in the air to transform) = can fly for a short period of time
- bat (dodges at the last second to transform) = escape an attack
- snake (2x RT while in the water to transform) = glide through underwater locations
basics:
- the basic idea behind the combat is that you want to trap enemies in combos-chains of hits they can't escape from-in order to deal as much damage as possible while avoiding damage yourself.
So dodge often!
- collect halos to buy stuff at the "Gates of Hell" bar/shop.
Buy Soul Pearls and Witch Hearts, which increase your magic and vitality respectively.
All of the items in the shop can also be found in the games levels.
- last Chapter: 17
sources:
Redout
controls:
Right Stick left|right = steer
RT = accelerate
LT = brake
LB | A = turbo (consumes the azure "ENERGY" bar on the right of your ship, auto-recharges over time)
X = use powerup (if the turbo meter is fully charged, must be selected before the race)
Right Stick left|right = strafe -> use for tight turns
Right Stick up|down (in mid air, slopes) = pitch down/up -> always pitch up (move the Right Stick down) on slopes to avoid grinding.
B = look back
Y | d-pad = switch camera
game types:
- time attack
- speed = time attack with extra turbos
- survival = energy auto-drained, get to the finish line with no respawn
- istagib = time attack with no respawn
- race = powerups allowed
- pure race = powerups not allowed
- arena race = no respawn
- last man standing = elimination (1 for each lap)
- score = get point via clean racing
- boss = long race on five tracks chained via teleporters
basics:
- getting hit will deplete the "HEALTH" bar on the left. It will autorepair after a while taking no damage.
- you obtain credits even if you don't succed the race events, so always finish them.
- when you're in the Ship Select screen, you'll see detailed specs on the ship you're looking over and customization options in the bottom corner of the screen. Whenever you have upgrades available and can afford them, get them.
- best powerups to buy: drone
sources:
controls (XB360 controller):
Left Stick = move
Right Stick = aim, look
A = jump
X (hold) = boost (consume the vertical orange gauge in the top-right) -> use to destroy barricades and containers usually with items inside
LT | RT = fire left|right weapons
B = switch left|right weapons (tap LT|RT to scroll weapons, then B again to confirm)
Y (in midair) = stomp attack -> very powerful, use often
L3+R3 (when the circular gauge in the top-right is filled and glowing) = bomb-like "Blaze" attack (refill slowly by destroying things)
d-pad = random taunt
Start = pause and check the full map
basics:
- starting at the top-right, the green cubes represent your health. Each cube is 1 health bar.
Next to that is the vertical Boost Gauge. This gauge will deplete when you use your booster or when you use energy weapons. You can only activate your boost or use energy weapons when there is some level of charge in this gauge. You can OVERHEAT your mech by continuing to hold down the boost button. Doing so will begin to drain your health bar.
- the squares/crosshairs in the center are where your weapons are aimed (targeting reticle). You will typically have 2, one for each weapon. Different weapons also have different reticles. Generally speaking, the smaller the reticle the more accurate the weapon.
The reticle will turn green or orange when a target is within range of the weapon.
- the map on the top-right shows your location on the battlefield. Yellow dots are target areas to be destroyed, red dots are the enemies. You can use RB to zoom in and out.
Be warned: the yellow and red lines show the edges of the battlefield. Cross the red line and it's game over.
- you get 2 Resources for completing a mission: MONEY and TECH. Both are used to invest in new weapons.
- best weapons types to invest and develop: Machineguns, Bazookas.
- light weapons can free POWs without killing them.
- last mission: Space Station
sources:
Gigantic Army
controls (keyboard):
arrows = walk
arrows up|down = aim
2x arrows left|right = dash -> use often to move faster and save time
X = jump (hold in midair to activate the jetpack, check the "VERNIER" gauge on the bottom-left)
Z = fire MAIN WEAPON (hold to lock direction), melee attack near enemies (tap)
Z (tap near enemies) = melee attack -> more powerful, use often
C (hold) = shield (can be aimed with arrows) (check the "SHIELD" gauge on the bottom-left, when depleted it is destroyed)
V = fire SPECIAL WEAPON (check the counter on the bottom-right, refilled after each stage only)
Q = pause
R = back to the title
basics:
- best weapons: SRI-U6 RIOT GUN (wide spread), MJ-88 MISSILE POD (homing)
- if the "TIME" counter on the bottom reaches 0 you will game over and have to restart the current stage.
- enemies do not release any item, so try to skip them if you can to save time.
- do not skip any green box instead to get an item:
- "T" = TIME extend -> very necessary in some stages
- "H" = restore your health (check the blue "HP" gauge on the bottom-left). The health is not fully restored between levels, but only replenished by a couple of units.
- "P" = increase the main weapon level, as represented by slightly larger projectiles. Taking damage reduces this power level by 1 unit.
- last stage: 6
sources:
GunHound EX
controls (XB360 controller suggested mapping):
d-pad = move, aim
A = jump (hold in midair to activate the jetpack, check the small blue "BG" gauge on the top-left)
B | 2x d-pad left|right = dash -> assume a more compact posture, hold for soft landings
X = fire main weapon (switch in the "Customize" menu, check the horizontal yellow gauge in the top-left for the remaining ammos in current magazine)
Y = fire secondary weapon (switch in the "Customize" menu)
RB (hold) = use anti-air/lock-on weapons -> also good for ground enemies
LB (hold) = lock aiming -> use in 0G stages to hold the facing direction
RT = Armor Purge -> fully restore HPs, faster movements but less defense. Collect the item from the ally heli to get the armor back mid-stage.
basics:
- the Power fist, equipped as your sub-attack by default, can be used defensively as it can stop enemy bullets.
Press the button with the right timing to use "Hard Blow." A repeated attack can be unleashed. Each hit from a repeated attack will result in increasing damage.
In addition, if unleashed during a dash, you can deliver even greater damage.
- check the radar at the bottom of the screen: enemies appear in red, allies in yellow.
- last mission: 5
sources:
Assault Suit Leynos (2016)
controls (XB360 controller):
d-pad | Left Stick = move, aim, fly in space
2x d-pad | Left Stick left|right = dash
A = jump (hold to use the jetpack)
B = dash
X = fire current weapon (check the ammos counter in the top-left)
2x X = discard current weapon for this stage, reload LG-GUN
Y = melee attack
RB = shield
LB (hold) = lock aiming while moving
LT, RT = switch weapon
Start = pause
basics:
- your health refills automatically after a few seconds of avoiding damage, and you can also equip armor pickups, each of which offers a full health recharge upon the orange meter's depletion, effectively acting as an instant 1UP.
But again, each of these armor items uses up a slot that could otherwise carry a weapon. For longer missions against heavily armored foes, it's advisable to keep a healthy stock of explosive weapons on-hand to avoid running out of ammo and reverting to the weaker machinegun.
- additional weapons may be unlocked over time in the Practice mode by playing any of the levels (including the tutorial). The player's cumulative score acts as an experience system, slowly allowing access to numerous unlockables
- many of the 8 levels are extremely short, and it is possible to dash and boost-jump your way past most of the weaker enemies in order to reach primary targets (and earn a lower score)... or you can stick with your Assault Suit squad and slowly march forward with the aid of their additional firepower.
Some levels have secondary objectives, such as defending cargo transports or your home base.
- last stage: 8
sources:
Ginga Force
controls (XB360 controller):
d-pad | Left Stick = move
X = fire MAIN weapon (narrow, full range)
A = fire SUB weapon (wide, limited range, req. the yellow SUB gauge)
RT = special weapon (defensive, absorb bullets, req. the blue circular gauge, autorefills when not used) -> use when surrounded by enemy fire
RB = switch SPEED (check the counter in the bottom-left)
basics:
- in STORY MODE you collect "CR" (=CRedits medals) while playing chapters to buy new equipments in the PARTS SHOP.
In SCORE ATTACK you can play chapters unlocked in STORY MODE for competition on online leaderboards.
In SCORE ATTACK you can only use 3 preset ships.
- best equipment to buy: Beam Cannon (MAIN), Spread Missiles (MAIN, piercing), Heavy Ion Gun (MAIN), Shotgun (SUB), Homing Missile (SUB), Counter Shield II (SPECIAL, reflect enemy shots absorbed, auto-barrier), Durability Display (EXTRA, also shows the weak spots), Power Consumption Decrease (EXTRA), Capture (EXTRA)
- both MAIN and SUB weapons needs energy to operate. Collect "power-chips" (blue cubes) to refill (check the colored gauges on the bottom-right corner).
The MAIN weapon consumes energy at a constant rate regardless of whether you are using it or not. So unless you collect power-chips, it will eventually use up all its energy. The attack strength of the main weapon depends on the energy it has, so it's important to keep the energy level as high as possible. Even if you run out of energy, you can still attack with the main weapon, but it's much less effective.
Unlike main weapons, sub weapons only consume energy when attacking with it. So in chapters you don't have enough energy, it's important to use sub weapons only when you need.
Special weapons uses the blue circular gauge. Only this gauge automatically refills with time.
- last chapter: 10
sources:
Natsuki Chronicles
controls (XB360 controller):
d-pad = move
A = fire Primary Weapon (unlimited) -> forward shot
X = fire Secondary Weapon (unlimited, can be combined with Primary with reduced power)
RT = fire/use Special Weapon (overheat after a while, cannot be combined with the others) -> absorb bullets
RB = switch SPEED (2 settings, check "A|B" on the top-left, adjustable in the options)
basics:
- getting hit will reduce your yellow SHIELD in the bottom-left by 1 slot (autorefills slowly over time while not taking hits).
Touching the scenery will also count as a hit.
If your shield reaches 0 you will have to restart the stage/mission from the beginning, but you'll obtain an "EX-SHIELD" (extra shield slot).
- before taking off in STORY MODE/Chronicles Mode, you can select different equipments and buy new weapons (req. CR=CRedits, obtained after beating stages).
You can also adjust your speed and other settings, like the "Bullet Trajectory Display".
In ARCADE MODE you make a single run through all stages, switching and upgrading weapons via pickups (check the icons inside to recognize them).
- best weapons to buy: all homing weapons like Homing Laser, Mega Beam or the Grenade (Primary), Rear Multi-bomb or Super Multi-bomb (secondary), Search Option 1 or 2 (Special Weapons).
- last stage: 10
sources:
Castle of Illusion Starring Mickey Mouse (2013)
controls (XB360 controller):
d-pad | Left Stick = walk (walk down slopes to run), crouch
A = jump (press again when landing on enemies to jump higher)
B | X = throw items (check the counter in the top-left, collect the same icon or bags to restock) -> use to open chests (cannot be opened by jumping)
basics:
- kill enemies by jumping on them or by throwing items.
- collect stars to refill your health (check the stars in the top-left).
- collect white diamonds to access new worlds in the castle (check the req. diamonds sign above the castle doors).
Locked doors req. the prev. stage to be finished to unlock.
- hidden statue pieces, playing cards and chili peppers are minor collectables that unlock some extras.
- last world: The Castle
sources:
Infinite Beyond The Mind
controls (XB360 controller):
LS | d-pad left|right = move
LS | d-pad up|down (hold) = crouch, enter doors, climb ladders
2x LS | d-pad up|down (hold) = look up|down
A = jump (press again to double jump), wall jump -> climb walls
LS | d-pad down + A = drop down
X = attack
B + direction = roll (on the ground), dash (in midair) (req. the white gauge in the top-left, auto-refill when not used) -> evade enemies
B (hold for a while while standing still) = bomb-attack (req. the white orbs in the top-left, refilled after each stage) -> best saved for the bosses
basics:
- most enemy aiming and their bullets are slow, so keep moving, jumping and dashing to avoid them.
- you can touch enemies without taking damage, but do not touch vehicles while they are moving.
- to easily grab a ladder in midair, start tapping the Left Stick | d-pad up at the exact moment you are aligned with the ladder.
- collect red suitcases to refill your health (check the colored dots at the top-left).
- find hidden colored gems to increase your health.
-
last area: 16
sources:
Vanquish
controls (mouse+keyboard):
mouse = aim
LMB = fire weapon
RMB = aim
mouse wheel click = weapon zoom
mouse wheel = switch weapon
WASD = move
E = cover
Shift = boost
F = melee attack
R = reload
G = throw grenade
Space = evade
1, 2, 3, 4 = quick switch weapon
Esc = pause
Tab = skip events
T = activate bomb
sources:
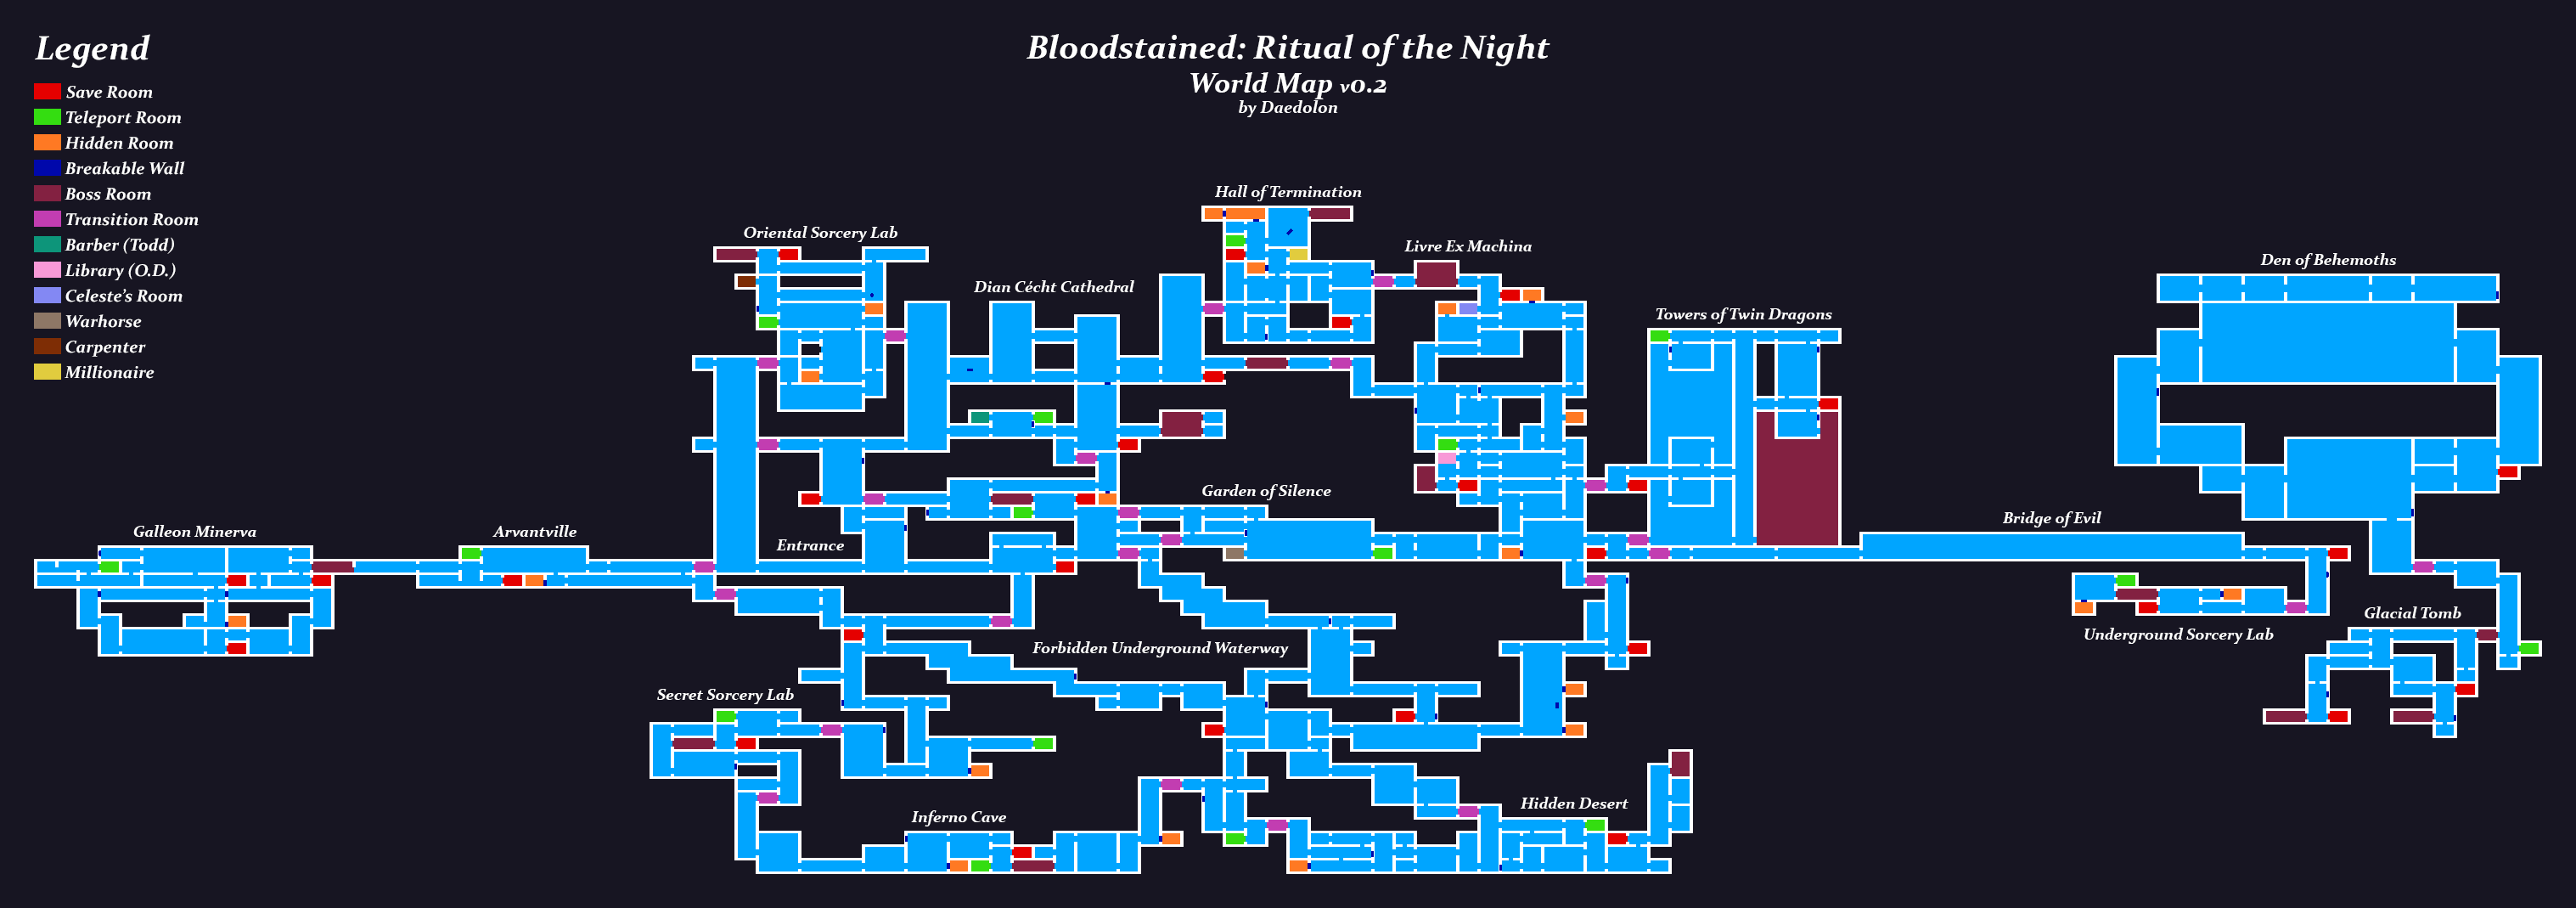